

Welcome to The Kester House & Garden Project!
This site has been created to document our rather in-depth home renovation project. Friends and family ask about the status from time to time, so this will serve as a place to keep track of our progress. I also use the site as a place to store photos, plans, and technical information (like paint colors, etc.) so I can find that information when I need it.

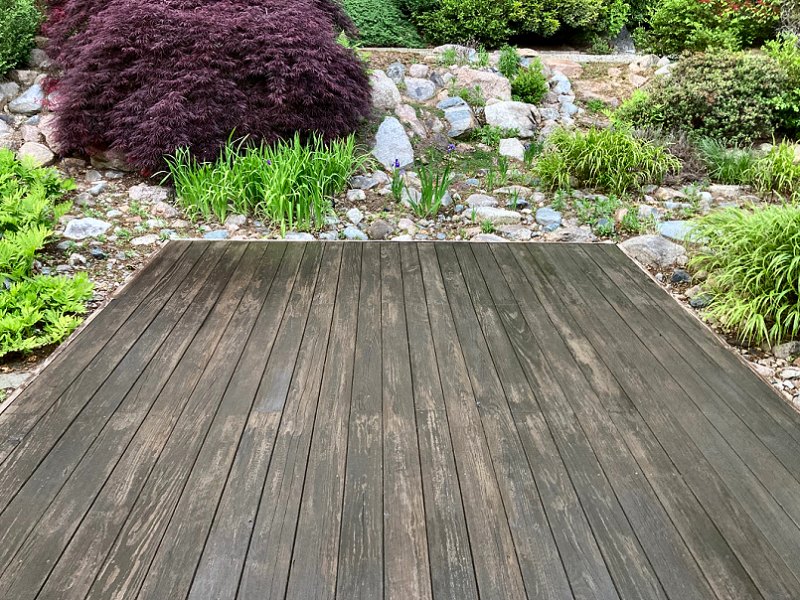
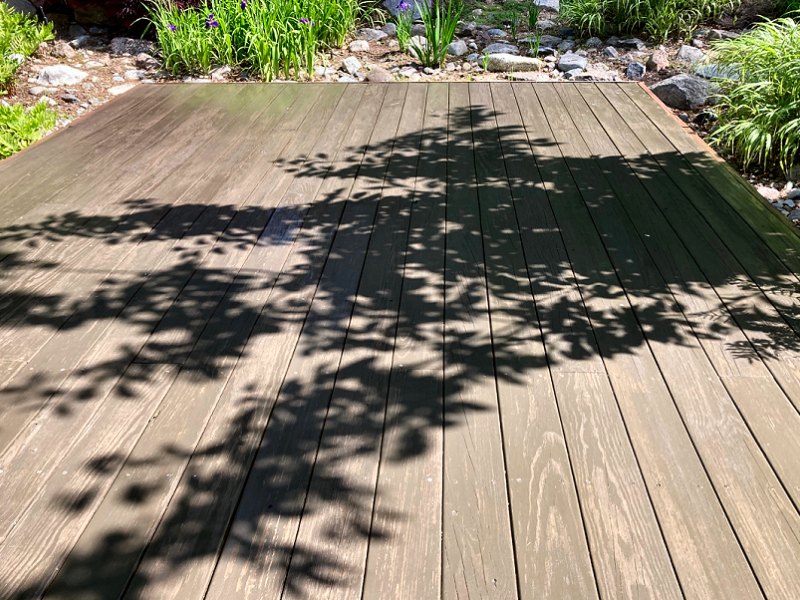
The tsukimi-dai got re-stained this Spring (3 photos).
If you're visiting the site for the first time, after having a look at this Welcome page I recommend reading the House and Inspiration sections before you dive right in, so you'll have an idea of what we started with and what we're hoping to end up with. I've been writing about the project in the order we've been working on it, so the Garden sections would be next, followed by the Exterior sections and finally the Interior sections.
I often add new information or photos to various sections, so the News section below will always have links to the latest updates. There's also a Table of Contents at the bottom of this page with a brief description of every page on the site. Additionally, if you're looking for information about a particular project, you may find the table available on the Project Timeline useful, since you may click on the project name to go directly to the information regarding that specific work.
 News
News
2025.06.22
The House: The last few weeks of work have mostly dedicated to projects in the yard and garden, since as I think I've
mentioned before, I haven't done much of anything out there for a couple seasons after getting the bamboo containment project finally completed. There
has been a lot of pruning to take care of on the shrubs out back (of which I've perhaps taken care of about a third so far), and I've also been
working on getting the irrigation system running again (and that's needed two of the four control valves replaced so far). The old leaf
chipper/shredder/vacuum engine could not be saved, so rather than try to get a new engine (for which Briggs & Stratton said they
no longer make a direct replacement unit when I asked them about it), we decided to just replacement the thing with a new one from Home Depot
(which is here, but still in the box waiting for me to put it together). So many little projects!
I did manage to get a couple things taken care of that I mentioned in the last news update: the cleaning and re-staining of the
tsukimi-dai decking is finished and the thing is lookin' good again. I also got the new control cables for the lawn mower
installed and after sharpening the blade, have already put that to use a couple of times. I also made time to get a couple coats of semi-gloss
clear on the saobuchi ceiling trim, so that will start getting installed soon.
The Vanagon: The thing has been running just fine since the last update, and we've been using it for grocery shopping
and a few other errands with no problems. I still need to take a day to have the shop put in the new clutch hydraulics, but that will likely wait
a week or more since our weather for the next few days is supposed to be quite hot (we may get above 100° F, which is pretty rare for these
parts). The oil pressure warning issue has not returned, so that's certainly good news.
The Site: Like my last update, I didn't add any new content to the rest of the site other than this status update.
I did take care of cleaning up this page a bit by creating the new 2024 News Archives page and getting all of last
years status updates moved over to that, which also warranted updating the search index this time around. That's it for now – Stay cool
and enjoy the start of Summer!

2025.05.21
The House: It's somewhat hard to believe how fast Spring seems to be going by as I'm making very slow progress on
getting more work done on the interior renovation work. I haven't really done any more work on the living room ceiling light, although all the
ribs are glued up and waiting for me to spend a day on them with a hand plane. I've also gone through that heap of saobuchi
ceiling trim and given it all a light sanding, then stained it with two colors to closely match the ceiling panels. Clear-coat on that stuff is
next to move things along inside (when the weather is a bit more cooperative – lots of rain and high humidity lately).
The good news is that we're actually making some progress taking care of the garden, as that was pretty much neglected for the last couple of
seasons while dealing with the bamboo containment project. The lovely bride's been doing an outstanding job of collecting leaves, and I've been
trying to get our outdoor power equipment up to snuff for another year (the lawn mower needs a new throttle cable and control cable, which
I have and need to install. The leaf vacuum/shredder thing hasn't run for years, and I've had to do a new pull starter, coil, and now a
carburetor to see if I can save it). I also intend to get after a lot of pruning that needs to be done out back, as well as clean &
re-stain the tsukimi-dai deck.
The Vanagon: I've finally managed to get the Vanagon into decent running condition after lots of tinkerin'. With the
new Oxygen sensor installed, I was able to get the idle mixture adjusted to that happy place of 0.4VDC average output after lots of adjusting of the mixture
set screw and idle speed setting, and that output is consistent at idle, 1,000RPM, 2,000RPM, and 3,000RPM (which means it's correct).
I didn't need to fiddle with the wiper arms or spring tension in the air flow meter (which is sometimes required to keep the mixture correct
at those higher RPMs), so I was also able to seal the AFM cover back into place as well. I also installed a new throttle cable, since the old
one had lost the sealing boot at the engine end of the cable and that allowed water to get into the cable sleeve and cause issues in the Winter when
it would freeze. I then finally replaced the idle control valve (which is supposed to "vibrate" when powered on, and did not), and
that's now humming along as it should. I got a spare idle control unit from my mechanic, so I'll likely send that out for a rebuild to ensure it's
working properly. When I took it for a quick test drive after finishing up in the engine compartment, I was presented with a lovely oil pressure
warning light & alarm (the above-2,000RPM buzzer and blinky light warning, as opposed to the below-2,000RPM light only warning), so
I limped it home at low revs and ordered more stuff to deal with that. After a new proper MANN W719/12 oil filter, five quarts of Castrol 20W50
high-mileage motor oil, and a replacement high-RPM oil pressure switch, there was no more oil pressure warning. More than likely it was caused by
the improper fuel mixture setting (it had been running very rich, which can thin the oil significantly and cause that oil pressure
warning – the engine already has a replacement GoWesty 30mm high-volume oil pump, so I'm confident is was just thinned oil that was the
problem, and it hasn't re-occured after the oil change).
There's still plenty of projects I'd like to take care of on the Vanagon (the upgraded wiring and relays for the headlights, installation of
the fog, driving, and auxiliary back-up lights, replacement of the bearings for the sliding door, addition of the third brake light, and
more), and I also need to get it back to the shop for them to install the new clutch master and slave cylinders. For now, it's running and driving
quite well, so I'm just enjoying the ability to run errands for supplies without issues while we try to get caught up on yard work.
The Site: Other than this rather lengthy status update, I didn't add anything to the rest of the site this
time around. That is all.

2025.04.02
The House: We've actually gotten one of our interior rooms finished! Well, it still needs some proper wardrobes for
the cloths, but I consider that in the category of "furnishing" the space and am happy to call the "renovation work" for that room
completed. We often find ourselves just walking to the closet doorway to look over the space, letting the fact sink in that something's actually
done. Progress!
The Vanagon: As I was workin' on idle issues, I decided to replace the Oxygen sensor so got a new, Bosch 3-wire unit
(as opposed to the single-wire things that need to be spliced to the existing harness, and rarely does the job correctly). I installed a
complete stainless-steel exhaust system a few years ago, so I was hoping the thing would come out without too much difficulty. Wrong! I instantly
rounded off the existing sensor while trying to un-screw it with a 22mm wrench, then tried vise-grips and it wouldn't budge. I ended up trying to
break it loose with a hammer and sharp cold chisel, which resulted in just tearing the sensor's mounting flange off the side of the catalytic converter.
So, after I dropped the cat with the muffler and tailpipe, I then chiseled out the old sensor at the bench. Joy. I took the cat to the shop
and they re-welded the flange (so that saved a few hundred bucks for a new cat), and they even ran a tap through the threads of the old
flange so the new sensor should go in fine. Just waiting now for the new cat and muffler exhaust gaskets, as well as new stainless-steel hardware
to put everything back together, then we'll see if the new sensor allows me to properly adjust the idle mixture.
The Site: The Bedroom page of the Interior section got a few new
paragraphs and photos to cover the Closet/Laundry Room Flooring Installation work for that space.
That also led to the usual update for the search index, and a new entry to the Project Timeline.
2025.03.03
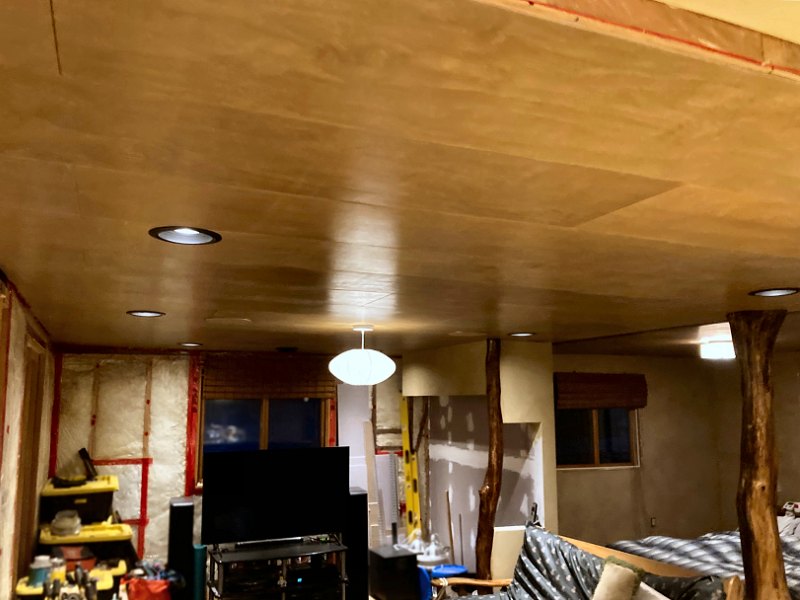
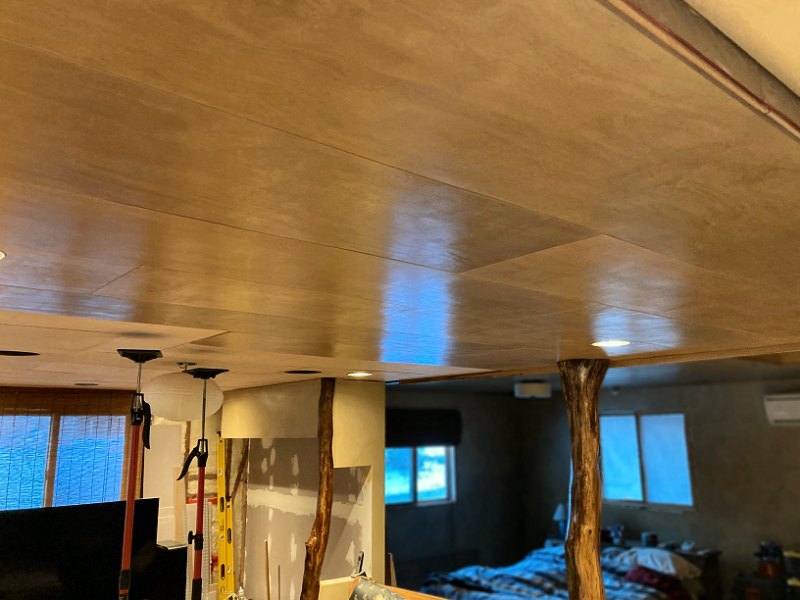
The House: I'm pleased to report that the finished ceiling panel (tenjou-ita)
installation work for the living room has been completed, and I've even managed to save a few 2-foot lengths of the ceiling panel stock to
use for the attic hatch when the time comes to work on that thing. I also got together with my friend with the pick-up truck last
weekend for a Home Depot run and then spent some shop time at his place. We got all the stock for the bedroom and living room ceiling trim (the
saobuchi) milled to size, and that stock is now waiting for finish to get applied once the weather gets a little nicer.
I then spent a few days taking care of the last few details for the living room ceiling work with the painting & installation of the recessed
light trim rings and the in-ceiling speaker grills, and then installed the last interconnected smoke/CO detector between the bedroom and kitchen
on the new living room ceiling. The final little "side project" for the living room ceiling is to make a new pendant light fixture for the
space, which I started working on last week (but we replcaed the paper lamp shade with a better looking pendant fixture for
now).
Next up is to get started on finished flooring installation in the closet/laundry room and bedroom (so I can get all those Ikea®
boxes of bedroom furniture out of the living room and finish the GWB work in there). Unfortunately, Lumber Liquidators no longer sells the
laminate flooring we originally selected (and already installed in our offices off the genkan), so a new search for
flooring began in earnest a couple weeks ago (we figured out our flooring was no longer available back when the flooring underlayment work got started
a couple years ago, so I've been doing a little browsing for new flooring for a while now). We ordered a few color samples of various
Pergo® Outlast+ laminate flooring to get a better look at the stuff, and decided to go with their "Cocoa Walters
Oak" 12mm stuff with attached underlayment. We picked up a few boxes when we got the ceiling trim stock, and I plan to order the remainder to do the
rest of the house soon, since HD has free shipping on this fairly heavy material (oh – I also recommend if you plan on buying flooring from HD,
certainly order a couple samples for $3 ea., as they come with a 10% off flooring coupon).
The Vanagon: I got the Vanagon Synchro cooling system and engine compartment work taken care over the last few weeks
(when we weren't getting dumped on with snow and ice). It's running again, although I'm not thrilled about how it idles and haven't really
been driving it much. I've done a little trouble shooting to try to eliminate what could be causing the problems (temp sensor II and air-flow meter
are relatively new and tested properly), so I'll likely need to replace a couple pricey items to really make it right (like the idle speed
control valve & control unit – which is made of unobtanium so that'll be a pain, and probably a new throttle body unit from GoWesty).
As the weather continues to become more tolerable to work outside, I'll keep pickin' away it the thing.
The Site: Once again the Living Room page of the Interior section
got a couple more paragraphs and photos added to the Finish Ceiling Panel Installation section to wrap up
what went into that project, then I started a new section on the construction of the Main Ceiling Light
that I'm working on now. I've also updated the search index, and the Project Timeline to include the most
recent changes.
2025.01.29
The House: While I've been pickin' at the work on the new Vanagon over the last couple weeks while waiting for parts
to arrive (and finding more stuff to take care of, then waiting for more parts to arrive), I did finally manage to get back to doing some
work on the house once again. I got the daikokubashira stained, and re-stained the tokobashira, then got
a few coats of Minwax® Antique Oil Finish applied to both pillars. I also determined I needed to add a piece of trim
to the bottom of the fusuma door header so the living room ceiling panels would have something to butt against to get them
all aligned properly. With that I've been able to make some progress on the finished ceiling panel installation work for the living room, so things
are moving along on interior renovation work once more.
The Vanagon: As far as the vehicle goes, as mentioned above, that work is still ongoing. I'm taking care of alot of
little things in the engine compartment that I wasn't thrilled about – lots of clean-up, some wiring repairs, and then the cooling system fixes
that started it all a few weeks ago. The last couple parts should be here this week, so it should be back on the road in early February.
The Site: The Living Room page of the Interior section got a couple new
paragraphs and photos to address the Finish Ceiling Panel Installation work for that room (which I'll likely
expand as the work continues). I've also added some more detailed information about what I'm doing to the
new Vanagon Synchro within the Old Volkswagens section of the Et Cetera page. As usual, I've also
updated the search index, and added new links for 2025 to the Project Timeline.

2025.01.12
The Vanagon Status: Not really a site update (since this has nothing to do with the house)…
Did you know that most automobiles have basically four hoses for the cooling system? There's a couple big ones that
go from the engine to the radiator and back again, then a couple small ones that go from the engine to the heater core (although one of the heater
hoses has a heat control valve somewhere in its run, so I suppose it should be five hoses). The 2.1l VW Vanagon Synchro,
on the other hand, has over 20 hoses for the cooling system, along with another six metal pipes, and a big 4-way junction block to feed another
half-a-dozen hoses for supply and return to the front and rear heater systems. An "average" modern vehicle has a coolant capacity of between three
and seven liters, while the 2.1l Vanagon holds 17.5 liters. So why am I blatherin' on about the Vanagon cooling
system? On New Year's Eve we were on our way back from the local grocer when I noticed a lot of steam/smoke in the rear view mirror — that's
gotta be a coolant leak. The store's less than 10 miles from the house, so I decided to try and make it home rather than pull over and wait for a tow.
I did my best to keep the revs low and let it coast when I could, all the while keepin' a close eye on the temp. gauge. Not too hot, and no blinky red
light (which starts up when the coolant reservoir is low) and we were more than half-way home. Slow & steady… now into our neighborhood…
Temp's startin' to climb but still no blinky red light. Made the final turn onto our street and the light started, so I just turned it off and rolled down the
hill then into our driveway.
So my chilly New Year's Day was spent takin' apart stuff in my engine compartment to get a look at the cooling hoses I haven't already replaced (all
but three of the big hoses were replaced with $ilicone hoses from VanCafe, and the metal connector pipes were replaced with $tainless
$teel units from GoWesty when the engine was in the old Vanagon). My suspicion was that something for the oil cooler had popped – either
one of those four little hoses split, or one of the little connector pipes finally gave up. I removed the A/C compressor to see the lines below it,
then poured in a gallon of water and connected a pressure tester to the system to pump it up and see where it was leaking. Despite the crusty lookin'
steel oil cooler pipes, it was actually a tiny hole in the elbow of the "peace pipe" hose that was sprayin' water on to the cylinder head when
pressurized. Luckily, VanCafe still had all their silicone hoses on sale for the holiday, so I ordered a new "peace pipe" hose and the set of
four oil cooler hoses from them that afternoon. I also ordered one of the stainless steel oil cooler pipes from GoWesty (the other was out-of-stock
at both GoWesty and VanCafe, but I found one at Van-Again so I can replace 'em both while I'm in there with the system drained). Now I just need to
wait for everything to arrive, then it'll be time for fun with cooling system work… in the driveway in the middle of Winter. That is all.
For past chronological updates, please see the following pages:
2008 News Archives.
2009 News Archives.
2010 News Archives.
2011 News Archives.
2012 News Archives.
2013 News Archives.
2014 News Archives.
2015 News Archives.
2016 News Archives.
2017 News Archives.
2018-21 News Archives.
2022 News Archives.
2023 News Archives.
2024 News Archives.
Using the Site
Visitors should check this page to determine the most recent updates, or browse the sections listed in the navigation menu on the left. I'll try to always have a picture of the most recent project or the house itself on this page too.
Navigating the Site
The navigation menu will expand when you hover your curser over an item with a down arrow (↓) in the name.
The section you are currently visiting will display in a different color than the rest of the menu so you hopefully won't get lost.
There's an up arrow (↑) near the bottom of each page that will return you to the top of the page when clicked.
Links in the body text will display in a different color than the rest of the text.
All internal links (links in the body text or nav menu sections) will replace the contents of your browser's current window with the target's content
when clicked, so you may navigate using the 'forward' or 'back' controls of your browser.
External links (links to other sites) are in the footer and will open in a new browser window (or tab) when clicked.
If an external link is placed in the body of the page, it will be indicated with an icon: ![]() .
.
Receiving Updates
If you click the RSS feed icon ( ![]() )
in the News section above, your browser will open the news feed page that I usually update whenever I update the site. In order to have it display in
your browser, it simply runs a little code to allow it to show up, but no longer provides a means of subscribing to the feed. In order to automatically
receive updates, you'll need to use a dedicated RSS News Reader application (or browser "add-on"), then copy & paste in the address of our feed:
http://kesterhouse.com/rss/kesterhouse.xml into that reader. If Google Chrome and Microsoft Edge get their
"Collections" and "Follow" stuff worked out, perhaps I can get rid of the code and go back to just loading the XML in the browser.
)
in the News section above, your browser will open the news feed page that I usually update whenever I update the site. In order to have it display in
your browser, it simply runs a little code to allow it to show up, but no longer provides a means of subscribing to the feed. In order to automatically
receive updates, you'll need to use a dedicated RSS News Reader application (or browser "add-on"), then copy & paste in the address of our feed:
http://kesterhouse.com/rss/kesterhouse.xml into that reader. If Google Chrome and Microsoft Edge get their
"Collections" and "Follow" stuff worked out, perhaps I can get rid of the code and go back to just loading the XML in the browser.
Searching the Site
When you click the 'SEARCH' item in the nav menu you'll be presented with a search box to enter the keyword(s) you'd like to find.
Hit your 'enter' key or click the little magnifying glass and your browser will load the search results page with your search terms highlighted.
When you navigate to a page from the link provided in the search results, the search terms will also highlight in the new page to make them easier to find.
'Lightbox' Image Viewing
When you click on a photo it will enlarge in the browser window and the background around the image will darken to allow better viewing of the image.
If there are additional photos on the particular subject, you will find controls to view those additional photos below the bottom-right corner of the image.
You may also hover your curser over the image to use the Next and Previous buttons when there's more than one photo in the group you're viewing,
or view the set as a slide show by using the Play and Pause buttons below the image. To open an individual photo in a new window (in case
you wish to bookmark the image, or copy it for appropriate use), click the small Expand icon in the top-right corner of the photo. To
return to the normal page view, click the small X below the image, or click anywhere on the background around the photo.
The Footer
The footer contains a link to send us an e-mail if you'd like to make a comment or suggestion.
It also contains external links (they all open in a new window) to other sites I enjoy.
Creating the Site & Compatibility
I've created the site entirely with a text editor, since I'm still a member of the 'old-fart school' of web design.
I'm using a lot of Cascading Style Sheet design controls, as well as a fair amount of Javascript to make the page do what I want it
to do - some written by me, but mostly I'm using the wonderful jQuery library with plug-ins I've found here and there.
If you've got Javascript disabled in your browser, the site should degrade gracefully and remain functional, although it's not going to look very nice.
I check the site occasionally for functionality with a smart phone or tablet, although I generally write everything in anticipation of having it read on a laptop or workstation. I have the latest versions of most Windows 10 browsers installed and have verified the pages display correctly with those. As stated above, Microsoft Edge is currently having issues with RSS feeds as they implement some new news reader features, so I'll tweak the XML as needed when and if they get it all worked out.
What's in the Sections
Here's a description of what's included in the sections - some are more complete than others but it's all getting there.- Welcome This page
- 2008 News Archive contains the updates from the News section for 2008.
- 2009 News Archive contains the updates from the News section for 2009.
- 2010 News Archive contains the updates from the News section for 2010.
- 2011 News Archive contains the updates from the News section for 2011.
- 2012 News Archive contains the updates from the News section for 2012.
- 2013 News Archive contains the updates from the News section for 2013.
- 2014 News Archive contains the updates from the News section for 2014.
- 2015 News Archive contains the updates from the News section for 2015.
- 2016 News Archive contains the updates from the News section for 2016.
- 2017 News Archive contains the updates from the News section for 2017.
- 2018-21 News Archive contains the updates from the News section for 2016 through 2021.
- 2022 News Archive contains the updates from the News section for 2022.
- 2023 News Archive contains the updates from the News section for 2023.
- 2024 News Archive contains the updates from the News section for 2024.
- The House is about the original structure, the purchase, the installation of (and recent repairs to) the new septic system, and lots of major tree work.
- The Garden is about the garden renovation, with information on the lot, initial landscaping, front yard, the irrigation system, Pine pruning, and dealing with Bamboo containment.
- Design addresses the decisions about the garden design and construction, including a complete plant list and details of the construction of our stone lanterns.
- Pond showcases our goldfish pond.
- Bonsai is about our (failed) attempts to get some bonsai started.
- Garden Shed is about the construction of the prettiest tool shed ever.
- Teahouse is about the construction of our Japanese-style tea house.
- Exterior introduces the exterior projects of the renovation.
- Foundation is about repairs made to the foundation.
- Roof is about the new roof design and replacement.
- Windows & Doors shows the installation of these units.
- Siding & Trim covers the siding and trim work, including gable ends and soffits.
- Engawa & Tsukimi-dai pertains to the planning and construction of the decks.
- Garage design and building is still on the drawing board.
- Interior introduces the interior projects of the renovation
- Genkan is about the new foyer.
- Kitchen is about the kitchen remodel.
- Bathroom is about the bathroom makeover.
- Living Room is about the living room remodel.
- Bedroom contains the bedroom and walk-in closet.
- Mechanical introduces the guts of the house renovation
- Wiring covers the replacing the original wiring and service panel, along with stand-by power systems and recent "smart home" device additions (lighting for each area is covered in the Interior sections above).
- Plumbing explains the water supply systems (fixtures are covered in the Interior sections above).
- HVAC is about the heating, ventilation and air conditioning systems (and recent repairs) used in the renovation.
- Energy Efficiency covers steps we're taking regarding weatherization, insulation, and reducing energy costs (including upgrading to LEDs).
- Inspiration attempts to address why we decided to build a Japanese style house, and why we're doing it ourselves.
- Specifications contains reference information regarding the house and equipment, plans, supplier information, etc.
- Color Palette has all color chips and color codes for finishes.
- Timeline is a chronological list of renovation projects and tasks, with links to the appropriate sections of the site.
- Hand Tools contains a list of vintage hand tool data, as well as catalogs and reference books regarding my ever-growing collection.
- Power Tools is a list of power tool data with PDF documentation for most tools.
- Et cetera contains my ramblings on this or that, not specific to the house renovation.
Currently the page contains some information regarding our sailing dinghies and vintage outboard motor, as well as a new section about
our old Volkswagens and my time at GreenWheels Electric Car Company.
- Hand Planes details the restoration and tuning of vintage metal hand planes.
- Joiner's Bench addresses the design and building of an English style joiners bench.
- Shop Equipment has information about bench vises and other shop equipment that'll end up in the garage eventually.
- Vintage Tools contains images of all my hand planes and other vintage hand tools.
↑