

Bathroom Design
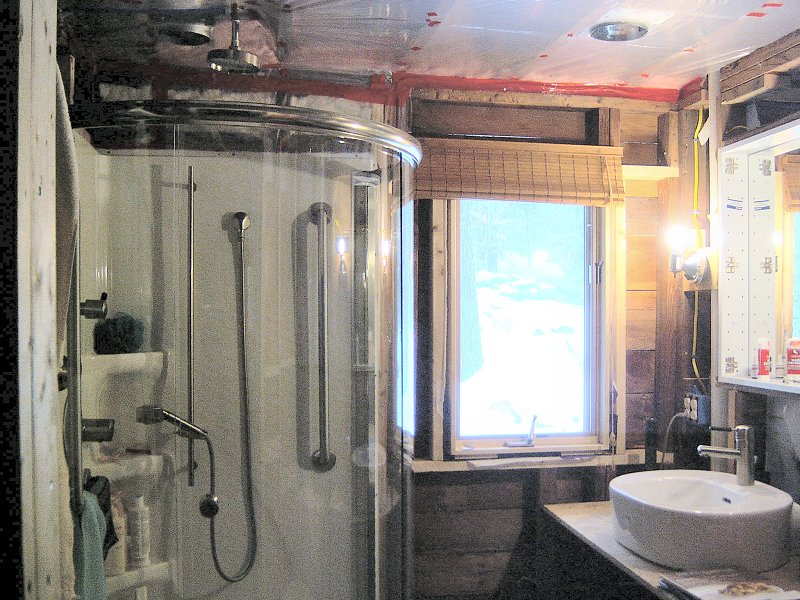
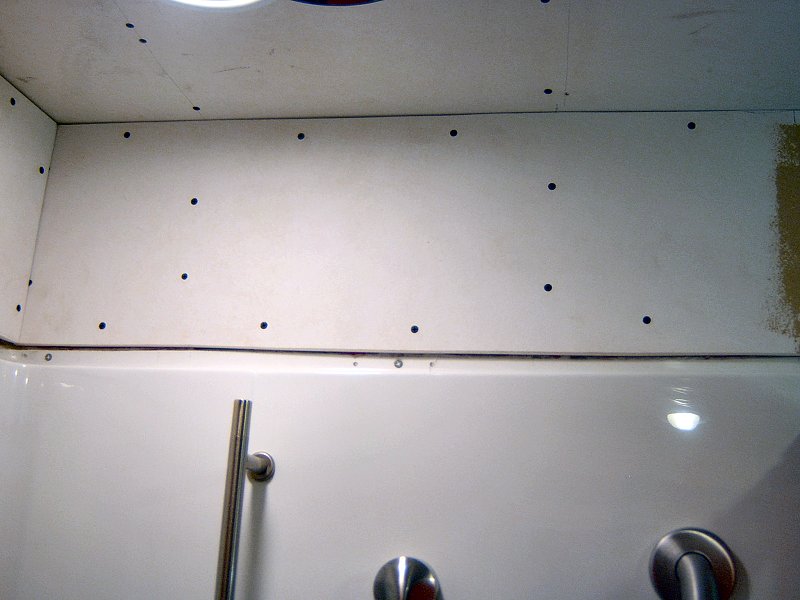
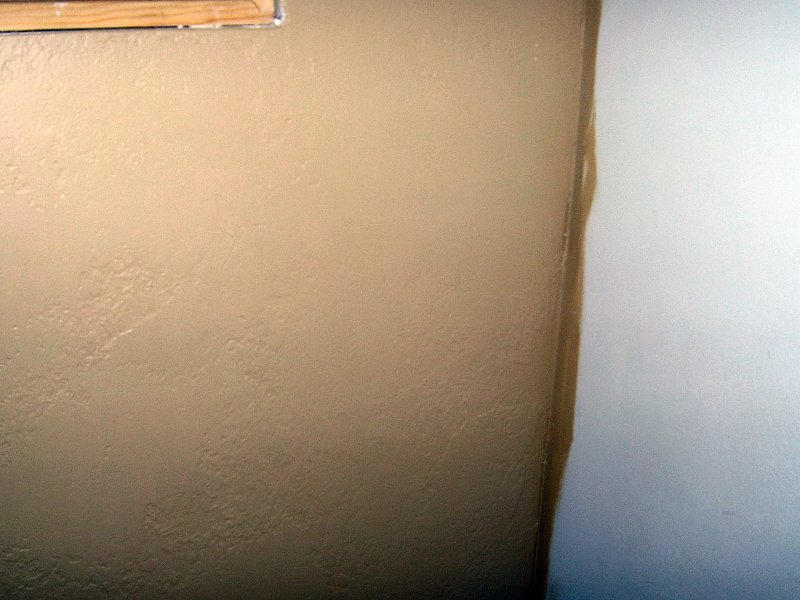
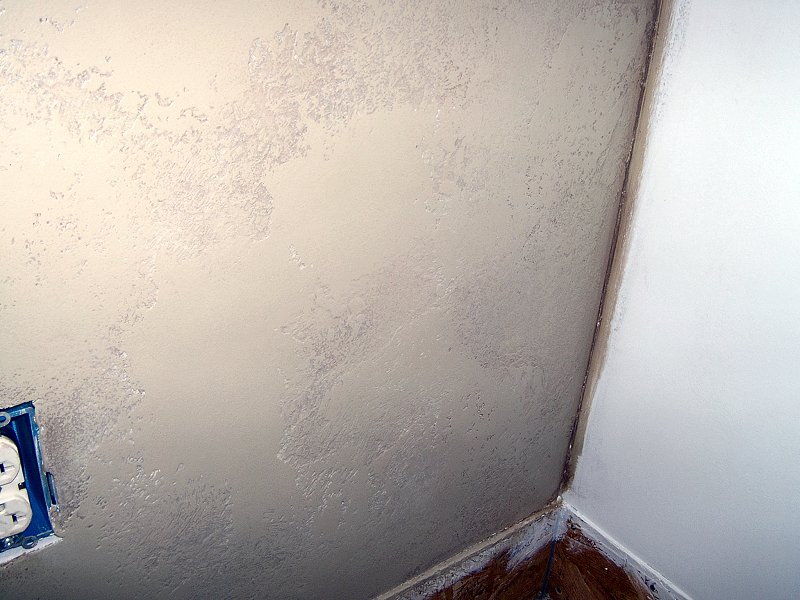
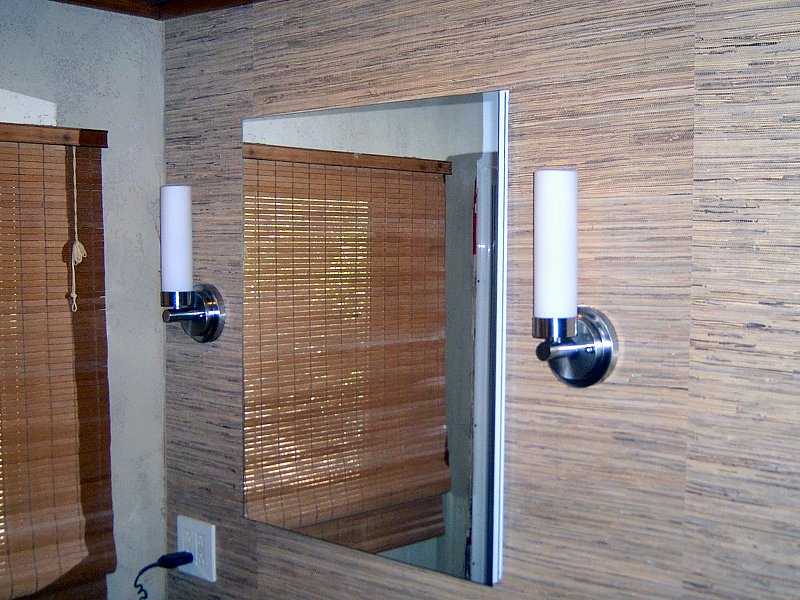
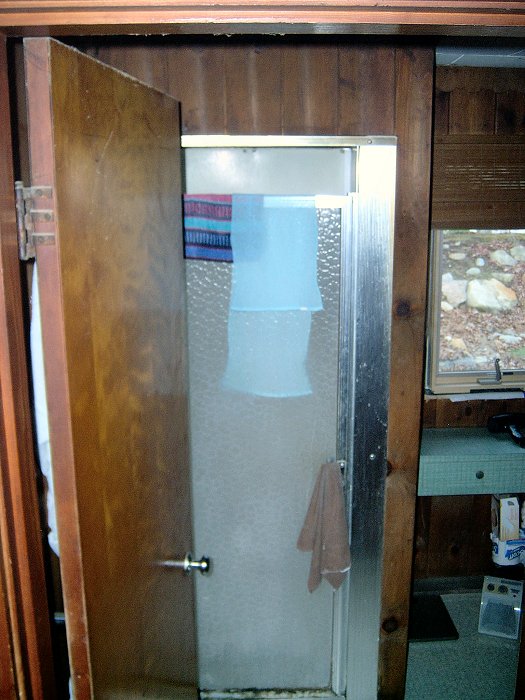 Our nasty old bathroom (4 photos).
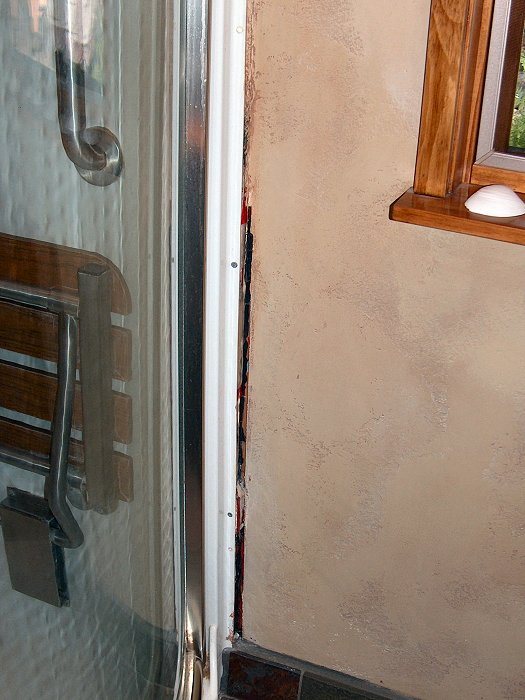
Not long after the kitchen tear-out began in late Fall of 2008, we also started work on the bathroom. The goal was to try and get our plumbing work done at last, with the removal of the old cast-iron and installation of all new PVC waste lines and vents. We came into the project with a vague notion of what we wanted to end up with, but hadn't really worked out any of the specifics. As you might guess by looking over the photos at right, we were very eager to get that old bathroom gutted after having put up with it for many years.
When we bought the house, we had talked about making both the kitchen and bathroom much larger by blowing out the North wall by about 10'. When planning the septic system, we made sure we reserved enough space along the back of the house to enlarge the footprint by that much and still keep appropriate set-backs for the septic system. As we began to look at what projects we were going to start on, and how much work we had ahead of us, we decided to just keep the house footprint the same and work on fixing what we had. If we had added the extra space (or if we do in the future), then we'd have gone for the traditional Japanese bathroom, with a separate small room for the toilet and lavatory, a space for dressing with a door to the walk-in closet, and then a "waterproof" room facing the garden with a hand shower and deep soaking tub. As wonderful as that would have been, we would have likely spent all the money we had just on the bathroom, so we abandoned that whole idea.
For the most part, the design of the bathroom would remain largely the same, with the window, door, toilet, sink and shower all located in the same locations they were in before we began. There were a few minor changes in the layout, with the window getting centered in the wall space between the kitchen wall and the shower, the door would get re-located a little further to the right as a pocket door, and the toilet was bumped over a couple inches as well. The original room was a pretty small at 6'4" by 6'7". The South wall (with the door in it) was re-built about 9" to the South so it would line up with the edge of the kitchen floor tiles, and those extra couple inches really make a big difference in how large the room feels. We also removed the solid partition wall next to the shower, which also helps open up the room quite a bit.
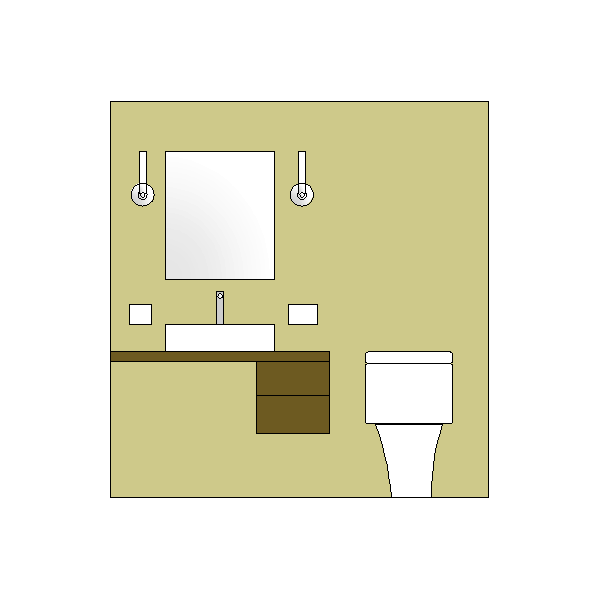 Bathroom plans (5 sheets).
After many hours of perusing web sites and books for bathroom design ideas, we've settled on the materials we're going to use for wall finishes in the bathroom. One of the biggest struggles has been deciding on whether or not to tile all the walls, since it's really the ideal wall finish for a bathroom in my opinion. As much as we like the look of natural stone tile, we decided that covering all the walls of our tiny little bathroom with Slate would make the room appear too much like a little stone cave - it's just so small to begin with that we didn't want to "shrink" it even more with dark walls. Keeping our pseudo interior design "rules" in mind, we decided to apply the "standard" faux stucco finish to the exterior wall with the window, and the grass-paper wallpaper will go on the wall behind the sink with the medicine cabinet and lights. According to our "rules", the rest of the walls in the room should also get the grass paper, but we're a little concerned about water splashing over the top of the shower so we're instead going to apply horizontal tongue & groove knotty pine panelling with semi-transparent Cedar Naturaltone (Olympic #716) stain. The light-colored wood should help brighten and open the room a bit, and will provide a relatively waterproof wall covering with a few coats of satin polyurethane topcoat. We're also planning to install the same wood panelling on most of the ceiling (the shower ceiling will be DensArmor Plus® GWB, which I discuss at length in the kitchen section).
Bathroom Fixtures
While we may have been working "backwards", we ended up buying most of the bathroom fixtures well before we were ready to begin any construction work. We'd had the shower stall for well over a year in fact, since we managed to get it for a price that was too good to be true. F.W. Webb, one of the local plumbing suppliers, was building a new show room up in Gloucester a while ago and my neighbor (the plumber) gave me a call to tell me they had a nice one-piece corner shower unit sitting on the floor of the new building for a couple hundred bucks. I'd been looking at replacement shower stalls and was pretty well set on getting a Maxx® 3-piece unit, even though I wasn't thrilled about having caulk seams in the shower. The 3-piece seemed to be the best balance of price and durability at around $700. Anyway, Webb had a Maxx® 36" round corner shower sitting there for $150, and the thing normally retails for over $1,200. We hopped in his truck and took a ride to check it out. Apparently Maxx® had changed the corner shelf configuration after Webb had bought the unit for their show room, but before they had finished building the show room. Webb couldn't have a unit on display that was no longer available, so they were trying to get rid of it for cheap. It had been installed, so there were a few screw holes around the edge and a 5" hole in the side for the mixer valve, but it had never been plumbed in or used. I bought it without hesitation, and the only caveat was that Webb asked that we also buy the doors and shower fixtures from them, which I had no problem with (my neighbor graciously charges me his cost on plumbing supplies I buy through him). The curved glass door set is still around $700, but the doors for the old 3-piece cost nearly that much as well, so it worked out quite well. The only down side was that we'd be looking at a shower stall sitting in the living room for nearly a year.
I went a little overboard on the shower fixtures, but since we were getting them at cost, we decided to go ahead and live it up a little
bit. We'd been looking at the usual suspects of Hans Grohe®, Kohler® and
Porcher®, which all make some beautiful stuff... but the costs of that stuff is startling. We could have
easily spent $10,000 on fixtures for our little 46 square foot bathroom. Part of the problem was that we wanted contemporary fixtures,
with very geometric, "blocky" lines and a satin nickel finish (satin nickel doubles the price compared to standard chrome). It seems
ornate Victorian stuff is very popular, since that's what most of the reasonably priced manufactures are offering, but that was a look we
had no interest in at all. After looking over many fixtures on-line and at a few local plumbing show rooms, the folks at Webb suggested
we take a closer look at a new product line manufactured by Delta® to compete with the high end stuff from
Kohler® and Hans Grohe®. I liked the idea of using Delta®
"guts", since repair parts for their stuff are readily available, and the plumber had been advising us about which brands were junk and
which ones seem to hold up well (you certainly get what you pay for with plumbing fixtures, it seems). He said good old Delta®
has a pretty good track record, so we took a look at their new Brizo® line and were very impressed.
The Brizo® fixtures are about twice the money of similar Delta® fixtures,
but even in satin nickel they're still less than half the cost of a similar looking fixtures from Kohler®.
We selected the Brizo®
Quiessence ![]() fixtures consisting
of a rainfall shower head, adjustable hand shower, a pair of body sprays, 6-way diverter valve, and a temperature / volume control.
Brizo® offered a couple options that, in addition to the very attractive price, really set their shower
stuff apart from the competition - the 6-way diverter allowed us to eliminate a couple of additional controls we would have needed
if we'd stuck with Hans Grohe® (which is what we had nearly purchased), and the main volume control allowed
us to set the temp where we wanted it, then turn the water on and off without messing with the water temp - a feature we both really like.
fixtures consisting
of a rainfall shower head, adjustable hand shower, a pair of body sprays, 6-way diverter valve, and a temperature / volume control.
Brizo® offered a couple options that, in addition to the very attractive price, really set their shower
stuff apart from the competition - the 6-way diverter allowed us to eliminate a couple of additional controls we would have needed
if we'd stuck with Hans Grohe® (which is what we had nearly purchased), and the main volume control allowed
us to set the temp where we wanted it, then turn the water on and off without messing with the water temp - a feature we both really like.
With all the metal bits to go in the shower in order, we then started looking at a lavatory and toilet to complete our little mini-spa.
So here's my thoughts on the toilet... something I usually don't spend a lot of time thinking about unless I'm sitting on one. As we
began looking at replacing the toilet, it would seem at first that there's not much to them. When it comes time to spend some money on
one though, it turns out there's a lot going on in the old commode and there's a reason some are $40 and some are $4,000. The design of
the bowl and trap hasn't changed much in the last hundred years, and even with the 1987 mandate to change from 5 gallons-per-flush (GPF)
to 1.6 GPF, all that really happened was manufactures made the tank smaller. The result was miserably performing toilets that just didn't
get the job done for a healthy adult male (dump 5 gallons of water in a toilet and anything will go down... 1.6, not so much). After
years of battling that old 1.6 GPF American Standard with plunger and brush in hand, I was looking forward to finding something that had
a little more engineering thought put into the design. Thankfully,
Toto®
![]() has done just that, and produces
toilets that are far and away the best on the planet in all respects. I could go on for pages about how wonderful a Toto®
toilet is, but I'll defer to their website for the sake of brevity. We selected the
Toto Nexus®
has done just that, and produces
toilets that are far and away the best on the planet in all respects. I could go on for pages about how wonderful a Toto®
toilet is, but I'll defer to their website for the sake of brevity. We selected the
Toto Nexus® ![]() toilet as the best combination of features to meet our needs. Of course, we fitted the toilet with a
S300 Washlet
toilet as the best combination of features to meet our needs. Of course, we fitted the toilet with a
S300 Washlet
![]() since it's a Japanese style house,
after all.
since it's a Japanese style house,
after all.
The rest of the fixtures include the Nexus® single-hole lavatory for the sink, which will receive the Brizo® Quiessence faucet and will be mounted on a wood slab counter top. To add to the mini-spa experience, we've included a heated towel bar next to the shower. Another important element of the bathroom fixtures is the inclusion of ample grab bars in the shower, and one next to the toilet. While we're still relatively young and able bodied and don't require grab bars, I thought it best to get them in now while the walls are apart and I have the opportunity to get solid blocking installed. I also installed blocking for a small, fold-up shower seat. Now that all the accessibility fixtures are in place, we both find we use them all the time.
Building the New Bathroom
 The first day of bathroom renovation (11 photos).
Demolition & Plumbing: Fall 2008
At long last we were ready to make the old bathroom go away. With most of the fixtures on hand, the plumber committed to a firm start date
and I was off. Managing this part of the home renovation project was a little tricky, since the plan was to get both the kitchen and
bath torn apart, then get the new waste lines installed and have a functioning toilet again within a day or two. The new shower and
kitchen sink would get hooked up next, then the plumber would be on hold until we are ready for installation of the lavatory and
dishwasher, and the finish plumbing inspection.
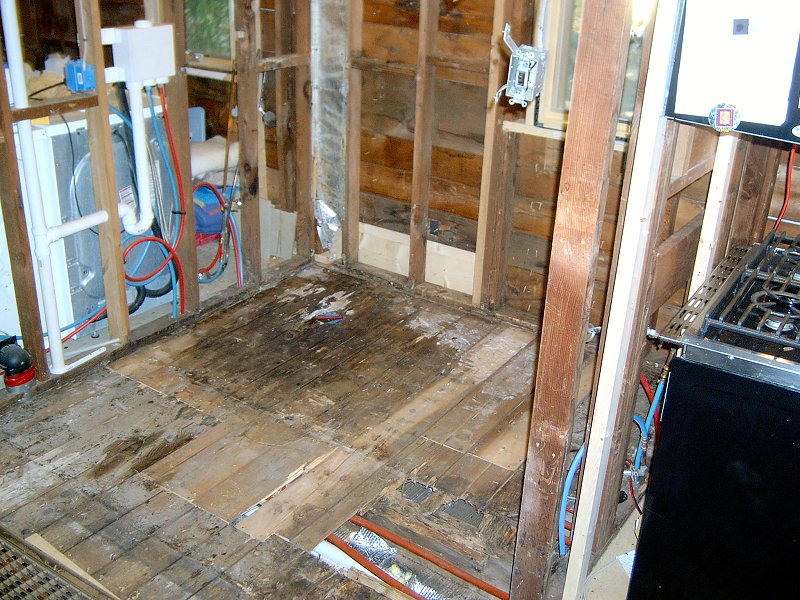
I've discussed some of the details of re-building the kitchen / bath wall in the kitchen section, since we did the kitchen and bathroom work over the same couple of days. The bathroom required a lot more tear down than the kitchen, and we had a pretty good idea that most of the floor was junk. Before the plumber arrived, I removed all the interior wall coverings in both the kitchen and bath, the ceiling in the bath (since it'd be easier to work on the vent stack connections that way), and most of the South bathroom wall to allow access to the old cast-iron vent stack behind the toilet. I also had to spend a little time digging up the old waste pipe in the frozen back yard so we could connect all the new waste lines to the new septic system. We planned to re-locate the stack to the North corner of the kitchen / bath wall, so I had also begun framing that wall out to accommodate the 5" diameter pipe. I couldn't re-build the entire wall until we had installed the shower, since we wouldn't be able to get the one-piece shower into the room if the wall was in place. All this was going to happen while the lovely bride was at work, so it would be a busy day.
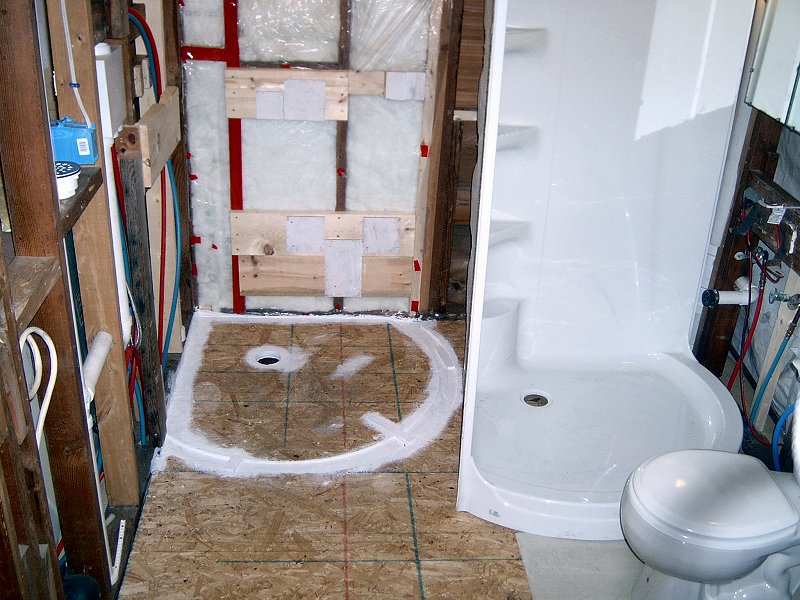 The shower goes in the next day (5 photos).
The morning of tear-out went pretty well, and as suspected the bathroom floor was in pretty bad shape. I had purchased a few extra 2x8's in addition to the OSB I had on hand to replace the floor, and it turns out we needed all the 2x8 as well. The plumber and his helper showed up on time, so they started working on removing the cast-iron under the house while I finished getting the old floor up. They installed the vent for the shower, the new main vent for the kitchen and bath, the drain for the kitchen, then that was about all they could do until I had the new floor in place in the bathroom. I worked on scarfing in new floor joists and getting the new floor down for the rest of the day, then the plumber stopped by later in the afternoon and set the old toilet in place (we decided to re-use the old unit, since it would need to be re-seated a few times while working on the tile floor and wall finish - no sense taking a chance of scratching the new one). We had done what we set out to do - gut the entire bathroom and get the new waste lines installed in a day, including a working toilet and kitchen sink before the lovely bride arrived home from the office.
The next morning I finished getting the blocking in place for the shower fixtures and grab bars, then the plumber came back mid-day and we plumbed in all the fixtures. The plumber was pretty much finished for now, since installing the sink in the bathroom will require the wall finish and bathroom counter is installed before it can be completed. It was a pretty hectic couple of days, but we were very glad to finally have the new shower in place and all those cast-iron waste lines removed.
 Finishing the wall framing and wiring (4 photos).
Wall Framing & Wiring: Winter 2008/2009
With the bathroom plumbing completed by the end of November, 2008, I spent the next few months working on the wiring for both the bathroom
and the kitchen, as well as getting the wall built between the bath and kitchen. In order to do the framing on the bathroom side of the
wall, we needed to select a medicine cabinet, and get some idea of the kind of lights we would install around the cabinet. We must have
looked at thousands of various bathroom wall lights when trying to decide on fixtures, and still can't seem to decide among a group of
10 or so that we've narrowed it down to. I have a feeling I'm just going to make something so we'll have exactly what we want. Still,
the vanity light selection exercise helped determine where the lights would be located, and that allowed me to get the wiring in place
and continue building the wall. I also re-built the wall on the South side of the bathroom, which contains the pocket door.
With the walls up I finished installing the wiring for wall receptacles and switches. We've got a pair of 20 amp GFCI breakers that run the receptacles on each side of the sink, then another 20 amp GFCI breaker controlled circuit for the wall receptacles, including the toilet and the towel warmer. In addition to the vanity lights on each side of the medicine cabinet, we installed a pair of 6" recessed dimmer controlled fixtures with one above the sink and one above the toilet (which have dimmable CFL floods in them), and a separately switched CFL floodlight in the shower. The recessed housing for the shower light is a component of the Fantech bathroom ventilation system, so the light trim also acts as the vent grill for an attic-mounted 100CFM exhaust fan. The exhaust fan is controlled with a push-button timer located in the wall with the door.
 Insulation and wallboard (5 photos).
Gypsum Wall Board(GWB): Spring 2009
After a week or two of wiring and drywall work in the kitchen, I continued work in the bathroom with the installation of insulation
and wallboard. In addition to insulating and sealing the exterior wall for energy savings, we insulated all of the other bathroom walls
to help soundproof the room. Soundproofing a pocket door will be interesting, but I've got a few ideas of how I can make that happen too
(brush weather-stripping to the rescue). One of the problems with soundproofing the room however, is that a bathroom that doesn't
allow sound to escape also doesn't allow ventilation make-up air to enter. Not only do we have the 100CFM fan in the shower, there's also
a 6" exhaust vent that is connected to the Heat Recovery Ventilator for moisture control. The room will need some kind of air intake
system for all those vents to operate properly. To allow air in, I installed a 4" Fantech adjustable grill near the floor under the
towel rack ducted through the wall to the walk-in closet. This should let ample ventilation make-up air into the room, and
still allow a discreet bathroom experience by only allowing sounds to escape to the closet. Perhaps I'm going overboard, but I really
don't need to hear what's going on in the bathroom when someone else is using it.
Before installing GWB in the bathroom, I added a 6" strip of OSB to the walls around the perimeter of the room at the floor, which will get covered with floor tile. Rather than run wood, GWB and wallpaper down to the floor then cover it with wood trim, this little edging of 6" tall tile should help quite a bit to keep the walls from sustaining any water damage in case of spills or accidents in the bathroom. I think it will make a nice transition from floor to wall too. Once all the vapor barrier was up and sealed, I installed the GWB on the North and East walls, as well as the walls and ceiling above the shower. We though about installing tile over the shower, but since that could give rise to maintenance headaches with grout and caulk, we've decided instead to simply plaster the area and finish it with white paint to match the shower walls.
 Making waterproof shower walls (7 photos).
Applying Wall Finishes: Spring/Summer 2009 - Waterproofing the Shower Walls
Okay, so to say "simply plaster" doesn't really do justice to what's going on with the shower walls and ceiling. GWB in a shower
is not a great combination (hence the creation of DensArmor Plus®), even when it's covered with thinset mortar
and tile. Water seems to always find a way to seep through grout, or caulk fails, or something cracks when the house settles - the point
is water gets in the wall and starts growing mold at the very least, or tiles start falling off at worst. DensArmor Plus®
does a fine job of keeping mold at bay and that's the only thing I used for all the kitchen and bath walls, however the DensArmor Plus®
with a bit of plaster and paint didn't seem to me to be adequate for walls inside the shower where they will likely get a direct spray with
the hand-held from time to time.
To address the problems associated with waterproofing the walls of a shower, the folks at
Schluter® Systems
![]() in Germany came up with a perfect solution.
These folks produce a bonded waterproof membrane that's used as a tile backer for showers walls and tile floors, and may also be used to
waterproof plaster wall covering. "Bonded waterproof membrane" sounds like some kind of plastic sheeting, which would be the last thing on
earth plaster could stick to. It's actually a spun plastic fiber that's very soft, and has a little nap to it. The strands of nap are what
the mortar or plaster adhere to, and it really works great. I purchased the little bit of Schluter® Kerdi,
Kerdi-Band and a pipe collar I would need to line the walls and ceiling of the shower for a very reasonable price on E-Bay, believe it or not,
since none of the tile suppliers around here stock it (which makes no sense - why anyone would tile a shower without this stuff has me
completely baffled).
in Germany came up with a perfect solution.
These folks produce a bonded waterproof membrane that's used as a tile backer for showers walls and tile floors, and may also be used to
waterproof plaster wall covering. "Bonded waterproof membrane" sounds like some kind of plastic sheeting, which would be the last thing on
earth plaster could stick to. It's actually a spun plastic fiber that's very soft, and has a little nap to it. The strands of nap are what
the mortar or plaster adhere to, and it really works great. I purchased the little bit of Schluter® Kerdi,
Kerdi-Band and a pipe collar I would need to line the walls and ceiling of the shower for a very reasonable price on E-Bay, believe it or not,
since none of the tile suppliers around here stock it (which makes no sense - why anyone would tile a shower without this stuff has me
completely baffled).
 The finished shower walls (2 photos).
Installation of the Kerdi was surprisingly easy, and after a couple days to ensure the thinset had cured, I started spreading thin layers of plaster over the Kerdi every couple of days. Okay, it's not just "plaster" - I used Georgia-Pacific's DensArmor Cote™ All-Purpose Ready-Mix Joint Compound. After a couple days of this I found something else to do... one can only sand and re-plaster the same 10 sq. ft. of shower walls so many days in a row, ya know. Days turned in to weeks, but eventually I got the shower wall plaster finished to a point where I was satisfied. I primed with Zinsser® "Bullseye 1-2-3" primer, then topcoated with two coats of their "Perma-White Mold & Mildew-Proof™" interior paint. All that plastering and sanding took place over the Summer whenever the weather was right (not too hot, not too humid...), and I finally managed to snap some pics of the finished walls early in the Fall of 2009.
There's an awful lot of stuff going on with the walls for such a small room, since we decided to use three different wall treatments. In addition to the work to achieve a level 5 finish in the shower (semi-gloss paint on GWB can be challenging...), we're also applying faux-stucco, wallpaper, and T & G panelling. The first wall I tackled was the North wall with the window. This wall is getting the stucco finish, and applying that finish can make a bit of a mess, so I wanted to get it done before applying the wallpaper on the adjacent wall.
Applying Wall Finishes: Spring 2009 - Textured Wallboard
The stucco technique I came up with is a combination of a textured plaster surface, followed by a series of glazes I apply to bring
out the texture and give the finish some depth. I begin by bringing the GWB to a normal Level 4 finish with joint compound, consisting of
3 or 4 coats of compound on fasteners, corners and seams. If I have other things to do while waiting for compound to set, I usually add
a final skim coat over the entire wall as well (which would make it a level 5 finish, although I don't sand out all the tool marks for a
true level 5). After the skim coat has set, I go after the wall with a batch of slightly thinned joint compound, applied with a 4" knife.
I just glob the stuff on in a rather haphazard pattern, then I grab a 6" round drywall texture brush and start dabbing at the globs to
raise a series of peaks and even out the globs a bit. With fresh compound on the brush, I also pat it against the wall to add a
little texture to the "low" areas between the globs I applied with the putty knife, dipping it into the bucket of thinned compound
as needed. I try and work a small section of the wall at a time (2' x 2' or so), otherwise the compound dries too much for
the next step.
 The North wall with texture and base color.
Once the section I'm working on is covered with little peaks and high spots from the globs, I've only got a couple of minutes to knock everything down to achieve the final finish texture. Working quickly with a 12" drywall knife, I use large sweeping motions at a low angle to knock down the peaks left by the brush. The timing for this step is critical - if I wait too long, the little dabs of compound from the brush will be too dry and leave lots of brush marks and sharp peaks. If I start knocking the stuff down too soon, the larger sections of compound will just spread out under the knife and skim coat the wall, destroying the entire texture. I usually end up getting a little of both (dried peaks and too much smoothing), so I'll re-dab some compound on the areas that need it with the brush, then immediately give them a light drag with the knife to blend them in. Once I've got the section knocked down so there's no peaks or obvious brush marks, I start globbing and dabbing the next section. While waiting for the next section to dry enough for knockdown, I use a 14" flat plaster trowel to give the previous section a firm rubdown with the trowel. The troweling polishes the surface and brings up a bit of a sheen on the flat spots. If I get the flat trowel work done at the right time, the finished surface doesn't require any sanding at all. If sanding is required, I just give things a very light going-over with a 220 grit sanding screen mounted on a swivel-head pole sander.
 Tinted glazes highlight the texture (3 photos).
Applying Wall Finishes: Spring 2009 - Paint & Glaze
After the compound has a chance to dry overnight, I apply a coat of drywall primer, then the base color coat. The primer needs to be
well rolled out so I don't end up filling all my little textured areas with paint. Once the primer dries (which only takes a couple hours),
I apply 2 coats of color (Valspar's "Prairie Dance", 3006-10A), again rolling the paint out well so it doesn't fill up any voids.
The base color is allowed to dry overnight, since the glazing step involves lots of rubbing and I don't want to risk rubbing through the
base coat to reveal the plaster. Glazing is basically paint with no pigment in it (although there are tinted glazes available too) and
can be applied with all manner of stuff to bring up a variety of textures on a wall (sponges, crumpled rags, dry brushed, etc.). Since my
interest is to enhance the existing texture of the wall surface, I essentially use the glaze like a stain, wetting the entire surface then
wiping away the excess. I tint my clear glaze with just a little dribble of Valspar's "Deep Walnut", 2004-9A, to give it a dark brown
color that will bring out some contrast in the little nooks and crannies of the textured finish. I just dab and brush the wall
with a lightly loaded natural bristle brush, concentrating the color in the low spots and working a small section at a time. The glaze
dries pretty quickly, so as soon as I have an area colored I immediately start rubbing the color in with a damp towel. Too much water
in the towel and I'll just wipe away the glaze completely, but too little and the glaze will darken the wall too much. The goal is to
get the dark glaze to stay put in all the little crevices, but remove it all from the high spots. The nice thing about glaze is if
it dries on the wall before I get to wiping it, I can just brush on a little more and it will mix with the existing stuff to allow
me to wipe it down properly. Once I get the low spots colored to my satisfaction, I re-wet the towel and go over just the high spots
to remove any glaze that's stuck in the tiny bumps on the surface left by the roller. This first layer of glaze in then allowed to dry
overnight so I don't wipe it away when applying the next color.
The next day, the wall is starting to look pretty good with the texture very visible due to the glaze, but it's not finished just yet. To mute the high contrast of the dark glaze and give the wall a more natural appearance, I make a highlight glaze with a dribble of Valspar's "Drum Skin", 7003-10, in clear glaze and give the areas with the most texture a light brushing with this lighter glaze (those little disposable Tupperware style containers make fine glaze mixing tubs, by the way). As before, I give the glaze just a minute or two to set, then go over the freshly glazed areas with a slightly damp towel to remove any excess glaze. With the lighter glaze, I only hit a few random spots on the wall, since I don't want to completely hide the dark stuff from the last session. This light glaze is merely to add a little depth and contrast to the finish. After the highlight glaze, I find the wall looks much more natural than it did with just the dark glaze, but we're not done yet. The final finish and depth comes from a top coat of nearly clear glaze that has just a hint of the original base color in it. I mix up the final topcoat and apply it the same day as the highlight glaze, since I won't be doing much rubbing on the final coat. This final tint is applied as before, with a very lightly loaded brush, and I do my best to avoid areas that have a lot of interesting texture in them so I don't cover up the previous work. I mostly stay on the smooth, high spots with the final tint, lightly brushing the glaze out in all directions with a nearly dry brush. I keep a damp towel nearby, but as the glaze dries it will become more transparent than it is while applying it, so I try to refrain from wiping the wall unless I get too much color in a particular section. I think the results are well worth the effort.
 With brackets installed for the counter, the wall is ready for wallpaper.
Applying Wall Finishes: Spring 2009 - Wallpaper
Prep work for the wallpaper is pretty straight forward, and involves bringing the GWB to a level 3 finish, (fasteners covered,
seams and corners taped, and everything sanded free of tool marks), followed by a coat of primer. The DensArmor Plus®
soaks up the primer a bit more than paper-faced GWB, so I put on a second coat and let it dry over night before going for the wallpaper
paste.
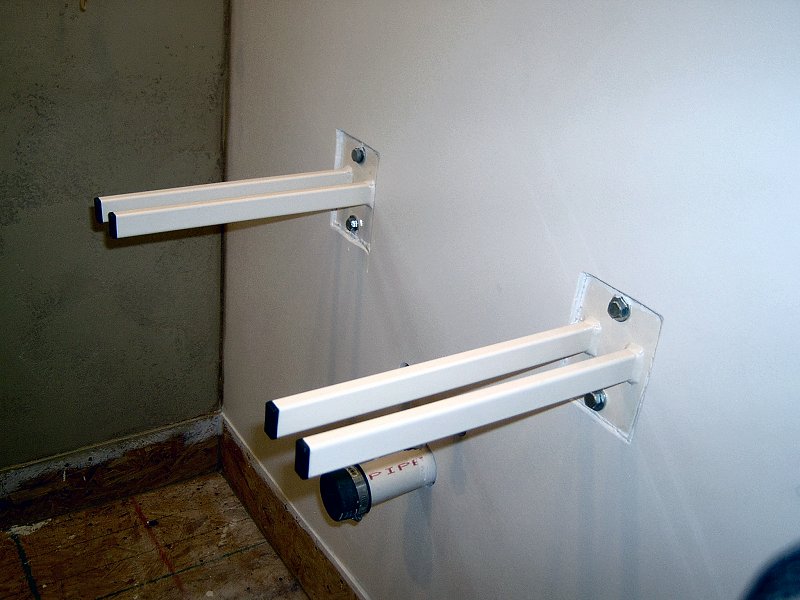
I also installed a pair of brackets before wallpapering, since I wanted to mount them to the wood, rather than having wallboard sandwiched between the brackets and the blocking I'd installed for counter support. I want the area under the bathroom counter to remain open and free of any legs or brackets, so I had to get a little creative in finding a way to attach the slab counter and fairly heavy sink to the wall and not have it end up on my toes the first time I lean on it. I purchased a pair of heavy-duty garden tool hangers, and attached them to the wall with 4" long, 3/8" stainless steel lag bolts. The hangers are made with a slight angle to them to keep tools in place during normal use, so I flipped them over (so they angled down), then shimmed them up level with hardwood shims glued to the blocking with construction adhesive. When I make the countertop, I'll plough a shallow dado in the bottom for each arm of the bracket to sit in, then run a couple screws through the arms into the countertop to secure it in place.
While grass paper may not be an ideal choice for a bathroom, between the heat recovery ventilator exhaust vent and the vent fan mounted in the shower I think we'll keep the place from turning into a steam room. Splashing water all over this stuff doesn't sound like a good idea, so we'll just try not to do that. Grass paper is not pre-pasted (since soaking it in a tub of water would result in a tub of dried grass mush), and just has a backing on it that's similar to newspaper. Application starts with a bit of measuring to figure out where the seams are going to end up, then I roll out a sheet and cut all the holes required for plumbing and electrical openings. Before hanging the first piece, I also mark the wall with plumb vertical lines to use as guides when sticking the sheet up.
 Applying the wallpaper (4 photos).
With the wall marked and the first piece full of holes, the pasting can begin! Since I'm working on sub-floor that's all going to get covered up later, I don't have to worry about slopping some paste around as I work. I apply pre-mixed paste with a special low-nap sponge wallpaper paste roller and a paint tray. I put a medium heavy coat on the back of the paper with the roller, trying to roll out any extra wet spots as I work. As soon as the paper's covered, I put another light coat of paste directly on the primed wall ensuring there's extra paste where the edges of the paper will land and around any fixtures. There's not a lot of time to fiddle around when doing this - the paper backing of the wallpaper sucks up the paste quickly, and if I don't get it on the wall right away it will begin to dry out completely (the first time I worked with this stuff the instructions said to let it sit 5-10 minutes for the paste to work into the backing... it worked in, and was completely dry in 5 minutes.) As soon as I've got some paste on the wallboard, I lift the sheet and get it into the room, being careful not to crease it or stick it to itself. I just slap it on the wall somewhere near where it's supposed to be, then hunker down and pull a bottom corner to find the layout lines. Working from the bottom up, I get one edge aligned and start smoothing the stuff upward and across the wall, removing any air pockets and trying to maintain a straight edge as I go. I peel off the part that I "slapped up" about halfway up the wall when I started, and continue to carefully align and smooth until I've made it to the ceiling. This whole process takes place in less than a minute - if I take too long, when I try and peel back the initial rough positioning, I'll peel off grass and the paper backing stays on the wall. That's bad.
Once the first piece is in place, I go over the entire surface with a wallpaper smoothing brush to ensure good contact on the back and remove any air pockets I may have missed. The final step is to take a slightly damp towel and wipe off the edges, working with the "grain" of the grass to remove any paste that may have gotten on the face while smoothing the piece onto the wall. Subsequent pieces go up in the same way, taking care to butt the edges together without gaps or humps, and then blotting the seams with the damp towel rather than wiping them. Grass paper is funky stuff in that while the edges are straight, the grass usually doesn't run across the face of the paper at a perfect right angle to the edge. It also stretches a bit when applying it to the wall, so the best I can hope for is to try and get plumb vertical seams. The seams are going to be blatantly visible, and there's really nothing to be done about it (at least I don't have to try and pattern match any designs at the seams). There's also slight color variation from roll to roll, as well as from one end of a roll to the other. Bottom line: it's organic stuff and while it might appear a little crooked or the seams might not be perfectly matched, I really like the final look and feel.
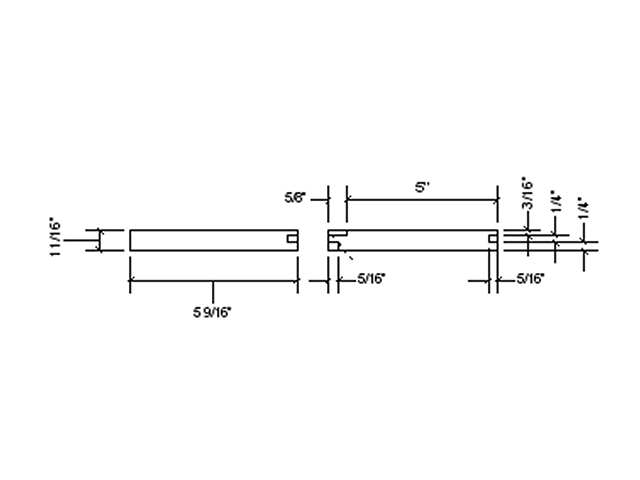 Our horizontal T & G joint design (1 sheet).
Applying Wall Finishes: Summer 2009 - Tongue & Groove Panelling
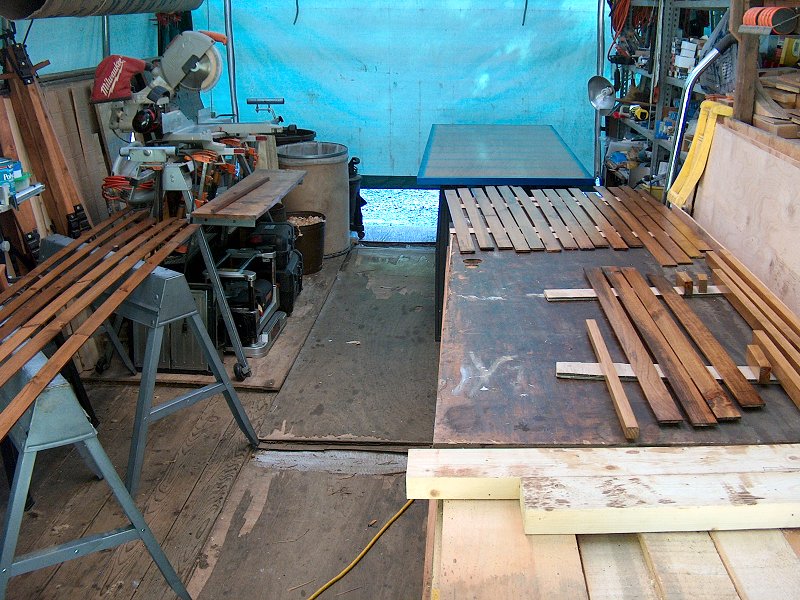
With two of the walls done and fine weather available, I admit I found plenty of diversions in the garden and outside to delay
bathroom work throughout most of the Summer. Still, the weather isn't perfect all the time, so on rainy days I'd head into the
green-tent woodshop and make sawdust and wood shavings as I recycled 50-year-old bits of salvaged panelling into what would be our
nifty horizontal T & G bathroom panelling. You didn't think I'd actually go out and buy pre-milled T & G
panelling, did you? Of course not! I already had heaps of old 8" wide "Pickwick" knotty-Pine panelling I'd taken off the
living room and kitchen walls, and a fair pile of 6" wide V-groove T & G I'd taken out of the bathroom. The finish was
nasty and there were nail holes all over the stuff, but I'd successfully re-milled a lot of the old "Pickwick" stuff for use as
the genkan ceiling, so I thought I'd take a shot at making another
heap of panelling for the bathroom from what most folks would've put in a dumpster.
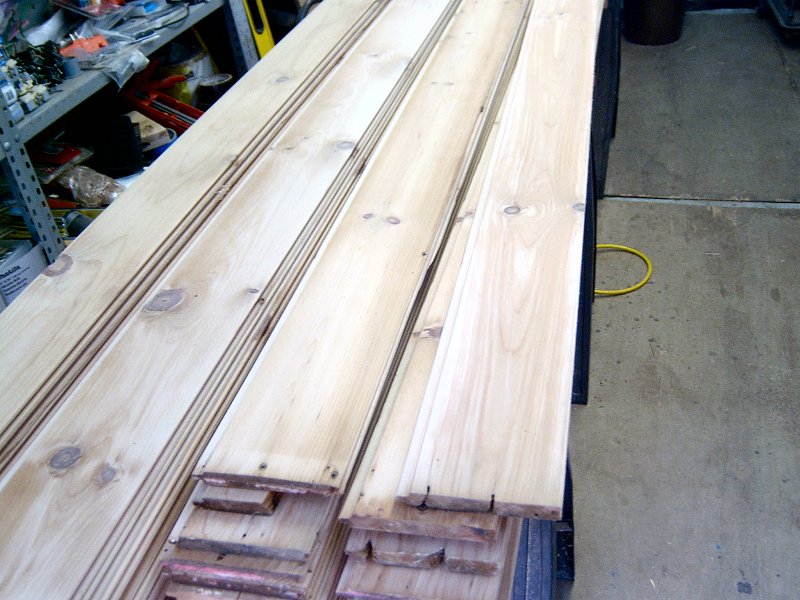 Details of re-using the old panelling (4 photos).
Milling the horizontal T & G joint turned out to be a little different than the standard "V-groove" joint (and was another reason to re-mill the old stuff, since this isn't a "normal" T & G joint I can just go buy at a lumber yard). The V-groove joint butts one board tightly up against the next, and we wanted instead to have a little space between each board. We also wanted square edges on each board, instead of the 60° angled edges of the V-groove stuff. After a little fiddling with the design to accommodate our undersized boards (I needed to mill the boards down to 11/16" thick instead of the standard 3/4" thickness to remove the old finish and expose clean wood), I ordered a "Freud 99-036" adjustable Tongue & Groove bit set as well as a "Freud 16-108" 1-1/4" dia. mortising bit for the router table and was ready to get started.
A friend from up the street offered to lend a hand with the house, so I took up his offer and asked him to help feed all this stock through the thickness planer and router table. We first ran everything through the table saw to remove the old groove, then ripped each piece to final width (which between the old face moulding and destroyed tongues, turned out to be 5-9/16"). Next, everything went through the thickness planer 3 or 4 times - a pass or two to remove the old finish from the face (which would end up as the back of the panelling so it didn't have to be perfect) then another pass or two to get the old back cleaned up and get everything to a uniform thickness. With the ripping and planing done, we stopped for the day so I could clean up the shop a bit and got the router table set up for the next day's work. After a few passes with scraps and tweaking of the adjustable T & G bits, we ran all the stock over the router table the next day. Each piece received one pass on each edge to cut the tongue then the groove, then I changed to the mortising bit for the final pass on the groove-side face of each piece to cut what would be the little reveal section. Another set of hands to feed all this stock was certainly a big help!
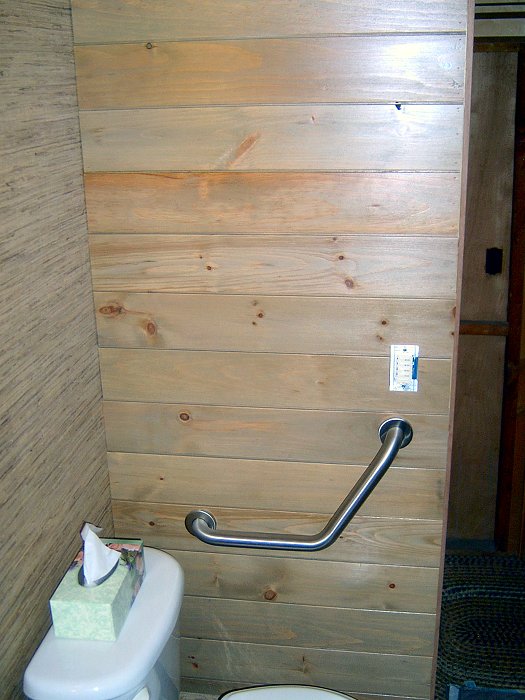 Installed T & G panelling (2 photos).
As I had done with the genkan ceiling, I pre-finished all the material before installation. The face of all the stock was first sanded with a 120 grit belt sander to remove any marks left from milling, then I gave all the joints and faces a quick pass with 150 grit hand-sanding block to soften the edges. Finding a proper stain color for the bathroom walls took a while, mostly because of the many trips back and forth to Lowes (thankfully they'll accept returns of mixed stain!). We started with little stain sample packs (which are usually sufficient), but none of the ones they had available were right (they all had too much orange in 'em). This old knotty pine stuff already had a lot of orange in it, and it seemed like any color we tried on it turned to some manner of bright orange cedar panelling wannabe stuff. We decided to move away from the warm wood tones and try something completely different with what looked like grey stain on the sample card. Olympic's "Driftwood Grey" was too depressing, but their "Aspen Tan" 920 semi-transparent turned out to be perfect. Between the orange patina already in the boards and the grey/tan of the stain, we landed on a very nice match to the existing grass paper on the walls. After two coats of stain, everything received a couple coats of Minwax®'s water-based semi-gloss Polycrylic Protective Finish topcoat.
Applying the Ceiling: Summer 2009
The ceiling is the same T & G material as what went on the walls, and it went up at the same time as the walls. However,
things got a little tricky while dealing with the round shower ceiling. Remember that relief cut I mentioned in the first
shower installation photo above? Yeah, I didn't either but luckily I still had the piece I'd cut out of the floor, which was
traced from the shower stall during installation. I'd used that piece as the pattern to make the radius cut in the GWB shower
ceiling, and still had it hangin' around the shop some place. It turned out I was going to get some more mileage out of it for
the ceiling panelling installation, and then to make ceiling trim as well.
 The T & G ceiling and shower trim (2 photos).
Ceiling installation began with the longest piece directly over the door, and progressed quickly until I came to the shower ceiling. The first piece of ceiling panelling that would touch the shower ceiling was put in place temporarily, then I carefully put a pencil line on the panelling board to get a good idea of where the radius cut for the GWB would end up. I took the board down and cut the radius with a jig saw, then re-installed the board to check the fit. After a couple more trips to the wood shop I had the radius right and dug up my old pattern piece. After lots of careful measuring to determine where the edge of each board would meet the curve of the GWB ceiling, I dry fit three or four boards together on the bench, traced the radius from the old pattern onto the boards, then cut and installed two or three of them. I always saved the last board I'd cut as I worked my way across the ceiling so I could use it on the bench to fit the next few boards to, then continue tracing the radius onto them from the pattern. I had to take some care since I had a limited amount of stock to work from, and if I cut something too short I'd have had to buy new wood and try to mill it to match the old stuff (and it wouldn't have matched and looked awful). It all worked out fine with no mistakes, no seams in any of the walls or ceiling, and I ended up with about half a dozen extra little 3' long boards when I was done.
Trim & Accessory Fixtures: Fall/Winter 2009
I started the trim work with the large curved piece for the junction between the GWB shower ceiling and the T & G panelled
ceiling (photo above). I glued up the radius from a few sections of 2x6 Spruce, then cut the curve with a jigsaw. The old
Stanley #113 radius plane came in quite handy while finishing up this piece, then after a bit of final sanding it was ready for
stain and topcoat. We tried the usual dark "American Walnut" stain on a sample piece first, but it looked way too dark with the
relatively light wallpaper, tan panelling and white shower. We also have all satin Nickel fixtures in the bath, and the dark
Walnut was selected to go with the oil-rubbed Bronze fixtures we have elsewhere in the house. After a bit of experimentation,
we came up with a custom color consisting of Minwax® Wood Finish™ oil-based penetrating
stains "Puritan Pine" 218, and "Early American" 230. To get the color just right, I give each piece a good wet coat of the
lighter "Puritan Pine" and let it soak a bit before wiping the piece down to remove any excess stain. This color is a close
match to the existing color of the natural Spruce, but it does highlight the grain a little and help even out the over-all color
of the wood. The first color application is allowed to dry overnight so the color won't be removed when applying the second
color. Once the piece is dry, the darker "Early American" is applied and wiped off immediately. This darker tint does a very
nice job of showing the woodgrain without making the piece too dark (which is what happens if it's allowed to soak in too long).
 Bathroom accessory fixtures (4 photos).
By the Fall of 2009, most of the ceiling trim was in place and we'd began to install some of the additional fixtures to complete the bath. The rest of the trim and fixtures will have to wait until the tile floor is finished. The good news is we finally selected the light fixtures for the vanity! We literally looked over thousands of choices online, and after making a few mock-up paper lamp shades to check sizes, we decided on a pair of Maxim Lighting's 53006WTSN "Cilandro" wall sconces in satin Nickel from LightingUniverse.com. We're very happy with the lights, and really like the way they match the plumbing fixtures. I'm glad they don't use Halogen bulbs (since those would be pretty hot to have up there with the grass paper), although I haven't found an adequately bright "B" type base (candelabra) CFL bulb for these yet so they're just using standard incandescent bulbs for now.
The ceiling light fixtures are Halo® Lighting H7ICAT 6" recessed canisters, with dimmable Philips Marathon® 16w R30 CFL floods in them. The shower light is part of the Fantech® PB100F bath fan, and uses a 14w, 4-Pin R30 CFL flood. The other light in the bath is this really nifty night light that's part of the wall plate for the wall receptacle behind the toilet. It's called a LimeLight® Duplex Sidelight and it gets hardwired into the receptacle. It doesn't require its own electrical box... just replace a standard wall plate with this thing and viola - instant night light. It's "on" all the time (it's rated at 0.03 watts, which is basically nothing) and is guaranteed to never burn out. During the day you can't even tell it's on, but at night it provides a nice green glow across the floor, which is just enough light to prevent accidents on those late night bathroom runs.
Other accessory fixtures installed so far include a Broan® BR-52WH304DPF "Metro" over-sized frameless medicine cabinet, a Warmrails® hardwired wall-mounted heated towel shelf, a pair of Brizo® 6948356-BN "European" double robe hooks, a LaToscana® AT11-PW "Atlanta" toilet paper holder (it looks exactly like the matching Brizo one, but at a fourth the prize), and a 1-1/4" grab bar / arm rest next to the toilet.
Floor Tile Installation: Spring 2011
Once the bathroom was functional, I switched to getting the kitchen finished throughout most of 2010. With the
kitchen now completed it's time to get back to working on the bathroom.
The next project for the bathroom is the installation of the floor tile, which I'm hoping to get done fairly quickly before
outdoor projects pull me away from getting it taken care of. I've spent a good bit of time learning my way around tile while
dealing with the kitchen floor, so I don't anticipate the bathroom being much trouble (although there's a lot more cutting
involved with the bathroom to get around that shower stall). Before any tile goes down, there's a fair amount of prep work
that needs to take place, however.
Installing HardiBacker®
Unlike the kitchen, that bathroom floor will likely get a good deal of water tossed on it so I did a few things differently
in the bathroom. Rather than run the wall coverings all the way to the floor, I stopped them about 6 inches up from the where
the wall would normally meet the floor. I added a layer of OSB around the perimeter of the room in this bottom section, and
the plan is to add 6 inch tall tiles to the wall to act as the baseboard for the room. I'll still put a wood baseboard trim on
the wall, but it will be above the floor as trim between the wall covering and those 6 inch tall tiles. The OSB just acts as a
base to start from, like a sub floor, so the first step was to add some HardiBacker®
tile backer board around the perimeter of the room. As I'd done in the kitchen, I cut the tile backer with the Porter-Cable
Porter-Cable cement board shears then attached it with tile mastic (in some spots), white thin set mortar, and Buildex
Backer-On™ 1-1/4-inch square-drive screws.
 Base board HardiBacker® installation (6 photos).
Part of the fun of renovating a crooked old house is that at some point old, out-of-plumb walls need to join with new plumb and level assemblies. I'd dealt with that in some regard when installing the shower stall, since the new shower is plumb and level, but the walls it attaches to are certainly not. Now I have to deal with more of that, since the baseboard tiles are going to need to act as trim between the crooked walls and level shower. To take care of the rather large gap around the shower, the plan is to make the baseboard tiles end up proud of the baseboard trim (so the tops of the tiles will be visible) which means the tile backer needs to end up about an inch think near the shower. I'd tried building up tile height in the kitchen when dealing with the out-of-level floor by adding additional mortar during tile installation, and while it sort of worked, it wasn't a lot of fun. I found it's a lot easier to install tiles when I can just trowel down the mortar and go, so I needed to make up the extra height during tile backer installation.
On the first day, I worked on the North and East walls, which didn't need any extra thickness built up beyond the normal 1/4 inch thick tile backer. To make life easy, I just used pre-mixed tile mastic to attach the tile backer along the two walls. I also cut a few 2 inch square pieces of tile backer, then attached those with mastic to the sections of the South and West wall where I was going to need to build up a lot of material for those sections of tile backer. After the mastic had dried overnight, I mixed up a fairly dry batch of thin set and slathered along the sections of the South and West walls to provide a good base for the tile backer on those walls. The pre-glued little chunks of backer gave me a good base to work toward to get the thickness right, and also allowed me to drive home some screws to hold things in place until the mortar cures without squashing all the mortar from behind the backer board.
 DITRA membrane installation (4 photos).
Installing Schulter® DITRA membrane
Rather than cover the floor with HardiBacker® as I'd done in the kitchen,
I decided to use Schulter® Systems DITRA uncoupling, waterproofing, vapor management, and
support/load distribution membrane. That's quite a mouthful, but the bottom line is it's the good stuff. The tile backer board
does a wonderful job of providing support and load distribution, but it does nothing for waterproofing and uncoupling. Since
the bathroom will likely be a lot wetter than the kitchen, I want to be sure there's no chance for any moisture to make it
through the grout and into the sub-floor. DITRA is basically a layer of plastic that makes a completely waterproof floor
below the tile. Then there's that uncoupling business... it seems strange, but ideally the floor tile isn't actually attached
to the sub-floor (like it is in the kitchen), which allows the sub-floor to expand and contract without causing the tile to crack
when it moves. While it's possible that may happen in the kitchen (as well as the genkan , when I get
around to tiling that), I'm not as worried about those areas because the temperature and humidity should be pretty stable in
those rooms compared to what happens in a bathroom. Because of the high humidity and temperature variations in the bathroom,
it's entirely possible that the floor will move enough to crack the tile joints. The DITRA has a surface of little
reverse angle-sided pockets, which cause a dovetail style mortar joint between the tiles and the membrane - if the floor moves
below the tile it won't matter, since the dovetailed tiles won't go anywhere. Time will tell, but I think this stuff is
going to work very well.
Installation of the DITRA is simple enough - spread an even coat of thin set with a notched trowel, lay the stuff down, and smooth it down with a rubber grout trowel. It comes in a 1 meter wide roll, so I had a seam in the center of the room that needed to be sealed as well. To seal seams and edges, a little strip of Kerdi is bonded to the DITRA (see above for more info about Kerdi) with a bit of thin set and smoothed out with the grout trowel again. The DITRA and Kerdi all went down in a day (which meant I could re-install the toilet before the homeowner arrived that evening), and the room was ready for floor tile installation to begin.
 Start of tile installation (3 photos).
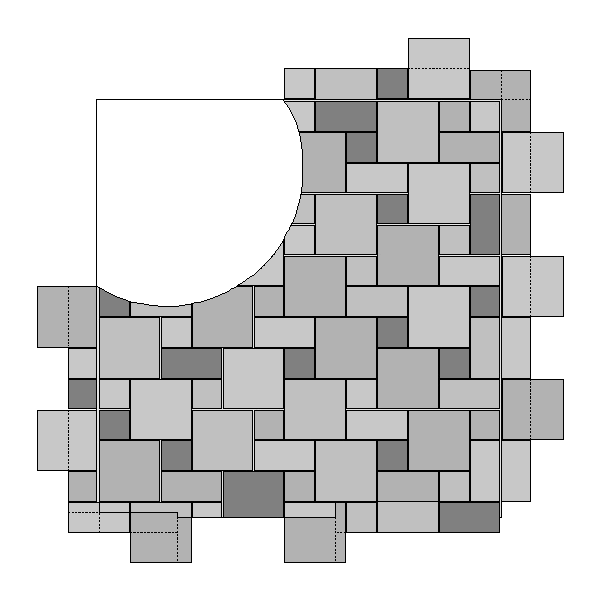
Installing the Slate Floor Tile
After the DITRA had cured a day, I began laying out the slate floor tile pattern by selecting a pleasing array of colors
and textures. I used the same pattern I had come up with when doing the kitchen tile floor, and had already pre-cut all
the half and quarter tile pieces I thought I'd need when I was doing tile prep for the kitchen in Winter 2009 (see the
Kitchen Floor installation section for more details). With a little
tweaking to ensure the tile spacing would work out evenly around the edges of the non-square room, I began the installation
in the corner under the sink. I'd mix 10 pounds of Laticrete® grey Fortified Multipurpose
Thin-set (gold label) mortar with 4-1/3 cups of water (since the bag says it's 5-1/2 quarts per 50 lb. bag), plus a couple extra
sprinkles of water after the mixture was allowed to rest for 5 or 10 minutes before I began spreading it. I applied the mortar
to the DITRA with a 1/4-inch notched trowel, and also applied mortar to the back of each tile before setting it into position.
I also ensured the mortar and tile were not in contact with the perimeter wall by placing a corrugated cardboard spacer along
the wall as I worked on the tile. This resulting gap will be filled with Schulter® KERDI-FIX
sealant to ensure a waterproof floor surface and allow a bit of room for expansion and contraction of the heated tile surface.
Because the floor isn't level, I did my best to at least get each tile level, and tried to use the thinner tiles at the high end
of the floor (under the window), while reserving the thickest tiles for the low side near the door.
In order to keep the bathroom in service throughout the project, I could only work a small section of the floor each day. This provided someplace to step each day to get at the sink, toilet and shower, being careful not to hit any of the tiles that had been laid that day. I also had to be careful to keep the tiles lined up while doing just a few at a time, so I used tile spacers to maintain even grout lines as I worked (although with natural slate, it's nearly impossible to keep perfect spacing due to slight variations in tile size). After getting the first few tiles in the far corner, I needed to deal with tiling around the curved shower stall in order to progress further on the field tiles in the middle of the floor.
 Cutting Slate for the shower (6 photos).
Round Shower, Square Tile...
To fit tile around the shower stall, I started by making a wooden template with a slightly larger radius than that of the shower
stall. I needed a little space between the fiberglass shower stall and tile for a caulked joint, since placing tile directly
against the shower would likely result in cracked tiles or grout (because the shower stall will expand and contract at a different
rate than the heated tile floor). I placed an 1/8-inch thick wood strip along the shower stall, then pressed a contour gauge
against the strip to get the correct radius. The radius from the gauge was than traced to a piece of OSB and carefully cut
with a jig saw. After a bit of touch up sanding and fitting to ensure the radius was correct, I had a proper template to use
for tile cutting.
I set up a tile cutting area out in the temporary wood shop (with the door open, since this project makes clouds of dust), using the Craftsman clamping table to hold tiles, and the Milwaukee 4-1/2" angle grinder with a Norton masonry disc to cut the radius into each tile. To determine where each tile needed to be cut required some very careful measuring from the existing tiles over to the shower stall, which after adjusting for grout and caulk joints, provided the point where each end of the radius would get traced onto the tile with the template. The tile was then rough cut with the wet saw, and clamped into onto the work table for grinding (see the photos here for step by step details). Final clean-up was performed with a 60-grit disc, then the cut edge was dressed with a hand block for a slight chamfer before installation. The first few curved tiles were installed using the already installed field tiles for measurements, then after curing over night, the next few curved tiles were indexed off the curved tiles that had been installed the day before.
 Installing the rest of the floor (4 photos).
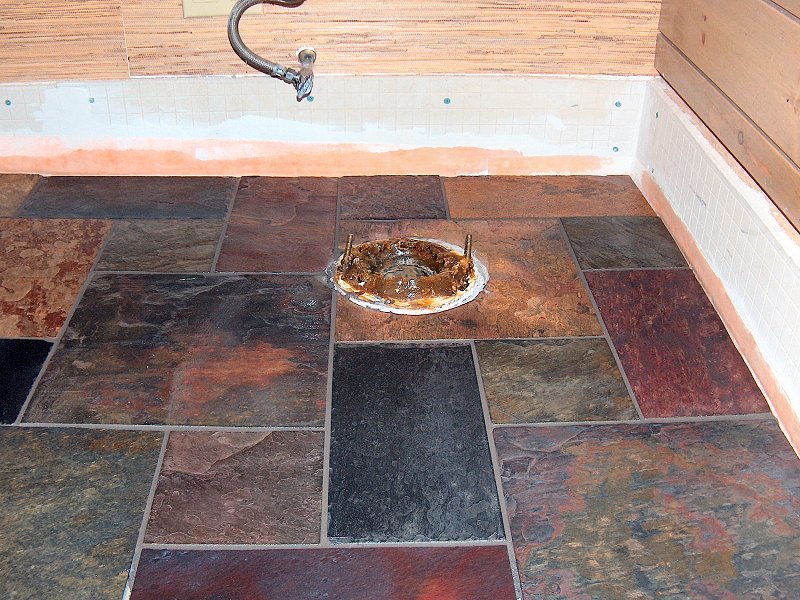
Finishing Floor Tile Installation
After a couple days of cutting and installing curved tiles, the room was ready for more floor tiles as I worked over toward
the toilet. Again, this was a slow process in order to ensure there would always be some previously installed tiles to stand
on so the bathroom could be used each evening as needed. On "toilet day", work began as soon as the homeowner left that morning
so the toilet could be pulled and tile installed right away, then allowed to set so the toilet could be re-installed before she
returned. The spacing worked out so the tile directly under the toilet ended up as a single, full sized tile with a 6-1/2"
hole in it for the toilet flange. The hole was cut using the grinder as before, allowing a bit of extra space for sealant after
the installed tile cured. The rest of the toilet corner was tiled, then everything was cleaned up until the homeowner returned
and gave me a hand sitting the toilet back into position. The wax ring on the flange was re-formed with a putty knife, and a
series of shims were placed on the floor around the edge of the toilet to help distribute the weight evenly across all the
tiles it sat on. The toilet was lowered into place and the retaining bolts snugged down, and the bathroom was ready for use
once more. The last few tiles just inside the door were installed the next day, then after a couple of days to cure the
floor was ready for grout.
 Applying the grout (7 photos).
Grouting the Floor
I used a mix of 1 part Laticrete® #1542 "Platinum" & 1 part #1524
"Natural Grey" sanded grout (for a little darker grey final color than what the natural grey gives), carefully
weighed with a kitchen scale for a small 2 pound batch, then added the dry mix to 1.3 ounces of water pre-mixed
with 1.3 ounces of their #1776 Grout Enhancer to provide mildew resistance for the finished grout. I'd learned
my lesson on the kitchen floor that despite what the instructions said, it's far easier to work the grout in
very small batches when dealing with a natural tile floor. I suppose if I were working with glazed porcelain or
ceramic tile, it would make sense to grout the entire floor at once then just wipe off the mess for a pristine
finish. With the porous, open surface of natural slate, I learned that cleaning the grout off the tile was
very difficult after it had set up, so small batches would allow me to work the grout into the joints, then
immediately wipe down that section before mixing a new batch of grout and moving to the next section.
I began the grout application in the toilet corner of the room, so that section of floor would have a chance to cure for most of the day while I worked on the rest of the floor. I could then get the toilet back in place again before the homeowner arrived home that evening. Working in very small batches allowed the project to go much better than that mess I'd made in the kitchen, and grout work only took a couple of days to complete. Grouting around the curved shower did require a little fussy work to ensure I kept a small gap between the grout and the shower, which I achieved by taping a very thin strip of wood into place between the tile and the shower (see photos). After the grout had cured a few hours, I carefully removed the tape, then pried the wood strip up with a putty knife to leave about an 1/8" gap between the shower stall and the grout (which would get caulked after the grout fully cured, as would the rest of the perimeter of the room). After the grout had cured a few days, I applied a couple coats of TILELabs® SurfaceGuard Penetrating Sealer and caulked the perimeter of the floor with Schulter® KERDI-FIX, then room was ready for the baseboard tile installation.
Installing the Toilet
Before I began working on the tile baseboard, I decided to unpack the toilet bowl for the Toto Nexus®
and double check the clearance between the full-skirt bowl unit and the back wall. Specifications called for a 14
inch rough-in clearance, and we actually put the flange at 15 inches from the studs back when we installed the plumbing.
That gap had also been steadily getting smaller as work progressed, with the addition of drywall and cement board
backer for the angled tile baseboard. I needed to determine if there would be enough space to run the tile behind
the toilet, or if I was going to have to cut the tile to fit against each side of the toilet along the wall.
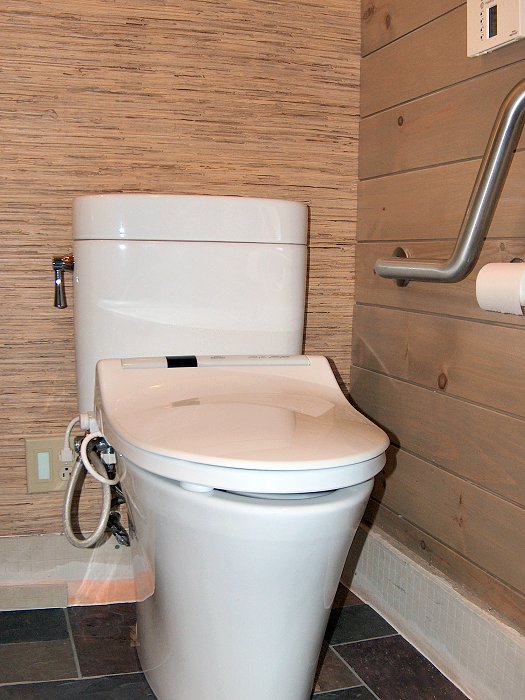 The new toilet (5 photos).
It had been nearly 3 years since we purchased the toilet, since we purchased all the kitchen and bath fixtures at the same time, so I was looking forward to finally getting rid of these Toto boxes and enjoying the new toilet washlet. Upon opening the box for the toilet bowl, my heart sank. The thing looked like someone had whacked it in the side with a sledge hammer. There was a chunk of porcelain missing, and a spider web of cracks that ran from the top lip then all across the side to the bottom. It must have been dropped off a loading dock onto its side or something, and was completely destroyed. I dug up the receipt and called Salem Plumbing to see if they could do anything for me, but due to the length of time since I'd bought it, my only option was to buy a new bowl. Luckily this model was still available, and they even had one in stock. They sold me the unit at cost, which was about 2/3 of what I had originally paid (since I originally paid "jobber cost" by purchasing it through my neighbor the plumber), and a couple hours later I had the new unit back home and ready to install. I learned my lesson however - open the box before leaving the store to check for damage!
I removed the old toilet for the last time, and cleaned all the old wax ring bits from the flange. I then sat the bowl in place and found I still had about 3/4 of an inch of space between it and the wall. Clearance for my fancy angled tile baseboard notion wasn't going to be a problem, so I proceeded with the final installation. Unlike traditional toilets that use a wax ring applied to the bottom of the bowl unit, the Toto uses a heavy plastic trap assembly with a rubber inlet flange for the connection from the bowl to the sewer pipe flange. This greatly simplifies later installation and removal of the bowl since the plastic trap assembly and wax ring stay in place, and the bowl just slides into the rubber seal. Installation of the trap does require the extra step of drilling the tile for a couple of attachment screws, but the hammer drill made quick work of that after a bit of careful measuring and shimming to ensure the trap unit was level and square. Because the sewer pipe flange was flush with the new tile (rather than sticking up), I used a "jumbo" wax sealing ring to ensure a good seal, then attached the trap unit with stainless steel hardware (and applied sealant to the new holes in the tile of course, to ensure no water could get under the tile in the event of a leak at some point). The rest of the toilet assembly went into place very easily, although I'll likely remove it one more time when I do the final application of sealant to the tile floor and then caulk the seam between the bowl and the floor.
 Installing the tile baseboard (5 photos).
Completing the Floor Tile: Summer 2011
After the tile for the floor was grouted and the new toilet installed, I set to work on the baseboard tile work.
Rather than just run a wooden baseboard around the room right at floor level, I surrounded the perimeter of the
room with a 6 inch tall tile baseboard, set at a slight angle. I thought this would provide a nice transition
from the floor to the wall and add a bit of interest to the room. When framing the room, I had added a 6 inch tall
strip of OSB around the perimeter, then covered it with HardiBacker®
at the same time I applied the HardiBacker® to the floor.
The last bit of preparation before actual baseboard installation was to add a 2 inch tall strip of
HardiBacker® along the bottom of the 6 inch strip, which would
provide a little angle base for the tile installation.
Rather than try and mix small batches of thin-set mortar for all this fussy baseboard work, I just used pre-mixed tile mastic. The tiles were carefully measured and cut, using the existing pattern and extending the layout up the walls. I also placed a strip of corrugated cardboard between the floor and the walls when gluing the baseboard tiles in place to ensure there'd be a gap between the floor and the wall to later fill with caulk - trying to fill the gap between floor and wall with grout would just result in cracks, since that joint is certainly going to be prone to some movement in this old house.
 The completed bathroom Slate tile work (3 photos).
After the tile mastic was allowed to cure overnight I softened all the exposed upper edges of the tile with a tile "rub brick", which is essentially a double-sided aluminum oxide sharpening stone, as far as I could tell. It did the job though, and the baseboard was ready for grout. Grout was applied uneventfully in small batches to allow for easy clean up, then the whole thing was allowed to cure a couple days before final caulk and sealer application.
Since the miserable Spring weather had turned to a hot, dry Summer, a few days turned into a few weeks as I spent some time outside trying to catch up on yard work and get the engawa project under way. By mid-July the heat in New England was hitting record highs (over 100° F), so I took a couple days off from outdoor work and finished the bathroom floor while I enjoyed the air conditioning we installed last Summer. I removed the toilet, and applied a two coats of TILELabs® Gloss Sealer & Finish, then re-installed the Toto with a ring plumber's putty between the toilet base and the floor. The Bathroom tile project was finished at last! Unless we get more dangerously hot weather in August, bathroom trim work will likely wait until Fall as I do my best to complete the engawa & tsukimi-dai over the rest of this Summer.
Bathroom Counter & Trim Work: Late Summer 2013
I can hardly believe it, but I apparently didn't get back to bathroom work for a couple years. At some point
I had done some prep work on a few pieces of corner and door trim, however I couldn't install any of that until the floor
was done and the tile baseboard installed to determine vertical trim length. With the tile finally finished, I could do some
corner trim but also needed to get the sink counter installed since that would have trim installed above and below it.
Now that all the pressure treated lumber was out of the shop from the deck projects, I could finally make some progress
on the bathroom sink counter, which would then allow me to get the trim finished at last.
 The bathroom sink counter (6 photos).
The counter was made from a large slab of Eastern White Pine that I had gotten from a local sawmill a while back in exchange for the main trunk of a White Oak I had removed for the driveway in 2008. The slab was just a couple inches narrower than what I had hoped for, but I think I managed to make it work. I ran it through a power thickness planer at a friends workshop, then gave it a light sand with 150 grit before applying the finish. I wanted to give it a durable, waterproof finish so rather then use my usual water-based Minwax® Polycrylic® Protective Finish, I decided to use Sikkens® Cetol® Marine wood finish, that I was familiar with from messing about with boats. Because the Cetol® Marine I had on hand has a light amber tint to it, I only used a single coat of Minwax® 218 Puritan Pine Wood Finish™ stain to provide a good final color match to the rest of the bathroom trim. To ensure the counter wouldn't have any issues with water spills and humidity in the bathroom, I then gave everything a coat of West Systems® 105 Epoxy with 205 Fast Hardener to prevent any water penetration, then started coating the stock with the Cetol® Marine. Cetol® Marine requires at least 24 hours to cure between coats, and it generally requires 3 coats of the amber stuff (which is a satin finish) before applying a couple final coats of Cetol® Marine Gloss top coat. I coated the pieces separately, then screwed and glued the backsplash piece to the counter and installed it on the wall brackets.
While getting the counter top finishes applied, I also got the cabinet built to attach beneath the right side of the counter. I made the cabinet case with a couple of old, wide pine boards that were in the attic, and used some IKEA® "RATIONELL" drawer units to keep things simple. The problem was that the drawer units required more depth than I had in the slab top, so I made a spacer to go between the counter and the cabinet that would provide the extra inch or so of depth I needed for the drawers. The bottom drawer unit uses the entire cabinet front as a drawer front, then there's another shallow drawer inside the cabinet at the top. Basically the thing is just a box with a couple extra pieces of wood needed for the drawer fronts. With the cabinet completed and the counter finished to a nice gloss, the next step was to attach the counter to the wall brackets. I had plowed a couple dados in the bottom of the counter to locate it onto the brackets, so installation was just a matter of sitting the thing in place and putting a couple screws through the brackets to hold it securely. I then laid down a bead of caulk and sat the sink into position, then installed that with a couple lag bolts through the back of the sink and backsplash then into the wall. Plumbing hook up was simple enough, and we finally had our sink installed. Before adding the cabinet to the side, I installed a couple more bits from IKEA® under the counter, both from the "GRUNDTAL" series of kitchen accessories. Just back of the front edge of the counter, I installed the rail to use for a hand towel, and to hang the blow dryer from. Behind the trap on the wall I then installed the wall shelf as a place to stash whatever, and keep it out of sight and off the floor. Both units had to be shortened to the proper length, which meant I had to cut them with a hack saw, pop the threaded insert out of the cut-off piece, then install it into the shortened tube. To hold it in place I just gave the tube a whack with a hammer and punch in a couple spots and everything seemed fine (and the threaded insert didn't spin when screwing in the ends, so it shouldn't go anywhere).
Finishing the Bathroom Trim: Fall 2013
Back in 2009 when I'd taken care of the tongue & groove panelling and starting working on the shower trim (see above), I'd also milled
most of the stock for the rest of the bathroom trim, as well as the funky piece that I'd need for the right side of the shower stall. I'd
had a few years to think about how I was going to deal with trimming that thing, and I think I'd put it off long enough...
 Finishing the trim (4 photos).
The trouble was that I installed the shower stall so it would be plumb and level, and while the wall on the left was new so trimming that was no problem, the wall on the right was original, and certainly not plumb. The top of the shower was flush with the wall, but the bottom was proud of the bottom of the wall by over an inch. I was planning to trim the shower with 1-1/2" wide by 1-1/4" thick trim, which meant I'd end up with less than a 1/4" of material for the trim after I removed material from the back of the trim so it would fit over the shower edge and still hit the wall. I'd need to cut a tapered depth rabbet in the 1-1/4" thick stock that was about 1" deep at the bottom, and tapered to no rabbet at all at the other end of the 6 foot long trim piece. The width didn't change over the length of the cut, so that would help a little when it came time to make the thing. Fun.
Rather than try and set up some long funky jig to cut the tapered rabbet, I used my Stanley No. 78 rabbet plane and did the whole thing by hand. The wall has a little curve to it, so I couldn't just measure top and bottom and have the thing fit - that would be too easy. I needed to scribe the profile onto the trim, so I began by cutting off a sharpened pencil so it was about 3/4" long, and mounted it in the end of a thin piece of scrap wood so I could use it to scribe the profile onto the trim piece while holding the trim piece against the wall next to the shower. Then I placed the wood on the bench and scribed a new line with a compass that was offset from the first line by 1/2 the diameter of the pencil. I set the fence on the 78 to the width of the rabbet (but no depth stop since that changed over the length), and started making shavings. It only took about 10 minutes to get the thing cut to perfection (with a couple trips to test fit it then remove material as needed), so I'm not sure why I'd been dreading trying to make that piece for so long. I can't imagine what a mess it would have been to try and cut that with the router table - glad I didn't attempt it.
Trim finishing and installation was pretty straight-forward once that piece was made. All the pieces got a coat of primer sealer on the backs, then after a little clean up with some 150 grit sandpaper, they were stained and finished with multiple coats of the usual semi-gloss poly, and a final coat of high-gloss poly prior to installation. Everything was tacked into place with the brad nailer, except for the shower trim pieces. Those were installed with some counter-sunk #6 stainless-steel wood screws, using a right-angle screwdriver to get into the corners between the glass shower walls and the trim. The screw holes were plugged and stained, while all the other brad holes were filled with a little putty. Finally, everything was given one last top coat of gloss poly, and the bathroom trim was finished at last!
The Bathroom Door: Fall 2013
With the trim finished, the only thing left to do was make the bathroom door, which was going to be a fair amount of work to pull off what
I'd been hoping to accomplish. Because the bathroom is next to the kitchen and close to the living room, the entire bathroom had been
built with wide, off-set stud, fully insulated walls to try and make the room sound-proof for privacy. The door would be tricky, since
it's a pocket door which would be challenging to weatherstrip and seal to prevent any sound getting out of the room. The original plan was
to install brush weatherstripping along the top of the door opening, as well as on the in-the-pocket edge of the door toward the inside of
the room. The door-edge brush would rub along the interior of the pocket opening, then land against the door casing to seal that edge. The
top would seal as the door closed against the brush, and the bottom would have a wood rail that rides in a track in the floor to seal that off.
Before going into he construction of the door, I did some test fitting of the plain solid-core door I was going to use and it became clear
the brushes were going to be too stiff to do the job. I'd need to come up with something else, so I tried to figure out a solution while
getting the door built.
 The door parts (4 photos).
The door itself would be a bit of a combination of an amado door and a fusuma door.
Fusuma doors are generally a lattice framework covered with opaque paper and a black lacquered frame, and used
to separate interior rooms. Amado are solid wood doors with a natural finished, and usually found as exterior
doors or window shudders. I built an amado door, but it's for interior use so it really isn't an
amado door. Since it isn't a room divider and built of solid wood, it really isn't a fusuma
door either. Whatever you want to call it, it's made with a solid-core, Birch veneered, 34" by 80" door, hung from a
Johnson Hardware®
![]() 100 series track and rollers.
100 series track and rollers.
The door would have nine horizontal strips applied to each side to simulate a wood frame, with full length vertical strips on each edge of the faces and the exposed edge that's visible when the door is in the pocket. I milled a very small groove down the center of the door as well. to give the illusion that the door was made of 2 wide panels, rather than a veneered slab. The entire thing would get the same stain as the rest of the bathroom trim (see above), with brushed Nickel hardware inside, and dark Bronze hardware on the outside. One of the worries I had while planning the door was how to apply multiple coast of stain and clear coat with all those interior edges and corners that would result from the framing strips. Rather than try and avoid piling up stain along all those corners, I decided to apply the finish to all the parts prior to assembly. That meant I'd need to do a lot of masking as well, to ensure I left some unfinished wood on the door where ever I intended to glue the strips, as well as leave the backs of all the strips unfinished.
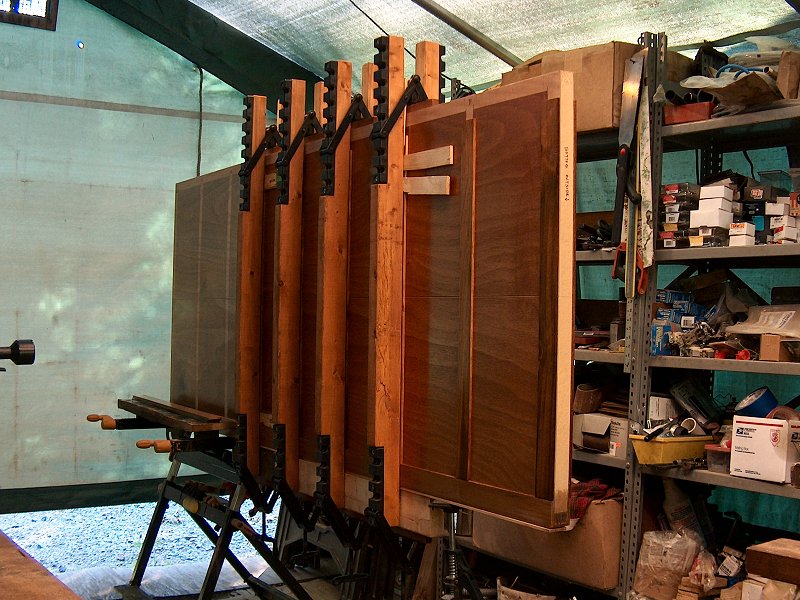 Assembling the door (3 photos).
I milled all the strips by cutting up a few scrap Douglas Fir two by fours I'd salvaged from other parts of the renovation project (I never throw away wood, since I figure I'll always be able to mill it down for trim or something or other). Then ran everything through the thickness planer to provide a fair stack of 1-3/4" wide stock that was all about 1/4" thick. Everything got sanded with a bit of 150 grit paper, and after a lot of masking tape applied to the door for later glue-up, I began applying stain and topcoats.
Assembling all the pieces took a few days, since I only have so many clamps and had to work in stages to allow the glue to cure from one set before moving to the next set. I began by gluing a wide strip to the long edge that would be visible in the pocket when the door is open. The next day I hand planed off the excess from both sides then layed the door on the bench and glued the long face strips to each side, along one edge of the door. These were applied one at a time to ensure they were straight and even, using a load of spring clamps with a very narrow piece of wood under each one so they didn't mark up the face of the strip. These were then carefully planed flush with the edge strip and I was ready to start applying the horizontal strips. The first couple were simple, since I could use the spring clamps again to do the top and bottom strips. I used care to ensure I had a straight, even edge, then planed off the extra overhang top and bottom after the glue had cured.
 The finished bathroom door (3 photos).
For the strips spread across the faces of the door, I did a lot of careful measuring and cut some little spacer blocks of wood
to ensure the strips would all be evenly spaced along the door. I then clamped one end of the door in clamping work table (the Craftsman
version of a "Workmate"), and support the other end on a stack of wood blocks. That allowed me to get to all the edges and face
of half the door with plenty of room to clamp the horizontal pieces in place. To clamp the horizontal pieces in place, I used a set of four
WoodRiver panel clamps that I picked up years ago from
Woodcraft®
![]() . For normal panel clamping I usually just use
pipe clamps since these WoodRiver clamps are kind of fussy, but to get these door strips applied with good pressure all the way across, these
clamps were perfect. I applied glue to each piece, then stuck it in place using the spacer blocks to get it in the correct position. I'd then
slide one of the wood river clamps over it and snug it up while checking both sides to make sure nothing moved out of position. After each piece
was securely clamped, I'd move the spacer blocks and do the next pair. After letting things cure overnight, I then flipped the door around and
finished the remaining pieces.
. For normal panel clamping I usually just use
pipe clamps since these WoodRiver clamps are kind of fussy, but to get these door strips applied with good pressure all the way across, these
clamps were perfect. I applied glue to each piece, then stuck it in place using the spacer blocks to get it in the correct position. I'd then
slide one of the wood river clamps over it and snug it up while checking both sides to make sure nothing moved out of position. After each piece
was securely clamped, I'd move the spacer blocks and do the next pair. After letting things cure overnight, I then flipped the door around and
finished the remaining pieces.
With the door assembled, I still needed to figure a way to add some weatherstripping to it to help keep any bathroom sounds in the bathroom. As I said above, the brushes were too stiff, and I'd tried a couple other tack-on weatherstrips of rubber and foam that also didn't work too well. I ended up tacking on a couple strips of felt weatherstrip - one wide strip that contacts the door frame when the door is fully closed, and a narrow strip on top of it to provide a little more overall stiffness. I tacked it all in place with small copper nails, then installed the hardware. Installation was simple - the door sits in a track at the bottom, and the rollers on the top snap into place in their brackets then get adjusted with a little wrench that comes with the rollers. The bathroom was finally finished! Well, as finished as it can be for now... I'd like to build a small merchant style tansu to sit in the corner under the towel bar, but that will wait until the rest of the interior is put together.
Bathroom Maintenance & Repairs
The bathroom has held up quite well since it was finished in 2013. The lighting was changed from compact florescents (which never worked very well with the dimmer for the two recessed ceiling lights) to LED R-30 floods in the ceiling, and little E12 Candelabra LEDs in the lights on either side of the medicine cabinet. The shower light is still a compact florescent R-30 with the GX24 4-pin base, but I managed to find a LED replacement for that odd base, so that'll get installed whenever the compact florescent finally burns out. The first real problem with the bathroom was found in early 2016, which was an issue with the Brizo® "TempAssure" series 60 shower valve…
Shower Valve Re-build: Spring 2016
We first noticed something was wrong when a couple of minor cracks showed up in the grout for the floor tiles. Later we also noticed the
section of OSB subfloor that extended into the hall under the door was damp, and had starting to swell up a little. Water was leaking into the
floor somewhere, and it appeared that it was getting under the DITRA membrane under the tile, since it was causing the OSB to swell
(see above for more information about the DITRA membrane). The only possible way for moisture to
get under the DITRA would be to leak from the toilet flange, or the shower fixtures. Since it was coming out the door way, I pulled the
toilet first, but everything there was bone dry. It had to be the shower (and I was really hoping it wasn't the shower drain flange,
as I certainly didn't want to pull the entire shower out of there to check). The future "walk-in closet" room behind the shower
was still unfinished, and the insulated shower wall was covered with a stapled-up, white poly tarp. I moved piles of stuff around in that room,
pulled the wall cover, and sure enough — there was damp insulation under the shower valve. I could see water dripping from the valve to the
bottom of the wall framing, then seeping under the shower to eventually show up at the doorway.
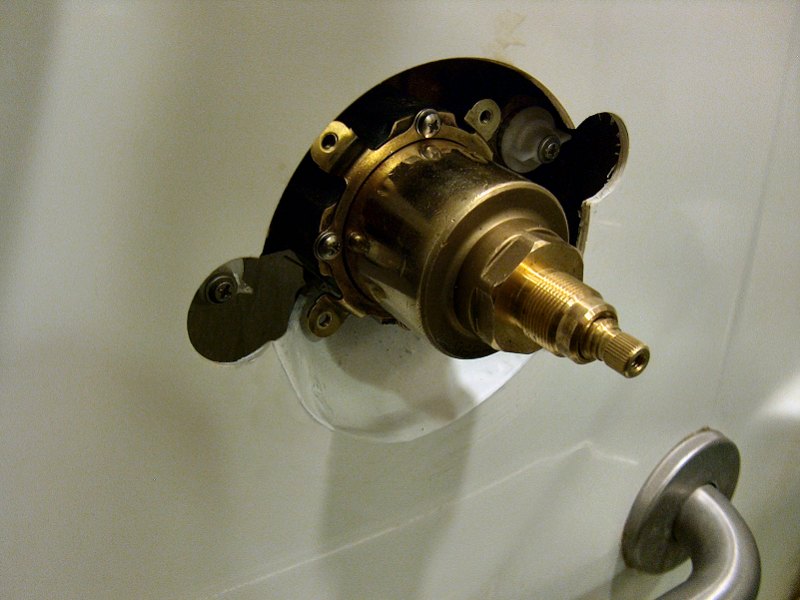 The rebuilt shower valve (2 photos).
I turned off the water supply to the shower, then went and asked my neighbor the plumber for advice on what the problem may be. He immediately said it was most likely the cartridge "O-ring". He said they generally wear out every few years and need to be replaced, so this leak was fairly typical. Okay then. The Brizo® stuff all came with a lifetime warranty, so I got on the phone with Delta to get a new O-ring. Well, unfortunately it wasn't that simple… Apparently Delta had updated the valve's cartridge, so I was going to need a new cartridge along with the O-ring, since the new O-ring would not work with my old cartridge. They sent along the new RP47201 cartridge and O-ring, and even supplied a RP54315-BN "1900 Conversion Trim Kit" to fit over the new cartridge, all at no cost. I disassembled the old valve then installed the new O-ring and cartridge without any problems (and even applied some G-man® PST-841 O-ring lubricant to the new O-ring to try and help it last longer).
Before I put the trim and valve handle back on the new cartridge, I got to thinkin' about how I could avoid this issue in the future. If the O-ring fails regularly, I didn't want to wait until I noticed a wet floor or ruined wall behind the shower when the house is finished to find out there's a problem again. I came up with a solution that I believe will work pretty well: I added a quarter-sphere "cup" that I fabricated from fiberglass mat and poly resin, then bonded it to the bottom edge of the shower valve opening in the fiberglass shower wall. The cup extends beneath the shower valve where the cartridge is fitted. If water ever starts to leak past the O-ring again, the cup will catch any drips and prevent water from dripping onto the floor. When I re-attached the valve trim, I also filed a little opening in the bottom of the trim ring (with a tiny 1/8-inch round file) so if water drips into the cup, it'll then run down the shower wall from the trim ring — a sure sign the O-ring needs replacing. I also bought a couple extra O-rings and hung them on the side of the valve with a wire tie, so when this happens again, I'll have them available for a quick fix.
I was very proud of the solution I'd come up with to prevent water damage in the future. I called it the "Kester Wall Saver", and thought it might be possible to have something like this manufactured for sale. A couple simple, blow-molded plastic pieces, in 6-inch and 8-inch diameters and a 6-inch half-square would work for most shower valves. Add a 1/2-inch lip to the bottom, and it could be applied to the shower wall under the trim with double-sided foam tape. The addition of a little 1/2-inch by 2-inch extension at the top of the cup could then be attached to the bottom/back of the shower valve with a wire tie. Perfect! I could see a little packs of "Kester Wall Saver" kits as a point-of-sale item at plumbing supply shops and home improvement stores for 10 or 12 bucks. We were gonna be rich! Then I talked to my neighbor the plumber about it, and showed him a picture of what I had done. He said he'd never use such a thing. Why not!? If shower valve O-rings are known to fail regularly, wouldn't this save folks a ton of money and headaches on repairs? He said my little "Wall Saver" would put three or four contractors he regularly works with out of business — they all make a living doing tile work, drywall and plaster work, re-painting, and his own plumbing work — that's all based on a few of these shower valve O-rings failing every year and requiring his customers to hire all these folks for repairs. Sad but true, he's probably right that no professional plumber would ever install a "Kester Wall Saver" and lose all that lucrative repeat business.
Oh well. With the shower back together, I did a little maintenance on the tile floor to get the bathroom back in shape. Once the water seepage under the floor was stopped, the floor dried out fine and all the swelling went away (thank you radiant floor heat). I then used a little dab of DAP® ALEX PLUS® "All Purpose Acrylic Latex Caulk Plus Silicone" in "Slate Grey" to fill in the little cracks in the grout (which was a perfect match to the grout color), then applied a fresh coat of tiler sealer to make the floor look like new again. We'll see how long the new 0-ring lasts, and if the "Kester Wall Saver" performs as expected.
Toto® Washlet® Replacement: Winter 2025/26
A few years ago we noticed the heated seat for our Toto® S300 Washlet® unit stopped
working, so I removed the thing and opened it up to find the wiring from the seat's main unit had broken where it connected to the lower seat near
the hinge. I managed to get enough access to the wiring to replace the broken section, but also found there had been some corrosion build up around
the spray wand inside the housing, and the oscillating feature for the sprayer was no longer working. I got the inside of the thing cleaned up well
enough, and everything else still seemed to work fine, but after re-assembly I found I had gotten the "pre-cleaning" spray hose
for the wand out of position – which meant that sometimes when sitting down one would get a little surprise splash of un-heated water right
on um… "the seventh planet of our solar system". We got used to that, but it was a problem when we had guests in that we'd
need to turn off the unit before they could use the bathroom. The homeowner had finally had enough of that surprise splash, and I was instructed to
get a new toilet seat for Christmas of 2025.
 The toilet gets a new S7A Washlet® (6 photos).
After a lot of discussion comparing the various Washlet® units, we finally decided to just go ahead and splurge on Toto's® top-of-the-line seat, and purchased the model S7A with all the bells and whistles. This thing has many nice features, including night lights for inside the bowl and around the outside of the seat, auto open & close for the seat and lid, and even an optional auto-flush unit for totally hands free operation. The thing I was most interested in (and which prevented me from getting a replacement back when our S300 initially failed years ago) was that their wall-mounted remote control panel would be able to get mounted where the S300 panel had been, and cover the old mounting holes in the wall panelling. All the replacements back when the thing first failed had narrow, vertical remotes that I thought would not look right with our panelling, and certainly have left at least one of the old screw holes exposed. Their new stuff now has larger, horizontal remotes so mounting that thing should look fine (although it's white, rather than beige like the old one, which was a close match to our Light Almond wall plates). I contacted Toto® to find out which of their auto-flush kits would work with our old Nexus 2-piece toilet, and they responded that the toilet would need to be replaced (of course) because the fill valve tube is too small to hold an auto-flush unit. After a little online research I found that they had an upgraded tank drain valve assembly available (Toto® part THU443.10b-a) to replace the old "flapper" drain thing (that I've already had to put a new flapper on twice), and the fill tube on the upgraded unit holds the auto-flush motor just fine. I ordered the upgraded drain unit, as well as the THU857 auto-flush kit, and once everything arrived I got the installation work underway.
To install the new drain valve, I needed to remove the tank from the bowl. It came off easily enough, and the drain valve replacement was very simple (just one big nut that gets hand tightened). If I ever need to get in there again, I'll need to also get a new tank bowl gasket, part 9BU024E, although I managed to get the old one back in place despite it being very fragile. The tank was then re-attached to the bowl, and the old S300 baseplate assembly was replaced with the new unit for the S7A. With that, the new washlet just slides into place and snaps to the baseplate, and that's it. Programming the new washlet takes a little study of the owner's manual, but it's all been set-up now, and even has personalized settings for up to four users. It's a little strange to just walk in the bathroom and have the toilet opens up its lid and light up so you can see where the thing is. After one is finished, it's simply a matter of standing up and walking away – the toilet closes the lid, does a "cleaning spray" of the bowl, and then flushes itself. We've actually starting calling it EVE (from WALL-E), since it kinda looks like that robot when it's sitting there with the lid closed.
↑
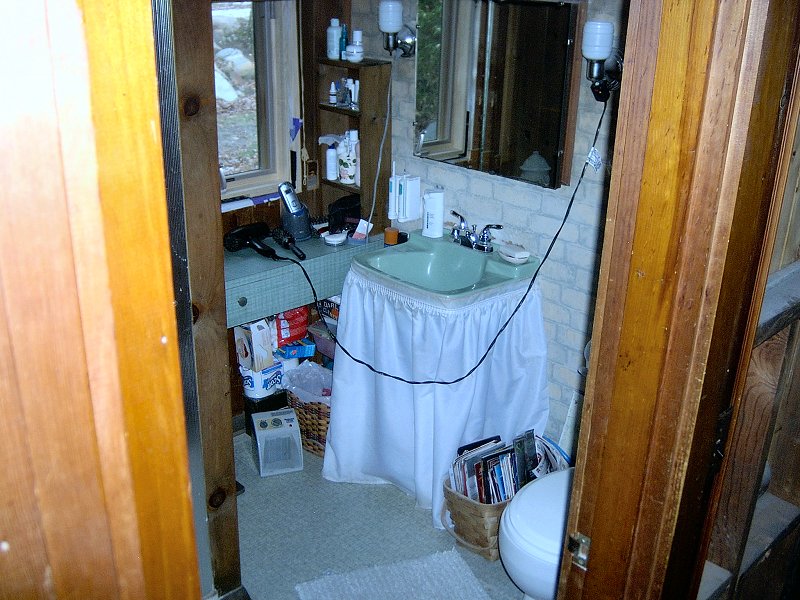
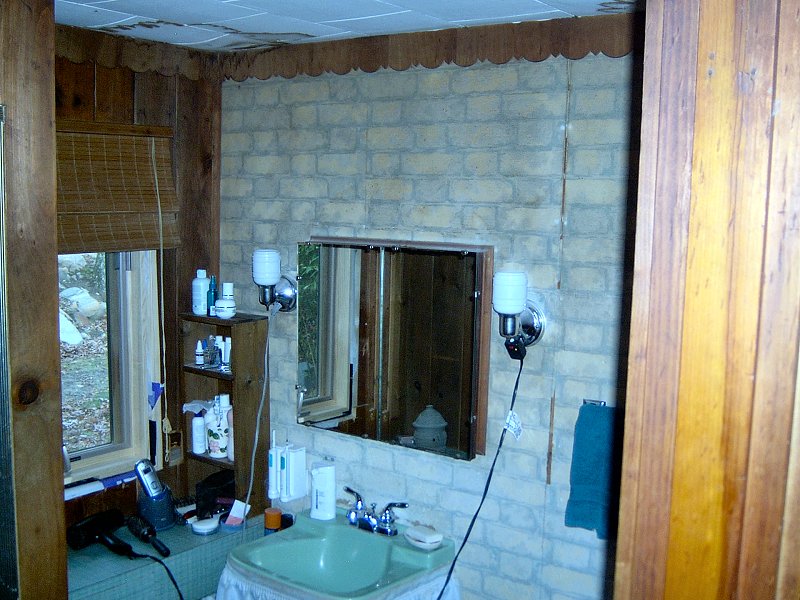
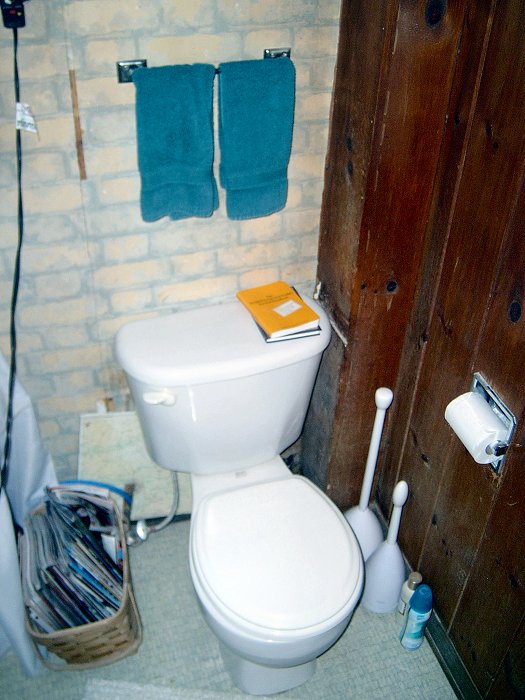
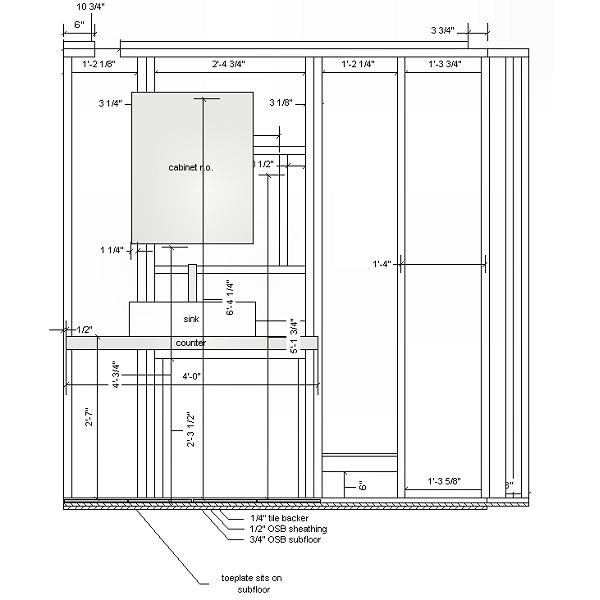
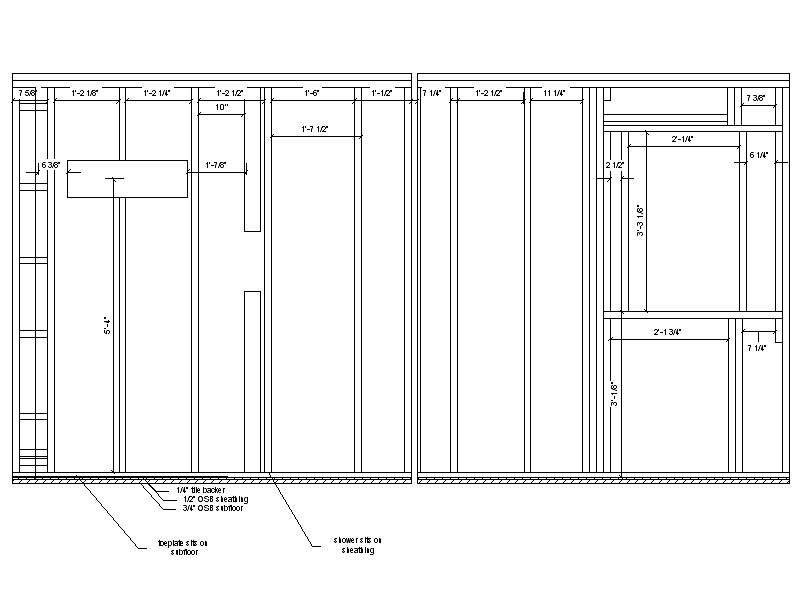
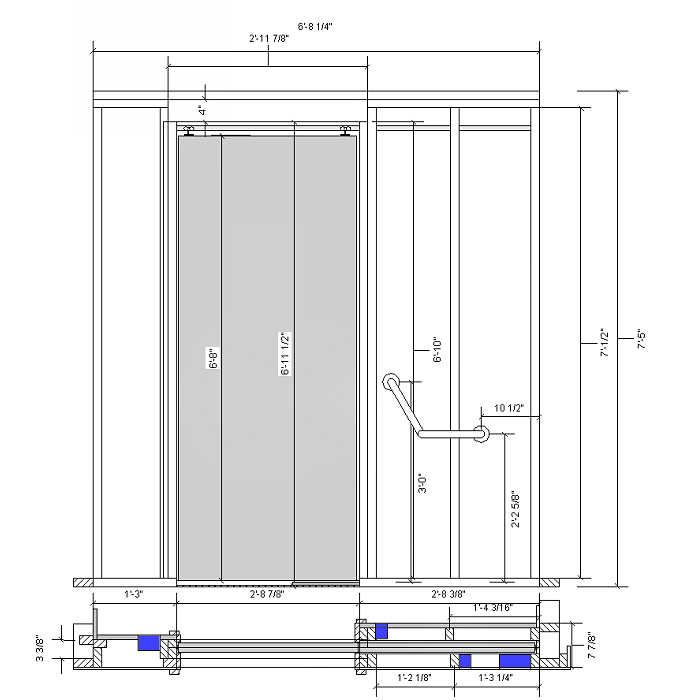
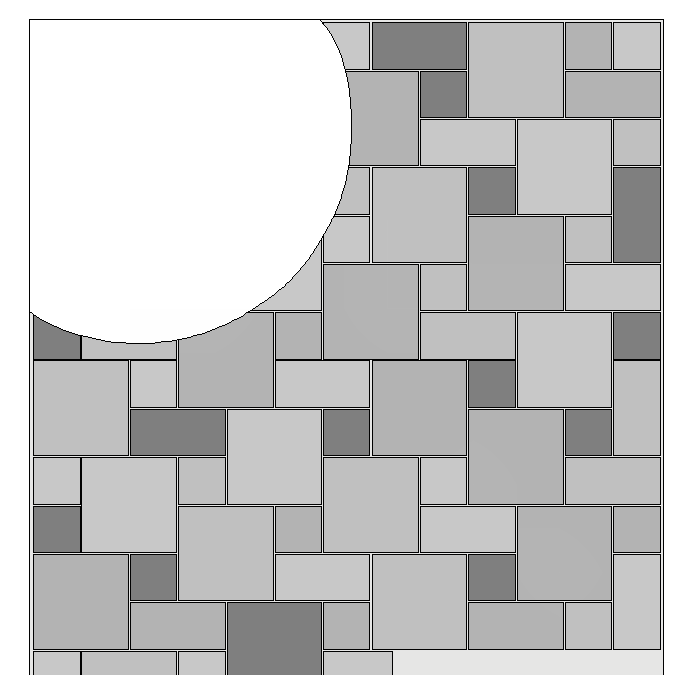
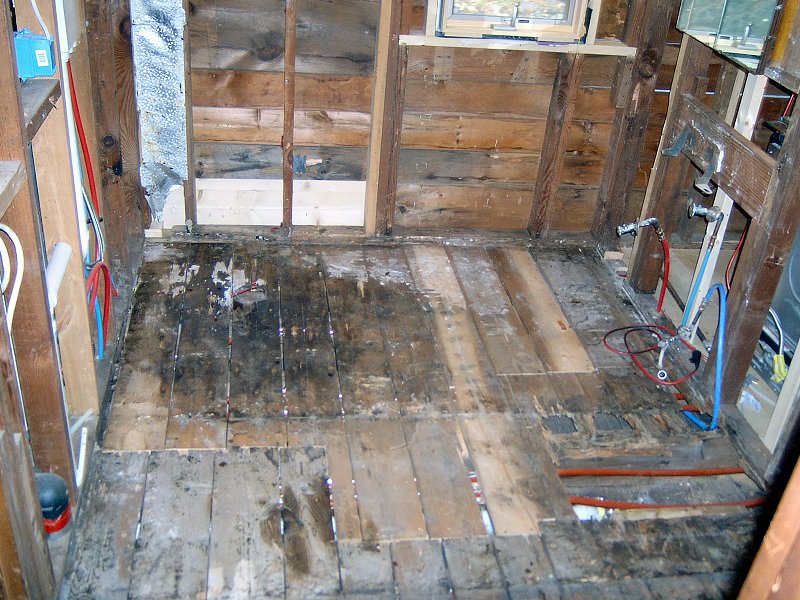
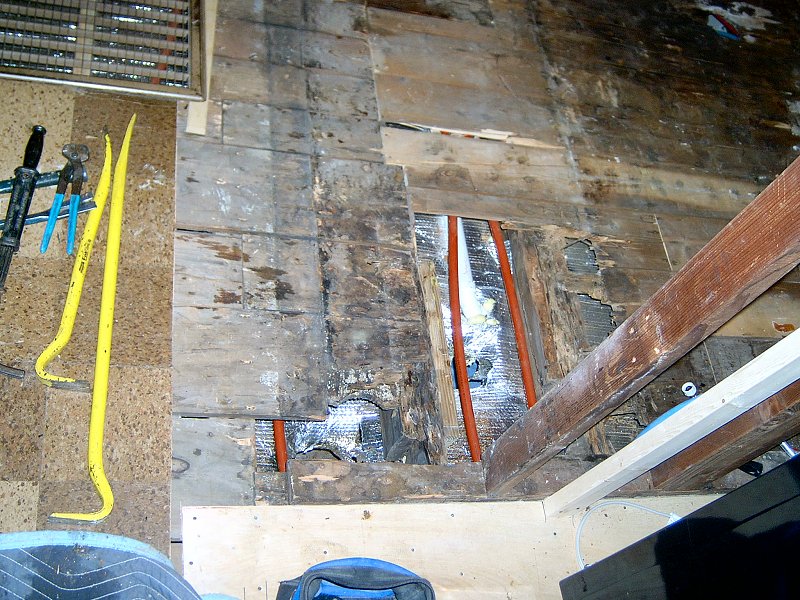
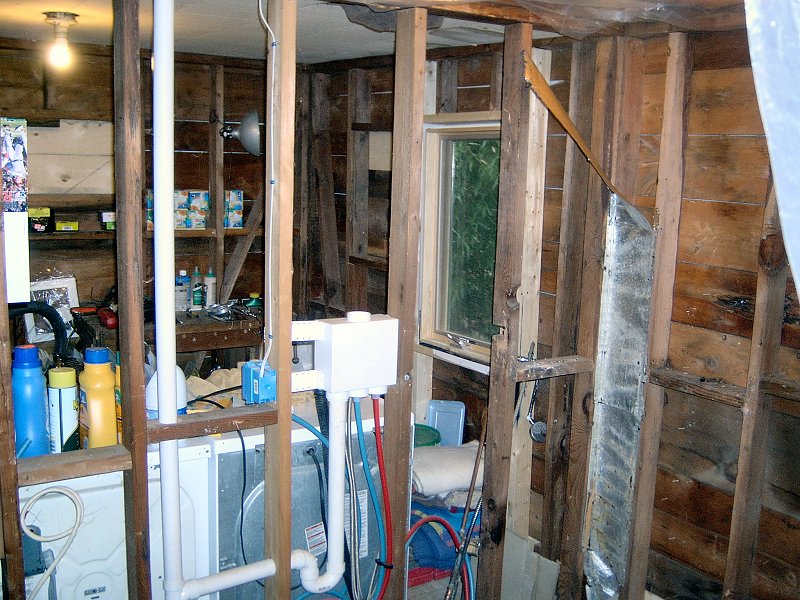
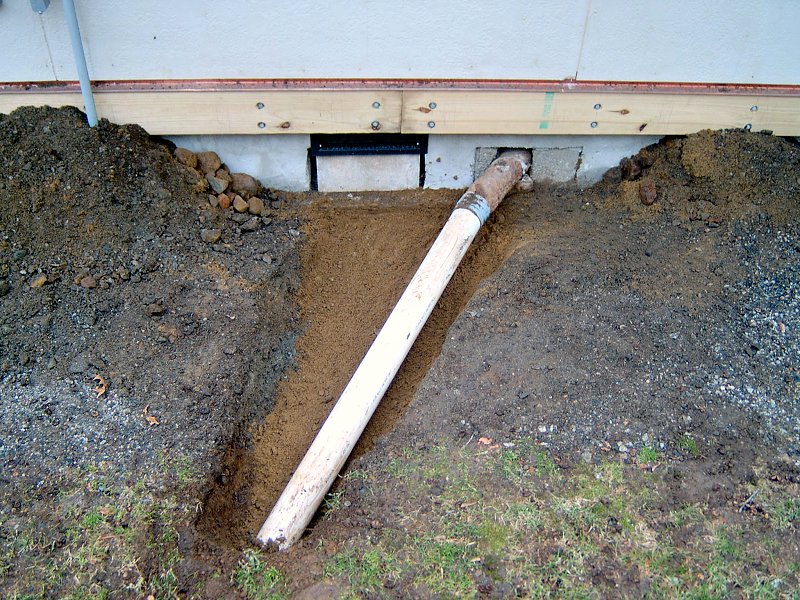
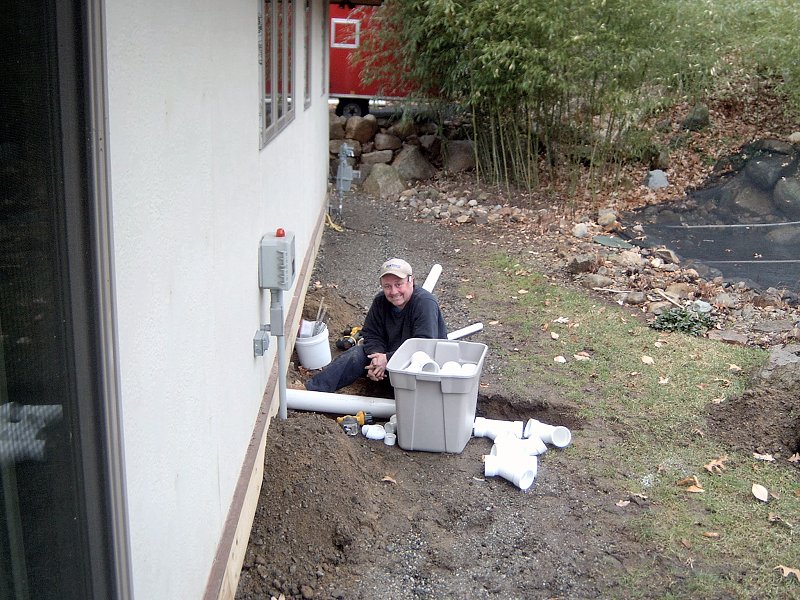
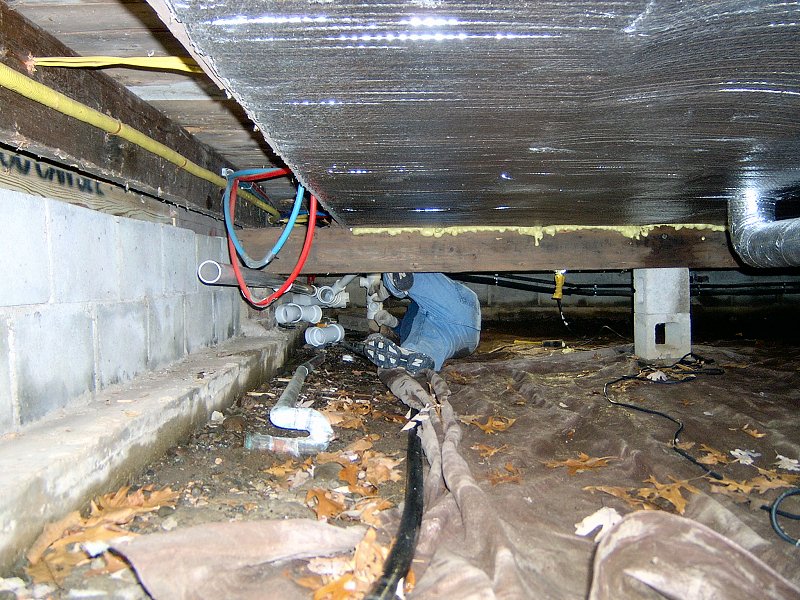
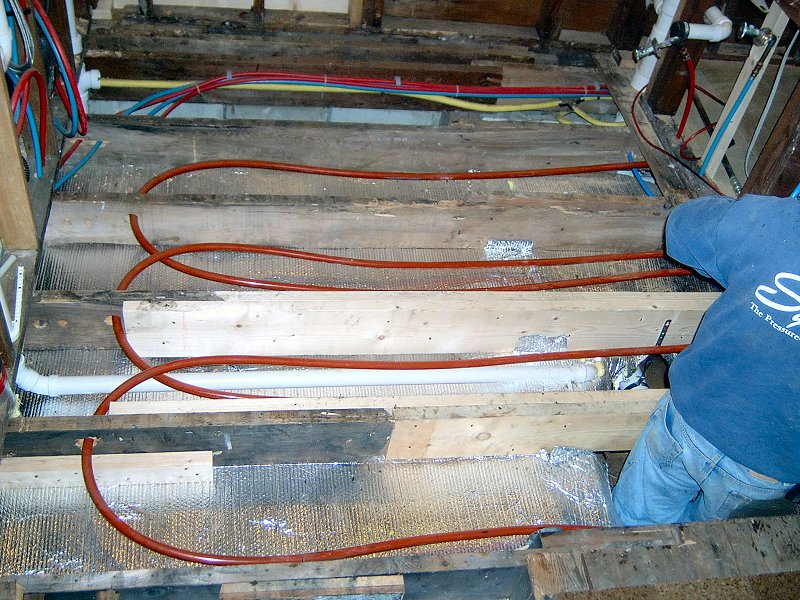
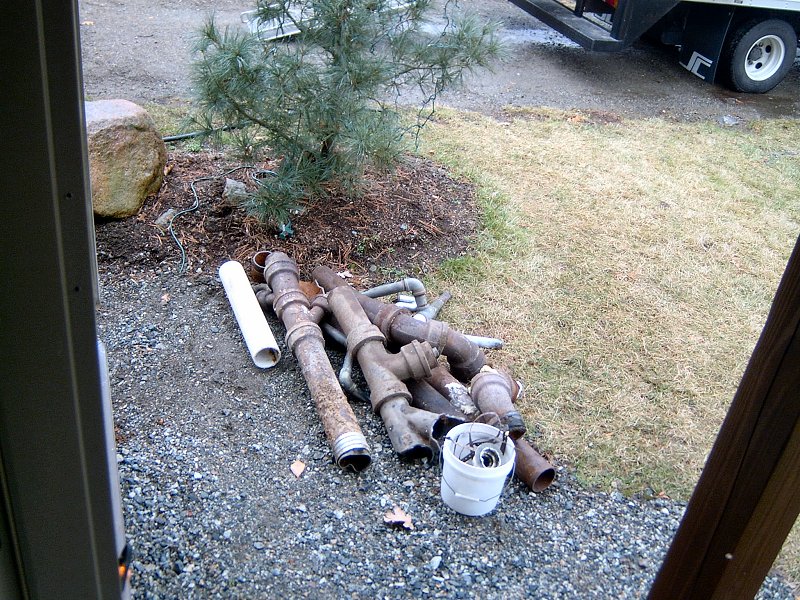
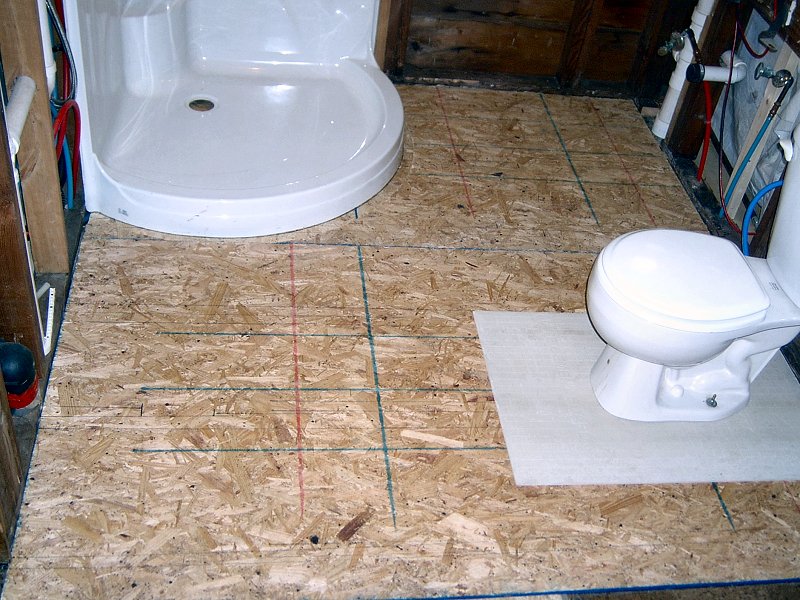
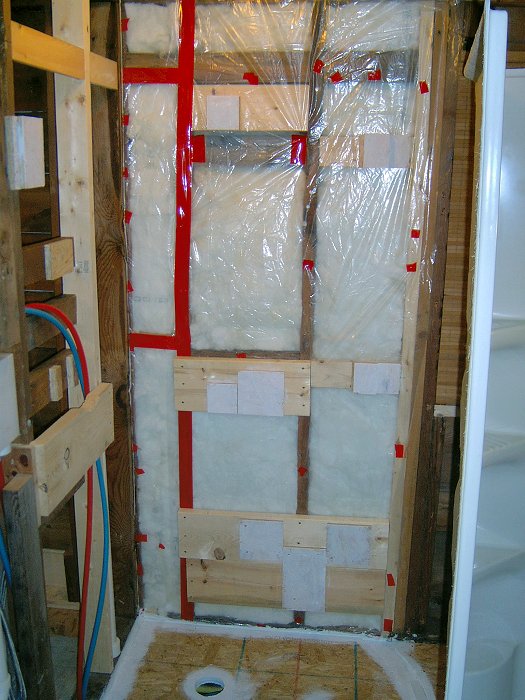
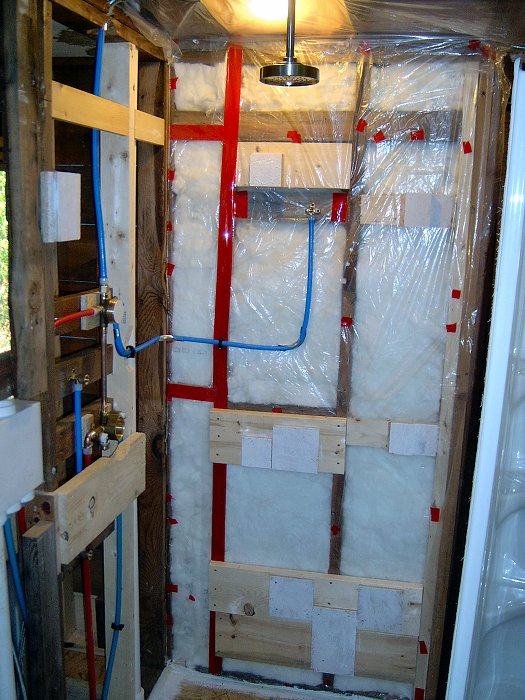
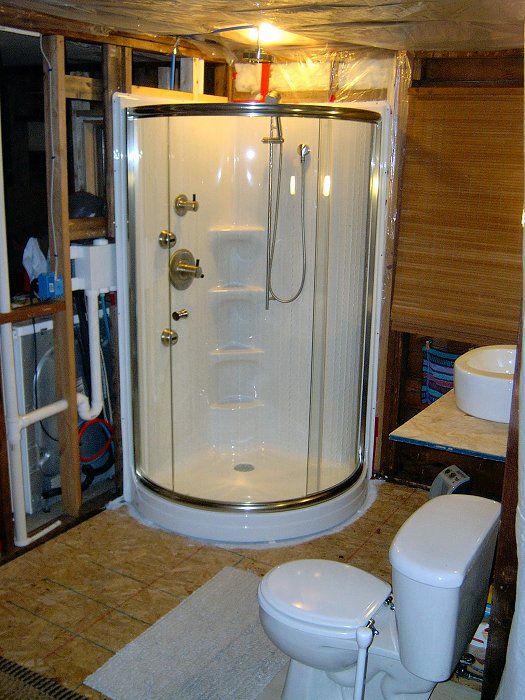
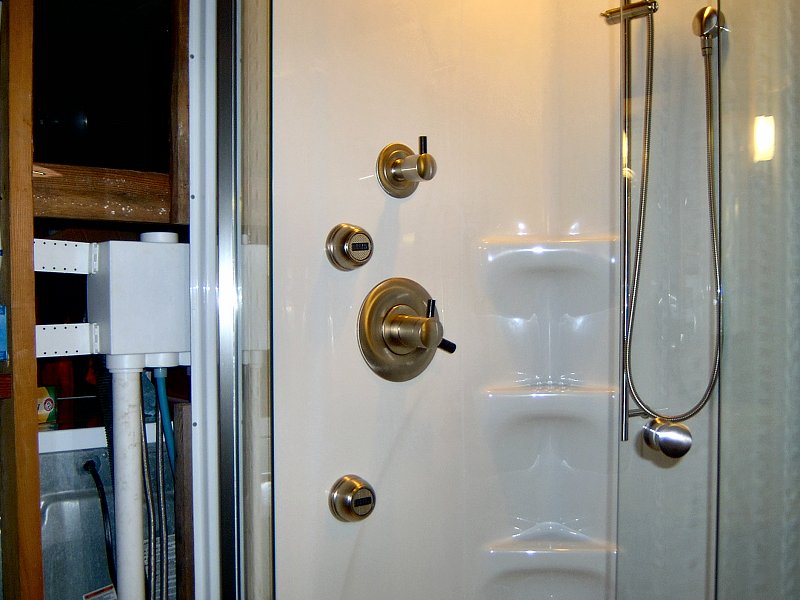
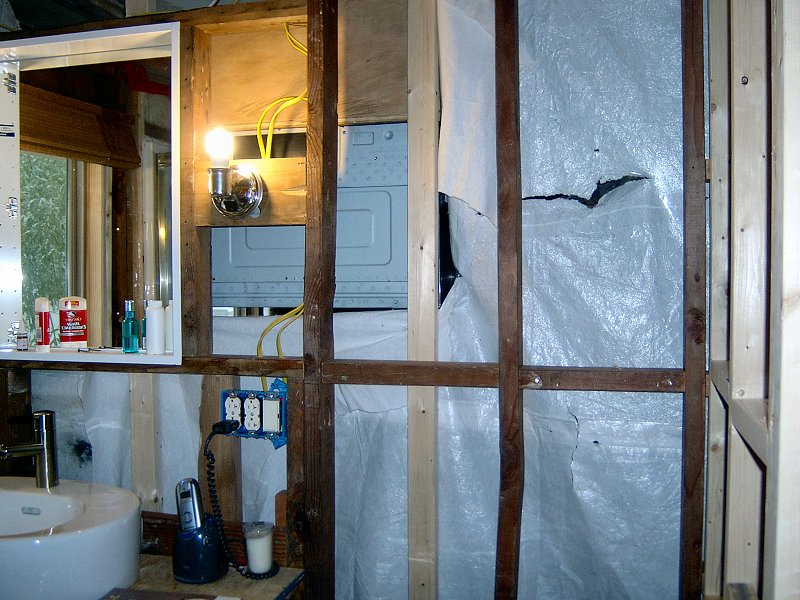
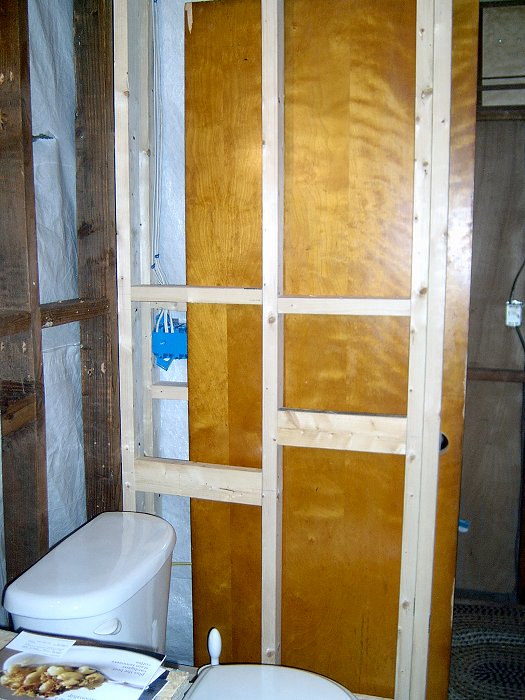
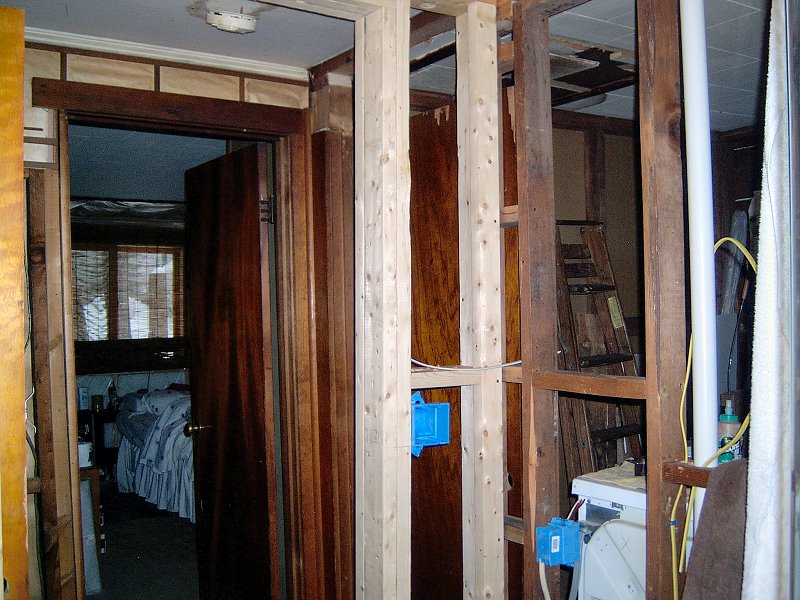
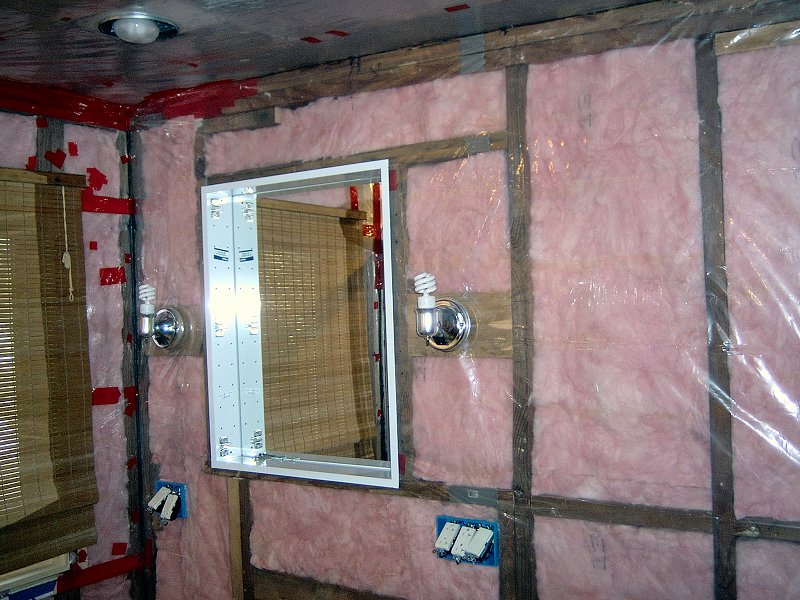
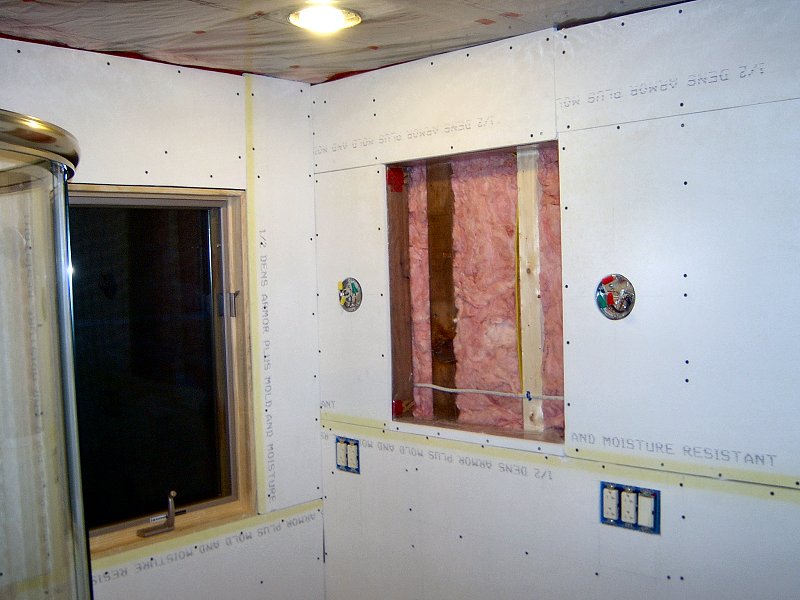
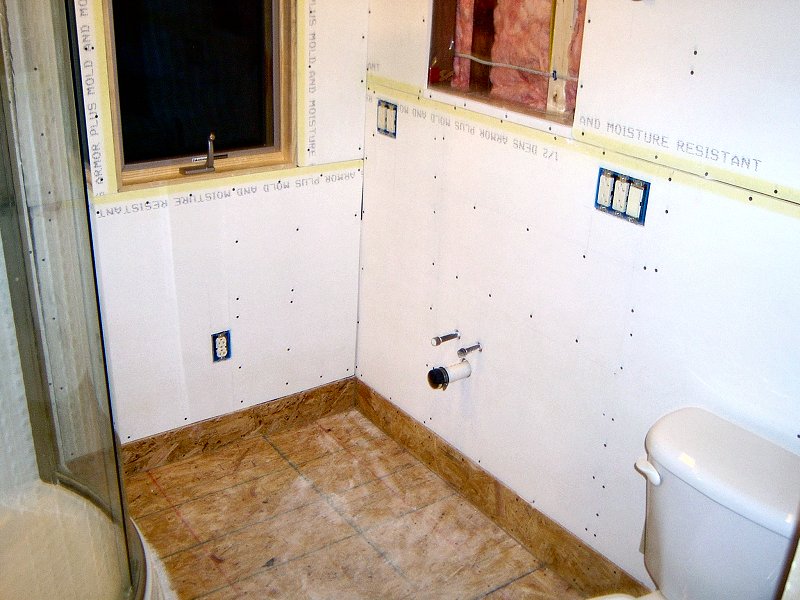
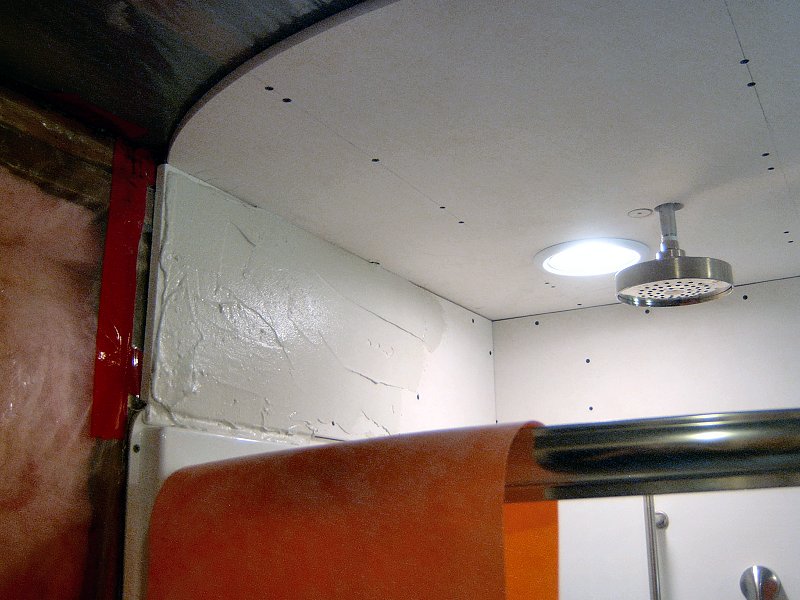
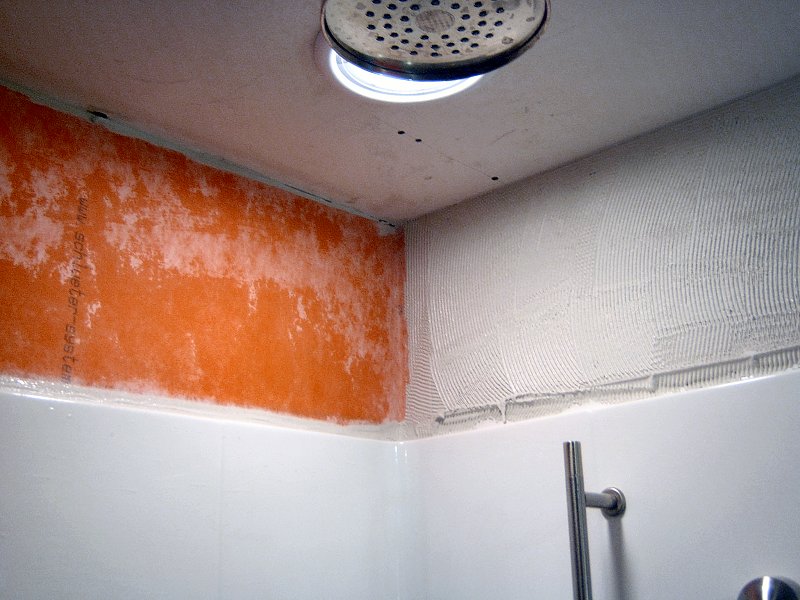
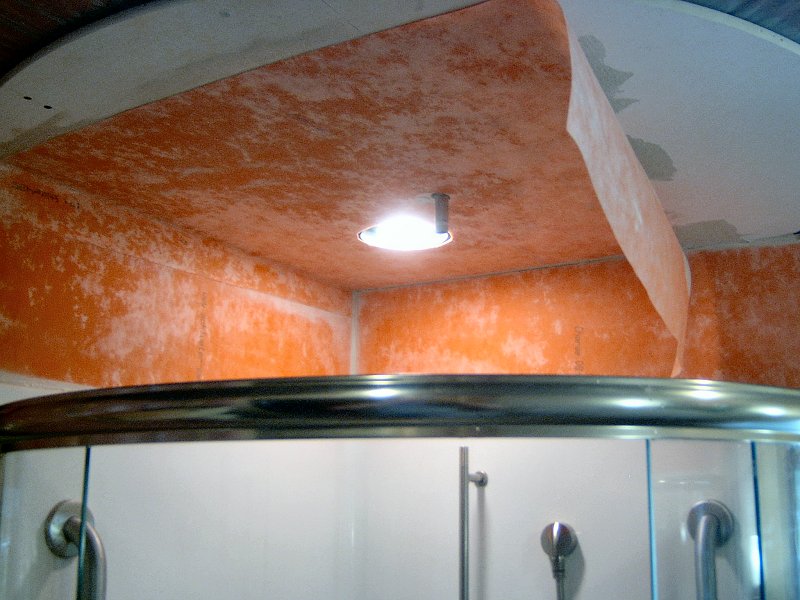
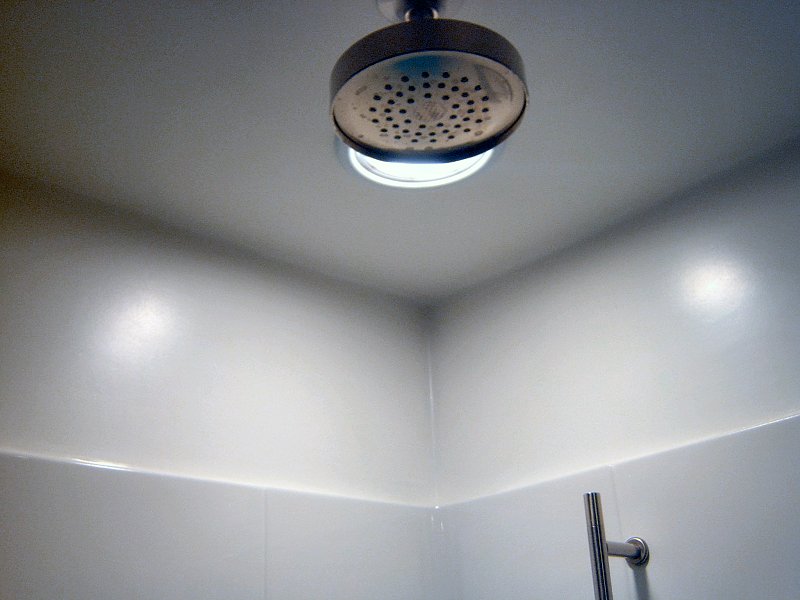
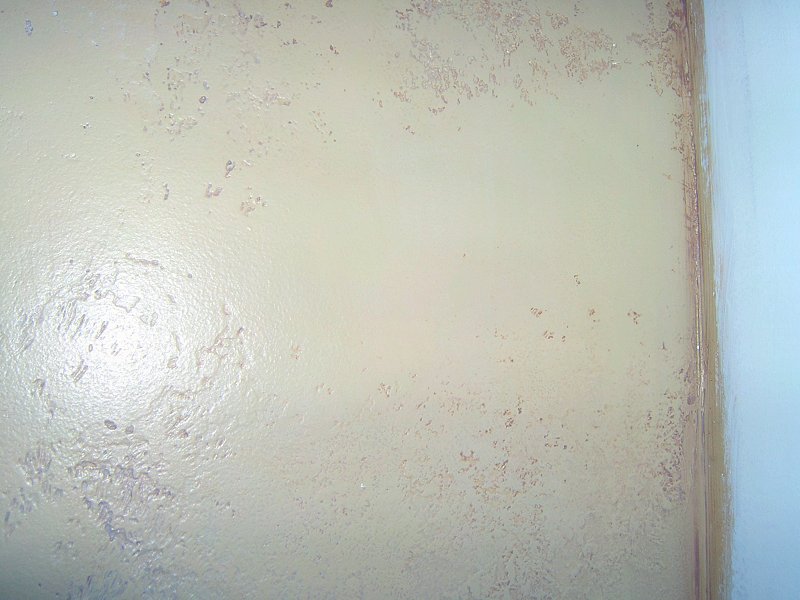
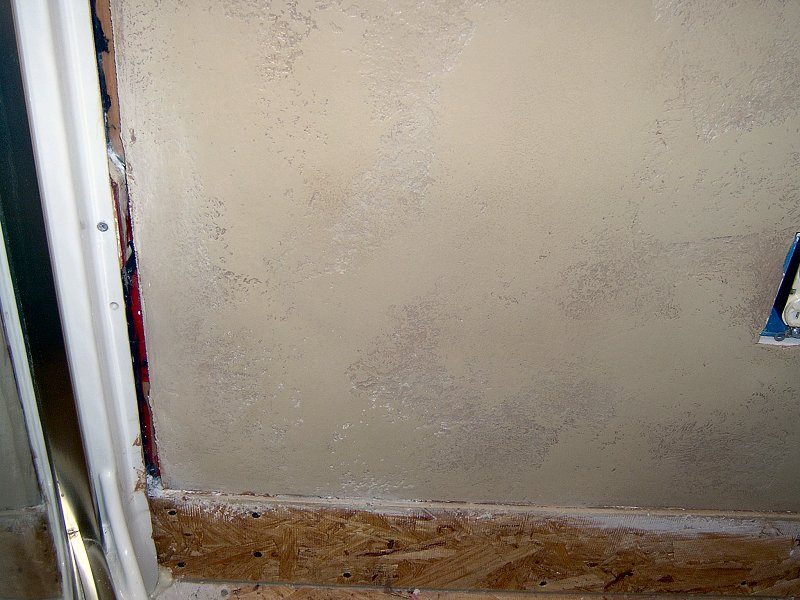
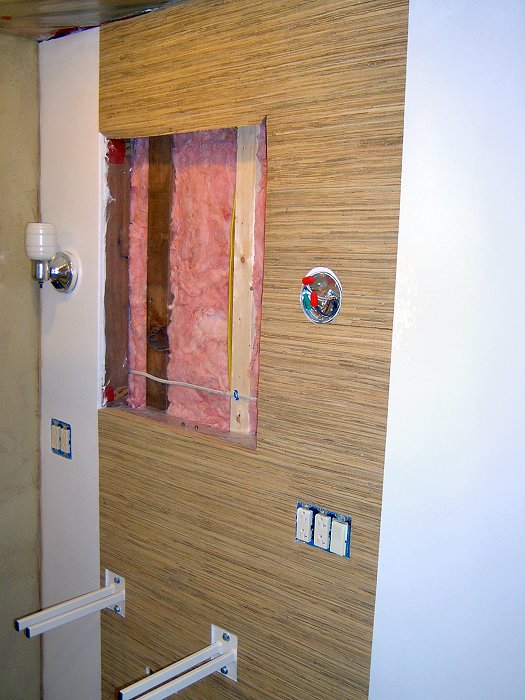
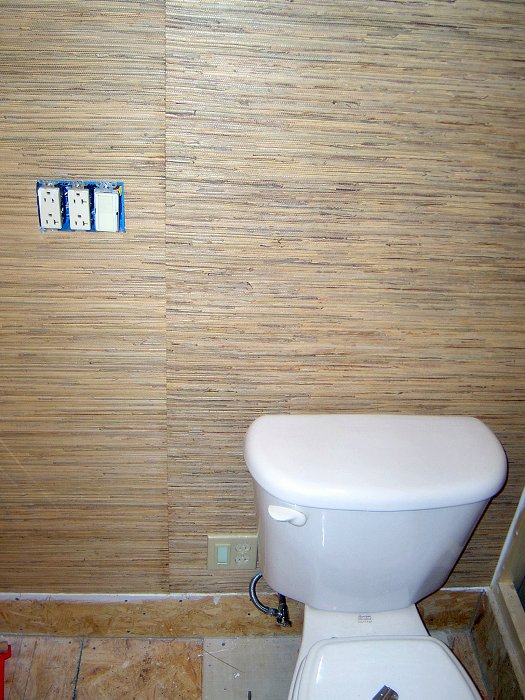
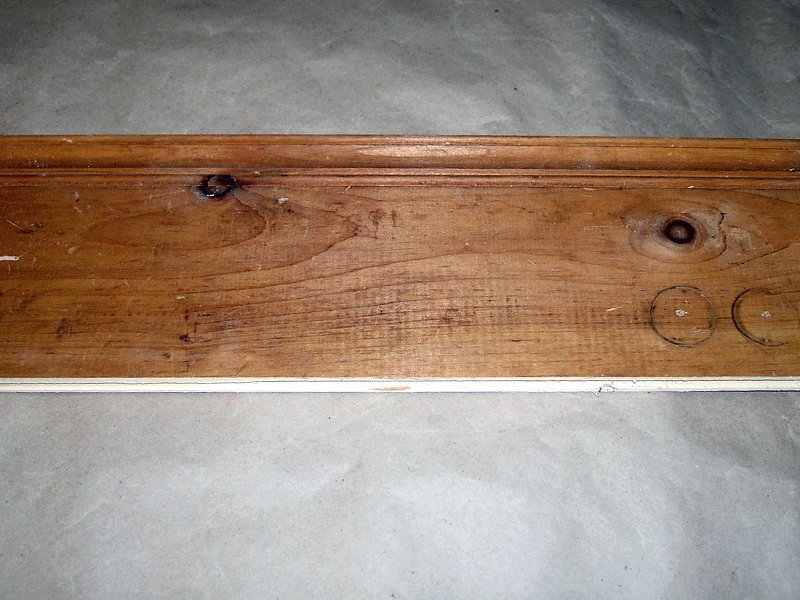
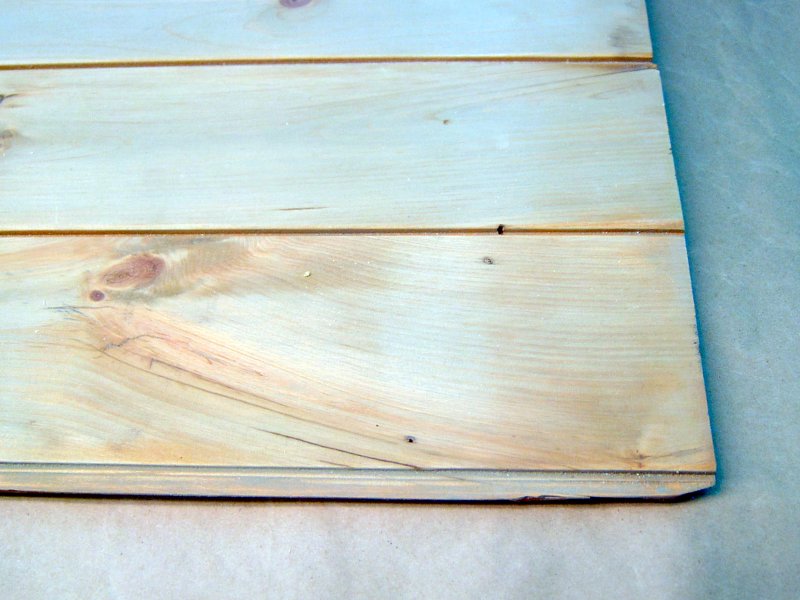
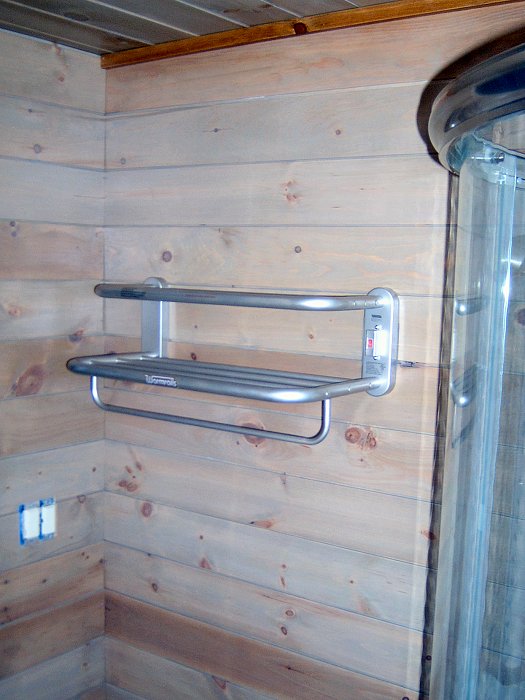
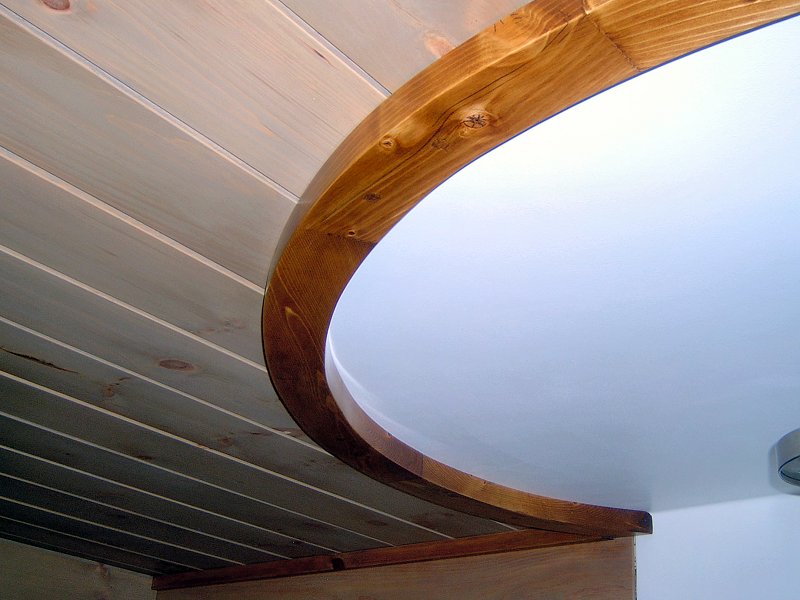
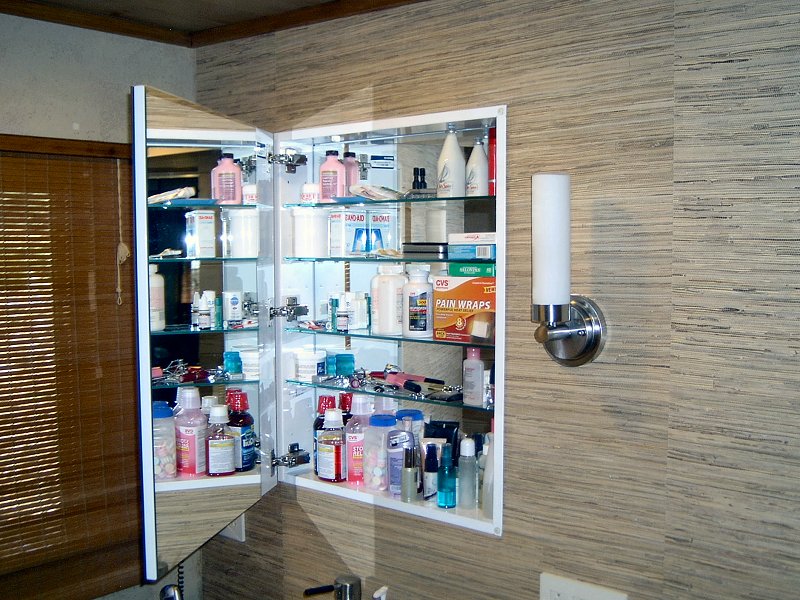
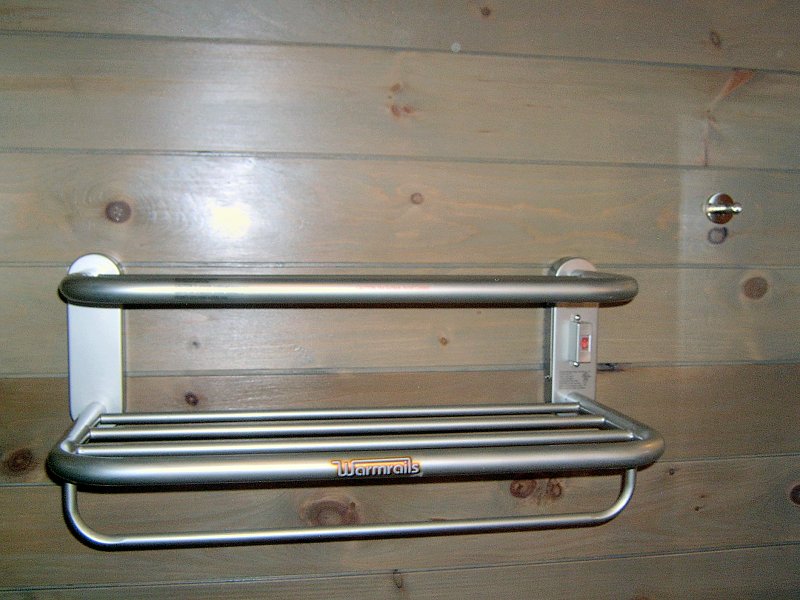
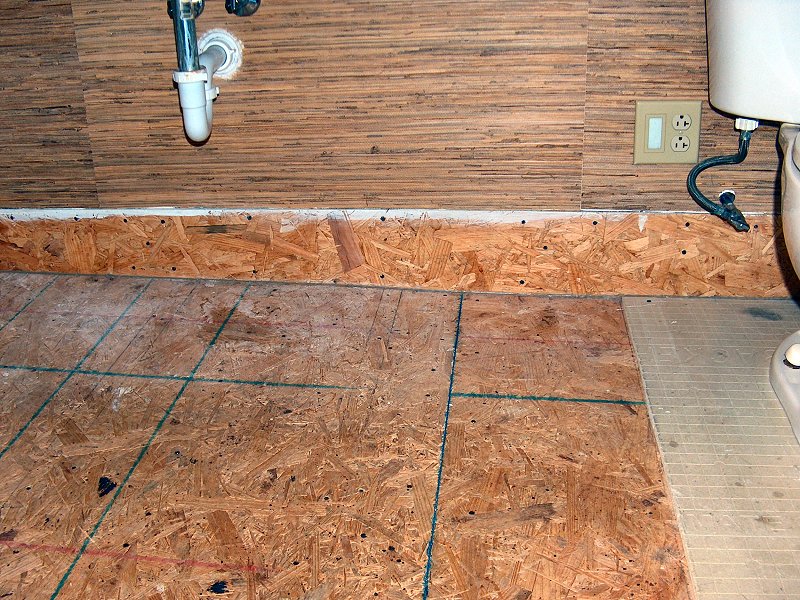
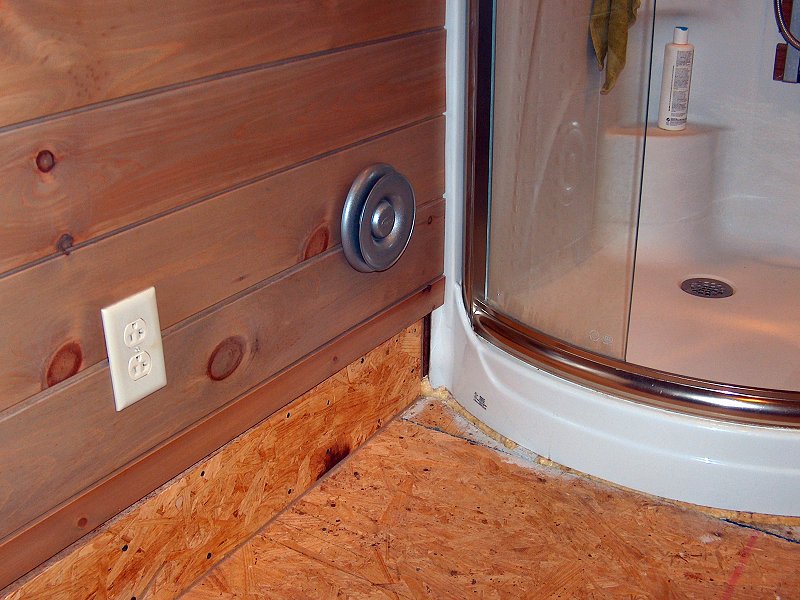
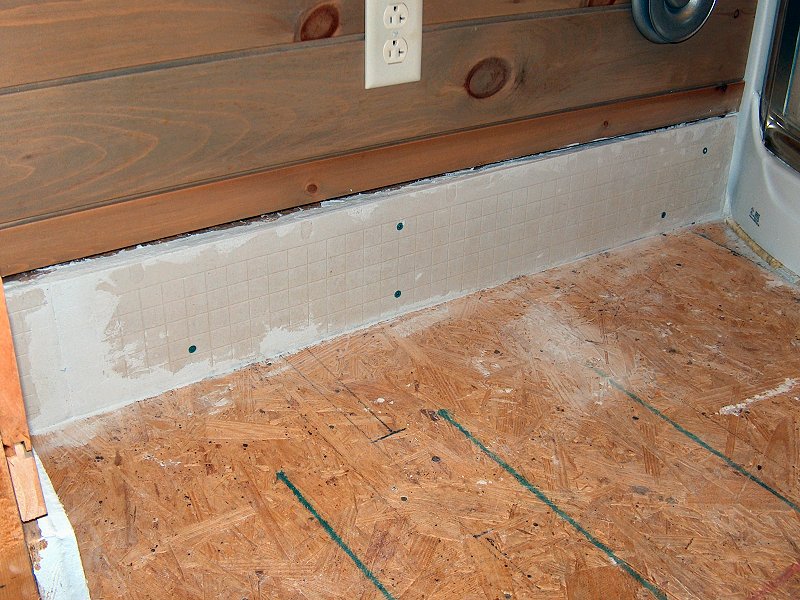
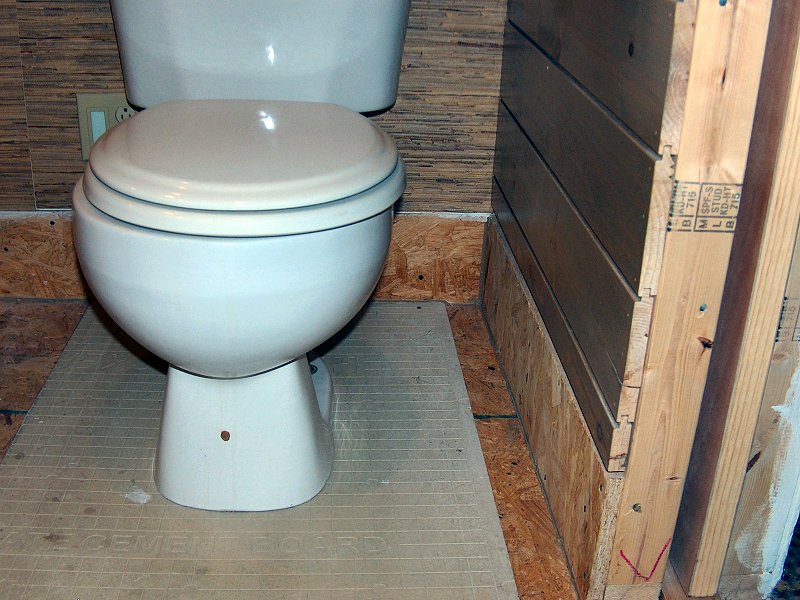
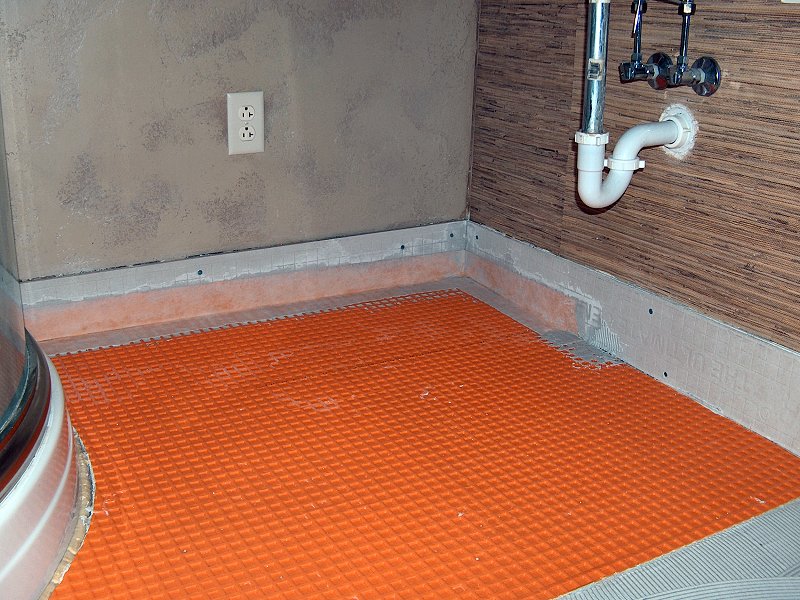
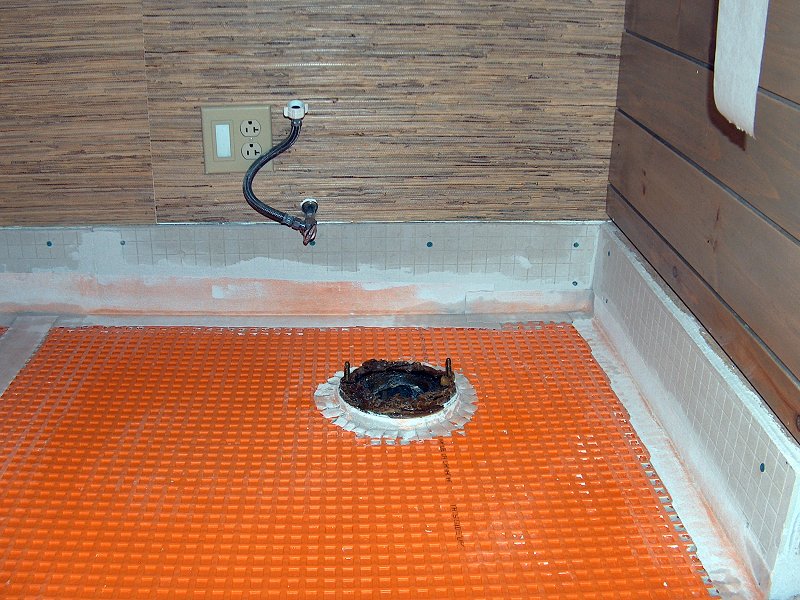
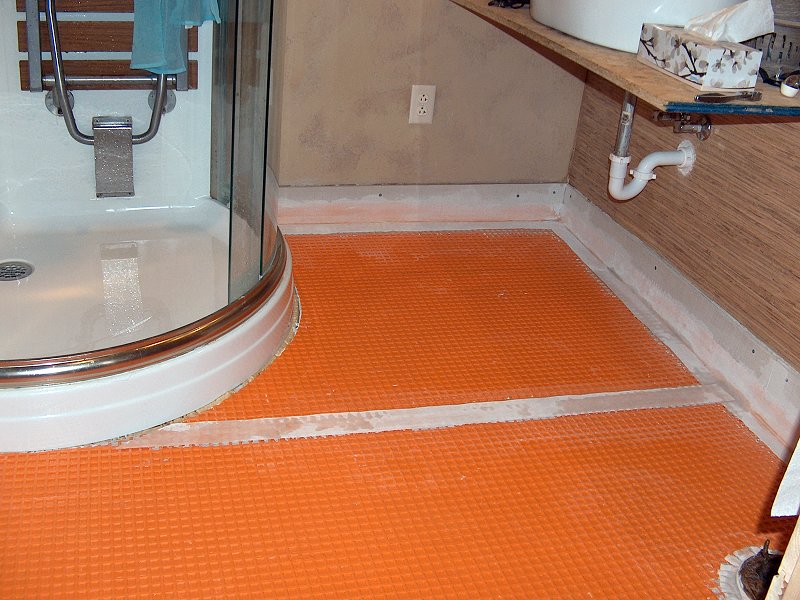
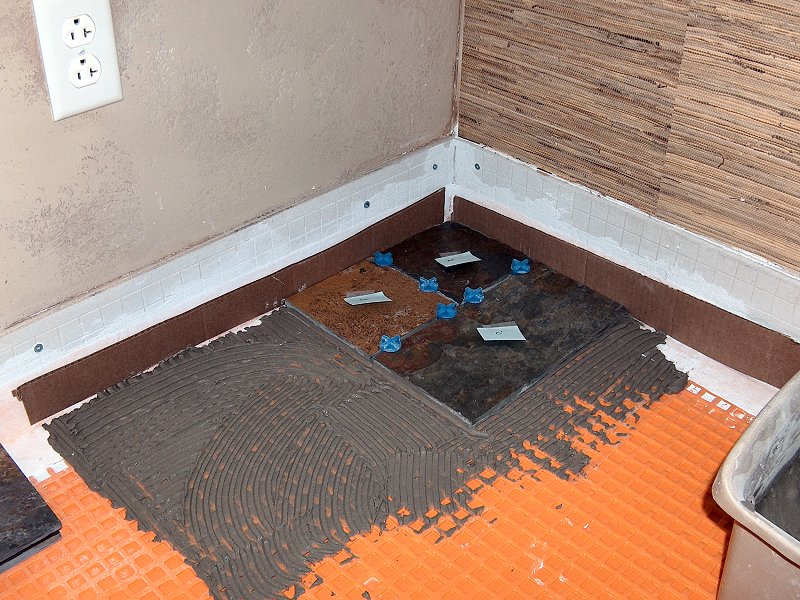
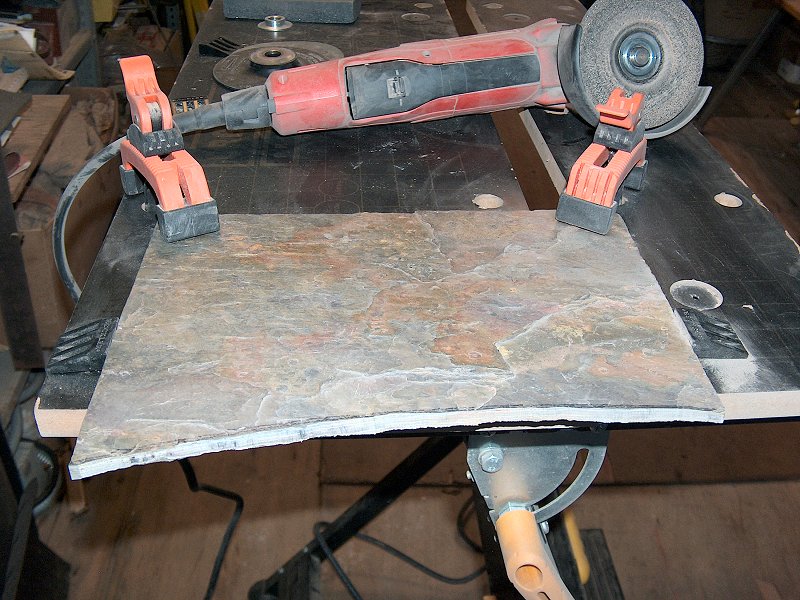
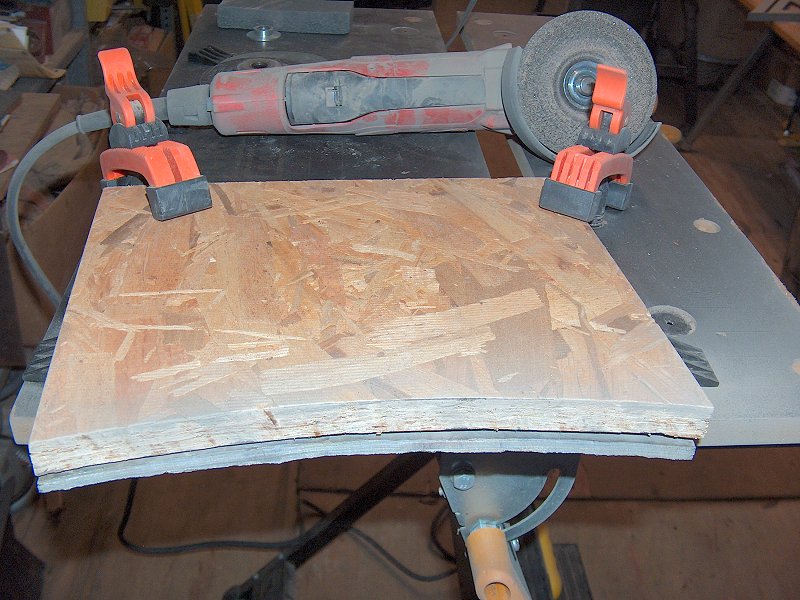
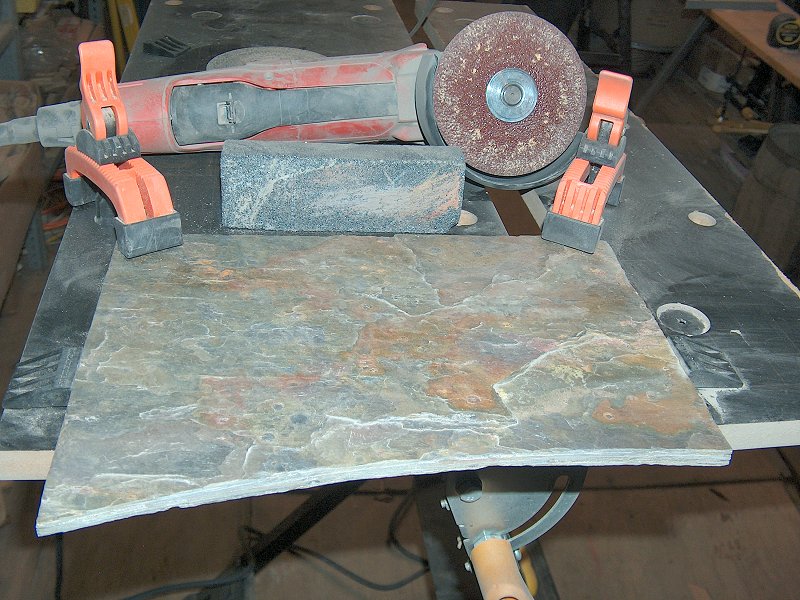
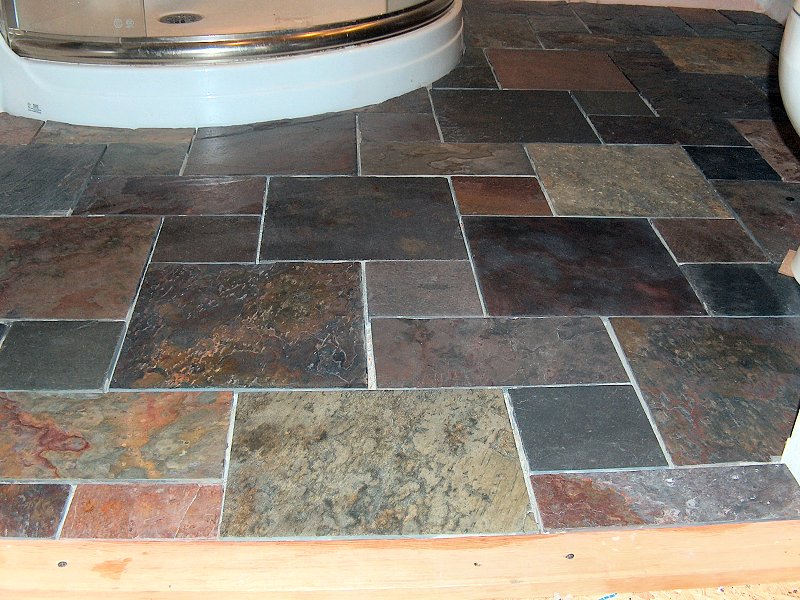
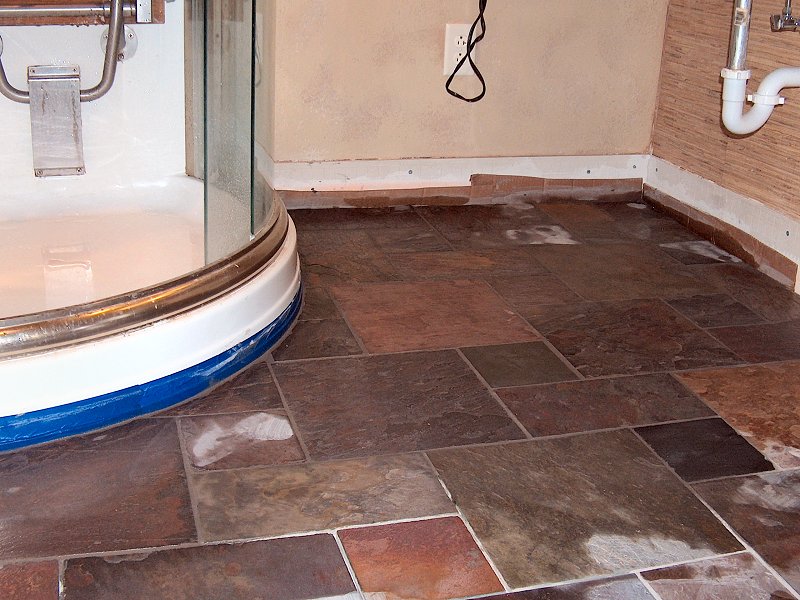
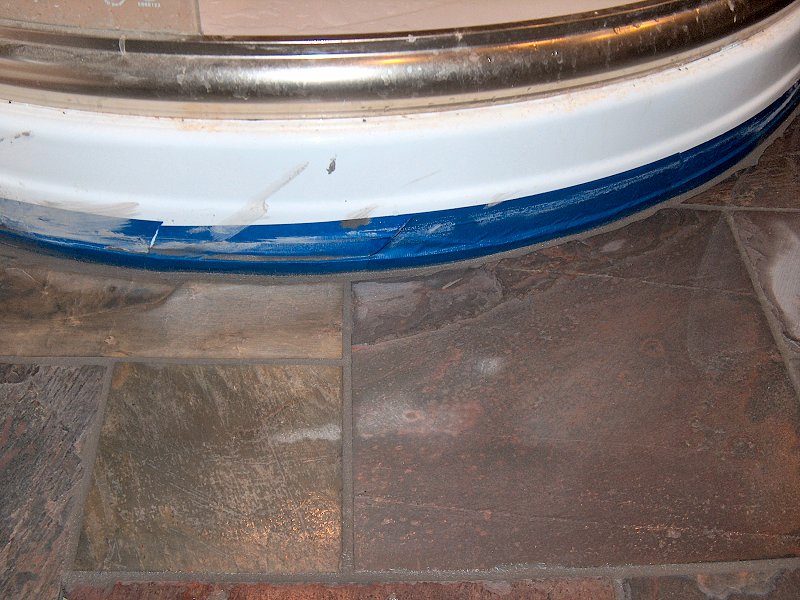
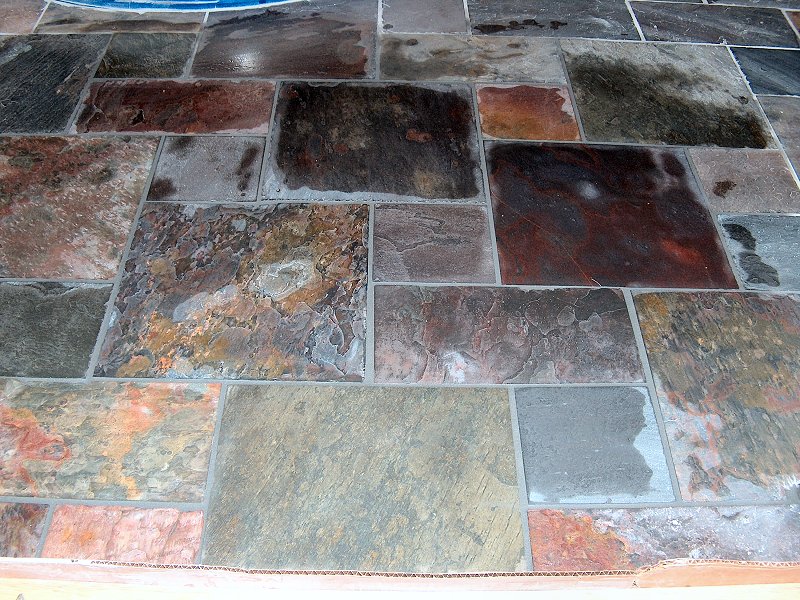
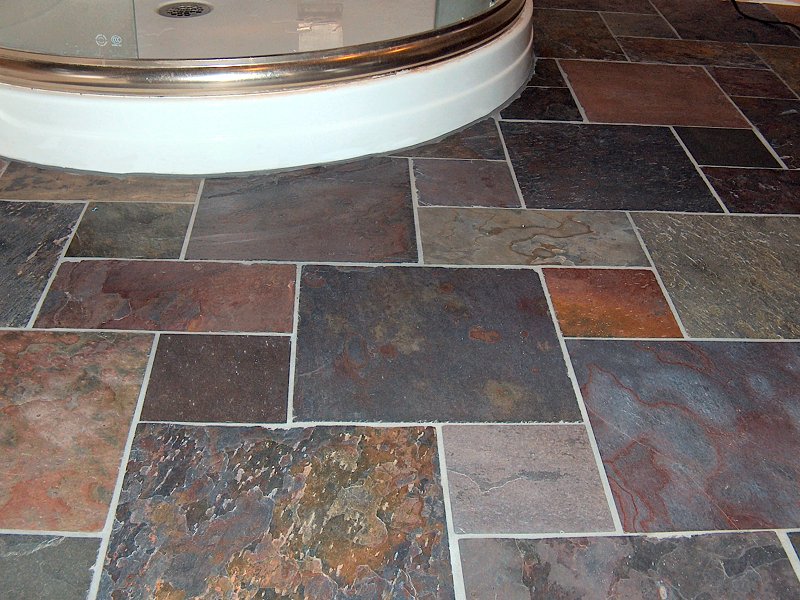
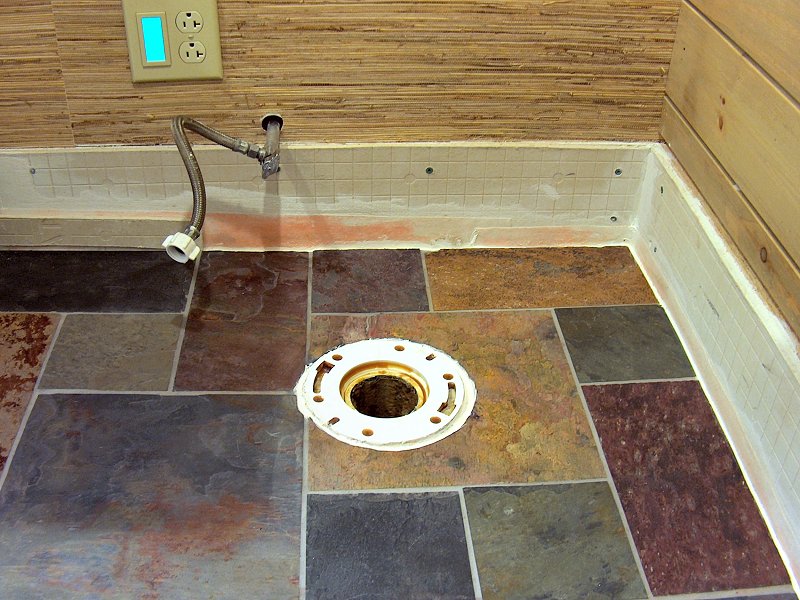
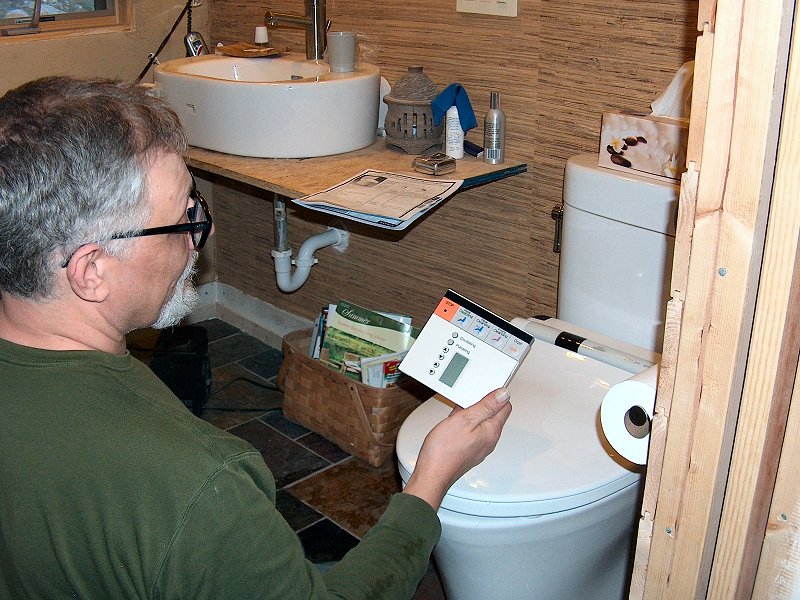
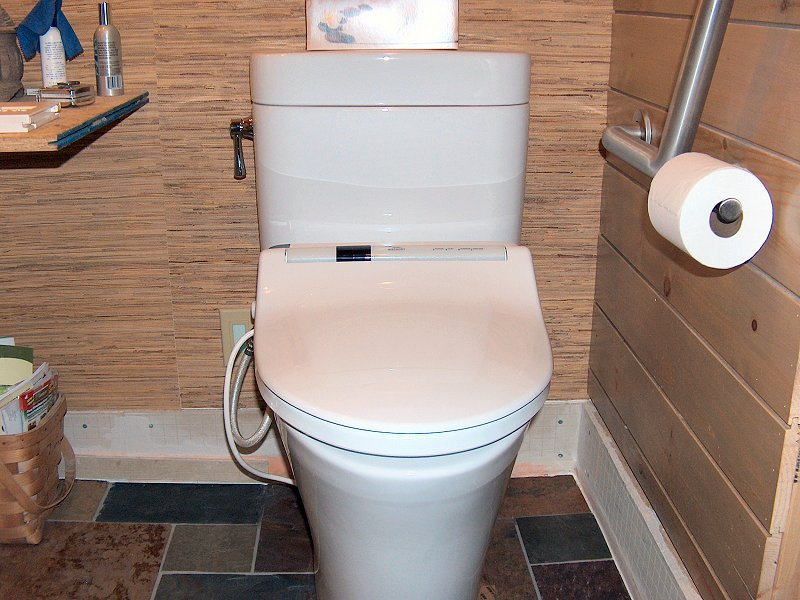
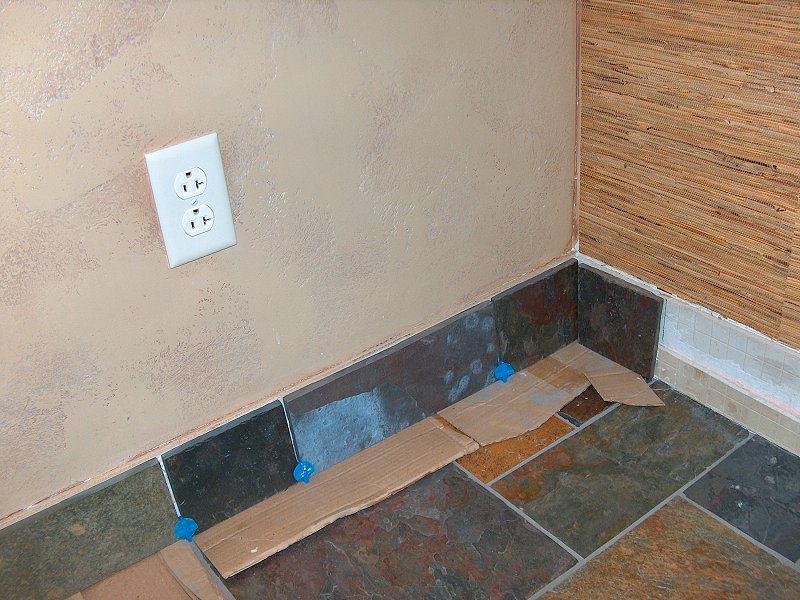
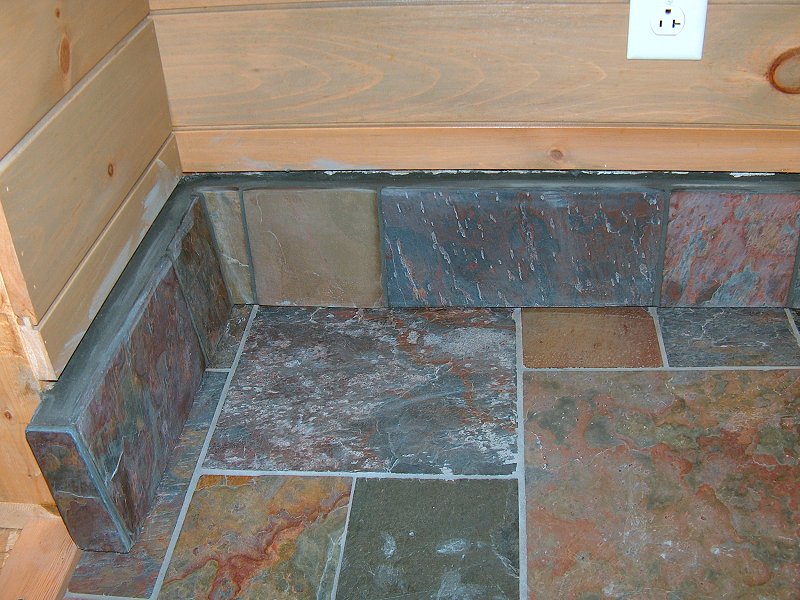
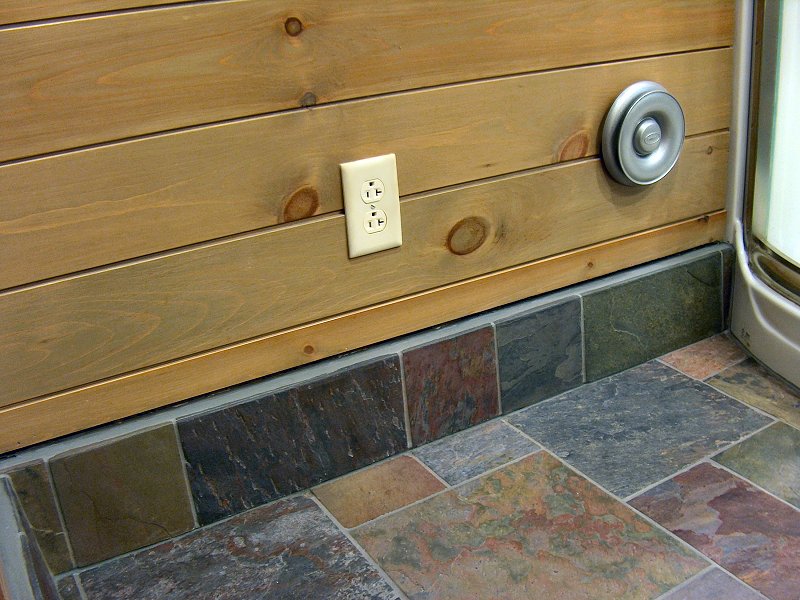
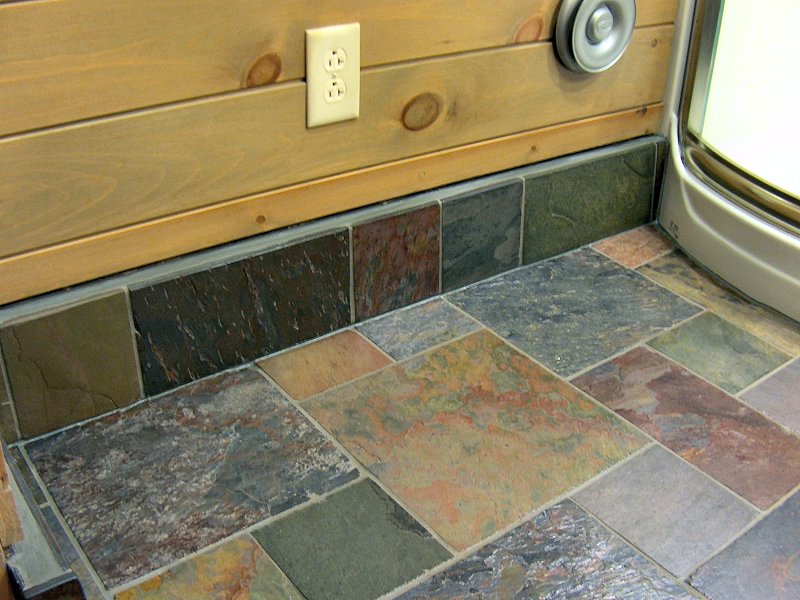
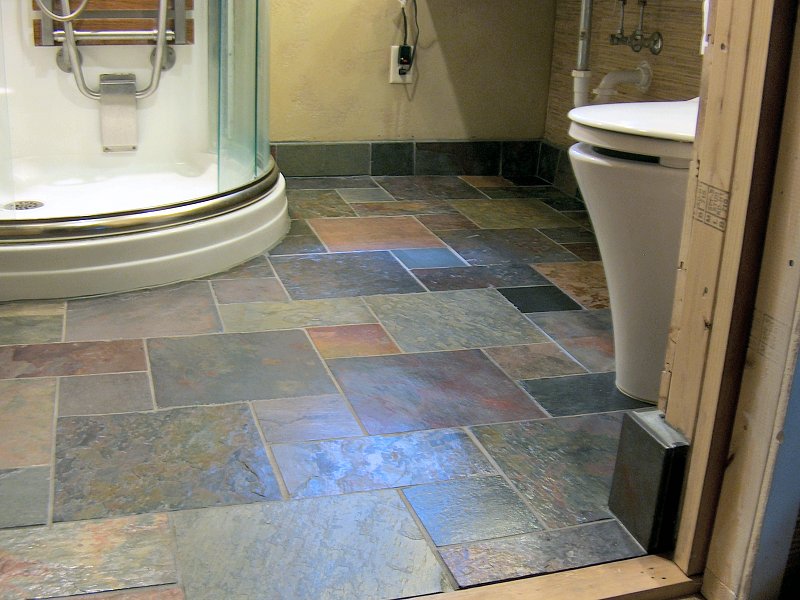
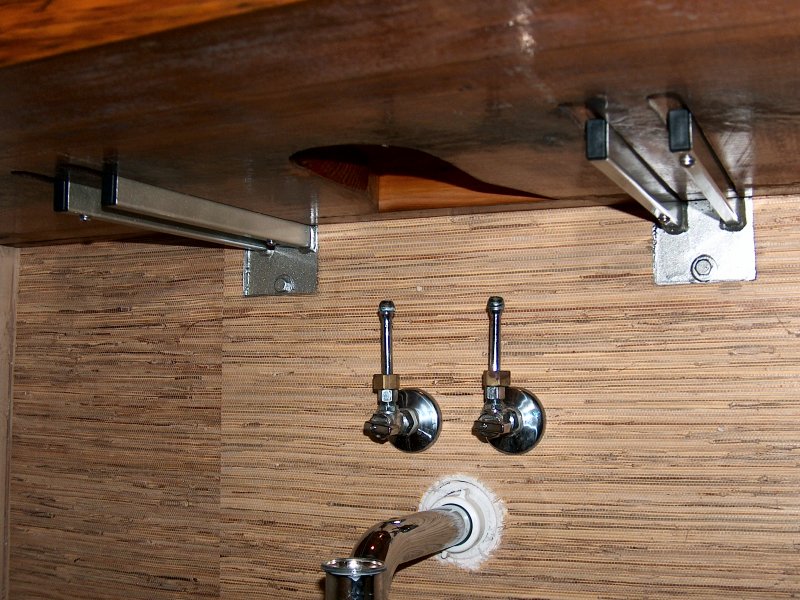
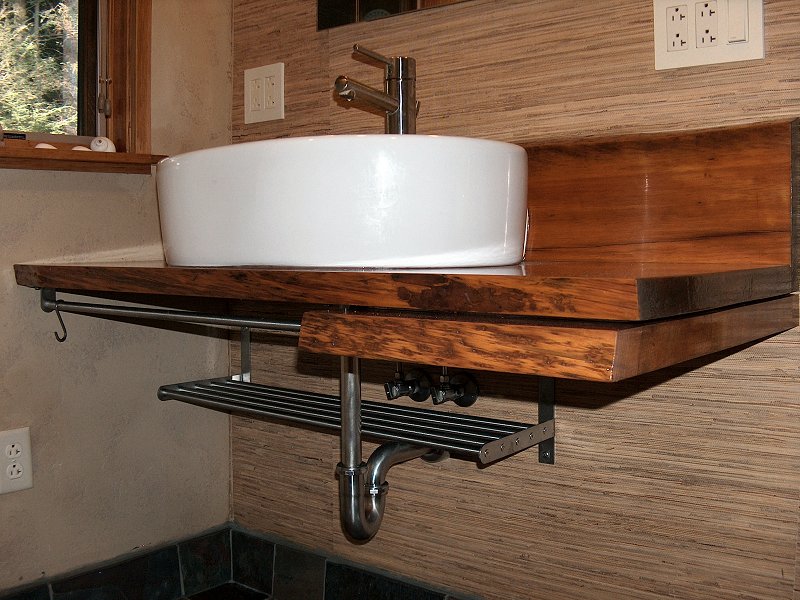
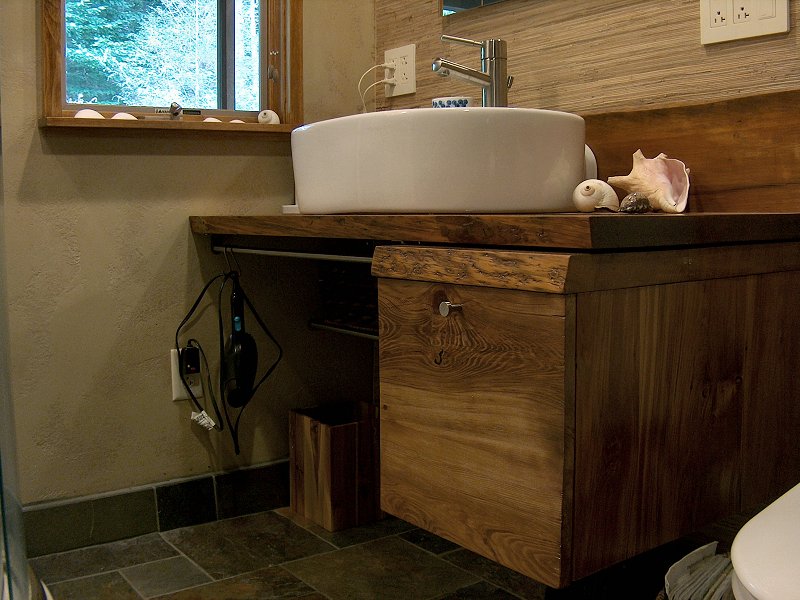
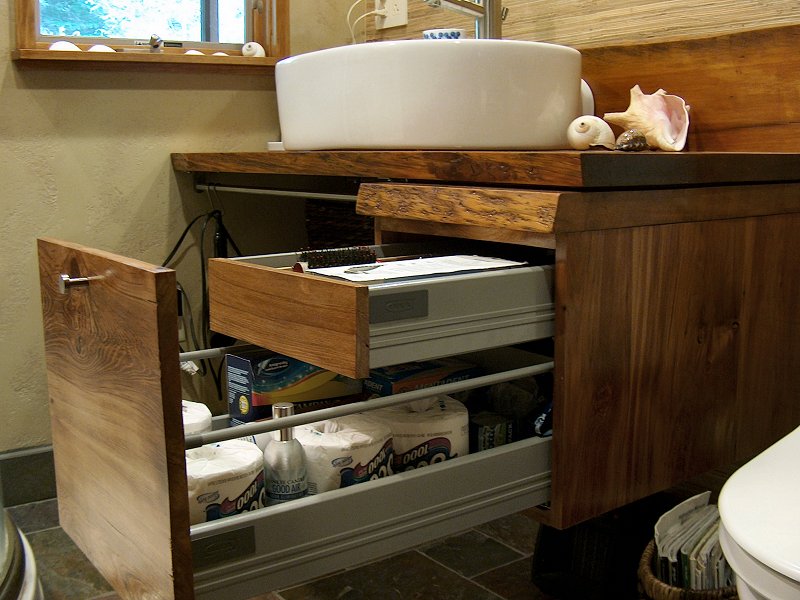
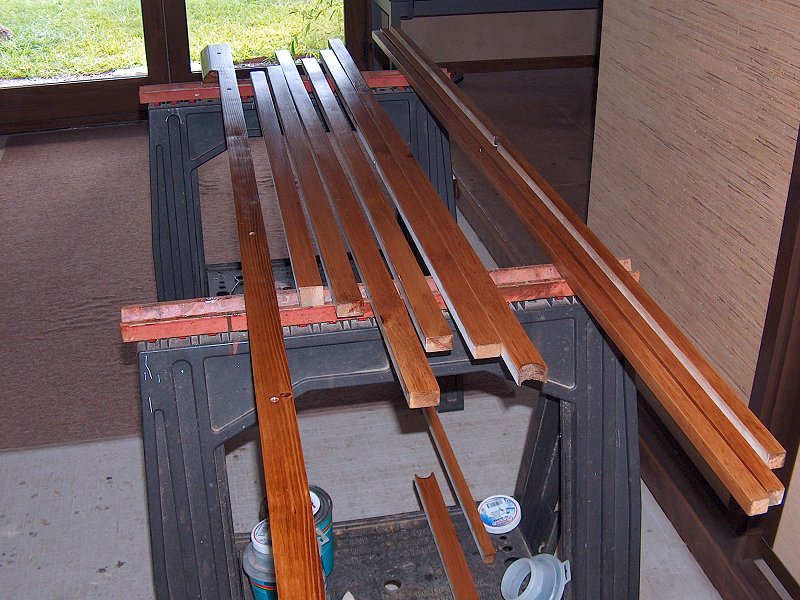
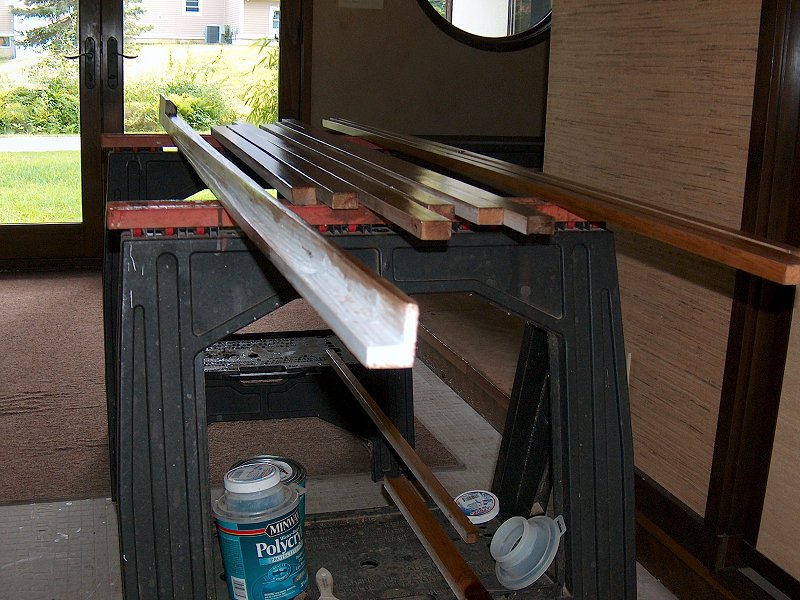
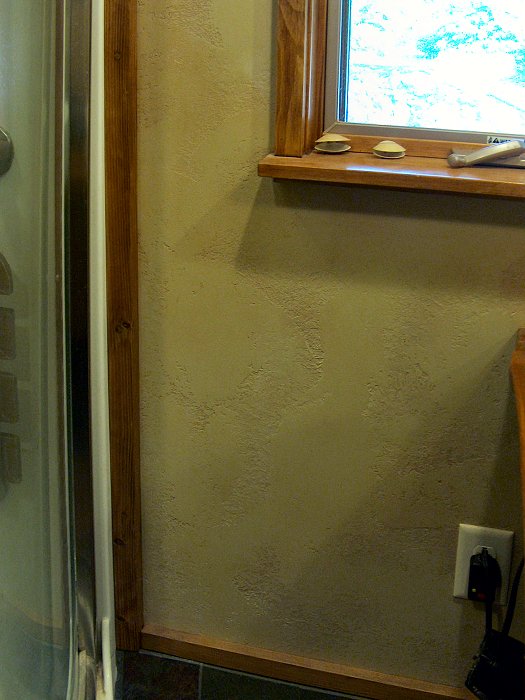
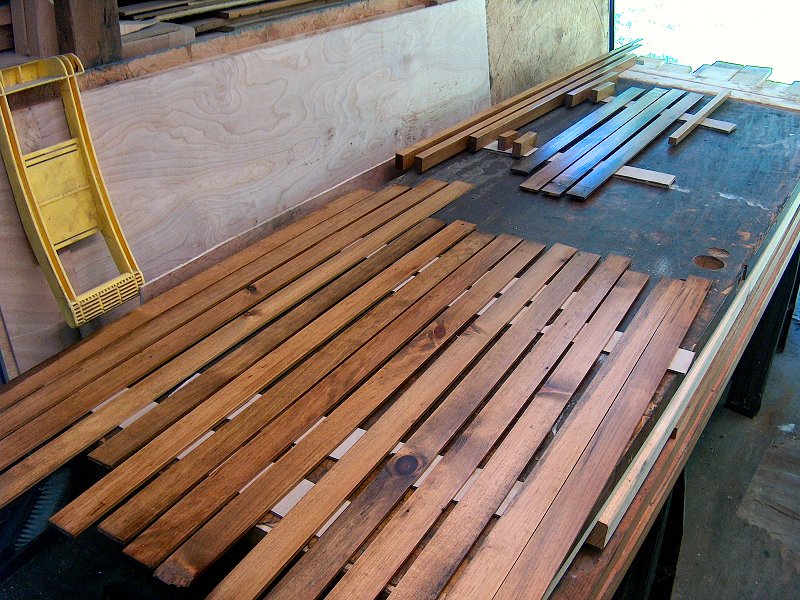
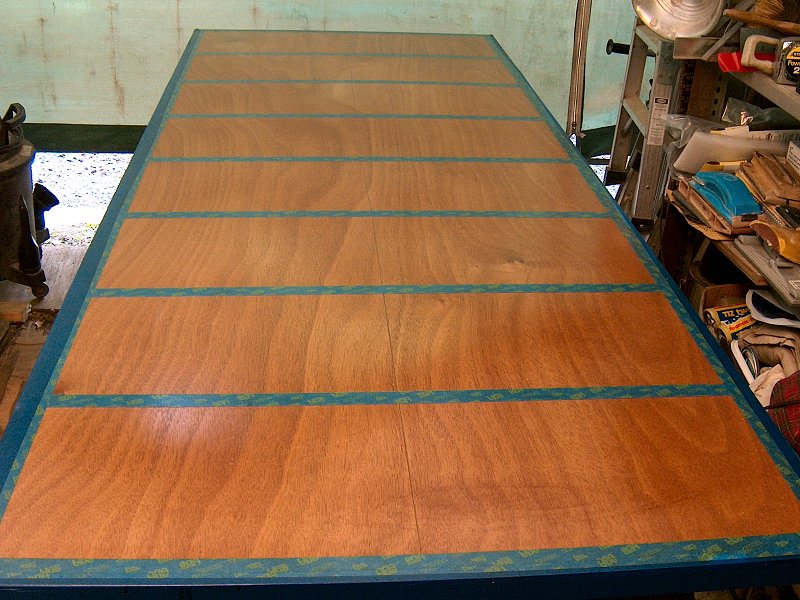
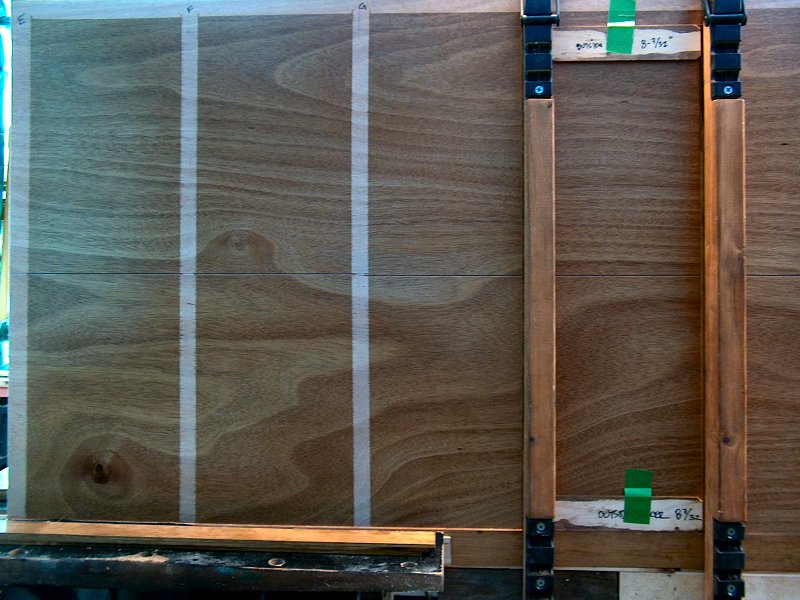
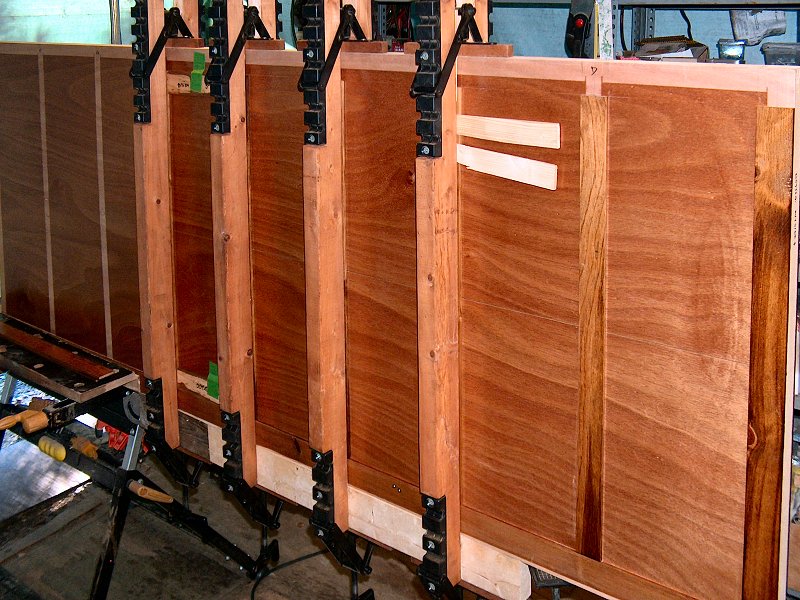
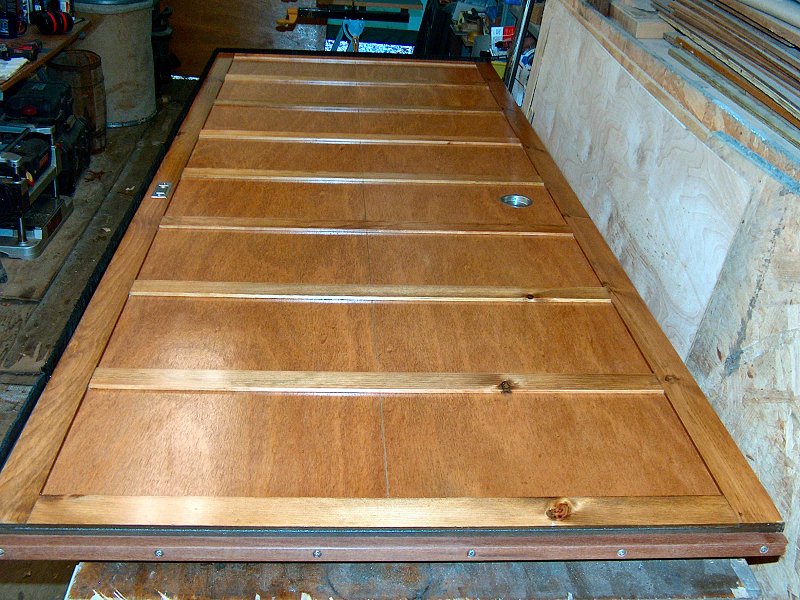
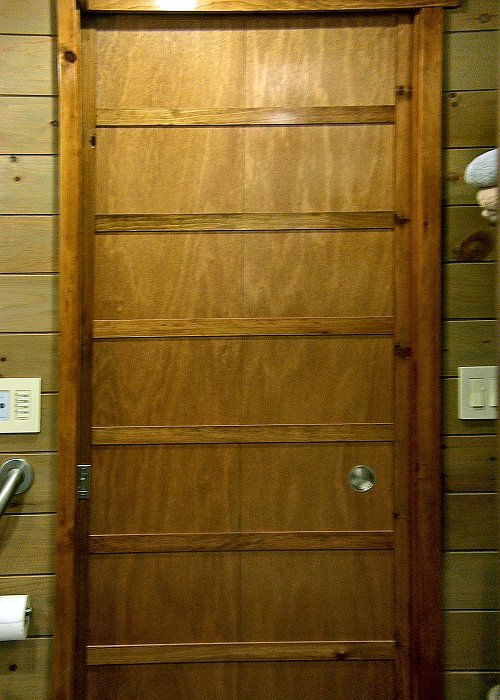
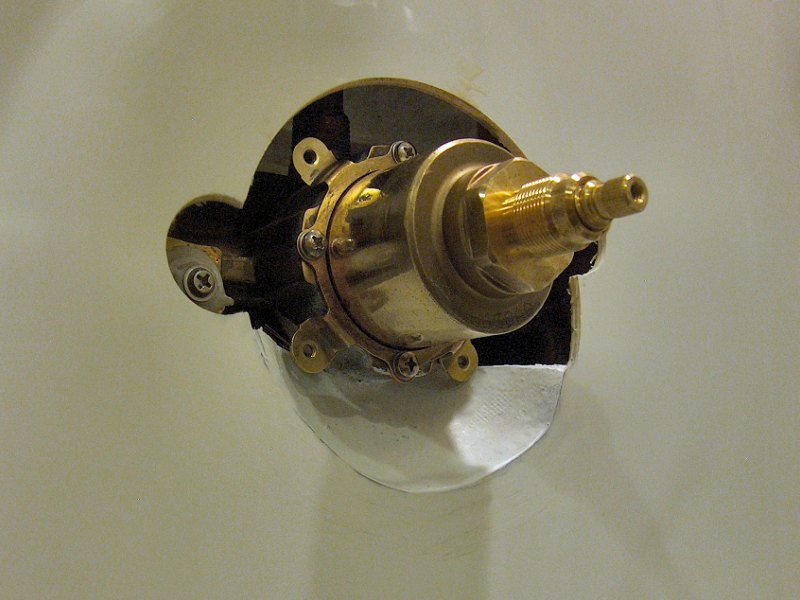
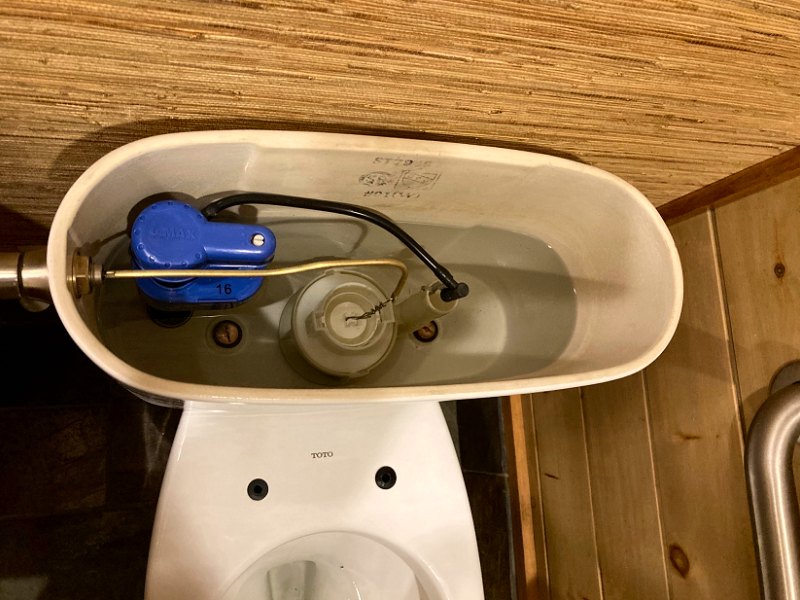
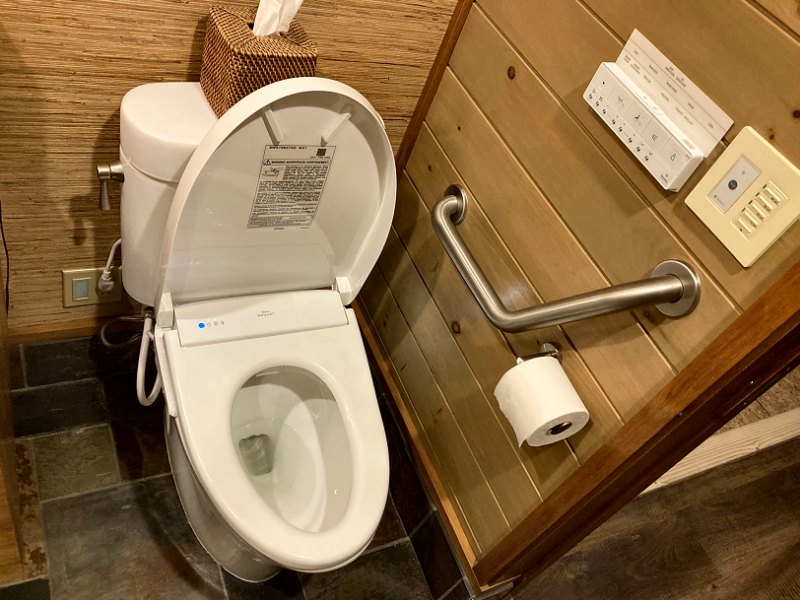
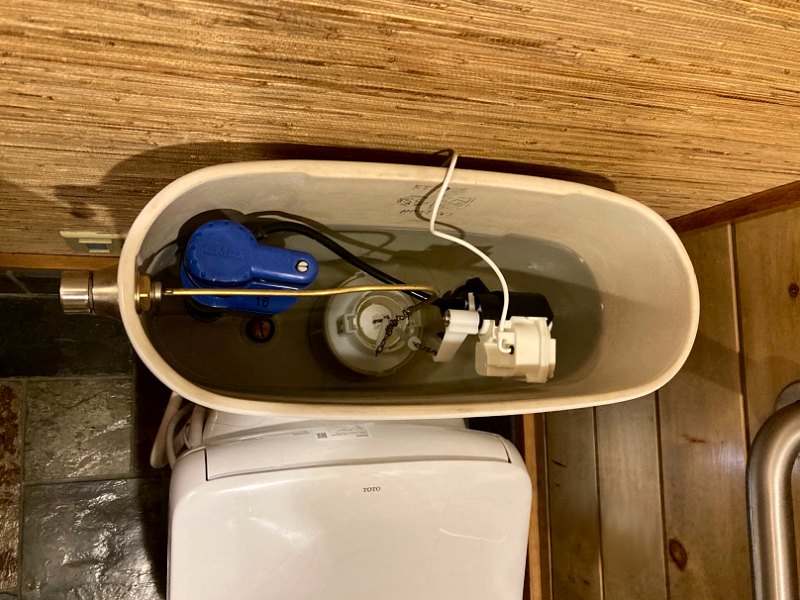
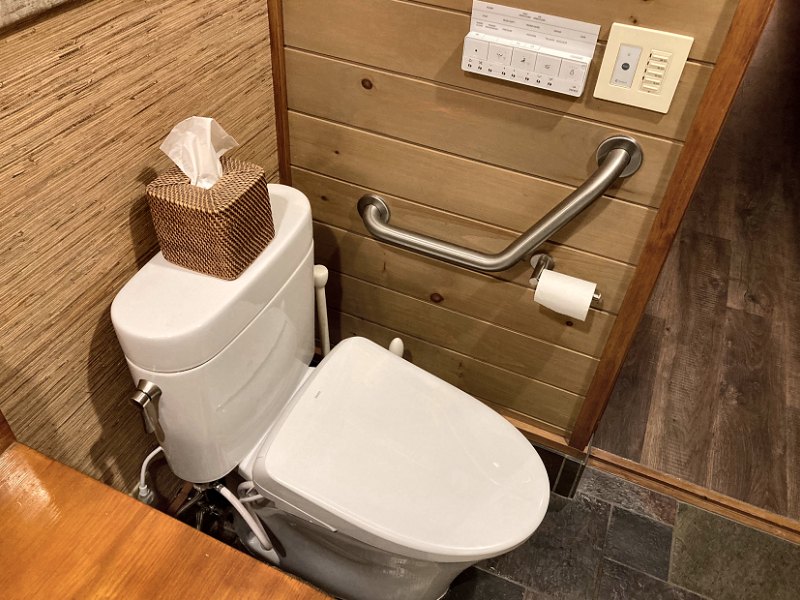