

In a Fine Fettle
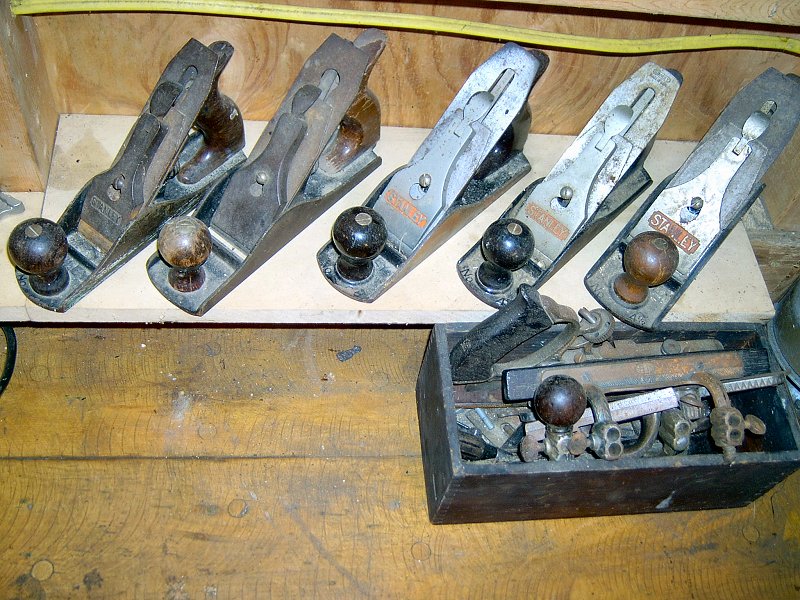
A small sample of my piles of rusted metal wood shavers.
If you've read any of the other sections of the KesterHouse website, it should be clear that I'm a bit of a tool nut (as opposed to just being a tool, although opinions may vary on that point...). While I certainly appreciate using a well-made power tool to make big pieces of wood into little pieces of wood, and then attach all the little pieces of wood together to make some thing of beauty that's a joy to behold, there's a certain satisfaction that comes from woodworking with simple hand tools - also known as "Neanderthal woodworking". I've run across some tasks where creating various bits of finish trim simply cannot be done in a practical matter with power tools. Not that the task would be impossible - it's just that sometimes the time required to get the tooling set-up and the jigs created to make some goofy cut with the router is just silly, when the same thing could be accomplished very easily with a hand plane or chisel in much less time. At least that's what I tell myself when searching E-Bay for old Stanley hand planes...
I remember being enthralled with dad's old Stanley No.4 "Handyman" smoothing plane, and over the years I've found plenty of times when doing something with a table saw I probably shouldn't have that I wished I had a decent hand plane available to do the job with less hassle. Back when I had my car shop, my neighbor and friend in the industrial park had a shop where he made beautiful curved wooden stair cases. All of his equipment was some sort of old wood working machinery he'd lovingly restored, and he had a fair number of hand planes at his disposal that I'd often drool over as well. When he'd find some new gem of a 100 year old tool, he'd bring it to my shop to perform some of the messier restoration work on it and thus keep the metal dust and paint chips out of his wood shop. I gained a great appreciation for the old tools he'd scrounge up, and began a bit of poking around myself to see what kind of "user" collection I could put together. Between E-bay and the large number of antique shops in New England, I've managed to get a decent pile of rusty metal things dreamed up by Justus Traut, Leonard Bailey, and the folks of the Stanley Rule & Level Company for the purpose of shaving wood.
As I work along on the house renovations and start to move away from rough carpentry into finish work, I'm running into more and more situations where some of those rusty metal wood shavers could be extremely useful. I decided it was finally time to dedicate a few hours a week to tuning the hand planes - also known as "fettling".
Getting Rid of Rust
Before I can get too serious about fettling or tuning a plane, I need to get the finish in order and make the rust go away. Sandblasting is an option, and while it will indeed remove the rust, it is pretty good at removing good metal right along with it. Some of the planes I have are well over 100 years old, so I want to keep all the original metal intact that I can, although I'm not all that concerned about the original finish. My main goal is to make a good "user" plane capable of producing fine shavings and performing the work for which it was intended. I'm not a tool "collector" (well, I guess I am after all), and have no intention of trying to re-sell any of the planes I've obtained so far (since removing the rust and original patina de-values the tool). At the same time, I would like to get these things as close to "mint" condition as possible, even if they're not "mint original".
So, abrasives for rust removal just don't seem the way to go here, whether those abrasives are sandblasted or in the form of a mounted disc or wheel. Other chemical-based rust removers can also have a negative effect on the "un-rusted" metal, by badly staining it or removing it right along with the rusty junk. The best method I've found (and the easiest, as it turns out) is to "reverse" the whole rusting process with the judicious application of a bit of electrochemistry. Rust is, after all, the result of an electrochemical reaction between iron, oxygen and water. Iron gradually loses its electrons to oxygen through oxidation , that is, any chemical reaction where something loses electrons. In order for something to lose electrons, there must be something else in the mix to accept electrons, and this gaining of electrons is called reduction. When oxygen is reduced, it makes oxide. If we put oxygen with iron metal, the iron is oxidized and the result is iron oxide, which we commonly refer to as rust (rust is actually pretty complicated stuff, made up of all manner of iron compounds, depending upon how much oxygen and water was present when the rust formed).
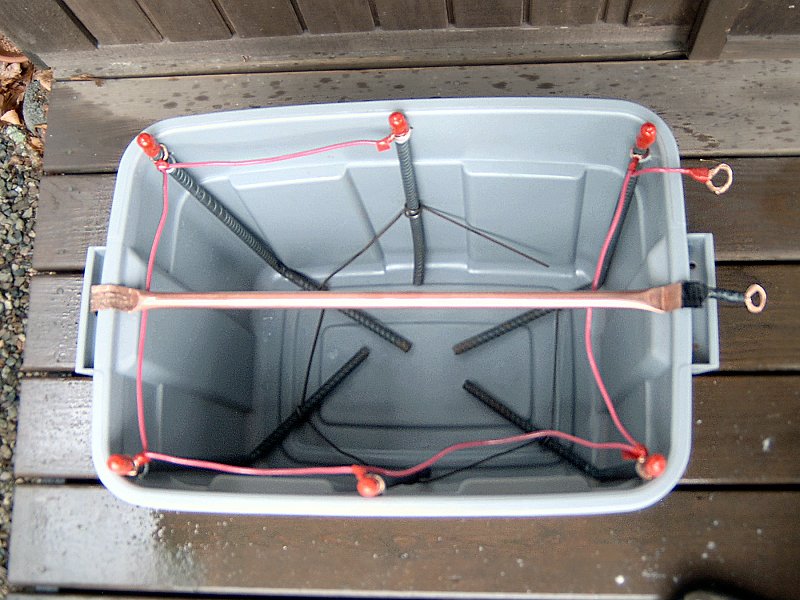
My electrolytic rust removal tub (2 photos).
Anyway, to make the rust go away, I need to create my own eletrochemical reaction where I can control what's getting reduced and what's getting oxidized. (I didn't invent this method - it's simply a twist on the whole notion of electro-plating metal, and has been used in the artifact restoration business since there were artifacts to restore). To make this work, I need an energy source to provide current (flowing electrons) and electron energy (voltage), a water solution that will conduct electricity (electrolyte), an anode to accept electrons (reduction), and a cathode to supply electrons (oxidation).
To get the water to conduct electricity, I dissolve about 1 Tbs./gal of sodium carbonate (Arm & Hammer Washing Soda) in the water, which dissolves into sodium ions (positively charged) and carbonate ions (negatively charged) to carry the current in the water. The energy source is a battery charger, which provides electrons with an energy of 12 volts at its negative lead, and accepts electrons at its positive lead. The anode is hooked to the positive lead (a handful of concrete reinforcing rods connected in parallel), and since the positive lead accepts electrons something must lose them - in this case the water at the anodes surface is oxidized and gives up oxygen (bubbles). The cathode is connected to the negative lead (the rusty bits, suspended in the solution) where electrons are being supplied. Since electrons are being supplied, something at the cathode must accept them - in this case two things are being reduced: the water at the surface of the cathode, and the rusty metal at the surface of the cathode. Ah ha! When water is reduced it produces hydrogen (bubbles), but when "rust" is reduced it produces... iron! So in theory anyway, electrolytic rust removal actually puts iron metal back on the surface of the rusty metal when destroying the rust. In practice, it mostly produces a black dust on the cathode surface which is magnetite (Fe3O4) and a very porous coating of iron metal powder.
Things to keep in mind when doing this:
- More is not better: 1 or 2 tablespoons per gallon is all that's needed for the solution to conduct electricity. Adding more won't make it work any faster. Same goes for the battery charger - use the smallest thing you can get your hands on. A 6 volt trickle charger of an amp or less is perfect. A 24 volt "booster" charger might clean your rust away in 5 minutes, but the violent release of hydrogen will likely blow many pits in the object you're trying to save and boil the solution with the heat it produces. Not good.
- DO NOT allow the positive copper connector to touch the solution, it will quickly take over as the sacrificial anode, migrate all of it's copper to your rusty piece as it dissolves, and cause your piece to rust very rapidly in the water.
- DO NOT do this in a closed area. The redox reactions taking place are producing oxygen and hydrogen gases, which can easily ignite if allowed to build up in an enclosed area (and don't check the progress while havin' a smoke, or you may lose your eyebrows).
- DO NOT use stainless steel anodes, as some web sites suggest - they produces a variety of nasty chromium liquid and gas compounds, which can kill you.
- DO NOT reverse the negative and positive leads. BLACK goes to RUST. If you reverse the leads and let it run overnight, in the morning you'll have nice clean re-bar, and your precious rusty part will have been dissolved.
- The re-bar anode(s) will eventually dissolve and need to be replaced, so check them occasionally to see if there's anything left of them.
- The solution will never "wear out", although it will get pretty disgusting so you might want to replace it after a while. It's just soapy water, although there may be a fair amount of paint and rust flakes in it so don't dump it in your fish pond.
- Water is being removed from the solution whenever the thing is powered up (as hydrogen and oxygen), so you'll need to add more water from time to time (but not more washing soda, since it doesn't go anywhere).
- This thing does a good job of removing paint and plating if there's any microscopic rust underneath the paint or plating. If you pull a part out after a couple days and there's no plating left on it, it's because there was rust under the plating and it would've flaked off eventually anyway. It's all good.
- Parts may be left in the solution as long as you want, provided you keep the power on (you cannot harm them by leaving them in "too long" - when the rust is gone it's gone, and nothing else will happen to them), however if you turn off the power, your clean parts will re-rust pretty quickly in the solution.
- Be patient - this cleaning method works wonders (it will even loosen rusted fasteners and assemblies while it's doing its thing), but it takes time to work. I suggest letting it run at least over night, and running it for a few days is even better. Remember, you can't hurt anything by letting it run.
Before and after of a plane with the electrolyte (2 photos).
I've used this method successfully now on a couple of planes, and I'm very pleased with the outcome. In addition to the list above, you must be careful about how you handle the parts when you're satisfied with the results of their time in the bath. When they first come out, they'll likely be covered with an easily smeared black dust. I take each part and toss it in a bucket of water to rinse it, then scrub the black stuff out of the nooks and crannies with an old toothbrush, re-dunking it in the water as I go. As soon as it's cleaned, it must be dried or it will rapidly take on fresh coating of light surface rust. I use a towel to get off as much water as I can, followed up by a few passes under a heat gun (a hair dryer will work too). I don't use compressed air and a blow gun to dry parts, since I have an inline tool oiler on the thing and no water separator. If you have a water separator and filter on your air lines, then compressed air would probably be fine. I give any parts to be painted a quick rinse with brake cleaner, then immediately get them primed. Any parts that aren't getting painted immediately get a liberal application of Camellia oil to prevent corrosion until I can get to finish polishing and apply a coat of protective wax.
Hand Plane Tuning & Re-assembly
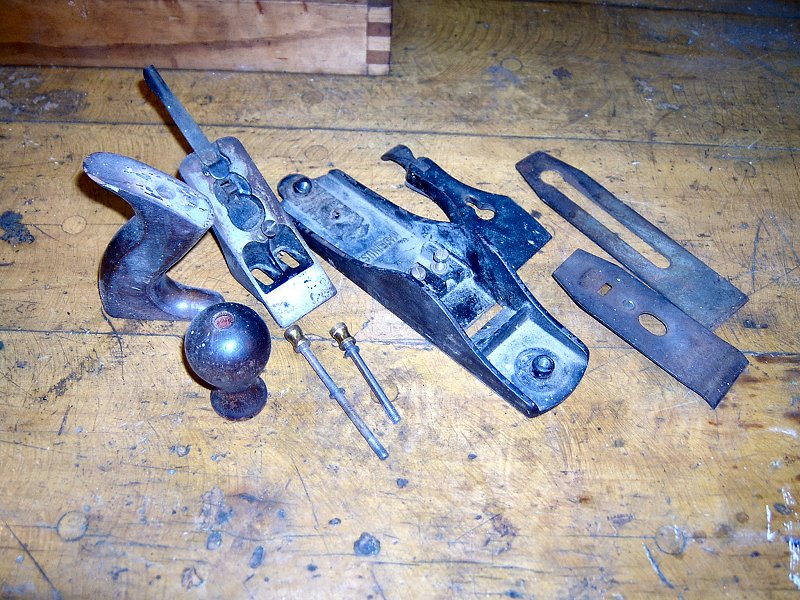
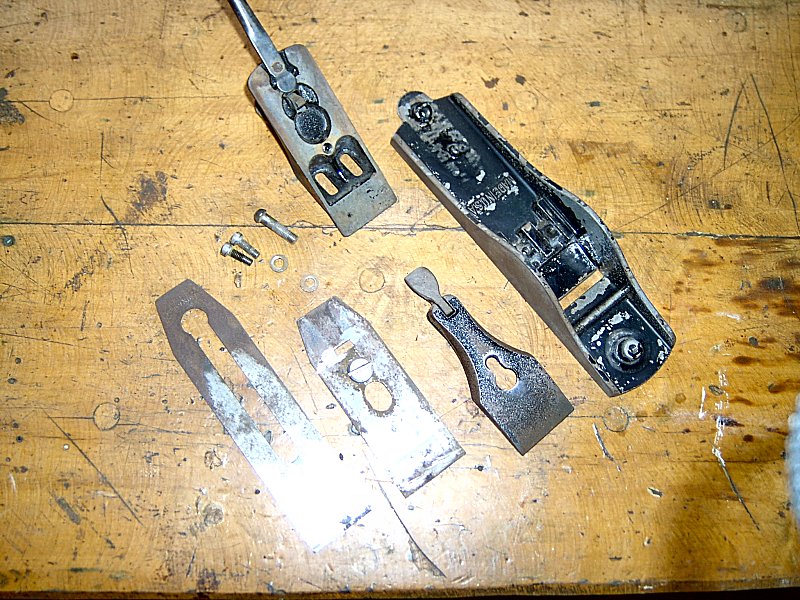
Once the plane is out of the electrolysis bath, dried and oiled to prevent re-rusting, I set about the work of getting the plane put back together and doing some tuning so it will function properly. I usually begin by giving everything a little clean-up with a 6" fine crimped wire wheel on the bench grinder to get a better idea of the condition of the fasteners and other parts that are used in assembly.
The frog mounts.
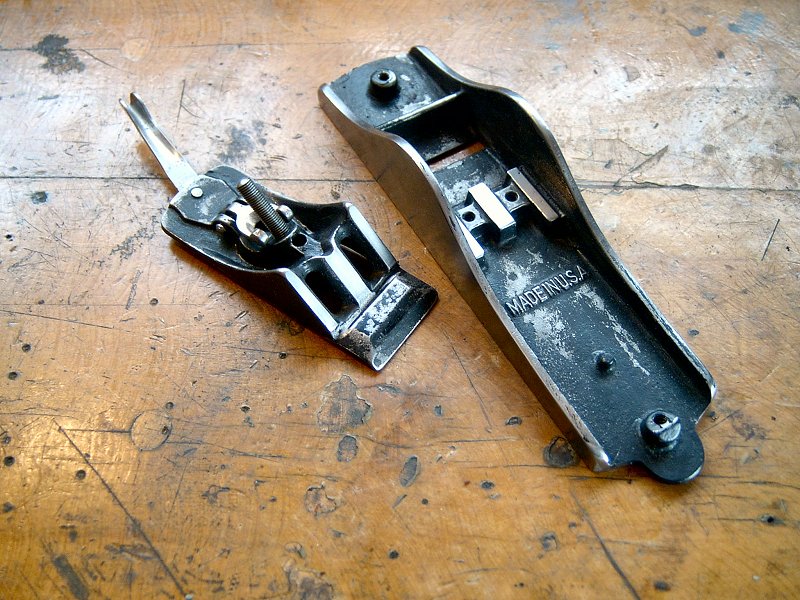
Lapping the Frog Mounts
When working on a bench plane (the photos continue this process with the Fulton #3), I start working on the two main parts of metal:
the frog and the body. I ensure the frog seats properly in the body by applying a couple drops of honing oil to the cast bosses
in the body, then give each section a sprinkle of 90 grit Silicon Carbide lapping powder and start rubbing the frog back and forth
on the mounting castings. This is slow work and requires steady, even pressure and frequent addition of more grit (I use a little
flux brush to add a fresh sprinkling of the dry grit every few minutes). After 10 or 15 minutes of lapping, the two surfaces should
have an even coat of slurry over their entire surface, which usually indicates everything is mating up nicely. I rinse away the grit
slurry with spritz of WD-40, give the surfaces a wipe and test my progress by just sitting the frog into position and moving it
around a bit to see if there's any wobble. Once I'm satisfied that the surfaces are making even contact, I'll continue to lap using
successfully finer grits, spraying and wiping between each grit, and finishing with a couple minutes of 600 grit powder for a final hone.
Lapping the Frog Face
With the frog making solid contact on the base, I then ensure the face of the frog is flat to give the plane iron a true surface to
rest on. The frog is clamped in a padded vise, and I give the face a few strokes with a medium mill file to see where the high spots
are. I try and knock the pin out for the depth adjusting yoke to give myself more surface area (although if it doesn't want to come
I'll just leave it). I never try and take apart the lateral adjusting lever, and just do my best to get a flat surface while working
around it. I spend some time working the frog face with the file until I'm getting full contact with each pass (good lighting
is a must so you can see what you're filing and what hasn't been touched yet). Once the filing is complete, I grab the lapping powders
and oil, and start lapping the face of the frog on a piece of glass. Again, I start with the 90 grit and lap the face until all the file
marks have been removed, then switch to finer grits to hone and polish the surface. The last step is to give the frog and the mounting
bosses a pass over the 6" spiral sewn buffing wheel loaded with black emery compound.
The frog face and throat.
Tuning the Throat
Next the frog is mounted in the plane body, and with the aid of a 6" steel rule I align the face of the frog with the back of
the throat in the sole. I then stick a piece of blue painter's masking tape to the frog face, and give the throat a few passes with a
fine file to see if there's any high spots or nicks. Most of my planes are set to have a very small throat opening, so even though the
back of the plane iron will never actually rest on the back of the throat, I still like to clean up this area with a few passes from
the file and ensure it's square with the sides of the plane and at the same angle as the frog face. The Fulton's throat was a little ratty (no nicks, but the casting was a bit rough),
so I took a few extra passes to square up the corners and remove and rough spots (the tape protects the frog from scratches while filing
the throat). The front of the throat also receives some file work to alter it from the original casting where the opening is perpendicular
to the sole, into an opening that has a little taper from the sole up toward the front of the plane. This allows a bit more room for
shavings to come out of the throat, but care must be taken to not enlarge the throat while adding the chamfer. Everything is rinsed of
metal filing again with WD-40, wiped clean, and the plane is prepared for flattening the sole.

Tensioning the sole.
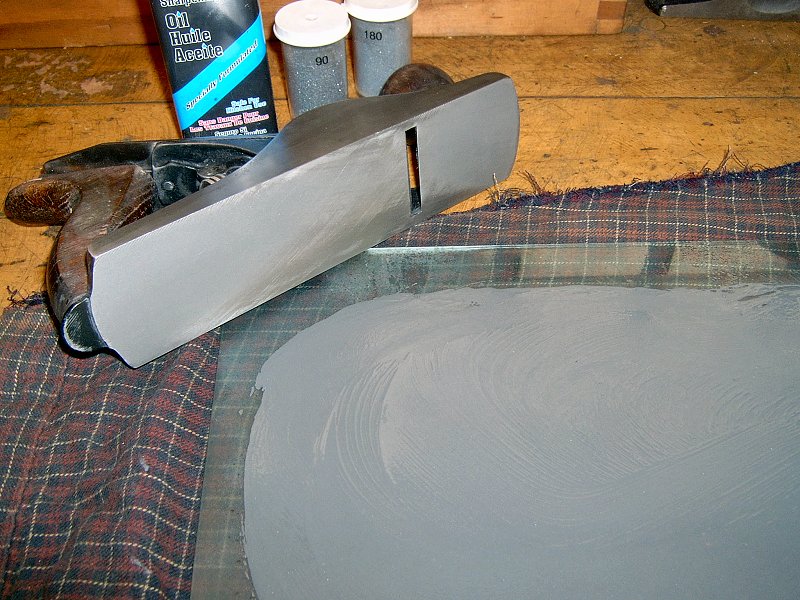
Flattening the Sole
In order to flatten the sole, all the working tensions of the assembled plane must be imposed on the plane body since they will
introduce slight deformations to the sole during use. With all parts re-assembled and fasteners fully snugged, the plane is once
again clamped in the leather padded vise and work begins with the big mill file. Now this is an area of hand plane tuning that
seems to cause some difference of opinion. There's one school of thought that says the sole must be perfectly flat, and folks that
believe that spend many hours lapping and grinding their soles on huge granite plates to ensure perfection. The other school of thought
is that it really doesn't matter all that much, and as long as the iron is sharp the plane is going to work just fine. I find myself
firmly planted right in the middle. I spend the time to try and get the sole flat, with my main areas of concern around the throat,
the area between the throat and the toe, and to a lesser degree, the heel and the perimeter of the sole behind the throat. If there's a
little low spot in the "big flat" between the throat and the heel, I don't worry about it much. If there are any gross high spots, those
are easy enough to make go away with a few passes from the file. I don't have a huge granite lapping plate and if I'm going to spend hours
rubbing my plane on something, I'd prefer it be wood, not lapping grit.
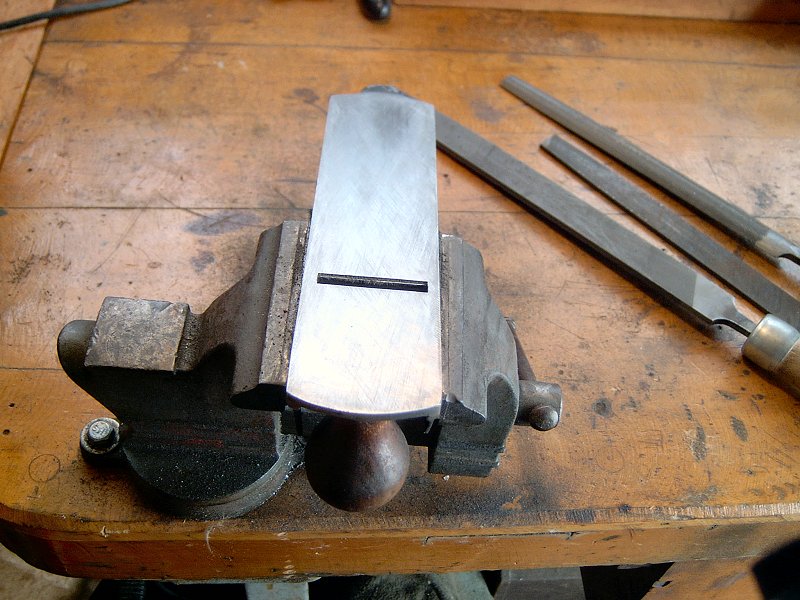
Flattening the sole (2 photos).
With the plane back in the vise, I do most of my flattening work with a file. I work with slow strokes at an angle across the entire sole until I get a good idea of where all the high and low spots are located. I flip the plane around and continue working at an angle to develop a cross pattern across all the high spots of the sole. Again, plenty of lighting is a must in order to keep track of where material is being removed. Once I've gotten a good cross-hatch of file marks across the critical areas of the throat and toe, I'm pretty much done removing material for the purpose of flattening the sole. The rest of the work on the bottom of the plane is just to remove the file marks and give the surface a nice finished look. I switch to a very mild cutting file and run smooth strokes along the length of the sole to try and remove the cross hatch pattern. When most of the angle marks are gone, I then take the plane out of the vise give it about 20 minutes on the lapping glass with 90 and 180 grit lapping powders to remove the rest of the scratches.

Polishing and buffing.
Polishing the Body
Once the majority of scratches are faded, I spray down the sole with WD-40 again and dry it with a soft cloth. Since I don't go
for the "perfect flat" sole, there's usually still a few scratches and low spots under where the tote is attached to the body, so I
give the sides and bottom a thorough going-over with a random orbital sander and 240 grit paper. The sander does a good job of evening
out the surfaces although they aren't perfectly flat, yet it doesn't remove a significant amount of material to adversely
affect the flattening work I've already done. Once the sides and bottom all have the same dull sheen from sanding, I disassemble the
plane again and use the 6" bench buffer to polish and buff the body to a high shine. I begin buffing with a fairly stiff, 6" spiral sewn
Sisal wheel loaded with Enkay's Black Emery cutting compound. Once the surfaces begin to take on a little shine, I give them a light buff
with an old tee-shirt to remove any remaining cutting compound, then switch to a loose single stitched Canton flannel wheel loaded with
Enkay's Green Stainless Steel coloring compound to bring up the final lustre.

Painting the body.
Applying the New Finish
Most pre-war Stanley iron planes came with either an incredibly durable black finish called "Japanning" (a term Europeans probably came up
with in reference to the high-gloss black laquerware of the Far East), or a bright silver Nickel plating. Original style Japanning is
an option for these planes (it's made up from turpentine, asphaltum and linseed oil), but the parts must be baked for a while between
coats, and it generally sounds like a mess I don't want to get in to. I'm not planing to sell any of these, so I'm not concerned about
keeping the original Japanned finish. After I run the parts through the electrolysis bath, most of the original finish has been removed
anyway, so I'm perfectly happy to just re-color the main parts with a heavy enamel paint. Getting the paint on evenly is kind of
important, so I start with a coat of primer, applied with a 1/4" wide artist's natural bristle brush. Once the primer's dry, I then
apply at least 4 coats of semi-gloss black Rust-oleum protective enamel. This stuff dries pretty slowly, so it takes a few days to get
all the coats applied. Because of the slow drying time however, the paint flows out to leave a very smooth finish that looks very
similar to the original Japanning.

The handles and fasteners, looking better than new.
Handles & Screws
Between coats of paint on the body, I spend some time with the wire wheel to clean up all the threads on the fasteners, then give a quick
polish to the screw heads and knobs in preparation for the final assembly. Screw heads and knobs first get a general cleaning with a
Scotchbrite wheel, then I buff them with cutting and color compounds to bring up a nice lustre. To keep from losing fasteners and burning
my fingertips, I use a little hand vise (included in the photo) with a couple scraps of leather in the jaws to hold each fastener as I
work them with the bench buffer or Dremel. I also polish the cutter, cap iron and lever cap while working on the rest of the
little stuff, although those three pieces will receive a lot more attention prior to final assembly.
To refinish the wood handles, I start with 180 grit sandpaper to remove all the old finish, then work with progressively finer grits up to 320 to give a smooth, polished surface to the hardwood. On the Fulton plane in the photos I applied a coat of Minwax's "Red Mahogany" stain to the wood to give it a more appropriate color, then re-polished the handles with a medium (burgundy) Scotchbrite pad after the stain had dried. Older planes with actual Rosewood don't get the stain treatment, of course. I finish the handles with a couple coats of boiled linseed oil and turpentine (4:1 mix), polishing with fine (white) Scotchbrite between coats. I'll give the handles a coat of wax at the same time I wax the plane body, just before assembly. With all the small parts ready to go, the next step will be to sharpen the cutting iron, then fit the cap iron, cutting iron and lever cap all together.
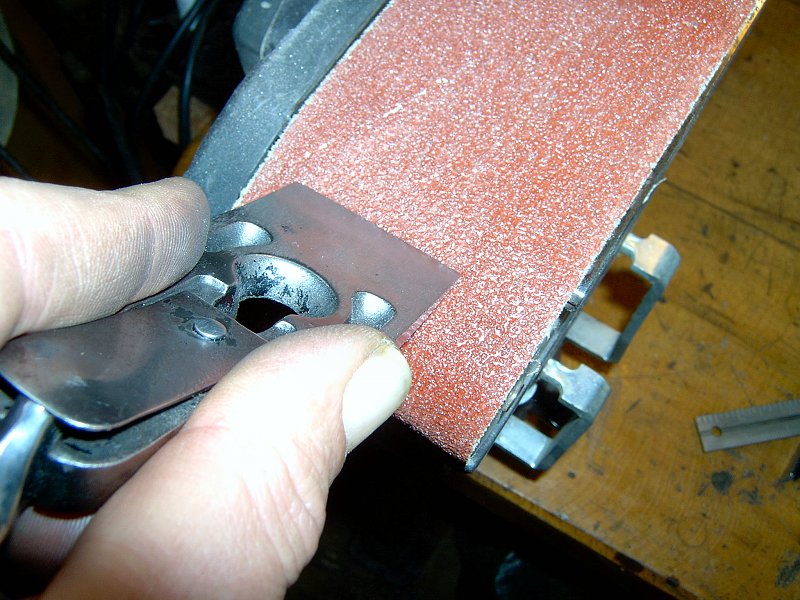
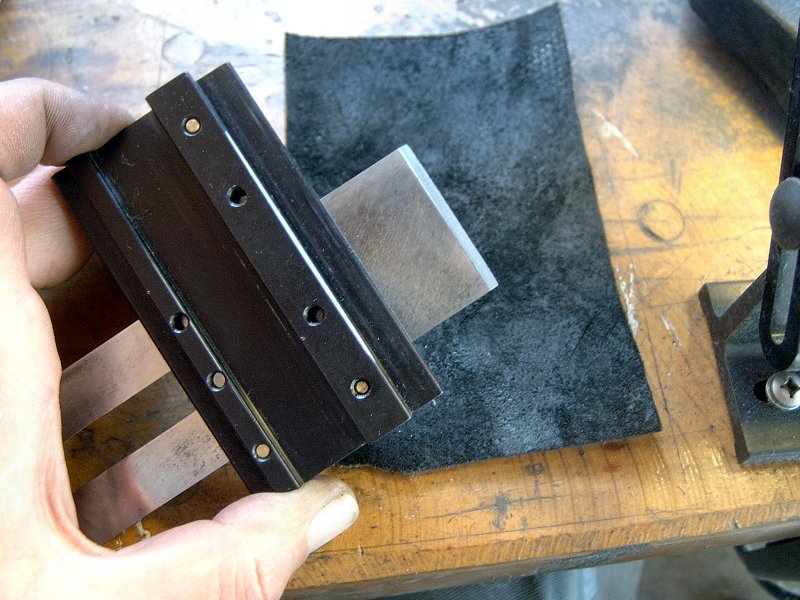
Tuning the irons for a good fit (8 photos).
Tuning the Irons
With the small parts ready for assembly, I work on fitting the cap iron, cutting iron and lever cap together. I begin with the lever cap,
which will clamp the two irons to the plane frog. Most of the pressure will be exerted under the front edge of the cap, so I use a 120
grit belt sander to smooth the bottom of the cap. I then flip the cap and work it against the unsupported section of the belt between
the roller and platen of the belt sander to create a soft edge on the front lip. I'll repeat the same steps with a 240 grit belt,
then use black emery and green compound for the final finish on the cap.
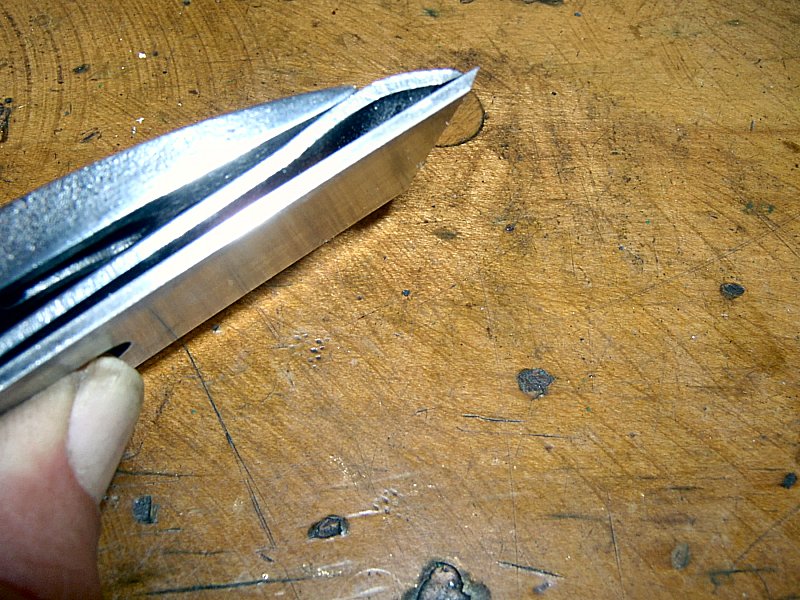
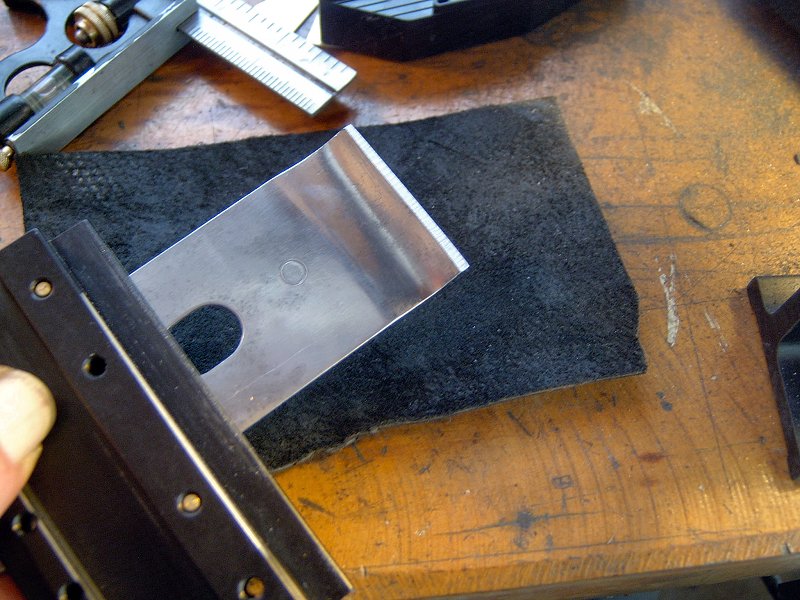
The cap iron (sometimes called the chipbreaker) mating surface requires a little more attention, so I start work on that with the grinding jig at the bench grinder. I put a very slight hollow grind into the underside of the cap iron, with the jig set up nearly vertical, then hone the underside with the 240 grit belt. Once the grinding marks are gone from the bottom, I flip the cap iron and ensure the top is smooth from the tip back over the "hump". I finish the cap iron with a few minutes of lapping the bottom of the tip on 320 grit sandpaper, then give it a final polish as well. The last step is to flatten and hone the back of the cutting iron in preparation for sharpening the cutter. With the cap and irons honed and square, I double check the fit then move on to sharpening.

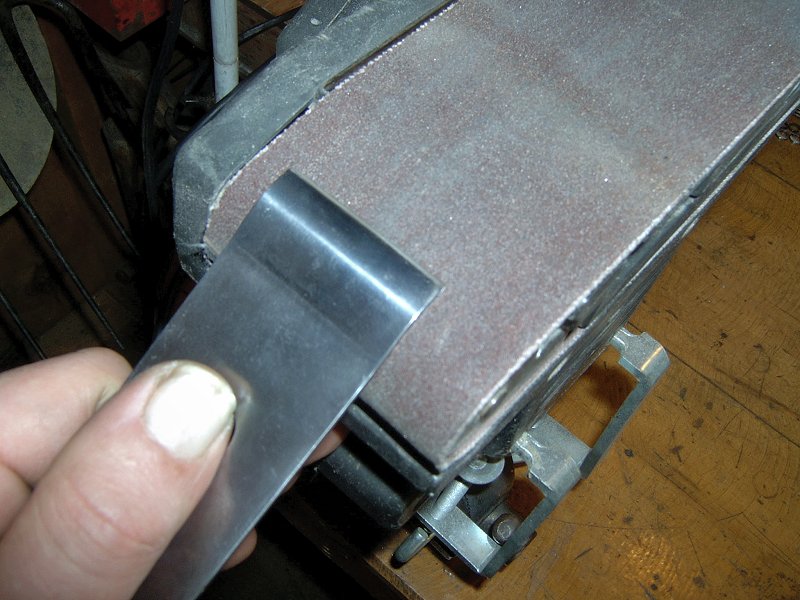
Grinding the cutter (2 photos).
Sharpening the Cutting Iron
Once the back of the cutting iron is flattened and honed to 400 grit, I begin work on the bevel of the cutter with the bench grinder.
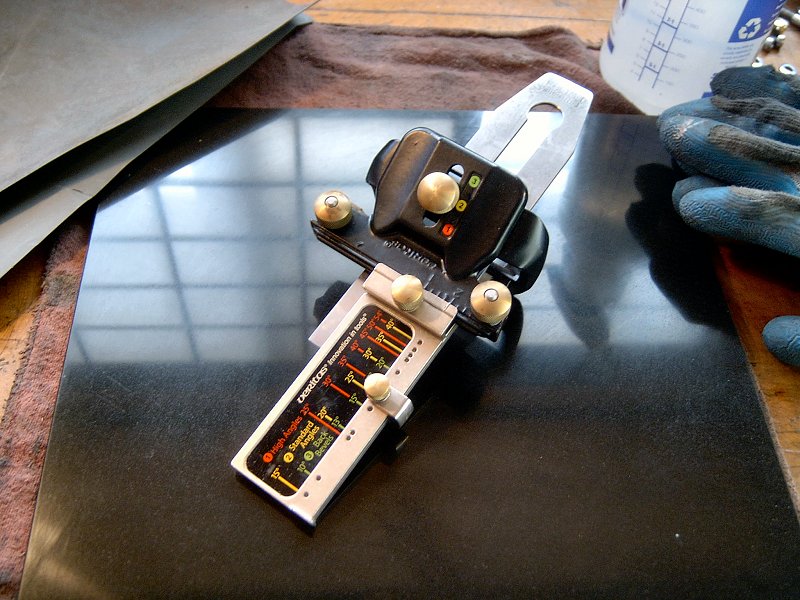
Not long ago I purchased a
Veritas® grinding jig & tool rest
![]() from Lee Valley tools, and the thing is
fantastic. Once it's secured to the bench and square to the wheel, it allows me to very quickly select a bevel and grind a square edge
on plane and chisel blades. I also use a Delta® variable speed 6" grinder with a "cool" wheel running at
1750 RPM, which helps avoid "burning" the edge of a blade and ruining the temper. I set the tool rest for a 25° bevel angle, and
give the blade a few passes to true the surface. Every few minutes I lift the blade to cool and strop it with a piece of leather to remove and burr
that builds up on the back as I grind. Unfortunately this blade had some rust pitting on the back where the old cap iron had been attached,
so I'll never get a perfect edge on it. I'm not planning on doing super fine work with this plane though, so I'll just continue with this
blade for now.
from Lee Valley tools, and the thing is
fantastic. Once it's secured to the bench and square to the wheel, it allows me to very quickly select a bevel and grind a square edge
on plane and chisel blades. I also use a Delta® variable speed 6" grinder with a "cool" wheel running at
1750 RPM, which helps avoid "burning" the edge of a blade and ruining the temper. I set the tool rest for a 25° bevel angle, and
give the blade a few passes to true the surface. Every few minutes I lift the blade to cool and strop it with a piece of leather to remove and burr
that builds up on the back as I grind. Unfortunately this blade had some rust pitting on the back where the old cap iron had been attached,
so I'll never get a perfect edge on it. I'm not planning on doing super fine work with this plane though, so I'll just continue with this
blade for now.
Once I've got an even bevel across the width of the blade, I remove the blade from the grinding jig and put together the stuff I'll
need for final honing. I use a simple method of honing that employs progressively finer grits of wet-or-dry sandpaper, spritzed with a
little water on a granite tile. I struggled with oil stones for a while, but I could never get the right touch to keep the bevel at the
correct angle to the stone. Stones would inevitably get hollows rubbed into them just as I getting close to a sharp blade so I'd have
to stop and flatten the stone, and it was generally a mess of oil and swarf on everything. The sandpaper method seems a lot cleaner, and
since I never invested in good quality oil stones, it's been cost effective so far. My brother recently gave us a pair of very nice
waterstones for our kitchen knives, and they are certainly a pleasure to use on the knives. Once I get through the initial tuning of all these planes,
I'll likely use waterstones to maintain the edge on the plane irons as needed. For sandpaper, I start with 240 grit after the grinding,
then progress through 320, 400, 600, 1000, 1800, 3200 and finally 4000. The only way I maintain the same bevel (and my sanity) through
these various grits is by using the
Veritas® Mk.II honing guide
![]() from Lee Valley. I've fiddled around
with 3 or 4 different kinds of honing guides, and this one is the only one that gives consistent results. It's extremely easy to set-up
and use, and while purists may call using a honing guide "cheating", I'd be lost without it. I also use a pair of inexpensive rubber grip
cotton gloves, which prevent that black wet-sanding residue from getting embedded in my hands as well as provide a secure grip to the piece
I'm working on.
from Lee Valley. I've fiddled around
with 3 or 4 different kinds of honing guides, and this one is the only one that gives consistent results. It's extremely easy to set-up
and use, and while purists may call using a honing guide "cheating", I'd be lost without it. I also use a pair of inexpensive rubber grip
cotton gloves, which prevent that black wet-sanding residue from getting embedded in my hands as well as provide a secure grip to the piece
I'm working on.
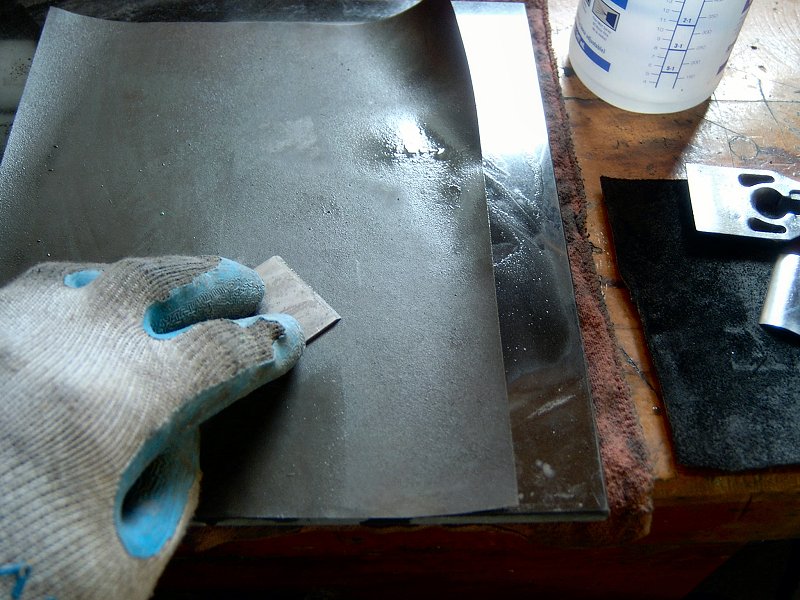
Honing the Cutter (2 photos).
For something to be "sharp", two polished surfaces must meet to make the edge. Little nicks and scratches on the bevel or the back introduce imperfections to one or both of the polished surfaces, so the blade cannot be sharp until those imperfections are removed. Grinding the blade was done to remove nicks and make the edge straight (although with this blade there will always be minute nicks due to the rust pits remaining in the back), but it also introduces a series of fine scratches. The blade is fairly sharp when it comes out of the grinding jig (since I'd already done some preliminary honing of the back as well), but it's certainly not polished due to all the scratches. Honing is done to remove the scratches and polish the blade, thus making it sharp. That means at each stage of the honing process, the goal is to remove the scratches of the previous stage, and nothing more. The back of the blade should already be flat, and the bevel should be at the correct angle and nick-free before honing begins. Otherwise you'll be there for hours trying to re-grind your bevel using 240 grit sandpaper, which doesn't really work. Still, the first stage with the 240 grit usually requires the most time as I work the blade until the hollow grind is gone and the bevel has an even color across the width (about 10 or 15 minutes). Every few minutes I strop the blade with a leather scrap to prevent a wire burr from building up on the back and give the sandpaper a fresh spritz with water from a spray bottle. As I work through progressively finer grits, it takes less and less time to remove the scratches from the previous grit. Once I get to 600 grit, I flip the blade and give the back a few strokes as I work, again to deal with that microscopic burr that always rolls out when honing. Once I hit 1800 grit, I don't use water anymore and only take a handful of passes, alternating front and back. At this point in the process I'm really not honing anything, and just giving the final polish to the blade. Those last couple strokes with the 4000 grit make the blade look like a mirror, and it's done.
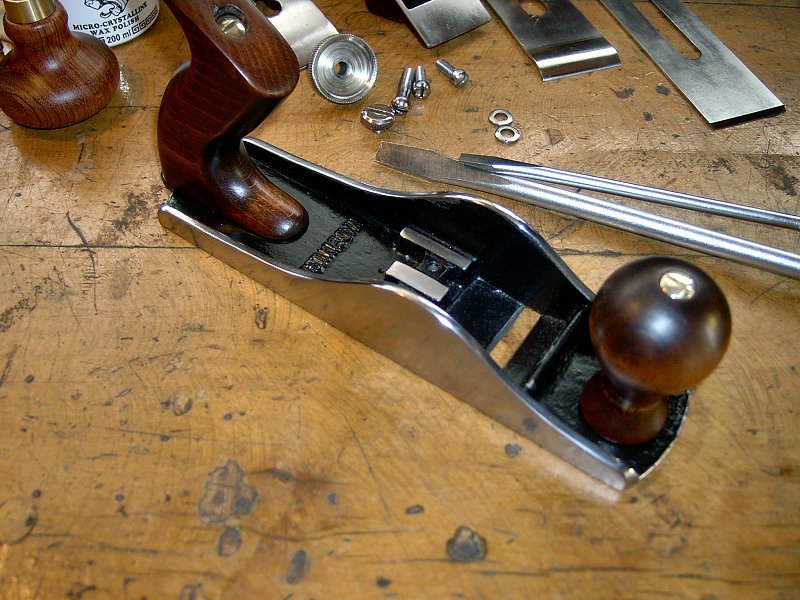
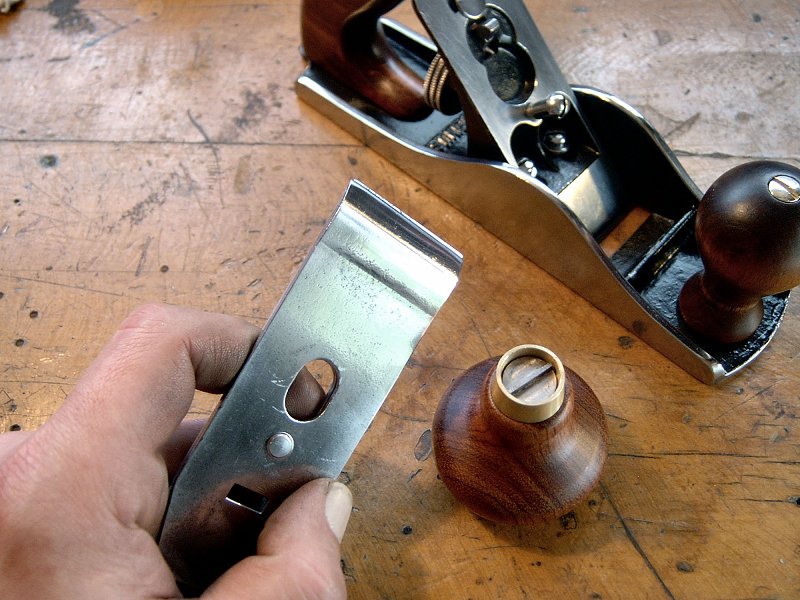
Putting it all together (4 photos).
Final Assembly
I get all the sharpening and honing gadgets put away, wipe down the bench, and I'm ready to assembly the plane. Each piece is given
two light coats of Renaissance Wax
![]() , and buffed after each coat with an
old tee-shirt - I find the wax to be a superior protective finish for the planes, although I still use Camellia oil on chisels and
pruning shears, etc. I install the studs for the knob and tote first, and gently snug them into the plane body with a pair of pliers.
The handles are then installed and the brass nuts carefully tightened with an appropriate size screwdriver. If the nut seems tight
yet the knob or tote is still lose on the plane body, the stud can easily be ground a tad shorter to allow the nut to hold the handle
securely. With the handles in place, I attach the adjustment knob and lever cap screw to the frog, then loosely attach the frog to
the plane body.
, and buffed after each coat with an
old tee-shirt - I find the wax to be a superior protective finish for the planes, although I still use Camellia oil on chisels and
pruning shears, etc. I install the studs for the knob and tote first, and gently snug them into the plane body with a pair of pliers.
The handles are then installed and the brass nuts carefully tightened with an appropriate size screwdriver. If the nut seems tight
yet the knob or tote is still lose on the plane body, the stud can easily be ground a tad shorter to allow the nut to hold the handle
securely. With the handles in place, I attach the adjustment knob and lever cap screw to the frog, then loosely attach the frog to
the plane body.
The cap iron is then attached to the cutting iron, and adjusted so there's about 1/32 of an inch between the tip of the cutter and the cap iron. Lee Valley sells a pretty handy tool made specifically for tightening the cap iron screw to the cutting iron, and with the amount of planes I've got I thought it might be useful. It's a perfect fit to the slot in the cap iron screw, and prevents over-tightening the thing by simply being a stubby little tool. It also prevents the screw slot from getting all chewed up, which seems to happen a lot on these old planes. With the irons assembled, I gently place them onto the frog and engage the tip of the adjustment yoke in the cap iron. Care must be taken here, since the frog is still pretty loose and the freshly sharpened blade could get nicked in the throat. The lever cap keyhole is hooked under the lever cap screw, and after a few turns of the screw to ensure the lever cap isn't too tight, the lever is snapped down and the plane is back together at last.
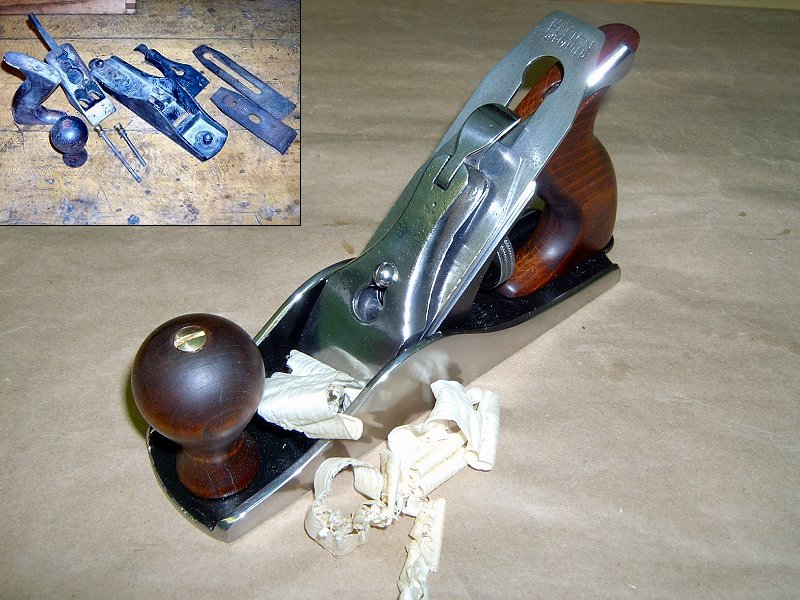
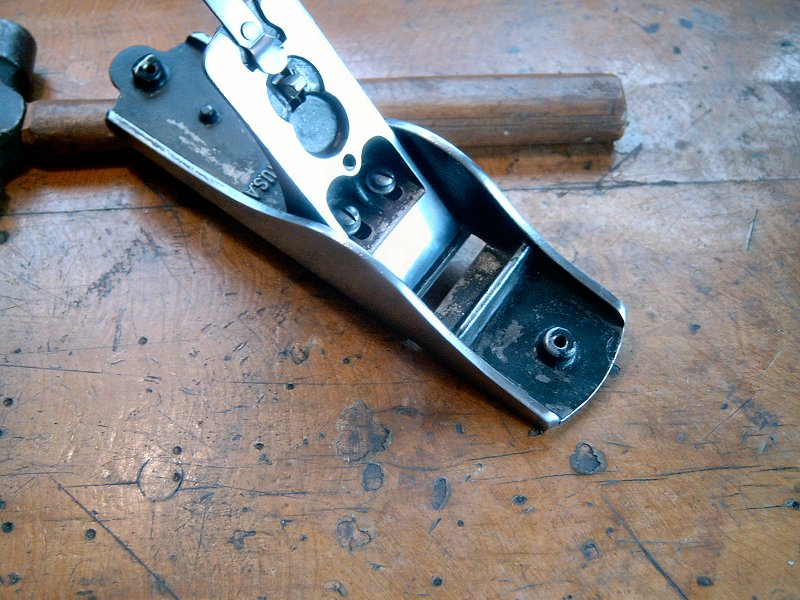
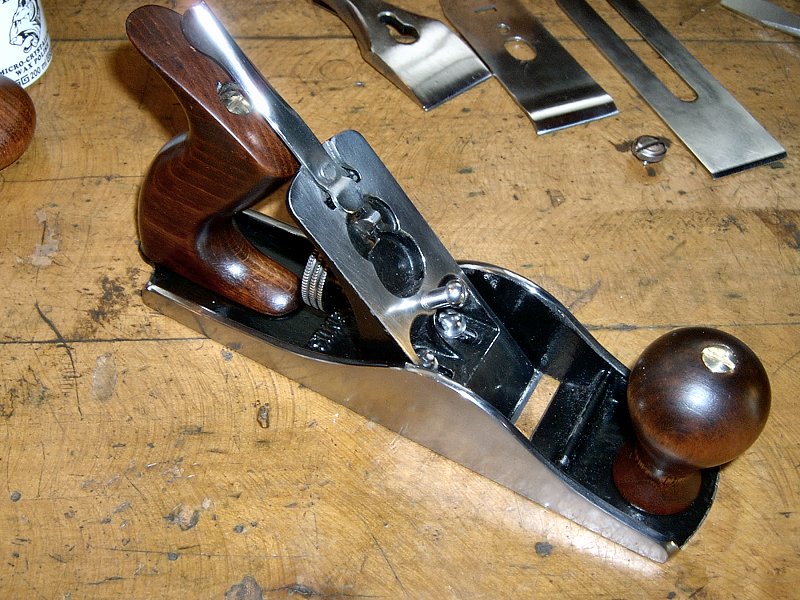
Tuned and ready for work.
It's not finished yet though - The blade depth is adjusted so I can see the blade through the throat when sighting down the plane sole, and then the frog is moved forward to close the throat as much as possible (and on this old Fulton, it isn't much). I try and hold the frog in position while I remove the cap and irons so I can get at the frog hold-down screws again. The frog screws are snugged up, and then the plane gets put back together again to double check that the frog is square to the throat. If all is well, the cap and irons are removed again and the frog screws given there final tightening. If adjustment is required again, this process is repeated until it's right. Once the frog is correctly positioned, I re-assemble the plane yet again. The last thing I do is give the lever cap screw a little twist after the lever has been snapped in place and check the blade tension against the frog with the depth adjuster to ensure I can still move the blade. Now it's ready for wood.
Additional Hand Plane & Vintage Tool Information
As my collection of hand planes and other vintage tools has grown over the last few years, my desire to document everything I want to keep track of has outgrown a single web page. All of the information that used to be on this page is still available here on the Kester House & Garden site, however I've re-arranged it a bit to make things easier and faster to navigate. The old page names still exist in case you've book marked them are made external links to them, but you may want to update your book marks for the new pages if you often refer to them.
Here's how the massive old Hand Planes page has been re-arranged:
- Within the Specifications section, where this page used to live, I've placed the table of Vintage Hand Tool Data as:
- Hand Tools, which contains a list of vintage hand tool data (not just hand planes), as well as catalogs and recommended reference book titles. Since this is just a table of data, it made sense to me to leave it within the Specifications section.
- The slimmed down Et cetera page has been added to the nav menu, and a sub-folder has been added to the site for it
which holds individual pages about tools or other projects, as follows:
- Hand Planes (this page) details the restoration and tuning of vintage metal hand planes.
- Joiner's Bench addresses the design and building of an English style joiners bench.
- Shop Equipment has information about bench vises and other shop equipment that'll end up in the garage eventually.
- Vintage Tools contains the images of all my hand planes (that used to be on this page) and other vintage hand tools.
↑