

A Bit of History
I moved to New England from Michigan back in 1986 after college. After a brief stay in West Gloucester, Massachusetts, I found this little place for rent in South Hamilton, MA. The house is facing the South on a 10,000 square foot lot, with a nice little lake at the end of the road about 50 yards to the East. It was a 3-season cottage built for summers on the lake in 1952 by the original land owners.

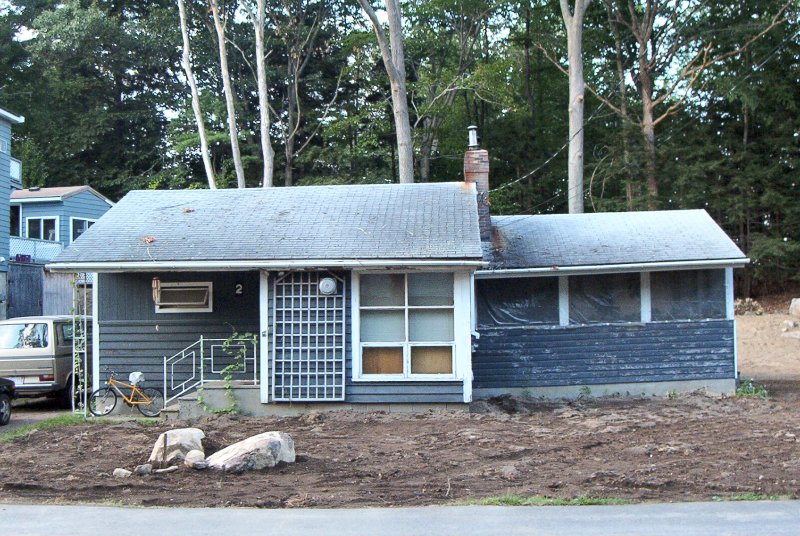
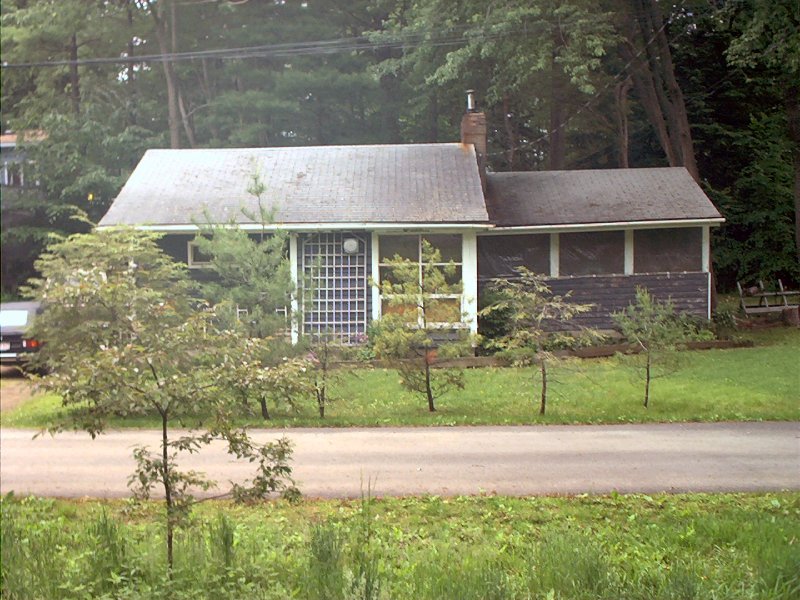
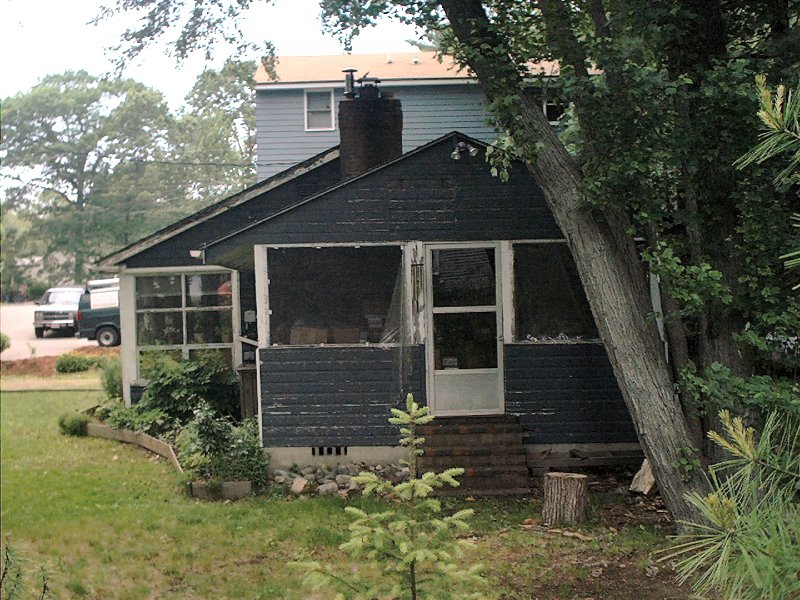
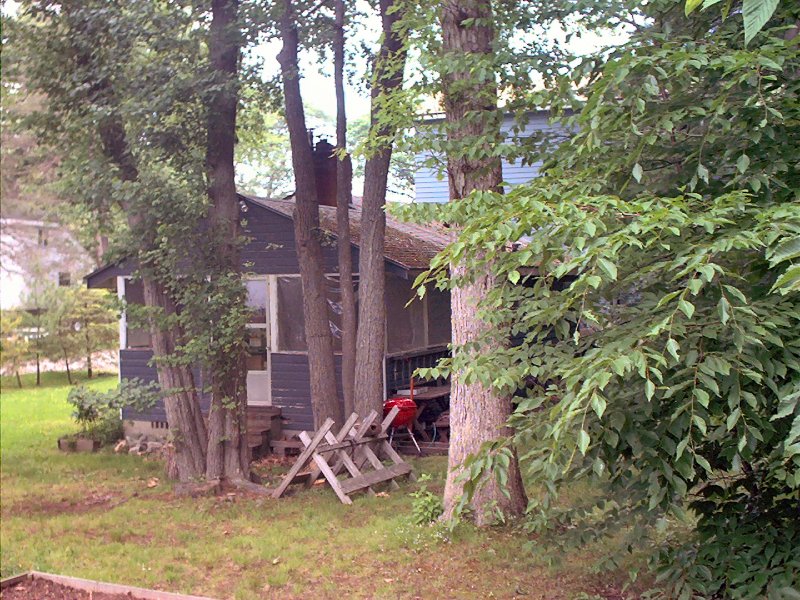
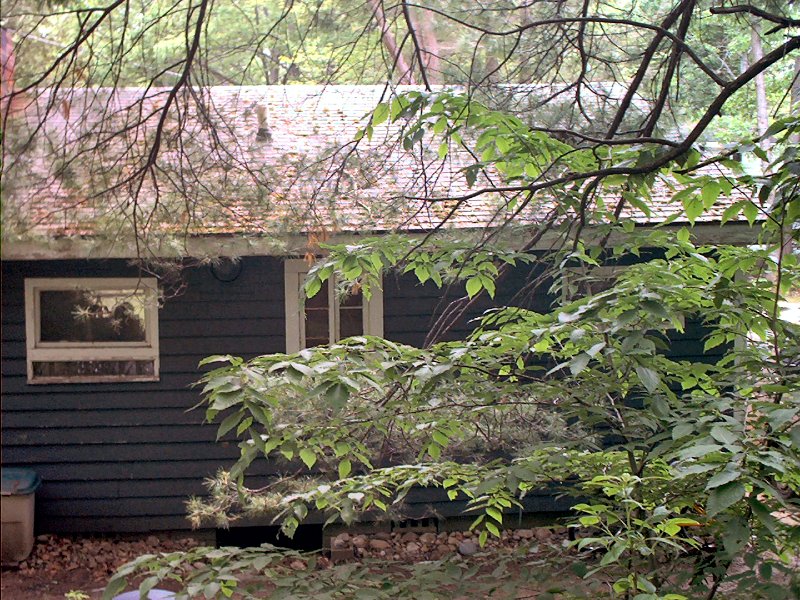
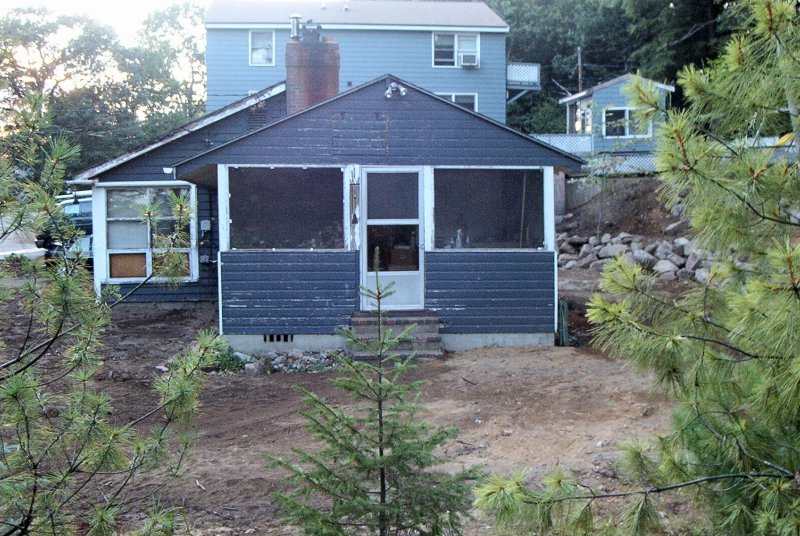
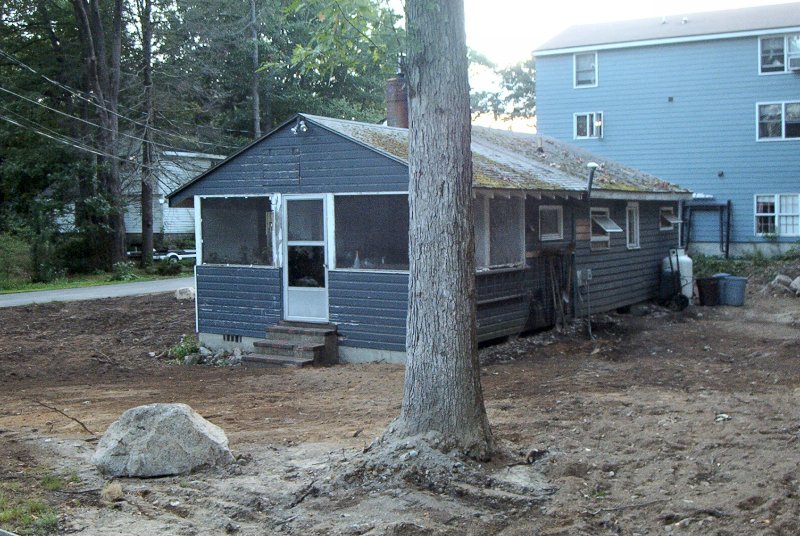
The house at the time of purchase, Summer 2002. (9 photos)
When their kids grew out of the place, they converted it to a 4-season structure and used it as a rental property. I came along 20 years later and the price was right, so there I was… paying rent (I loathe being a renter, really) and trying to pinch pennies to save for a down-payment, hoping to someday own my own home (but also not believing it would happen in New England due to prices here). The house was falling apart around me of course, but it wasn't my house, so I wasn't going to put any huge money into it — I took care of the yard and the house as best I could, but I wasn't going to deal with rotted sills and rakes, the leaky roof, sub-standard wiring and plumbing, and all the rest. Still, I had plenty of opportunity to poke and prod and think about what I'd do if I owned it. I also had a very good idea of what a complete train wreck it was.
In 1993 I met a wonderful woman that apparently didn't think I was a complete idiot, so I asked her to marry me and she said yes. We settled in to our humble cottage and kept our eye on the prize of getting the credit tidy and the bank balance going up. The house continued on its merry way of rotting back into the earth, and the landlord kept bumping the rent every time they had to fix something. The rent didn't go up much at all, then again they didn't fix much of anything either. We were then informed that they were thinking of selling it sometime in 2001. Yikes. I loathe moving almost as much as I loathe renting. Then it happened.
Up from the ground come-a bubblin' crude…
"Honey, it smells kinda funny in the back yard when it rains."
"Yes, yes it does… that would be the failed, 50-year old septic system".
"Hello Mr. Landlord? Yes, we sent the rent on time. Um, I believe there's a problem with the house though…"
So the septic system failed. Of course this was our fault with all that luxurious going to the bathroom stuff we had been doing. Kids these days. Now you won't see someone state this often, but that failed septic system turned out to be a real blessing, despite the aroma after a downpour. The landlord had already had some realtor friend come do a property value assessment before the septic system blew up, and I was certain the poor woman had suffered some manner of serious head trauma just before writing up her estimate. Did you look at the photos? Seriously, can you believe someone actually lived in that place? Looking back at those photos now, I'm astounded at how much we wanted to buy it. What a dump! Anyway, we then had our own assessment and home inspection done, and started talking prices. We met in the middle, more or less. More money for them, less money for us. It wasn't looking good.
The good news is that in Massachusetts there's this little gem on the books under Title 310 of the Code of Massachusetts Regulations, section 15.000: Title V of the State Environmental Code. Locals just call it Title 5. In a nutshell, it lays out regulations for proper septic system sizing and installation, as well as how to inspect a system to ensure compliance with said regulations. Then there's the kicker: any time a property with a septic system changes ownership, the system must be inspected for compliance with Title 5. If it is not in compliance, the seller must pay to repair or replace the system to bring it up to code. If a system has been inspected and fails, the seller has 2 years to repair or replace the system, even if they decide not to sell the property. Nummins, we'd already had an inspection done.
The better news is that the buyer and seller may negotiate a reduction in price equal to the cost of the installation of a new system, and then the buyers pay for the installation themselves rather than waiting for the seller to do it. With the stellar track record of home maintenance the landlord had already demonstrated, we didn't hesitate to negotiate the deal so we'd do the installation after the purchase was completed. The 2 year timer had started due to system failure, the landlord was shocked at the price of a modern Title 5 compliant system, and I think the tens of thousands of dollars they'd received from us as rent over the years finally softened them up to the point where we got a very reasonable price on the place. In June of 2002 we became home owners… and we didn't even have to move into the new house.
Title V: The Deforestation of Suburbia
The first priority as a new home owner was easy: make the septic system right. You may have noticed in the photo above, we had plenty of trees around the house. As our tree guy said: "Title 5 has caused the deforestation of suburbia…". The first thing our system designer said was "Cut down all the trees and then we'll get started." I like to think of myself as a bit of a tree-hugger type, so my response was "No, design the system around as many trees as you can. I'm not gonna cut down 100-year old Oak trees so you don't have to put any effort into designing our system." Years later I would come to regret that decision.
Anyway, the Pines went away, the Hemlocks went away, the Maples went away, the Beeches went away, but the Oaks stayed.
Two big Red Oaks and two White Oaks (big White Oaks are rare in these parts — most of them were turned into schooners
in Essex and Gloucester). The biggest of the bunch, a White Oak near the house, got a pretty good shredding of surface roots on
one side, and lots of soil compaction around the rest of it from heavy equipment. Still, the tree guy recommended we wait and see how
it would recover rather than just take it down at the time. It was refreshing to deal with a "tree guy" that really embraced
his profession as an arborist, rather than just hacking off limbs and clear cutting trees for fire-wood. I recommend without
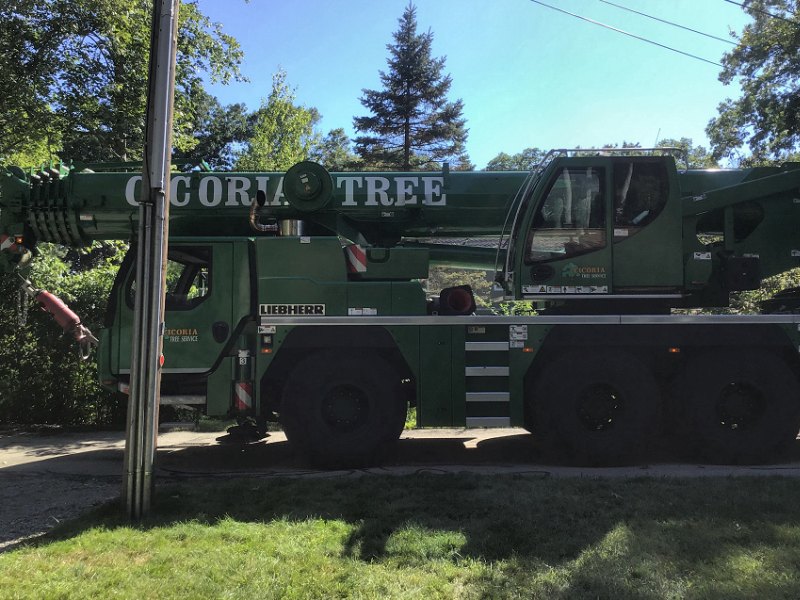
reservation Cicoria Tree Service![]() to anyone on the North Shore area of Massachusetts looking for the absolute best tree care service possible. I've had them to the
house a few times for tree work and they've been fantastic. I've also heard from friends that have used them whenever a crane was needed,
and they've all been amazed at how well they did the work, and that the price was very reasonable.
to anyone on the North Shore area of Massachusetts looking for the absolute best tree care service possible. I've had them to the
house a few times for tree work and they've been fantastic. I've also heard from friends that have used them whenever a crane was needed,
and they've all been amazed at how well they did the work, and that the price was very reasonable.
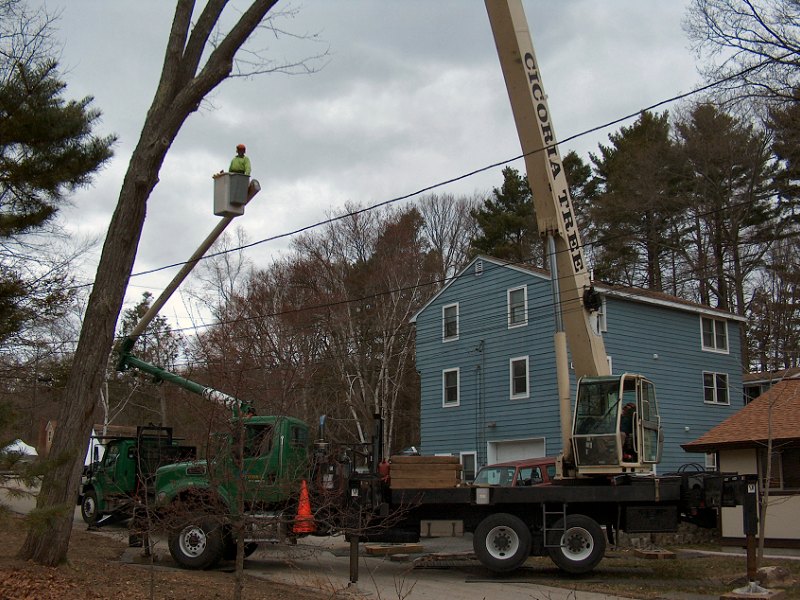
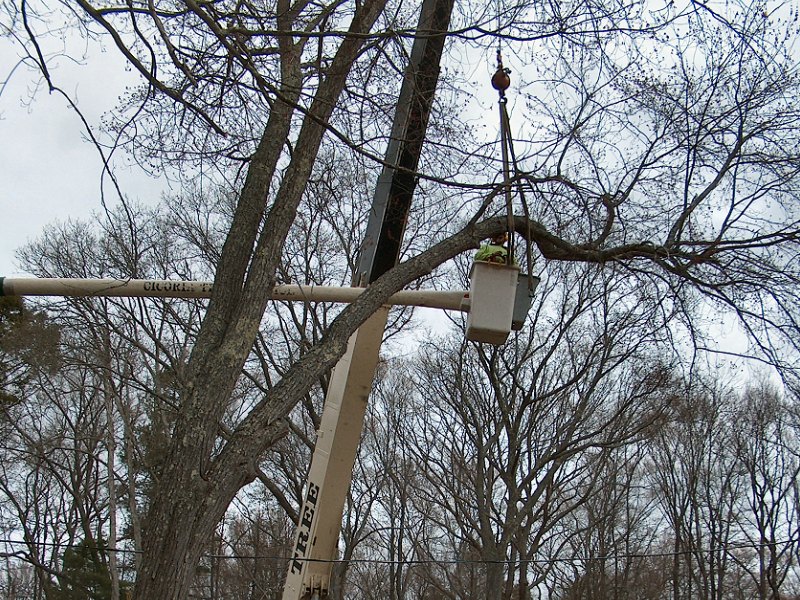
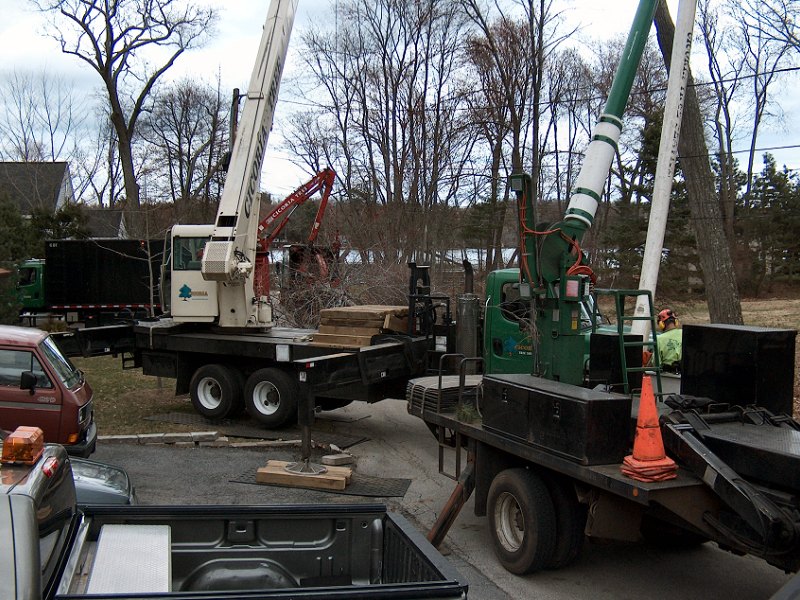
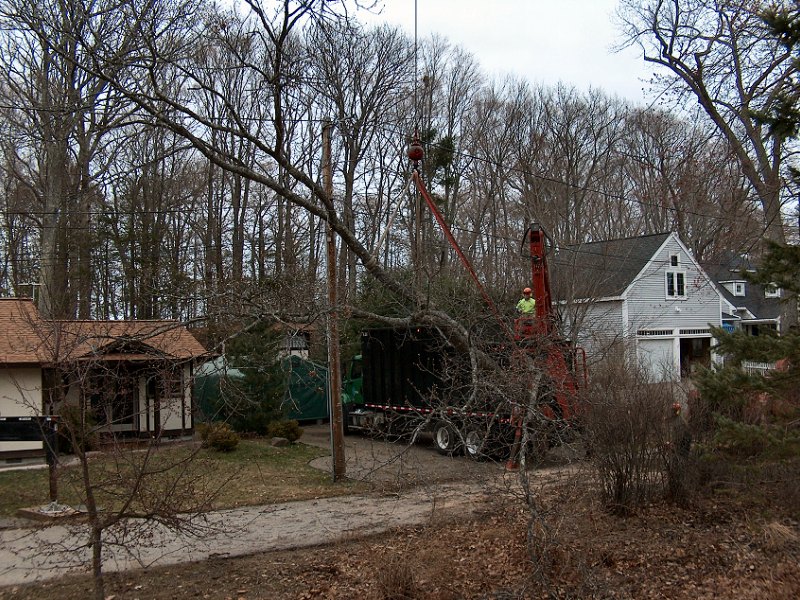
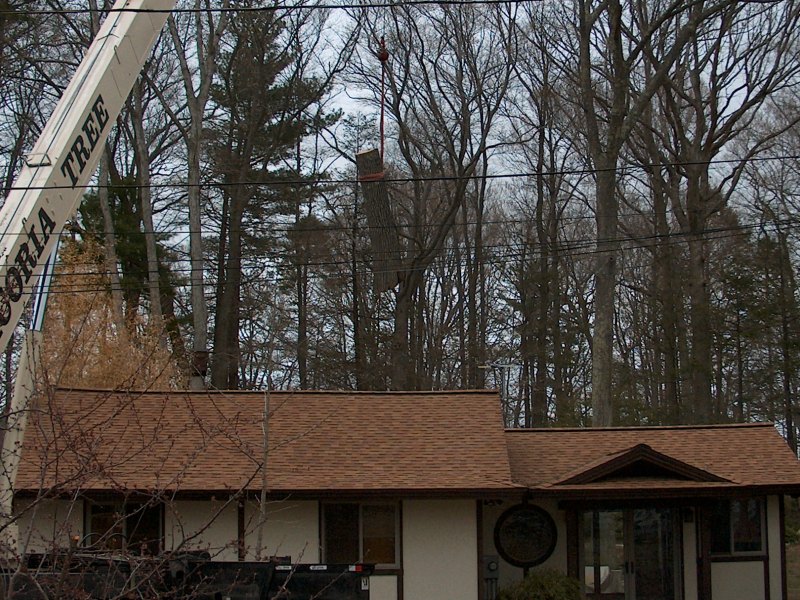
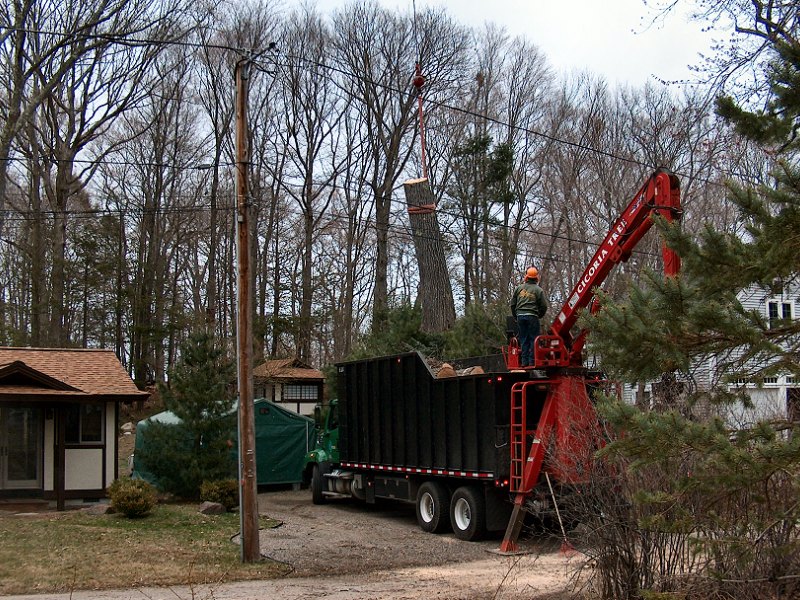
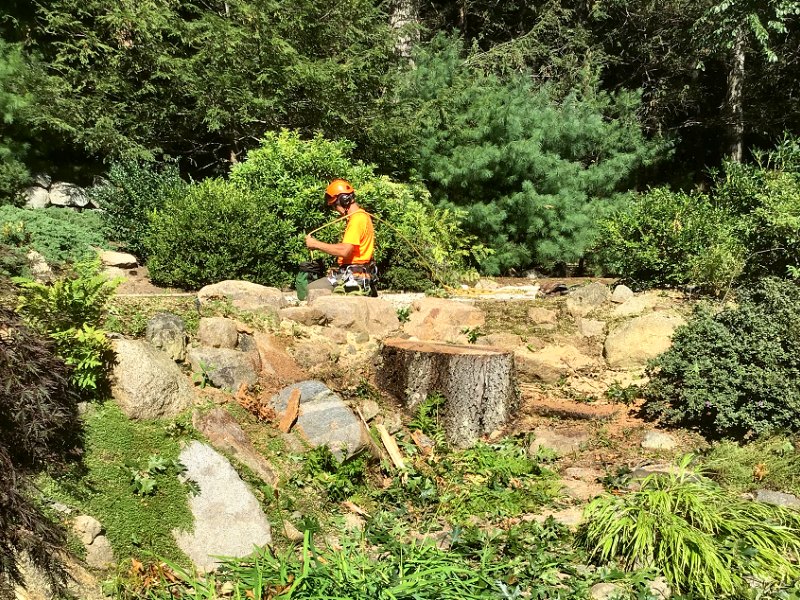
 Cicoria returned in 2008 for more tree work (7 photos).
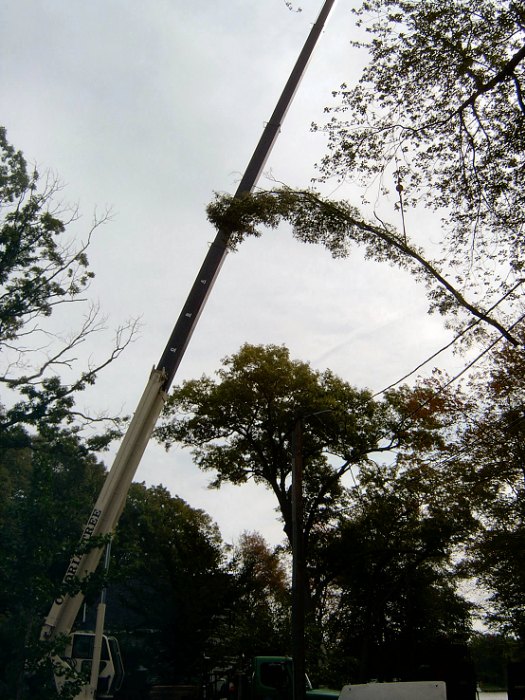
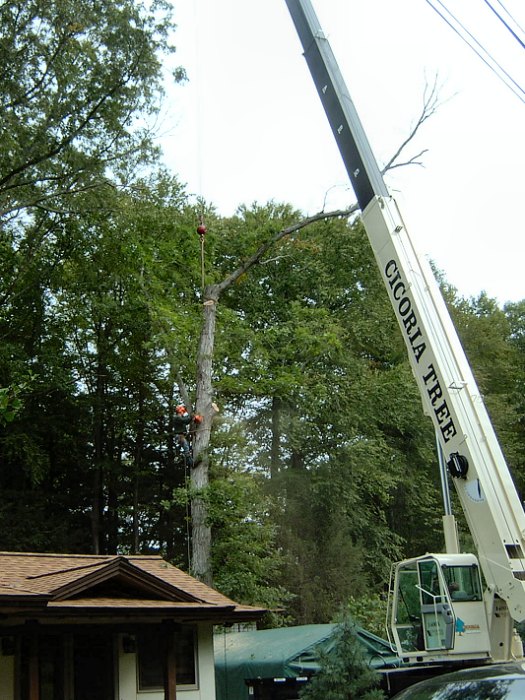
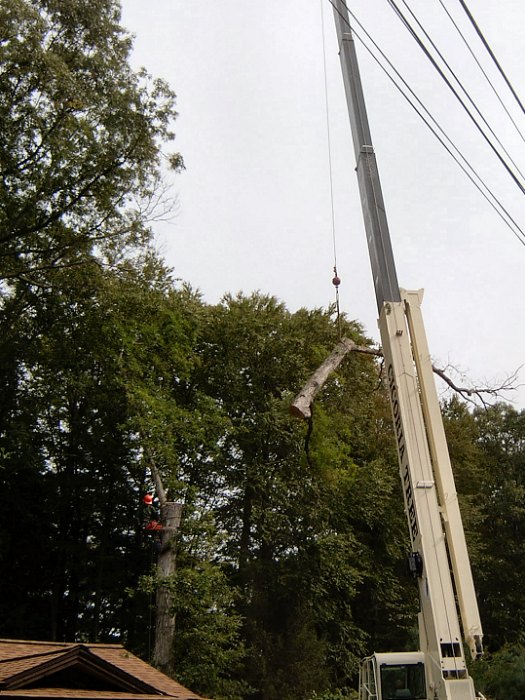
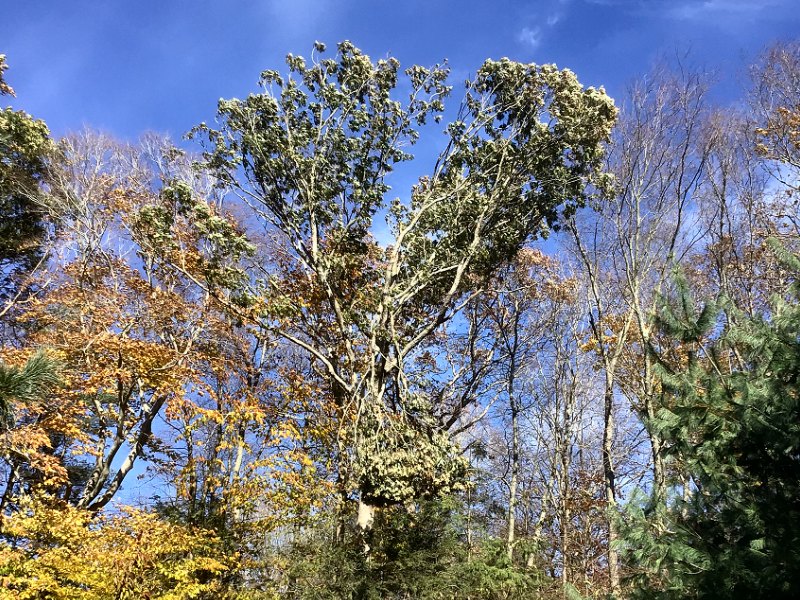
The White Oak: Fall 2008
Speaking of Cicoria Tree, this seems as good a place as any to tell the tale of the fate those two big Red Oaks and the White Oak
near the house that I'd made sure the septic system designer kept in place. I'd noticed over the years that the White Oak wasn't
lookin' too good, with less and less new growth at the tips of the branches. I called Cicoria to come have a looksee in the Summer
of 2008, and they agreed that it was not going to make it. The roots had been damaged too much during the initial septic system
excavation work, and it just wasn't making any progress on recovery. There was also a big limb in the Red Oak over the pond
that was hangin' over the house more than I liked, so we scheduled the tree work for that Fall. In September of 2008,
Cicoria showed up with the crane, log truck, and chipper, then the Red Oak limb and the White Oak near the house went bu-bye
(which was okay, as it would've had to go away eventually to build the garage over there). I did manage to save some
of it from the wood pile however. I talked with the owner of Markham's Sawmill in Essex to see if they wanted the
largest section of straight White Oak trunk, as I'd rather donate it for lumber than see it turned into fire wood. He offered
to collect the trunk section and take it to Burnham's Boatyard in Essex, in exchange for anything from his mill I could use.
I managed to get a wonderful slab of air-dried Eastern White Pine, about 2-inches thick and around 2-feet wide (which became
my "live edge" bathroom counter). Not all bad, and it also meant
fewer acorns and leaves to deal with each Fall.
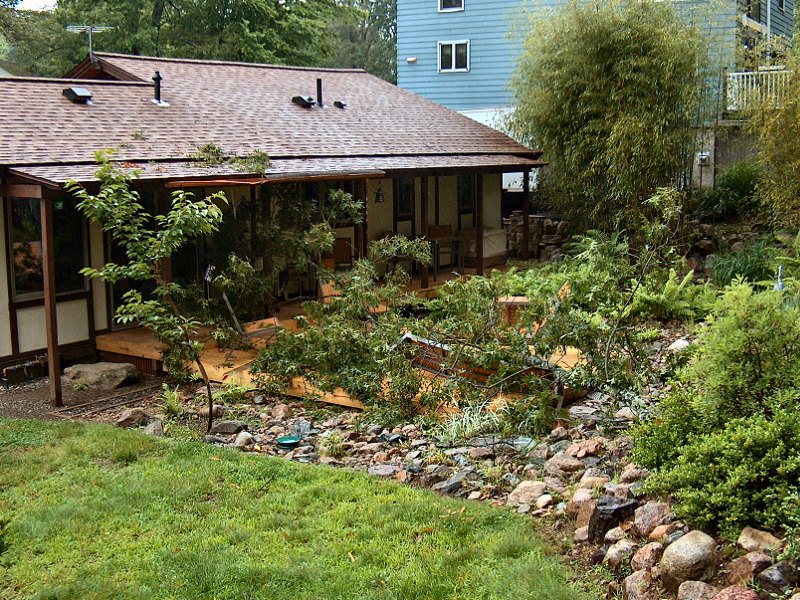
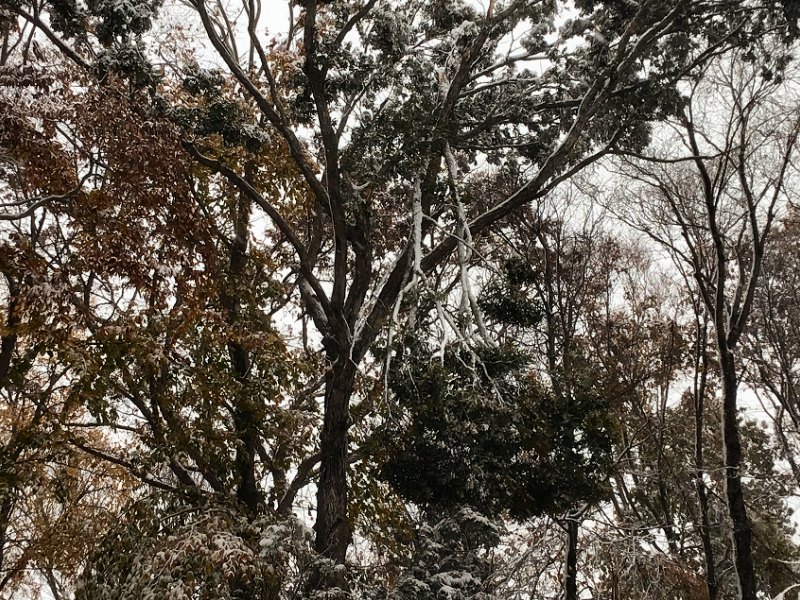
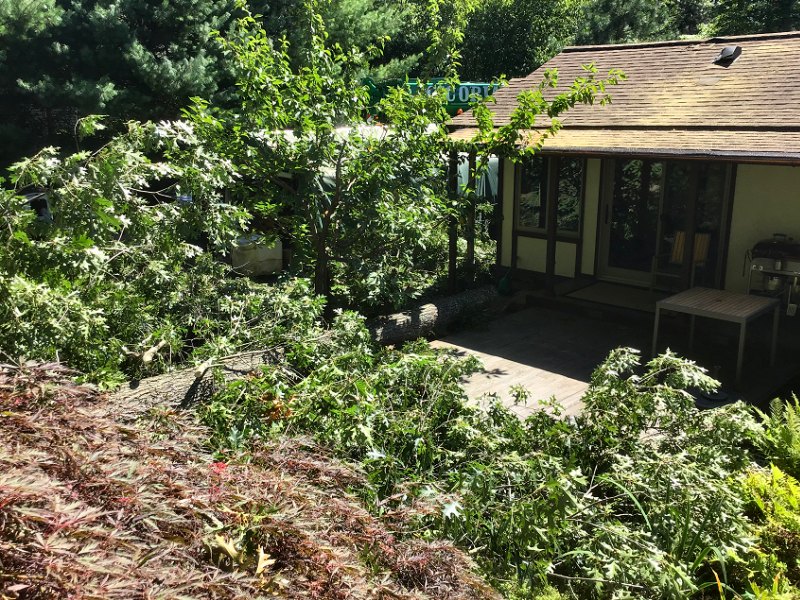
The Red Oak behind the deck dropped in to say hello in 2012. (2 photos)
The Red Oak Limb: Summer, 2012
Since the major tree removal and limb trimming work of 2008, I'd pretty much been ignoring the big Red Oaks behind the pond and
deck. While finishing up the deck work in the Summer of 2012, we got typical
Summer thunderstorm one night, then woke to find this mess (on the right) the next morning. One of the Red Oak limbs
just snapped and fell right on the deck. I was pleasantly surprised to find there was no actual structural damage to the new deck,
as most of the initial fall was caught by the bench (which was pretty much destroyed). The Copper gutter also got hit and
bent, but I was able to simply bend that back into shape. A couple hours with the trusty old Jonsered chain saw, then the machete
to take care of the branches, and I was back to deck work. We also ordered a new bench from Crate & Barrel to replace the one
the limb mangled. I even managed to sort of save the damaged bench by cutting out the twisted center section, then making
replacement legs and end pieces, painting them to match the rest of the frame, and ended up with a pair of shorter benches.
We were just happy we weren't sitting on the new deck when the limb came down!
 Cicoria returned in early 2015 for two more trees (10 photos).
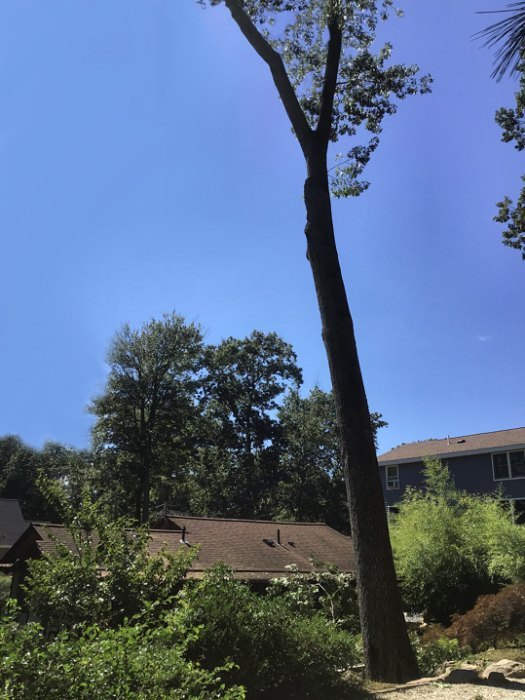
The "Pond" Red Oak: Spring 2015
In the Fall of 2014 while doing yard work and making more progress on dealing with the bamboo,
I had also grown concerned about another limb on the Red Oak behind the pond that was getting awfully long over the house. I
had Mark Cicoria come out and take a look to see if they could remove it. He basically said they would need the crane to get it out
of there safely, and if the crane was coming he recommended removing the entire tree. I thought the tree was okay, but he went over
to the base of the tree with little hatchet from his belt, whacked it once, and peeled off a fairly large section of bark. Underneath
the wood was black, which he surmised was probably a sign of "phytophthora root rot" (likely caused by stress to the root
system back when the septic system was built). The tree needed to go before it fell over onto the house. There was also a
fair sized Maple across the street from the house that was leaning over the power lines. I'd been asking the power company tree
crew about removing it (they come around every few years to trim stuff out of the wires), and they said unless it was touching
the lines, they couldn't remove it. Rather than wait for it to fall over, I asked Cicoria to deal with that one while the crane
was here for the Oak out back. We were added to their schedule (which was pretty well packed for that Winter), and just
had to hope that big Red Oak didn't come down in a Winter storm.
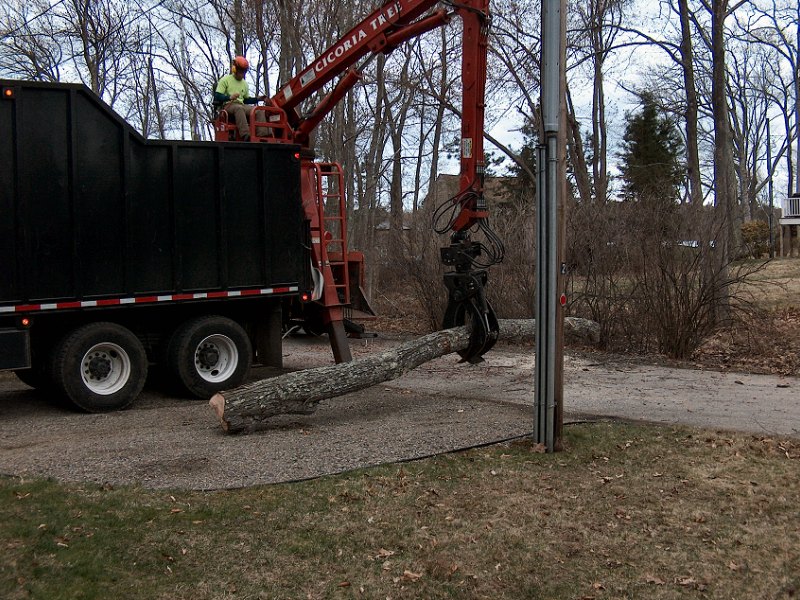
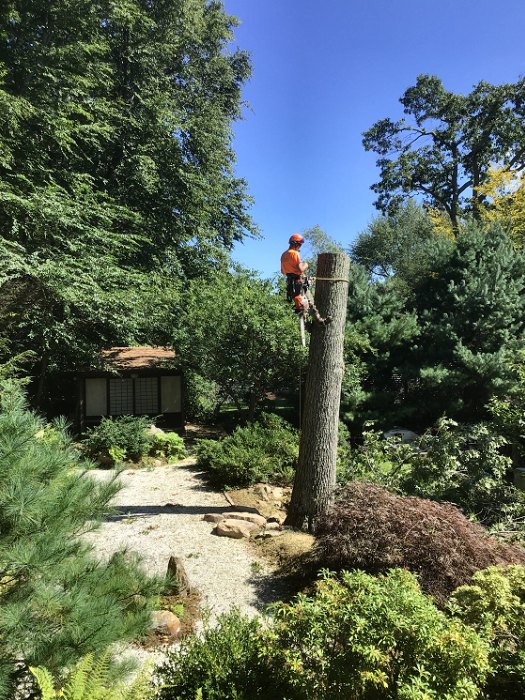
In early Spring 2015 I got a call that Cicoria was in the area and had finished another job early, so once again a bunch of green trucks showed up and trees went away. I let the neighbors know Cicoria was on their way, and we got some cars moved around so they'd have plenty of room to work. It was pretty impressive to watch this crew thread these huge limbs between all the power lines, then into the chipper and the log truck. They started on the Maple over the power lines, and had to use their long-arm bucket truck along with the crane to the get limbs from that thing clear of the power lines. When they took the last chunk off the stump, we found the stump was entirely hollow, completely destroyed by carpenter ants. No idea how that tree managed to stay up as long as it did, but I was glad to finally have it removed.
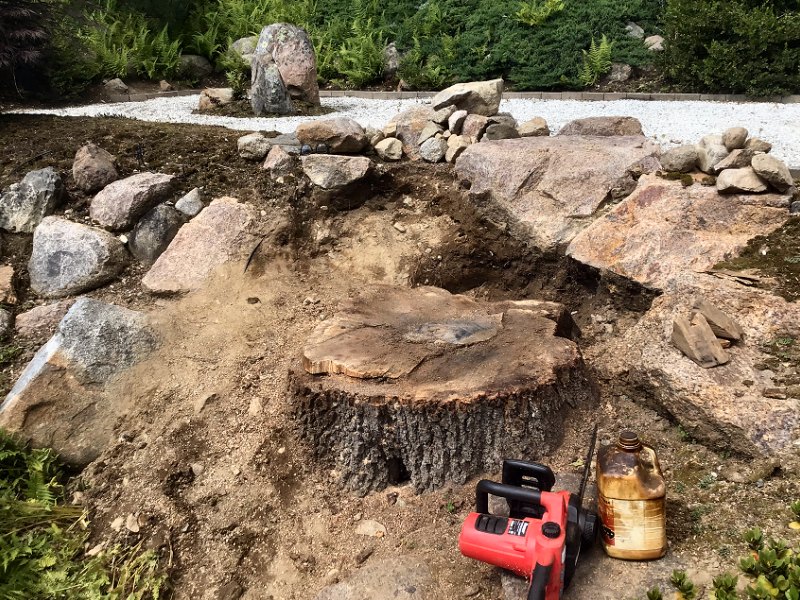
Removing the stump from the "Pond" Red Oak. (6 photos)
The Red Oak out back by the pond went away in identical fashion to the White Oak a few years earlier: One of the guys was lifted into the tree with a crane strap, then they tied off each of the large limbs, cut it off, and lifted it over the house to the driveway and street where it was chipped or put in the log truck. I think it took less than three hours to make both trees go away, and completely clean up the work area. Now I just had to deal with that big stump next to the pond.
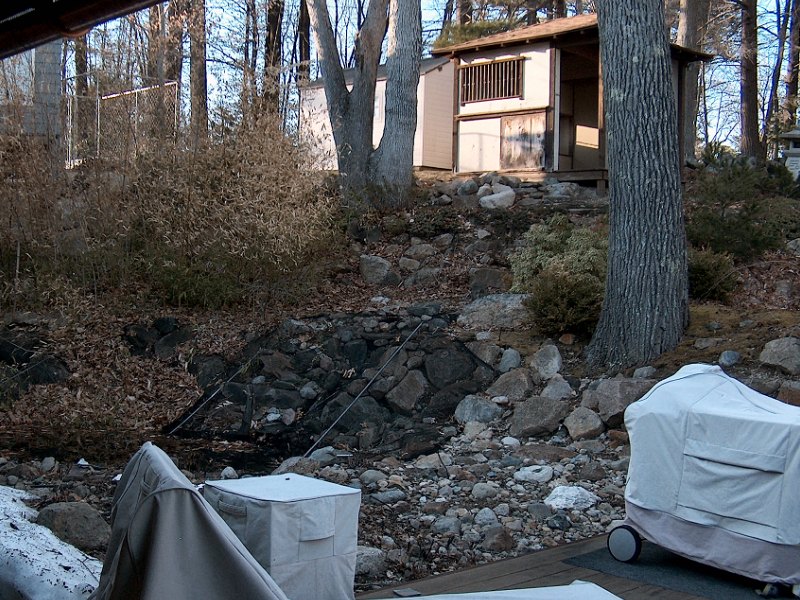
Dealing with the "Pond" Red Oak Stump
It seems I then spent most of 2015 working on the joiner's bench and continuing to work on the bamboo
(and trying to get my mashed right hand working again). I finally got around to doing something with that stump late in the
year. The stump project started with doing a little re-build work on my old Jonsered chain saw. With the saw tuned up and running
pretty well, I thought the best approach would be to excavate around the stump a bit to allow clearance for the saw, then work on
cutting off chunks of stump to get the whole thing below the surrounding ground level. Cutting away stump sections to form a
sort of "stair step" profile that matched the hill, I could then place a few medium, sized rocks on the "steps", and
backfill the area to make the stump disappear. The plan worked well, and I was able to get the stump cut away and buried before
the end of the year, thanks to a mild early Winter. I even got some Compact Thyme transplanted amongst the new rocks from other
areas of the hillside, and by late Spring of 2016, there was no sign of that big Red Oak. Leaf clean-up went a lot quicker with
that thing gone too.
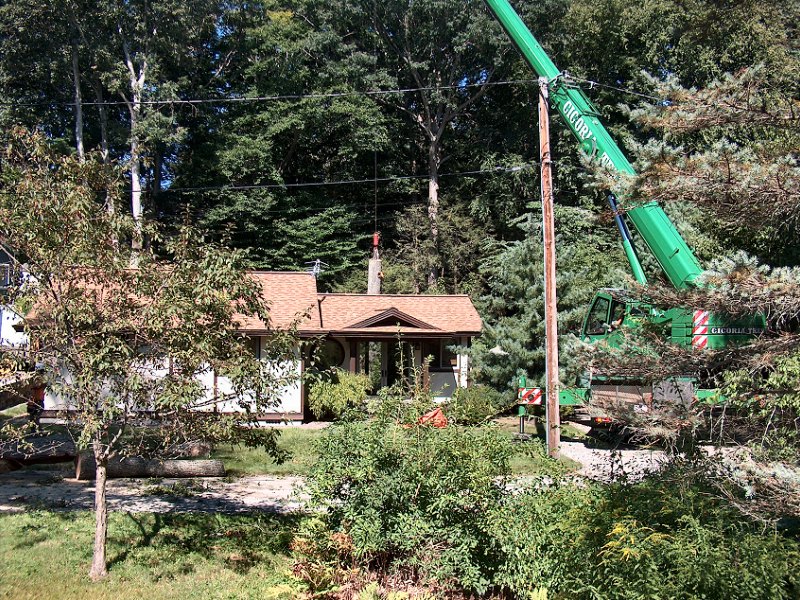
 The last Red Oak came down in 2020 (6 photos).
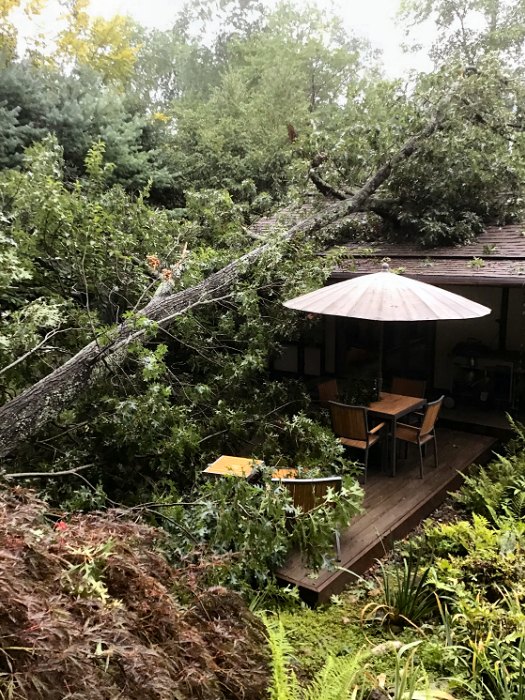
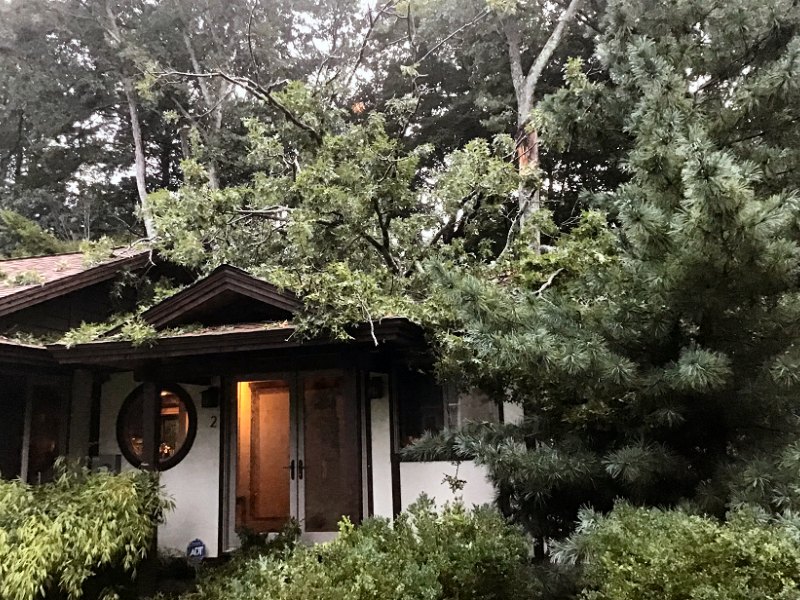
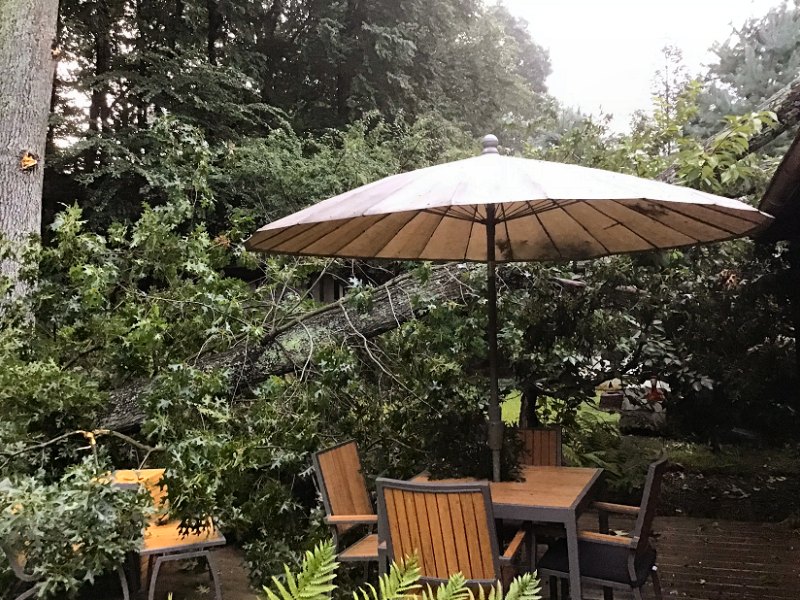
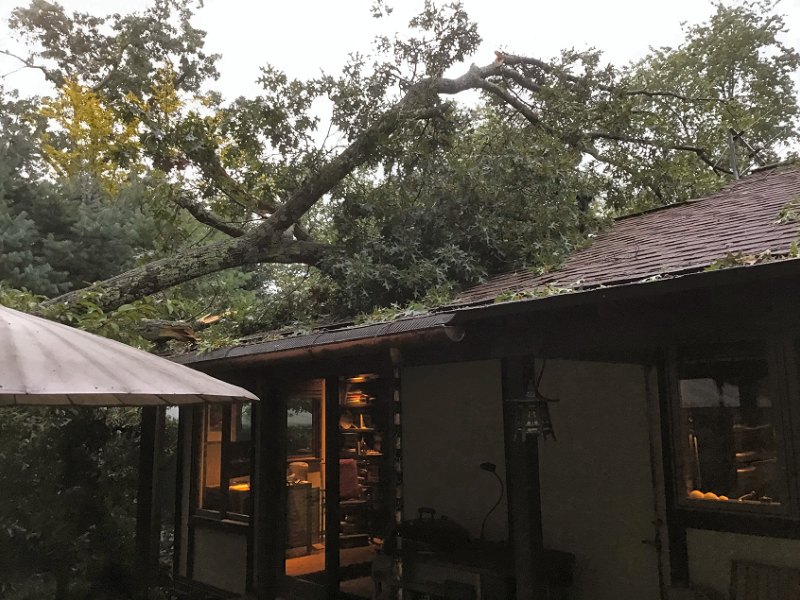
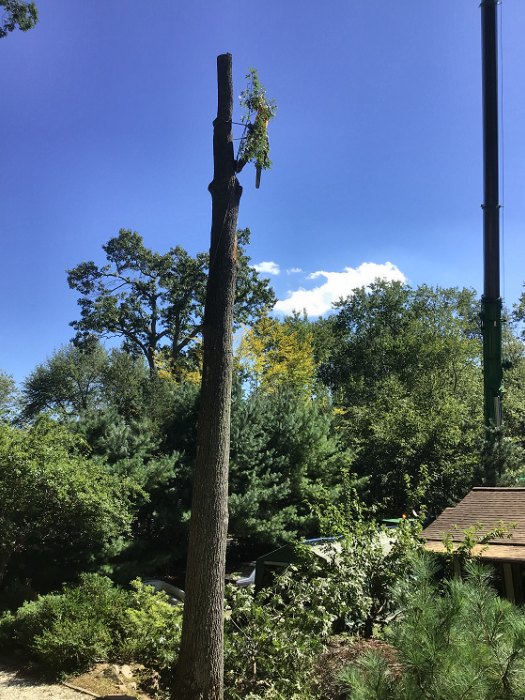
The Last Red Oak: Fall 2020
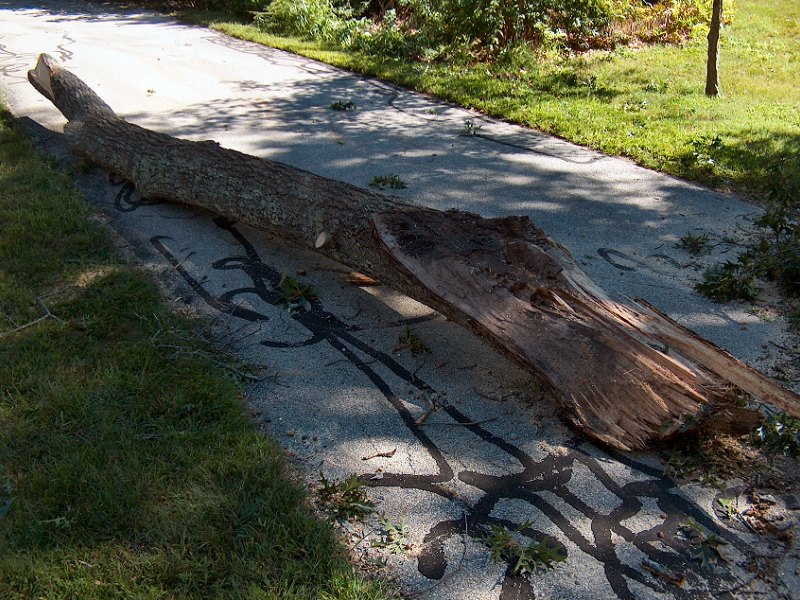
When I say "Fall 2020" above, I ain't kiddin' — the last of the big Red Oaks fell on the house at 6:30 in the morning
in early September of 2020. The whole thing didn't come down, but a good sized limb just let loose and crashed to the ground. I was sitting
in my office enjoying a cuppa Joe when a heard a big crack that sounded like thunder, and spun around to see a big limb come
through the ceiling of the genkan a couple feet away. The lovely bride usually takes her coffee at the table on
the deck, but thankfully she hadn't gone out there by the time this thing came down. No wind, no rain, yet this thing had just let go.
I was quite shaken, but managed to get into the files and find our homeowner's policy to try and figure out what to do. I called the MAPFRE Insurance toll-free claim number, fully expecting to get an answering system, and was shocked to have my call answered immediately by an actual person (at 6:40 on a Thursday morning, no less). They were very calmly asking if everyone was okay, and if there were any power lines downed or other dangers, and generally helped me calm down quite a bit. They said to take a few photos, then go ahead and call a tree crew to get the stuff off (and out of) the roof. They'd have a local adjustor get ahold of me soon to come have a look. My next call was to Cicoria Tree, of course. I'd been dealing with Cicoria for all the tree work at our place for nearly 20 years at this point, so I was hoping they'd be able to come have a look at the damage within a few days (they usually have 2 or 3 months of work lined up all the time). I called their "emergency tree service" number, again expecting to leave a message. The owner of the company answered the call on the second ring…
"Mark Cicoria"
"Hey Mark, Jeff Kester calling. We had a limb break off one of our Oaks and fall onto the house."
"Is everyone okay?"
"We're fine, just a bit shaken up. It did put a couple holes in the roof"
"I'm on the road now — I can be there in about 10 minutes."
Five minutes later he pulled in the driveway. The limb had crashed into the house at around 6:30 and Cicoria was there before 7:00. I was amazed. He looked over the damage then called his office. A few minutes later he walked over and let me know he'd have a crew on site that afternoon to get the limb off the roof. He basically said there's no "waiting list" for emergency work, and the roof needed to be cleared off so the insurance adjustor could properly assess the damage. The big crane wasn't available that day, but he figured he could get the log truck close enough that they could use the small crane on it to get the weight off the roof and let his crew cut the limb into manageable pieces. So that afternoon, in the rain, the log truck showed up with a small crew and the roof was cleared. I had a few extra shingles from when I'd put the new roof on back in 2006, so I put few temporary patches over the holes.
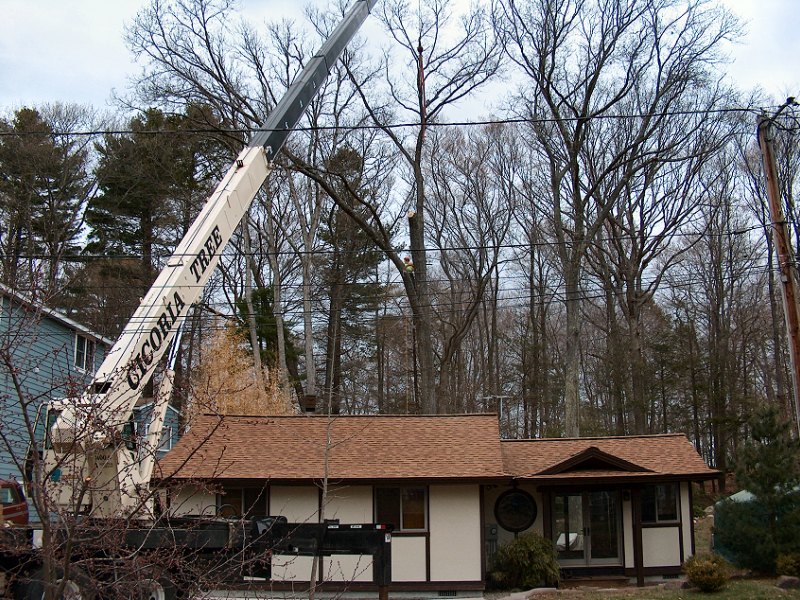
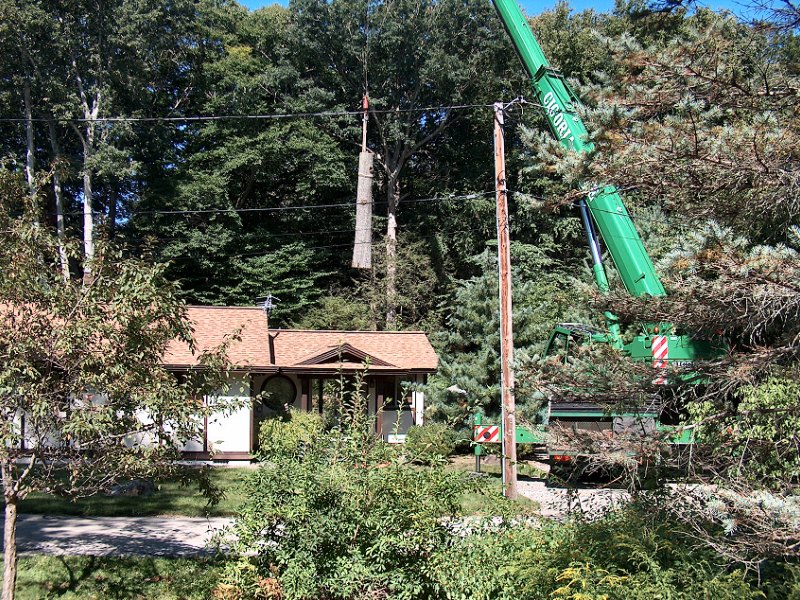
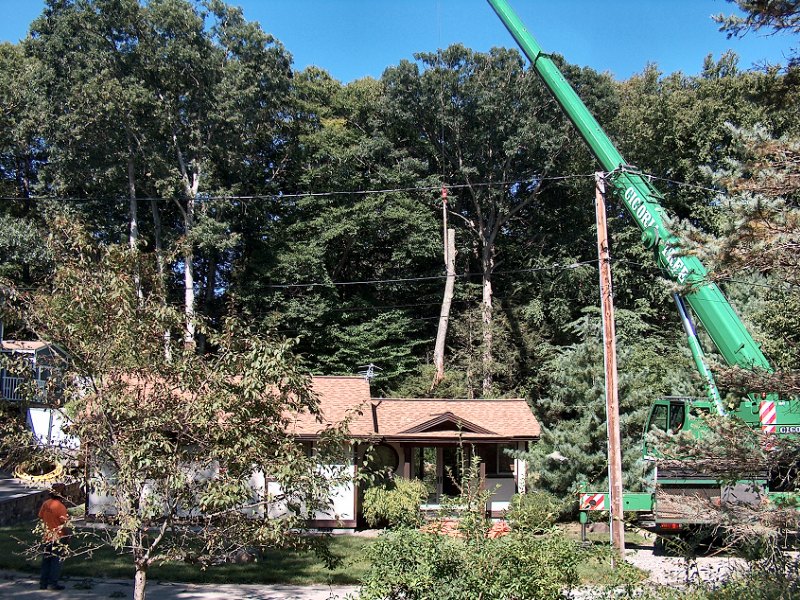
Removing the last Red Oak (11 photos).
He had also mentioned that I should tell the insurance company that he recommended removing the entire tree (he said sometimes insurers will only cover the cost to remove the broken limb that caused the damage, and not what's left of the tree regardless of the tree condition). I got a call from the adjuster that afternoon, sent her a few pictures, and she said she could come by early the next week to have a look and make her recommendations for repairs. I asked about removing the entire tree, and after she saw the photos she said to go ahead and have Cicoria remove everything. I let Cicoria know, and they said they'd be over on Friday to take care of it. I guess doing business with the same contractor for nearly 20 years was paying dividends. The day after the limb broke, Cicoria's big crane, log truck, and chipper showed up once more and the last Red Oak went away.
The weather was beautiful, and the work was taken care of without any issues. We were getting accustomed to the work flow by now, which started with getting rid of the rest of the standing Oak first. As usual, it was sawn into big chunks, with each chunk lifted over the house and laid in the street for the log truck and chipper to deal with. The crew all had headsets built in to their hard hats, and they were in constant communication while they did their work. Once the tree was gone, they then used the crane to lift big bundles of limbs and sticks from the back yard out to the street for the chipper. The last thing to get removed was the big limb that had broken off. With that the "Deforestation of Suburbia" (or at least of the KesterHouse & Garden), as said in 2002, was mostly completed. We still have one White Oak up by the tea house that seems to be holding up well (I have Cicoria check the health of that thing every time they're here, based on our not-so-great Oak tree track record). Details of the repairs to the genkan ceiling and the roof replacement work may be found within the Genkan and Roof pages.
 Another broken Oak limb! (3 photos).
You Must Be Kidding: Late Fall, 2020
I was still working on the much easier job of leaf clean up that Fall after the removal of the White Oak and the two Red Oaks, when one
night in October 2020 the weather turned cold and we got an early snow storm. With the snow piling up, we heard another big
crack from a tree somewhere in the back yard. All that was left in our yard to come down was that big White Oak by the tea
house, and that thing had been through many Nor'easters and a few hurricanes without any trouble. We grabbed a light and took a look
from the back porch, and it seemed fine. It must've been from the woods behind the house, so we went back to bed. The next morning we
could take a better look to see what had happened. There's another big White Oak just beyond the property lines behind the garden shed,
and one of the limbs in that tree that overhangs our back yard had been blown upward and somehow snapped back on itself. The piece of
broken limb was just hangin' there on what remained of the original limb, way up in the tree. Crazy.
You know by now what I did next. Cicoria showed up a couple days later to take a look, and also noticed a big chunk of the trunk of a nearby Black Birch was well rotted from where that tree had lost a limb years ago and never healed properly. As the Black Birch leans over the garden shed, he also recommended that tree go away too. This was going to be a little more complicated, since both trees are on the property of a neighbor that owns the strip of land behind our lot as part of the property for their seasonal cottage on the lake. A few phone calls and e-mails later I had the proper contact information for that neighbor, and sent along the work estimate from Cicoria (which required the crane for the work). I asked that we mostly split the cost, with me taking the larger part of the price. I'd sent fresh photos, but they wanted to come have a look as a family friend of theirs also ran a tree business with a bucket truck. As soon as they got a look at where these things were located and the height of the broken limb, they agreed to split the cost for Cicoria to come do the work. The Cicoria crew showed up a couple weeks later and removed the Oak limb and Black Birch with their crane (no photos of that work, this time around). As much as I appreciate the excellent work they do, I'm hoping they won't need to do anything else here for a long time.

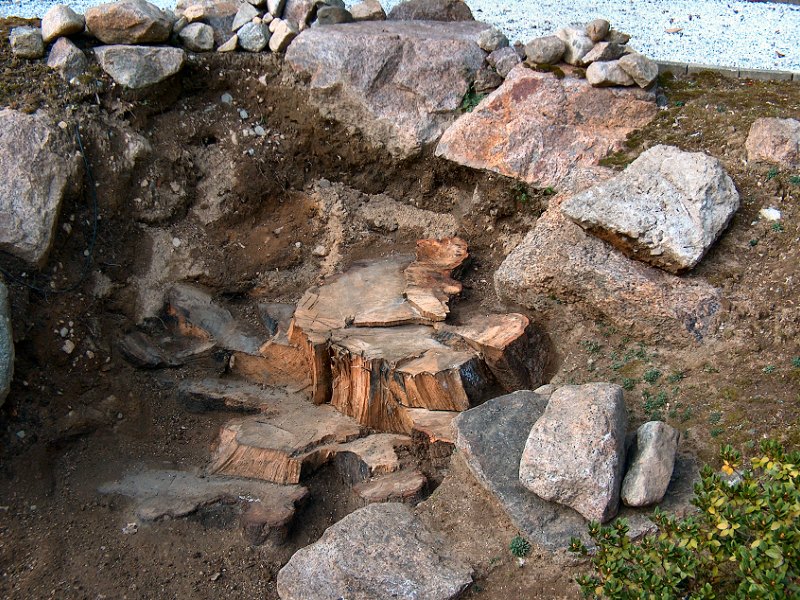
Removing the stump from the last Red Oak. (5 photos)
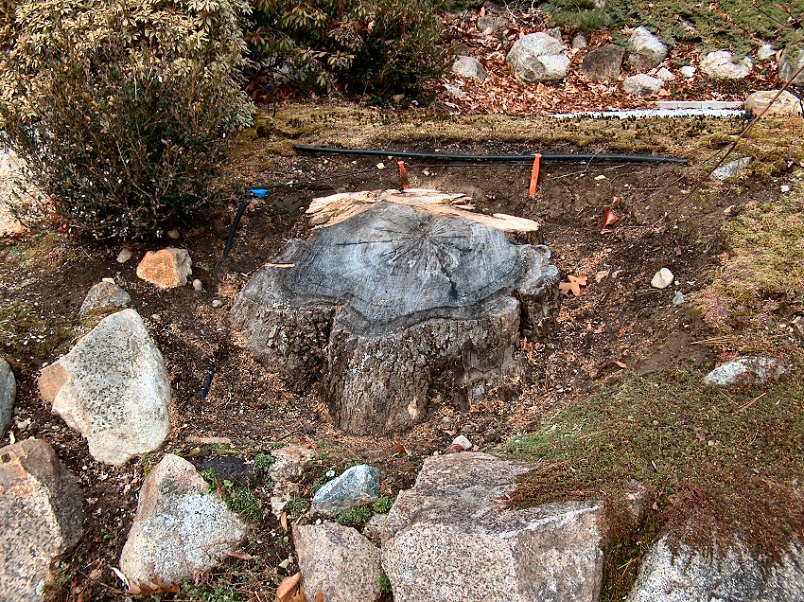
Dealing with the Last Red Oak Stump: Summer 2021
While trying to finish up the bamboo root barrier project now that the last of the Oak trees had been
removed, I also took some time to try and make the last stump in the hillside disappear. I pulled out the old Jonsered 14-inch saw
with the intent of hacking away at this thing the same way I'd done the last one. The last time I'd used the saw was when I did that other
stump back in 2015, but now it just wasn't havin' any. It would start and idle okay, but if I tried to get it up to speed it just
sputtered out. I tried cleaning the carb and adjusting the high-speed mix as best I could, but no joy. The other issue was that I wanted
to try and get a single slab sliced off the top of the stump (thinkin' it might make an nice table top), and a 14-inch saw wasn't
gonna do the trick for that. I asked a couple friends that had sizeable Stihl saws, but with the pandemic poppin' up again and their sick
kids, that plan wasn't workin' out either. I briefly considered buying that gorgeous Milwaukee M18™ 16-inch cordless saw, but at around
$500 for the saw and another $100 for a proper extra battery, I just couldn't justify getting it (especially since almost all
the trees had been removed from the property at this point). I ended up just going to Harbor Freight tools and pickin' up their Bauer®
16-inch corded electric saw for $70 and getting on with the project. I also grabbed one of those "2-in-1" saw
files after the friend with the Stihl had recommended it (the Bauer® 16-inch uses a .375" file, by the way),
along with a "stump vise" and an extra Oregon S57 chain, just in case. That sure makes keeping the thing sharp easy while I was
accidentally stickin' the end of the bar in the dirt around the stump as I worked.
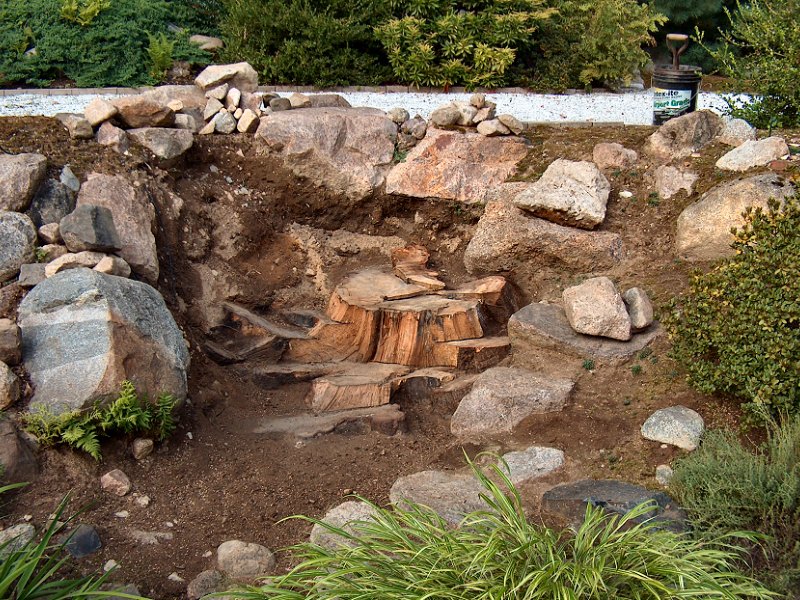
As I'd done last time, I excavated around the stump to allow clearance for the saw, and got the larger rocks moved with the 6-foot pry bar. After I got the slab cut off the top, I did the same kind of "stair step" horizontal cuts as I'd done on the other stump, then split off chunks to remove wood and repeat the process. It was slow going, but the saw performed surprisingly well (sharpening the chain after every few cuts and keeping the oil topped up certainly helped). I ended up packing the wheelbarrow with offcuts over five times, then taking it all up to a neighbor who heats with a woodstove. After a couple weeks of sawing and chopping, it was ready for rocks and fill. I kept the little rock path the leads up to the karensansui, then built up the area over the stump to match the surrounding hillside. I transplanted a mini-Rhododendron at the top of the filled area, and left another spot a bit lower to move a Mountain Laurel in to that was getting a little big for the herb garden. The rest of the area would get filled with moss and Compact Thyme. With that, I don't expect and more major tree work for the entire property. It sure would have been a lot less hassle (and a lot cheaper) if I had just clear cut the back yard as recommended by that septic designer back in 2002.
The New Septic System
With the trees mostly gone George Ricker Jr. Excavating & Septic came along and put in the new septic system. I happily recommend George and his guys for any work you might need done that requires diggin' holes and pushin' dirt around. On time, on budget, and he does as good a job cleaning up the mess as can be expected, considering the kind of work he's doing.
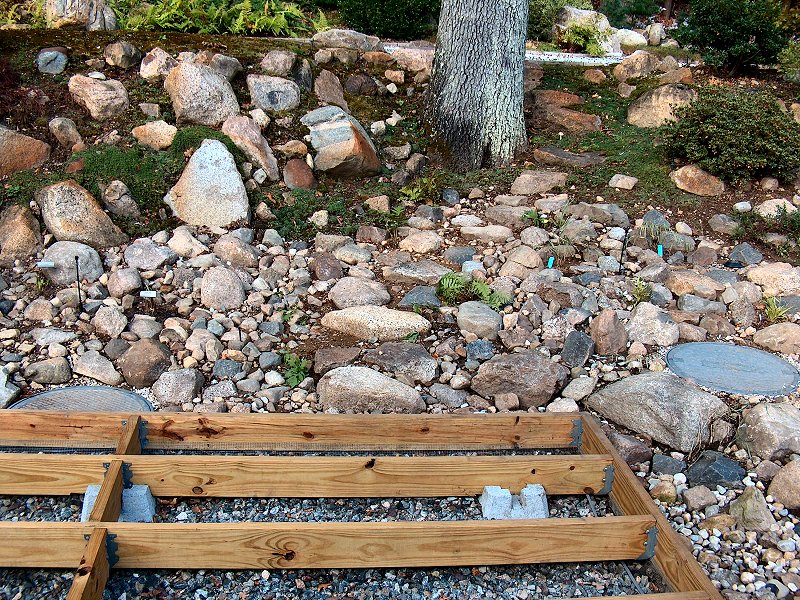
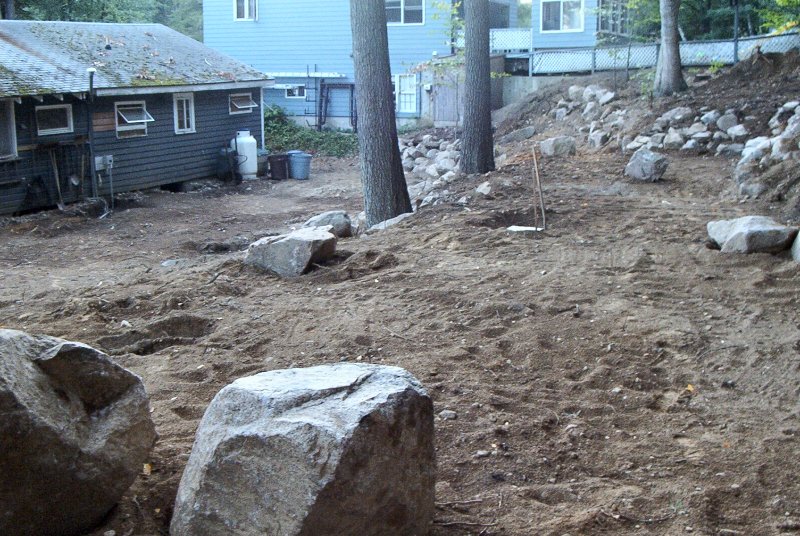
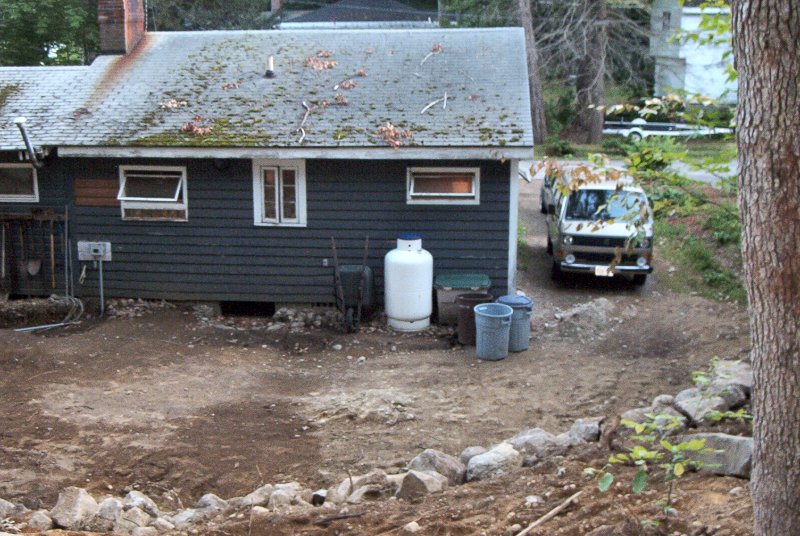
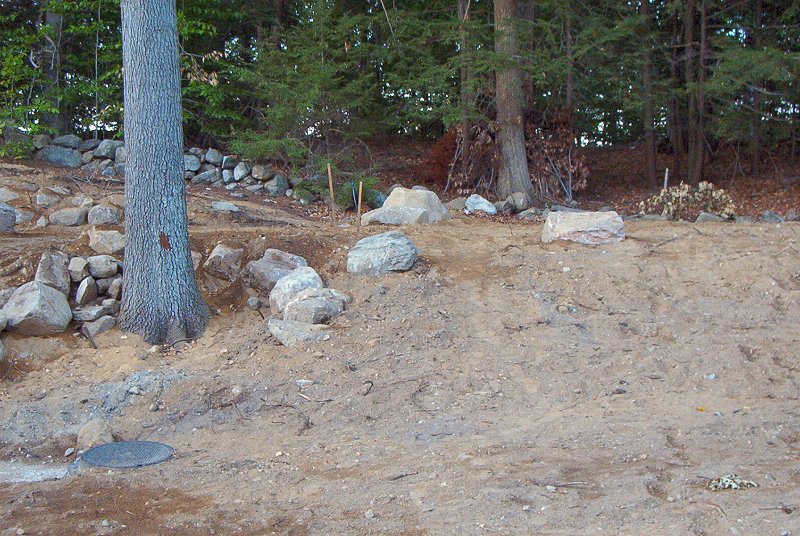
The septic system installation is finished, August 2002. (8 photos)
If you look through the photos here you'll get an idea of the state of the place after the installation was finished. I managed to get George to carefully transplant a half a dozen White Pines and Spruce from the front of the house to the East side of the lot (no small feat with an excavator — the guy is amazingly talented at running his machinery) and sneak them in between the existing trees there. The next task I had for him took a little convincing…
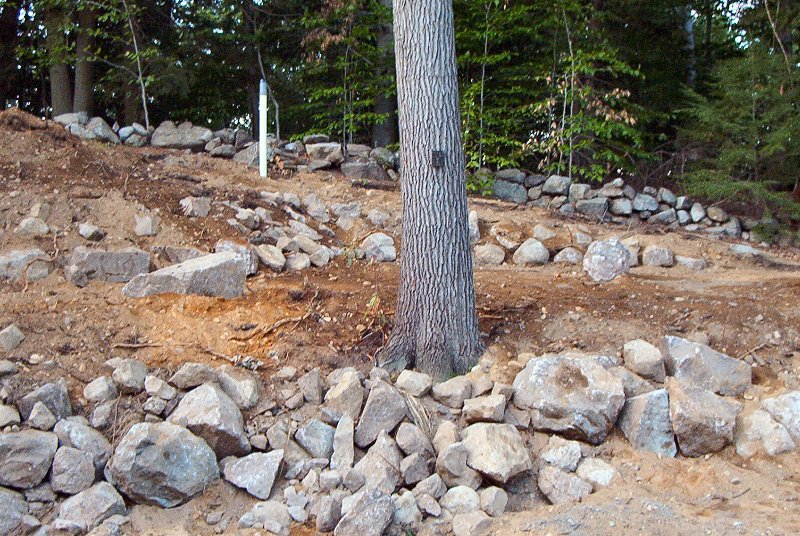
I had been thinking of what kind of landscaping I'd undertake since we had a clean slate to work with, and knew I was gonna need rocks to do my thing. When I asked George if he had any rocks, he just laughed. You can't dig a hole in New England without finding rocks, and since George was in the hole diggin' business, he had plenty of rocks. George delivered a 10-wheeler full of boulders, I took a day off work, and we spent the day with him in the excavator shaking his head and laughing at me while I ran around the yard flapping my arms and pointing at where I wanted the rocks. He branded me with the moniker "Rock Boy" that day, and that's what every local contractor and inspector has called me ever since. As you can see from the photos, I certainly earned the name Rock Boy (originally there were no rocks in our yard other than the wall along the back property line before the septic went in), but more about that in the Garden section.
Other than adding some "Septic Kleenz" granules once a month (which I bought a case of some 25 years ago when we were renters, and still had most of it hangin' around in the garden shed — who knows if it actually does anything), I pretty much ignored the septic system with so many other projects to deal with around the house and garden. I did have the system pumped out once in 2007 (I think), but as I recall they had said it didn't really need it at the time, and we could likely go every ten years (rather than every five) without any problems. As if on cue, in early 2017 we started to notice that we could occasionally get a whiff of the septic system from time to time in the back yard. I had checked both tanks when working on the deck re-grading and landscaping back in 2010 and 2011, and everything looked fine. Now something didn't seem right. Then we got an alarm horn from the septic pump control box. I pulled the cover on the effluent tank, and noticed the liquid was only a few inches below the top of the tank (well beyond where the "pump-on" float should have kick the pump on, hence the alarm). Not good.
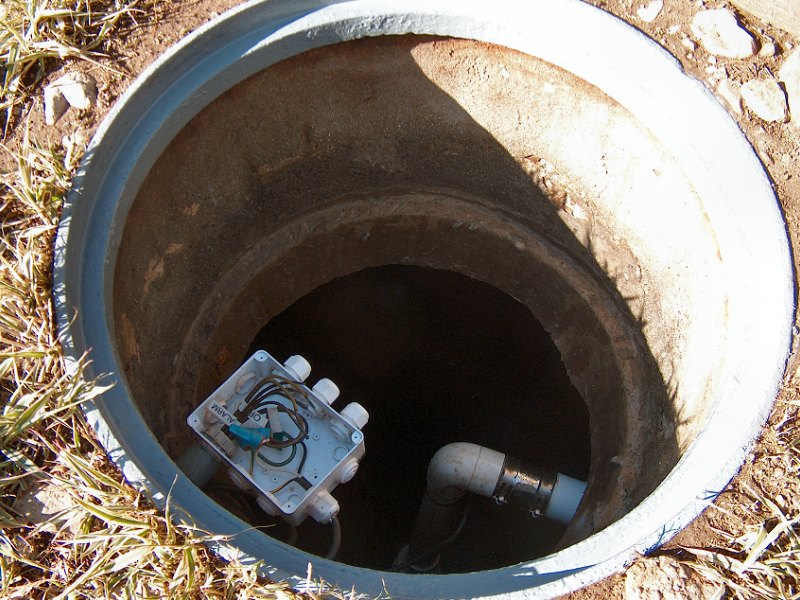
The septic tank covers near the deck (1 photo).
Septic System Repairs: Spring 2020
I'm not proud to admit that after we got that first alarm, I'd just go toggle the "manual pump" switch inside the septic pump control
box once a week or so and get on with other projects. If I occasionally forgot a week, we'd get an alarm horn and I'd go engage
the switch again to pump out the tank. I carried on like this for years (as I said, I'm not proud), until I had finally
had enough and determined in early 2020 to figure out what was going on with our septic system. What I found was just awful,
and had been caused by a complete lack of concern regarding quality work by the electrician that had hooked up the pump controls back when the
system was originally installed (who also happened to be our town's Electrical Inspector at the time, which could help explain how he
managed to do what he did).
Unfortunately, I didn't get any "before" photos of the mess I found, so I'll do my best to explain how our system is supposed to function, and what had happened due to the shoddy electrical work. The septic system has two concrete tanks (750 gallons each, as I recall), with the main drain from the house connected to the first "sludge" tank, which then has an internal baffle or "tee" outlet piped to the second "effluent" tank. Waste enters the first tank and solids settle to the bottom and turn to sludge, while oil and grease rises to the top and becomes floating scum (and the "Septic Kleenz" enzyme and bacteria stuff is supposed to help dissolve this sludge and scum). The liquid (effluent) in the first tank then flows to the second tank when the liquid level in the first tank rises sufficiently (with the baffle "tee" preventing all the scum from going along with it). When the liquid level in the effluent tank rises sufficiently, it causes a normally-open float switch to close a circuit to the pump control box. A pump in the tank then pumps the effluent out of the tank to a leaching field, where the liquid is distributed through an array of perforated pipes to move through sand and gravel layers beneath the pipes that filter the water back to the aquifer. A second, normally-open float switch in the effluent tank then opens the pump control circuit when the tank is pumped out, and everything waits to get filled up again. In the event of a pump or float switch failure, a third, normally-open float switch in the effluent tank will close a control box alarm circuit if the effluent rises high enough to close that circuit (which would happen, so I'd run the pump on manual to pump out the tank). This is known as a "pump up system", and was required here due to our high water table — if you live somewhere dry or at high elevation, then you likely have a single tank, with a baffle connecting directly to a leach field.
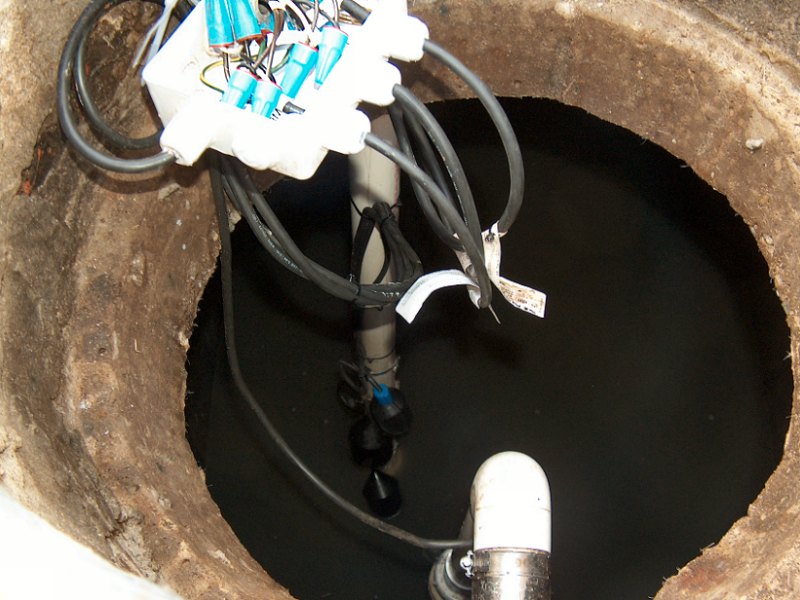
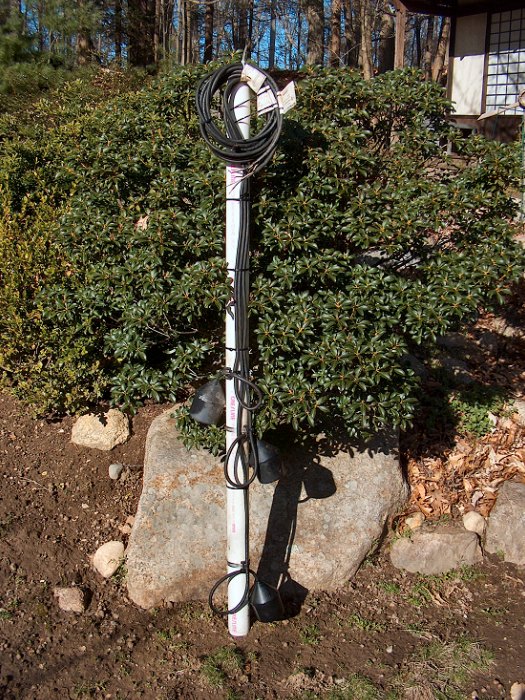 The pump control float switches (2 photos).
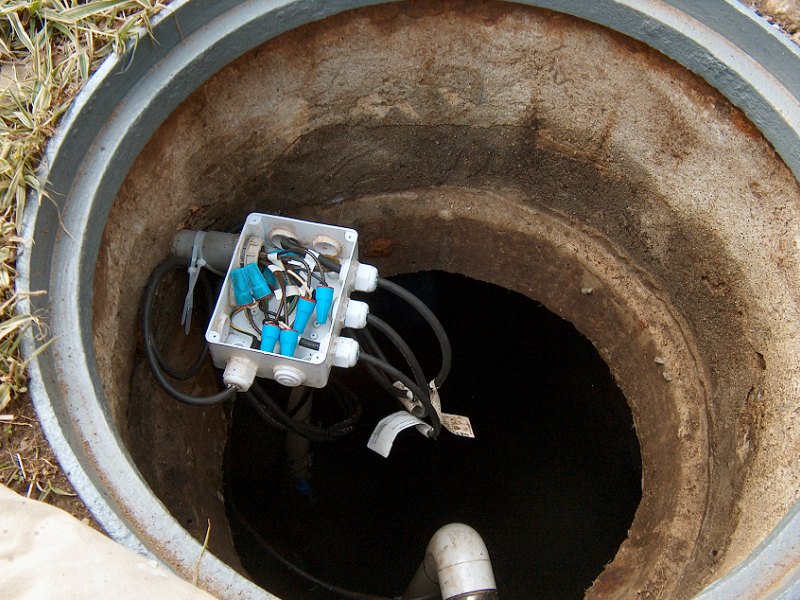
How all that stuff I just described functions in the real world means there has to be an electrical junction box inside the lid of the effluent tank, with a bundle of wires coming from the pump control box. That bundle of wires then has to have connections in the junction box with two wires for each of the three float switches, and four wires for pump power and ground. The junction box then has to have four cable "gland nut" connectors to get the cords for the float switches and pump into the box. All these components are within a 100% humidity environment, with the presence of H₂S (Hydrogen Sulfide gas) and likely H₂SO₄ (Sulfuric acid) as a result of sulfate bacteria breaking down the organic waste in the tank as part of the anaerobic digestion process. In other words, it's a very corrosive place for ferrous metals and to a lesser extent, concrete.
Anyway, back to the mess… I pulled the lid on the effluent tank to have a look at the junction box and couldn't believe what I found. The four screws for the lid of the PVC junction box were gone — as in, completely dissolved. The Brass threaded inserts in the box itself were fine, but the screws were just white powder. So, the box lid wasn't actually attached, and I found the humidity inside the tank had put about a 1/2-inch of water in the box. All of the cable "gland nuts" were just hanging out of the box (still attached to the cables), because the galvanized 1/2-inch conduit locknuts used to hold the things to the box had also corroded away. The 1-1/2-inch conduit locknut that held the box to the PVC conduit from the pump control box was also gone, so the box was just loosely hanging there. Then I checked the wire connections, which were all made using standard red and yellow wire nuts. Most of those wire nuts were just rolling around in the bottom of the junction box, with the exposed, twisted wire connections either covered with corrosion, are just lying disconnected in the water. The wire nuts for the few connections that appeared in tact just fell off as soon as I touched the wires, as the metal inside the connectors had corroded away. All the cable ties that had been used to bundle the float switch cables and pump power cord to the float switch support pipe were broken, with the cables tangled and hanging on the float switches, while the support pipe had fallen over and was leaning against a side of the tank.
All of this corrosion damage could have been mitigated by just spending a few extra bucks on installation components: Stainless-steel screws and conduit locknuts, proper silicon-filled waterproof wire nuts, and heavy-duty freeze-proof cable ties, (so less than $50) and none of this damage would have happened. I was not happy, but got to work making repairs.
The first thing I did was to deal with the float support tube. I got it out of the tank and cleaned it off, then got all the wiring trimmed
back to non-corroded copper. That allowed me to test the switches, and determine the N.O. "pump-on" switch was bad. The switch cables
all still had their labels attached, so I was able to figure out what I needed and ordered a replacement from R. C.
Worst Co.![]() in Idaho (and they were extremely
helpful for this project). I moved the existing "alarm on" float to the "pump-on" position, and installed the new switch in the
alarm position (so the new switch should last longer than the other two, and if they fail the new switch will still trip the alarm). I also
added a PVC pipe flange to the bottom of the support pipe so the thing could stand on its own, rather than relying on the marginal
"wedge-in-place" action the electrician had used to hold the thing up when he originally installed it (which had failed).
in Idaho (and they were extremely
helpful for this project). I moved the existing "alarm on" float to the "pump-on" position, and installed the new switch in the
alarm position (so the new switch should last longer than the other two, and if they fail the new switch will still trip the alarm). I also
added a PVC pipe flange to the bottom of the support pipe so the thing could stand on its own, rather than relying on the marginal
"wedge-in-place" action the electrician had used to hold the thing up when he originally installed it (which had failed).

Effluent tank wiring repairs (4 photos).
A new junction box, cable gland nuts, all stainless-steel hardware, waterproof wire nuts, and heavy duty cable ties all came from
McMaster-Carr®![]() and I re-assembled all the junction box stuff within the tank without too much trouble. I had also noticed the pump itself was not properly installed
(and I don't know if this was done by G. H. Ricker, or the electrician). The problem wasn't the pump so much, as where the "vent hole"
in the discharge pipe was located. The vent hole is usually a 3/16-inch or 1/4-inch hole in the pipe near the pump the allows liquid to
flow into the impeller of the pump when it's not running, and displace any air (through the vent hole) around the impeller which could
cause the pump to "air lock" and not move any liquid when it starts. There was a vent hole, but it was located above the discharge pipe blackflow valve, which meant when
the pump finished pumping out the tank, all the liquid from the backflow valve to the distribution box in the leach field would drain back into
the tank! Not only that, but the position of the vent hole was such that the liquid coming out of it was spraying against the septic tank side wall,
and had eroded away nearly an inch of concrete. To remove the pump, I cut the discharge pipe at the top of the tank near where it exits the tank,
cleaned it all off, and then glued on a half-round chunk of larger PVC over the old vent hole with pipe cement. After drilling a new vent hole
below the backflow valve (aimed slightly down and into the tank center), I then used a stainless-steel sleeved Fernco®
coupler to re-attached the discharge pipe back in position. If I ever need to service the pump, now all I'll need to do is loosen that coupler and
lift the whole thing out of the tank.
and I re-assembled all the junction box stuff within the tank without too much trouble. I had also noticed the pump itself was not properly installed
(and I don't know if this was done by G. H. Ricker, or the electrician). The problem wasn't the pump so much, as where the "vent hole"
in the discharge pipe was located. The vent hole is usually a 3/16-inch or 1/4-inch hole in the pipe near the pump the allows liquid to
flow into the impeller of the pump when it's not running, and displace any air (through the vent hole) around the impeller which could
cause the pump to "air lock" and not move any liquid when it starts. There was a vent hole, but it was located above the discharge pipe blackflow valve, which meant when
the pump finished pumping out the tank, all the liquid from the backflow valve to the distribution box in the leach field would drain back into
the tank! Not only that, but the position of the vent hole was such that the liquid coming out of it was spraying against the septic tank side wall,
and had eroded away nearly an inch of concrete. To remove the pump, I cut the discharge pipe at the top of the tank near where it exits the tank,
cleaned it all off, and then glued on a half-round chunk of larger PVC over the old vent hole with pipe cement. After drilling a new vent hole
below the backflow valve (aimed slightly down and into the tank center), I then used a stainless-steel sleeved Fernco®
coupler to re-attached the discharge pipe back in position. If I ever need to service the pump, now all I'll need to do is loosen that coupler and
lift the whole thing out of the tank.
With all the stuff in the tank back together, I turned my attention to the SJE-Rhombus® pump control box. A couple of the wire connections to the board in the control box were lookin' a little crusty, so I took everything off, cleaned the connection board, and trimmed all the wires to get fresh ends and re-connected it all. I then found the fuse on the circuit board was blown, so I replaced that (it uses GDC 2A 250V slow-blow fuses, which I had to order), then tried to power everything up again. No luck. A bit more testing with the multi-meter during a phone call to SJE-Rhombus support, and it became clear that one of the relays on the control board was toast. The bad news is new controller runs about $850. The good news is they sell a replacement printed circuit board for under $150. I had to call R.C. Worst with the part number, since SJE Rhombus doesn't sell direct to the public, and the new board was on the way. Installation was simple with just a couple screws, and the septic pump was working again! I did notice that in multiple sections of the control box installation manual, it says in bold type "You must use conduit sealant to prevent moisture or gases from entering the panel." Of course, there was no conduit sealant in the original installation (there is now), which likely caused the bad connections at the board, along with the shorted connections in the junction box to fry the relay. Basically, if it had been done correctly the first time, all of this headache and expense would have been avoided. At least now it's all been done right, and should be trouble free for the foreseeable future.
↑