

The Engawa & Tsukimi-dai
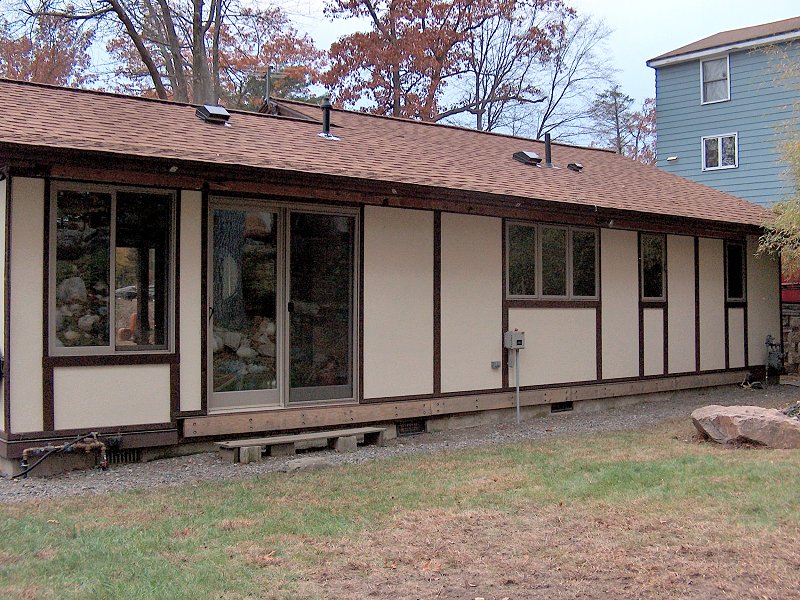
Although the projects that our "Roof, Siding & Windows" permit covered are finished (and so officially the exterior is finished), there are still some things we'd like to build that could be considered exterior house projects. The engawa is certainly next on the list, since the soffits along much of the back of the house only have a temporary cover of 1/4-inch plywood on them for now, and the water table trim back there is actually the ledger for the engawa so it remains un-stained.

Engawa & Tsukimi-dai, 17th century Katsura Imperial Villa.
An engawa is a covered, narrow wood-decked veranda, traditionally built with a series of amado sliding wooden doors or shutters which may be used to secure the house and protect the engawa during inclement weather (since the traditional shoji can do neither). The engawa acts as an extension to the interior living space, with a roof to protect it as well as provide additional shade over the home's doors and windows for a cooler interior in the Summer. Because our engawa is going on the North side of the house, the shading isn't a factor, although we still intend to roof the engawa to protect it from the weather (and it would look kind of silly without a roof). The engawa roof sheathing will be attached to the under-side of the existing roof rafters, which is why there is currently just inexpensive plywood on the soffits in that area. We also have no plans to install the amado doors, although there is enough space that we could add them later, as well as a proper tobukuro shutter storage compartment down at the West end of the engawa.
The tsukimi-dai or "moon-viewing platform" is basically low, rail-less Western-style backyard deck. It became a fairly common fixture in the homes and gardens of Japanese nobles during the Edo period, based on a tradition of Autumn moon viewing parties popularized by Emperor Daigo, who ruled Japan from 889 to 931 (so no, backyard decks to party with your friends at night weren't born in the American suburbs in the 1950s).
Planning the Engawa & Tsukimi-dai
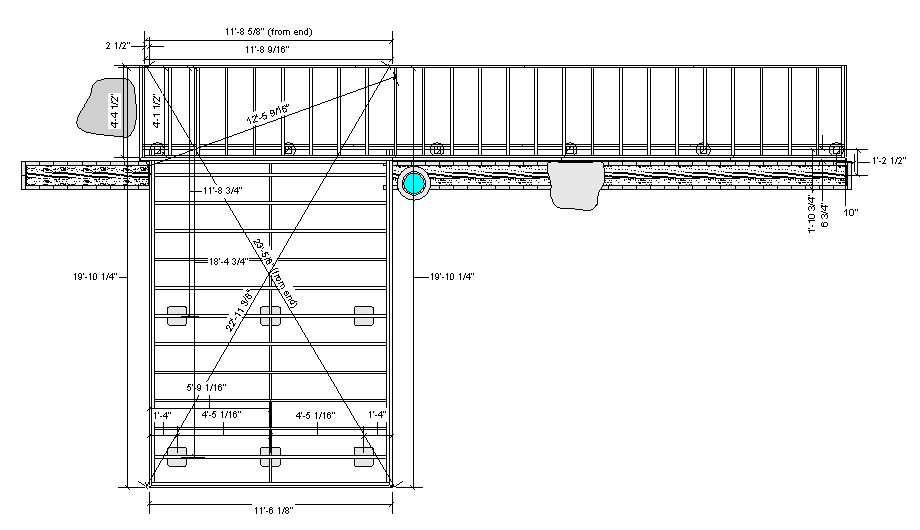
We intend to attach our tsukimi-dai framing to the main support beam for the engawa , so planning and construction for both structures will take place at the same time. As is my usual style, I developed a fairly detailed set of plans for the engawa and tsukimi-dai before doing any actual construction work. Back when I was working on the siding for the back of the house (Summer 2008), I needed to figure out where the ledger would end up for the engawa , since that needed to be installed at that time. With the rest of the projects completed to satisfy the siding permit, I've developed a complete framing plan for the engawa and tsukimi-dai in order to get a new permit to build those (of course the permit will just be for a "deck". I don't think our building department can deal with romanji).
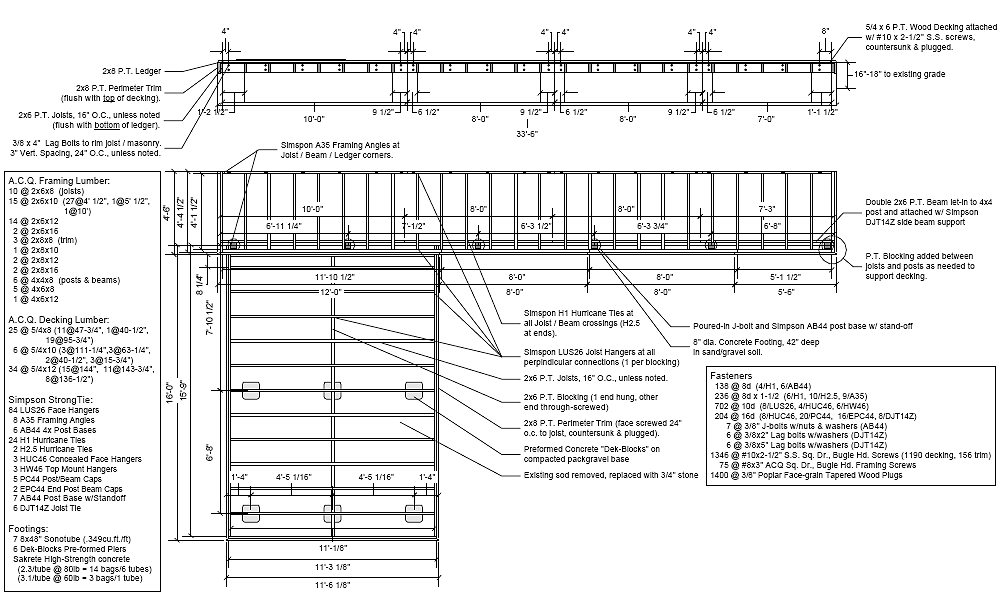
Engawa and Tsukimi-dai plans (4 sheets).
The framing and support structure was simple enough to determine, but the decking, and how to attach it, was a decision that was making me nuts. First we needed to decide whether to use wood decking, or one of the new composites, and that would determine how it's going to get fastened to the framing. The composites are pretty attractive, and a very close match to real wood... I just can't get past the costs associated with them and then all the fussiness of the little clips to hold everything in place. Next up is hardwood (Ipe, Mahogany, etc.) and it's gorgeous stuff, but I still can't deal with the up-front costs. In the end, we've decided to just use the "normal" 5/4x6 A.C.Q. pressure treated Southern Yellow Pine and hope for the best. I also looked through the many hidden fastening systems, since I don't want to have a deck full of nail heads. I could deal with slotting the edges of all the decking to use clips if I had to, but since pressure treated decking will likely shrink itself right off the clips within a year, I don't want the trouble of having to re-build this thing in a few months. In the end, we decided to go old-school and attach the decking with countersunk stainless steel screws then plug all the holes. Yes, it'll be pretty labor intensive, but I think the results will be worth the effort. Now if the building department approves my plans and issues permits, we can get started.
Building the Engawa & Tsukimi-dai
I took the plans to our building department in October of 2010, and a couple days later I got the call to say they were approved for construction. Our building department bases permit fees on the market value of the planned construction project, and according to them, the plans showed a "deck" with a cost of around $58,000! I was stunned - guess I've been working alone too long, since I had no idea that's what these things cost. Anyway, I talked with them and explained that I was doing the entire project myself, and would likely spend less than $2,000 on materials. It's good to get along with the building department - I paid the minumum permit fee of $45 and was ready to get started... in the Spring.
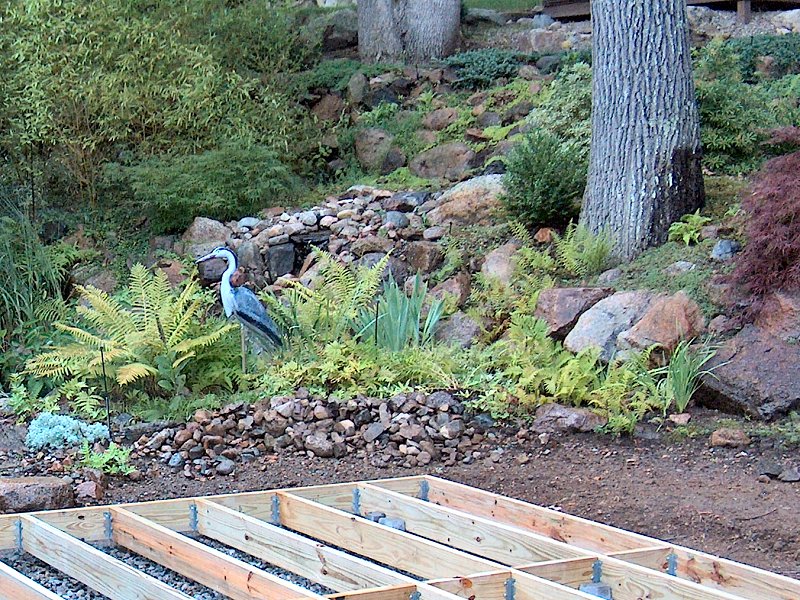
Prepping the back yard for construction (6 photos).
Excavation & Grading Work: Late Spring 2011
The deck ledger and roof ridge-beam had been attached to the house back in 2008, then the plans worked up from
those dimensions. That meant a fair amount of material would need to be removed from the back yard in order
to change the drainage of the yard and make room for the decks to pitch away from the house. The yard was
currently pitched to direct the water from the back hill and rear roof toward the house, around it and into
the front yard, although it mostly just went into the crawl space under the house. I needed to get the back
yard to pitch away from the house, and create a low spot under the planned deck. That meant I'd need to
remove at least a foot of earth over the entire 350 square feet of deck area... not something I was going to try
and do by hand.
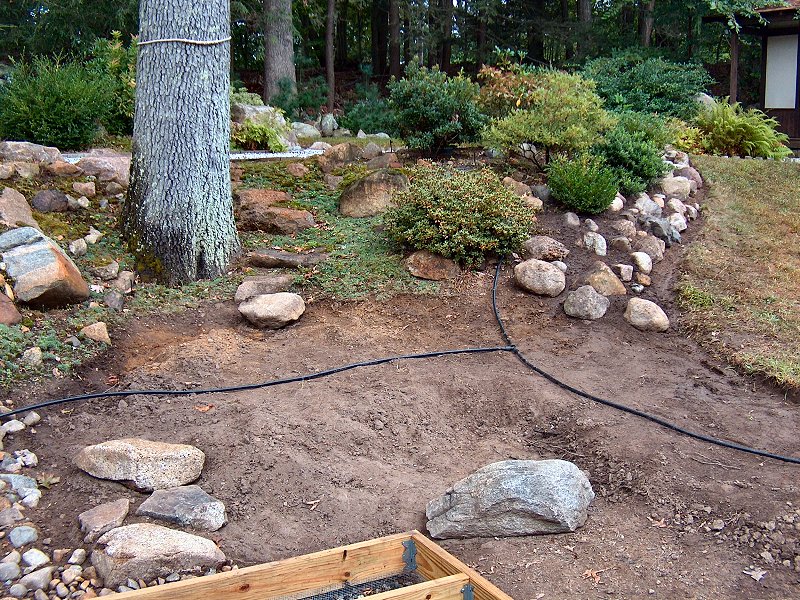
The good news is the neighbor has a skid-steer excavator, and said he'd take care of it. He brought the machine over, then had to wait a few days for the constant late Spring rains to stop. Once the yard dried out a bit in early June, we started digging. There's not a lot of space back there to maneuver, but he did an excellent job of getting the main area roughed out. He used the fill in a few low spots across the street, then we spent another day moving a couple of rocks (of course - that's why they call me "rock boy", after all). He also spread a couple tons of 3/4" stone in the general area of where the deck's going to end up, which saved me a huge amount of time.
Post Hole Digging & Footings
There's still only so much the machine can do, especially when there's a lot of landscaping around that's
finished and prevents access to most of the West end of the construction area. I had no choice but to get in
there with a shovel, mattock and wheelbarrow and do the final grading by hand. It was also raining quite a bit
in early June, but I just went out and played in the mud anyway, since it had to get done (and it also made it easy
to verify if the pitch was right, since I could just watch where the water was going as I worked). Messy, but
effective. With the pitch right and the stone mostly piled up where it needed to be, the next step was to get the
post holes dug for the footings. The plans showed exactly where each footing was supposed to be placed, but that
only works if the house is perfectly straight... and of course it's not. I figured the best thing to do would be to
just average the distant from the wavy house to where the posts were supposed to be, then run a straight line and
pinpoint the post holes locations with a plumb bob. The house is wavy but the engawa will
be straight.
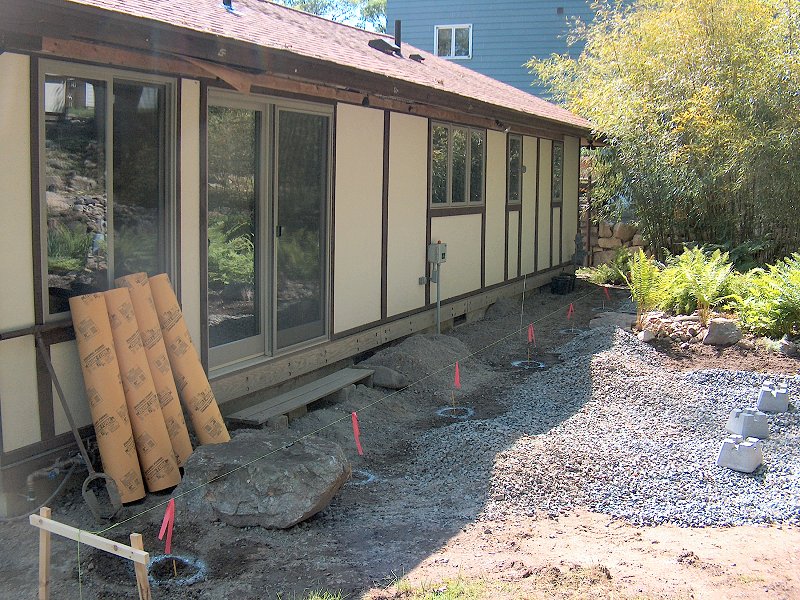
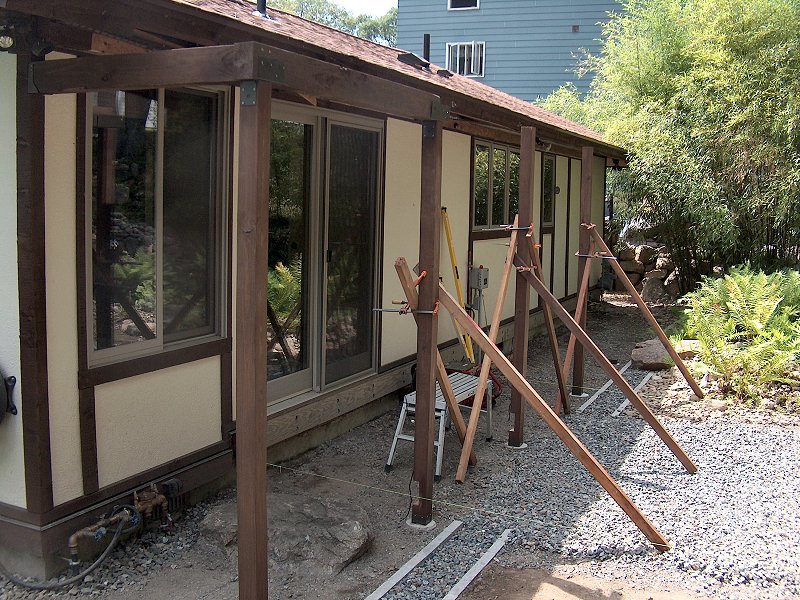
Placing the post holes (3 photos).
After a straight line had been established and the posts properly located, I rented a 2-man post hole digger and set about making holes...alone. There's a reason it's called a 2-man digger. I figured it's awkward and bulky, but I'm a big guy so I should be able to handle it. I started it up and it proceeded to immediatly drill into the earth up to the motor and stay there. No reverse. No way to pull it up. Oops. So, with a person on each side of the thing, the two of you steady the bucking machine and hold it up as it spins into the soil. When it gets down a few inches, you both give it a good tug upward to clear the earth from the auger and repeat until the proper depth is reached. If you're alone, you've got no way to pull it and clear the auger so it just threads itself into the soil then laughs at you. I'm getting too old for this. I dug my 4-foot long pipe wrench out the tool shed and tried twisting the thing up from the earth's core, to no avail. My neighbor got home while I lay there panting in the mud with a pipe wrench across my lap, and fetched his skid-steer. We removed the motor from the digger then wrapped a chain around the shaft and hooked it to the bucket on the skid-steer. As the rear wheels lifted off the ground and the machine nearly tipped over, I could still hear the auger laughing at us. We finally got the thing to budge a little if he put some upward pressure on with the bucket while I cranked on the pipe wrench with both hands, steadying myself with my foot on the auger shaft. Two hours later, we extracted the auger. Unbelievable. He then helped me blow the rest of the holes into the ground using the digger the way it was meant to be used, and we finished the remaing six holes in 20 minutes.
The post hole digger only gets the job partly done however, so I spent another couple days getting the holes right, placing sono-tubes, and removing the material the digger spewed all over the place. I got the layout strings back in place, then mixed the concrete by hand (a little over 2, 80 lb. bags per 8 inch tube) and got the tubes filled and J-bolts placed. The concrete would need a few days to cure before I could start placing posts, so I spent a little time fixing up the landscaping around the pond, and thinking about how I was actually going to build this thing.

Building the drain basin (5 photos).
More Prep Work: Early Summer 2011
Actually, I knew how to build the thing, the troubling bit was figuring out what part to build first. Since I'd
made the plans last Fall I'd thought of all manner of extra goodies I'd like to include in the project, many of
which needed to get done before all the framing prevented access to the area under the decks. One of the issues I
wanted to deal with was the water that the roof would dump in the back yard, and how to deal with that. As
seen in the photos above, the water was running into the area under the tsukimi-dai
where I wanted it, although I still needed to build some manner of drainage to get it there.
The traditional Japanese method is to have a narrow drain that runs around the perimeter of the
engawa, filled with stone and lined with roof tiles on edge or rocks. The area under
the engawa itself is often tiled or a poured concrete slab, neither of which I wanted to
build due to the expense involved. I decided to fill the area under the engawa with stone
pack, which is a mix of 1/2-inch crushed stone and stone dust (and packs down to a nearly solid surface). I've
already surrounded the entire house (and driveway, for that matter) with grey pack, although the final surface
is going to be a couple inches of 3/4-inch bank gravel, which is a nice mix of light brown, smooth stones. Grey
pack under the engawa should be fine (and is a lot less expensive than bank gravel), and
since I don't have access to Japanese roof tiles, I built a drain area lined with simple light grey concrete bricks
and filled with the same 3/4-inch crushed stone that's going under the entire tsukimi-dai
area.
Plans for the additional goodies (3 sheets).
I also had to deal with the now exposed septic tank cover. Originally the septic tank had nearly 2-feet of soil over the top of it, but after we finished re-grading the area for the tsukimi-dai, there was only a few inches of soil over the tank. Rather than have to dig up the yard every few years when the tank required pumping, I purchased a cast iron tank cover (I much prefer the black iron to those bright green plastic things), and took an afternoon to set that in place with a bit of concrete and a simple form I made from scrap wood. With all the grading work done and the footings in place, I scheduled the first site inspection with the building department. The building inspector had a look over the work I'd done so far and said it was coming along nicely without any problems. He needs to come have another look after all the framing's done but before any decking goes down, so I was good to go on the carpentry work.
In addition to the drain basin and new septic cover, I also planned for a handful of low-voltage light fixtures
on the engawa posts, as well as a couple louvered step lights to illuminate the step down to
the tsukimi-dai. I may have even gotten a little carried away, and laid out the location
for a cooling mister system for the area under the engawa roof. This is what happens when
I fiddle around with plans over a long Winter. Now that it was time to put it all together, I was keeping busy
trying to plan the pecking order for construction, as well as get all the supplies in a timely manner. Many of
the supplies were purchased online, although I did pay full retail for a few things since shipping can get very
pricey as the weight of items climbs. The
Simpson Strong Tie ![]() components can add up quickly if purchased locally, so I got most of those from
ConnectorsOnly.com
components can add up quickly if purchased locally, so I got most of those from
ConnectorsOnly.com ![]() out of Ohio. They stock all the specialty Simpson products, although I ended up buying the LUS26 Face Hangers
at Home Depot since I needed over 80 of 'em and the shipping would have been brutal on those. After doing a little
more research regarding the connectors, I decided to skip the very expensive stainless steel and go for
McFeely's NoCoRode
out of Ohio. They stock all the specialty Simpson products, although I ended up buying the LUS26 Face Hangers
at Home Depot since I needed over 80 of 'em and the shipping would have been brutal on those. After doing a little
more research regarding the connectors, I decided to skip the very expensive stainless steel and go for
McFeely's NoCoRode
![]() special deck
screws. They were about a quarter the cost of stainless steel, and McFeely's shipped everything for 2 bucks.
The low-voltage lighting supplies were another area where I was very surprised at how expensive the fixtures are
(at least for the name brand ones). I found what looked to be a good source at the right price through
YardBright.com
special deck
screws. They were about a quarter the cost of stainless steel, and McFeely's shipped everything for 2 bucks.
The low-voltage lighting supplies were another area where I was very surprised at how expensive the fixtures are
(at least for the name brand ones). I found what looked to be a good source at the right price through
YardBright.com ![]() ,
which also has a fine selection of LED bulbs (which cost a bit more up front, but last a very long time, and allow
you to use a much smaller transformer). Yard Bright ships everything for a $5.95, which is very nice as well.
The low-voltage wiring was purchased from Wire & Cable Plus in Florida, since they had an excellent price and sell
the stuff by the foot. Their web cart was a little wonky with the shipping price (since it was supposed to be free),
but they took care of the order over the phone and shipped the wire the same day. I still need to get the wood plugs
for the decking (which will likely be Poplar, since no one sells A.C.Q. Yellow Pine plugs), as well as a rain chain to
hang off the copper gutter that's going over the tsukimi-dai where it connects to the
engawa. So much for just building a simple deck!
,
which also has a fine selection of LED bulbs (which cost a bit more up front, but last a very long time, and allow
you to use a much smaller transformer). Yard Bright ships everything for a $5.95, which is very nice as well.
The low-voltage wiring was purchased from Wire & Cable Plus in Florida, since they had an excellent price and sell
the stuff by the foot. Their web cart was a little wonky with the shipping price (since it was supposed to be free),
but they took care of the order over the phone and shipped the wire the same day. I still need to get the wood plugs
for the decking (which will likely be Poplar, since no one sells A.C.Q. Yellow Pine plugs), as well as a rain chain to
hang off the copper gutter that's going over the tsukimi-dai where it connects to the
engawa. So much for just building a simple deck!
Engawa Posts & Beams: Summer 2011
With supplies on the way, I ordered the posts and beam stock from the local lumber yard (they have free delivery).
I also grabbed a couple cans of Rust-Oleum and painted all the Simpson post and beam connectors with a few coats
of Dark bronze, since I didn't want to look at silver Galvanized connectors when this thing is assembled. Yeah,
I've got issues. Anyway, over the course of a couple days I pre-stained all the posts and beams with
Olympic Maximum® Semi-Transparent 707 "Tobacco" stain and got a couple coats of paint
on the visible steel assembly components.
Installing the posts & beams (6 photos).
Then the low voltage lights and transformer arrived. That allowed me to temporarily attach one of the post lights to the garden shed post and determine the ideal height from the deck to place the light. After the homeowner approved the location of the lights, I needed to figure out how to get the things mounted without having a bunch of ugly wire stapled to the side of the posts. We planned to have the post lights 18 inches above the engawa decking, which meant the fixture would end up around 34 inches from the bottom of the post - too far to just drill a wiring hole up from the bottom. To deal with the wires then, I came up with a method using my Kreg™ pocket hole drill jig and an 18 inch long 3/8-inch drill bit. The Kreg™ jig holds the bit at a 15° angle, so with lots of careful measuring and clamps I was able to drill a hole down from the location of the light fixture, then drill another one up from the area the decking will later cover, and try to get the holes to meet in the middle. The first couple attempts didn't go so well (I blew through the front of the post and had to re-drill because the holes weren't aligned), but with a bit of practice the last few posts went very smoothly and the wires were all in place.
Installing the posts and beams was a bit slow, since the footings aren't perfectly level and the side of the house is pretty wavey. The method to get them in the right place was to carefully get the corner post installed at the correct distance from the house and proper height, then temporarily installed the next post and use the 6 foot level to mark the length and beam location on to it. This process was repeated down the length of the engawa to ensure the posts were plumb and the beam was level, even though the house isn't. Before moving on to the roof installation, I re-stained everything, graded the grey pack, and re-painted the visible connectors to make them less noticeable.
Fitting the Engawa rafters (2 photos).
Engawa Rafter Work
The next step was to get the rafters in place for the engawa roof, which should have
been a fairly simple bit of carpentry work. The trouble was I made a vital error back in the Fall when
performing measurements and creating the plans. I measured the distance from the top of the ledger to the
bottom of the ridge beam, both of which had been attached to the house for months
since the siding installation, but entered the distance in the plans as the measurement from the top of the
ledger to the top of the ridge beam. The result was that the plans had an extra
3-1/2 inches of space between the existing roof rafters and the proposed location of the engawa
roof. It doesn't sound like much, but with the posts and beams already installed (and the height of the beam cannot
be lowered since it would make the roof too low for me to walk under) it meant I would have to re-design the roof
system and the method for installation. The planned engawa roof rafters were supposed to
fit under the existing house roof overhang rafters so the existing soffit could be extended as sheathing for the
engawa roof. That would allow the engawa rafters to be exposed
for a nice step down effect from the soffit of the main house. Missing the space required to fit a 2 x 4 rafter
in there changed everything.
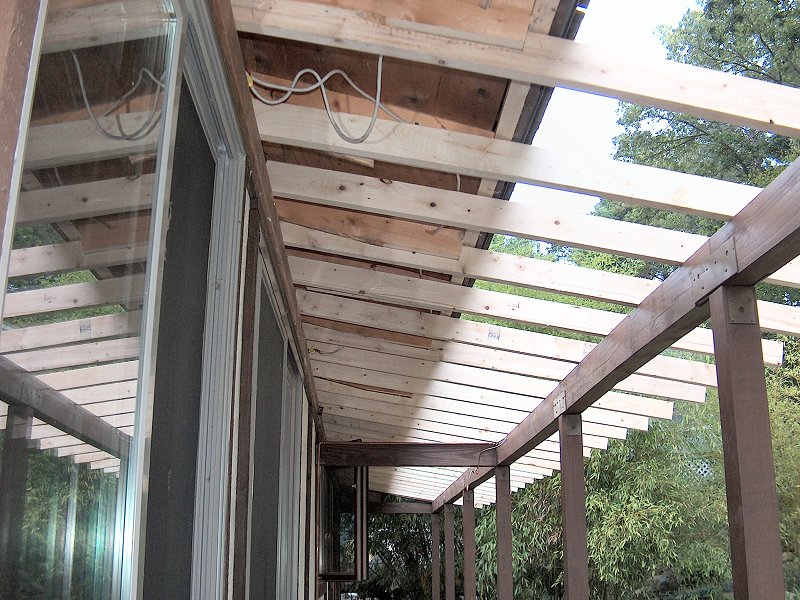
I found the error in the plans when I was installing the posts & beams, but knowing the height of that main cross beam could not be altered meant I'd have to just figure something out when it came time to install the rafters - and that time had come. First, I removed all the old temporary soffit plywood from the existing overhang, then took some new measurements and fiddled with the plans a bit. I still wanted to keep some manner of exposed rafter work over the engawa to set the space apart from the main house overhang, but there simply wasn't enough room to install rafters and then attach sheathing to the top of them to leave them exposed. I was going to have to fit the soffit material in between each rafter to achieve the desired effect, which meant the carpentry work to put this roof on had just gotten a lot more involved.
Finishing the rafter installation (4 photos).
The rafters would have to run at a slightly shallower angle then the existing 3:12 pitch of the house overhang and ended up at about 2:12, or a 9-1/2° pitch (as opposed to the 14° pitch of a 3:12 roof). The new angle allowed me to not have to cut a bird's mouth at the ridge beam end of the rafter, and only required a very small bird's mouth at the engawa beam. I also had to cut away a lot of the existing facia, as well as trim the bottom off each of the old overhang rafters in order to accommodate the new engawa soffit space. The engawa soffits would be set between each rafter, leaving 1 inch of exposed rafter below the soffit. Once the tricky overhead cuts were done, installation proceeded fairly smoothly. Again because of the wavey side of the house, I measured the distance carefully from the ridge beam to the engawa beam and cut each rafter bird's mouth to size while leaving the rafter a bit long. I then installed the two end rafters, using a plumb bob and the straight drain basin to determine the final length. With those two rafters cut to length then pre-stained, I installed those and put a line between them to determine the proper length for all the remaining rafters. Those were then marked and labelled, and everything was brought back into the wood shop to get cut to length and stained. Installation proceeded with a 4 inch long deck screw through the rafter and into the engawa beam at one end, and a couple 16d nails toe-nailed through pre-drilled pilot holes at the ridge beam end - along with a liberal application of construction adhesive.
Before starting on the soffit work, I then added nailer blocks to the inside of each rafter with a couple nails and more construction adhesive. I then set about installing the six 4-inch recessed light fixtures that will serve as overhead lighting for the engawa and had to be fit up between the old house roof overhang rafters. I also got all the plumbing in place for the cooling misters, since it would be tough to work on a ladder and have space for tools up there if I tried to install those lines after the soffits were in place. The simple method to install the misters would have been to use 1/4-inch plastic tubing, but it looks terrible. I decided instead to use 1/4-inch Copper tubing with nice Brass compression fittings, and even polished everything with a Scotch-brite pad and clear coated it with lacquer as it went up. Finally, I had to remove a bit of window trim and cut a groove in the back of it in order to install the 12-ga. low-voltage wiring for the Narabe Tsuru lantern that will hang near the center post of the engawa roof. After over a week of messing about with the rafters, I was ready for soffit installation.

Soffit preparation and installation (5 photos).
Engawa Soffit Work: Late Summer 2011
The soffit material around the house was toungue & groove material I'd milled from old house siding and some
new stock, which I didn't really want to go through again for the engawa... especially since
all the soffit boards would only be 14-1/2 inches long. Instead I used 1/2-inch CDX plywood, although I still spent a
few days on it to make it look a little better than cheap plywood. The first step was to go over the entire sheet
of plywood with a 60-grit disc on the 7" disc sander to give the surface a similar look as the rough-sawn
stock from which the existing soffits were milled. Next, I fit the router with a 60° point bit set to
about a 1/8" depth and using the cutting guide, milled a series of grooves at the same distance apart as
the existing assembled T & G boards. The final step was to stain everything with a healthy coat of
Olympic® Maximum® Semi-transparent Exterior
Stain in "Desert Sand". The soffits required 5 sheets of stock, which took a couple of days to get ready
to install.
Soffit installation was relatively simple, although I did do a lot of walking back and forth from the wood shop tent to the construction area as I had to measure and cut each piece to fit between the more or less 16" on-center rafters, rather than just nail down some 4 by 8 foot sheets as I'd originally planned. Oh well - it still worked out fine and the finished assembly looked just fine. Actually, I think it looks better than just fine - it looks really nice, and it doesn't look like a bunch of cheap plywood nailed up there, so it's all good. Now to get a roof on before the soffits get soaked with rain.
Engawa Roof Work
With the soffits installed, I could finally get a roof on this thing and then get back to building the decks... sort
of. Sheathing the engawa roof seemed simple enough, but I had to deal with a couple of issues
first: The bottom of the sheathing would be exposed above the rafters in the section of the roof that extended beyond
the main engawa beam so I'd have to rough sand, mill and stain that 1 foot or so of plywood to
match the soffits. The other problem was that of ventilation for the attic. Most of the house has a little vent
section in the soffits, but I didn't want to deal with that in the engawa since I didn't want
to look at that vent while sitting out there. Instead, I decided to make use of the space between the soffit and
roof sheathing to provide attic ventialation (which would be fine, since I wanted to keep exposed rafter tails over
the engawa). If I just left the space open, it would likely fill with wasps and rodents
rather than provide any kind of air flow, so I needed to make little screens to fit each rafter bay to keep the bugs
and beasts out - 27 little screens.

Dealing with attic ventilation and roofing (9 photos).
When I was installing the soffits, I'd added a couple little blocks to the top of each soffit piece at the beam end, which would give me something to which I could attach the screens. I then milled a load of 1/2-inch square stock, mostly from scrap wood in the shop, and got it all stained. I could pre-cut all the vertical pieces to the same length after the stain had dried, but the horizontal pieces couldn't get cut until I was making the screens, since each rafter bay was a slightly different width. More climbing the ladder, measuring stuff, and walking back and forth to the shop ensued as I assembled little screens and installed them. The work was tedious but also satisfying, and after a few more days (including a few days to mill and stain the exposed areas of the roof sheathing) I finally had the roof sheathing installed.
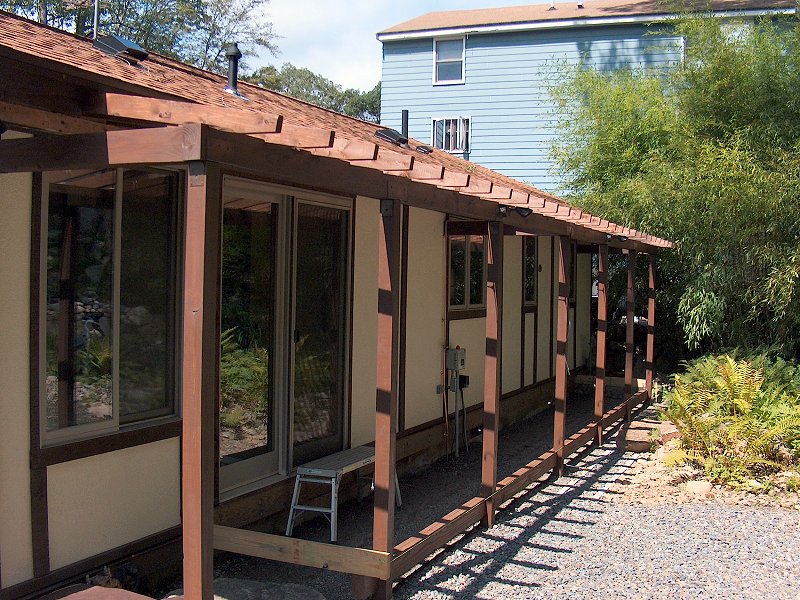
Installation of the shingles was uneventful. I still had a couple sections of scaffolding kickin' around the yard, so I set those up at the far end of the roof, and used a ladder to deal with the sections nearest the back door. I had saved some tar paper and a couple bundles of shingles from when I installed the main house roof, so after picking up a couple more fresh bundles of shingles the roof went on over a couple of fine clear days. The engawa was starting to look right, and with the roof done I could at last get back to working on the actual decks for a bit.
Tsukimi-dai & Engawa Framing
Like everything else so far on this project, framing the decks wasn't as simple as just bangin' in a bunch of nails
to a load of 2 by 6's like "normal". With those two mighty Oak trees in the back yard, we get a healthy dose
of leaves blowing around the yard each Fall (and no shortage of squirrels and chipmunks snacking on acorns too), so
I thought it'd be a good idea to try and keep those leaves and rodents out from under the decks. That meant I needed
to get some manner of screening installed around the perimeter of the deck frames, and there'd be no way to get at it
after the decks were built. I ordered all the 2 by 6 lumber I'd need for the framing, and also picked up a roll
of 1/4-inch square galvinized screen. At last I was ready to get started on the tsukimi-dai
framing.

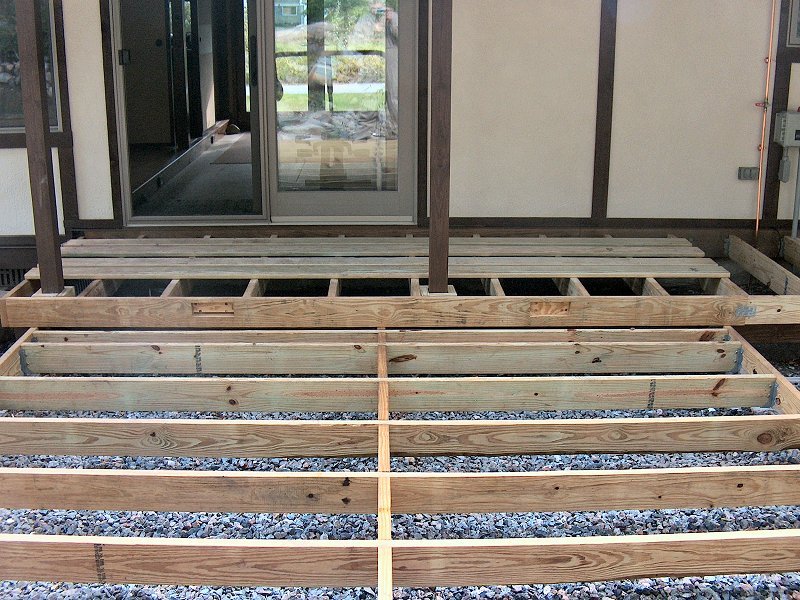
Framing assembly and leaf screening (6 photos).
Framing began with a couple of 16 (15'9") foot timbers and one of the 12 foot (11'3") cross members, attached together with 16d hot-dipped galvinized ring-shank nails, as well as Simpson A35 angle brackets inside each corner. With the main tsukimi-dai frame attached to the lower engawa beam, I then shimmed up each outside corner, and spent a bit of time measuring across the corners to try and get the frame perfectly square (my neighbor graciously spent 45 minutes doing this with me, since there's no way to do that accuratly by yourself). With the frame tacked in the correct position, I then added the two floor joist that span the frame over the deck blocks. That meant more fussing about with angle measurements and levels until the whole thing was right. On the outer set of deck blocks, I had to notch the bottom of the joist (by about 3/8") since the blocks are sitting directly on top of the edge of the septic tank and can't go any lower than they are. The middle set of blocks were set a tad lower than they needed to be as well, but that was by design - it's a lot easier get everything perfectly level if the block's a little low, and the joist is brought up to level using a couple of Cedar shims, rather than trying to get the whole block to tweak up and down to achieve a level frame. Once everything was level and square, I gently tweaked the frame up just a little with a pry bar, and applied a heavy bead of construction adhesive to the notch in the block where the joist sat. With glue in place and a final check of level and square (actually, the entire tsukimi-dai drops about 1/2" over the length from the engawa toward the far end, to avoid standing water), the frame was left alone overnight to give the glue a chance to set - that way any accidental bumps wouldn't shift the whole thing out of position while installing the rest of the joists.
The late August weather was fine and sunny, and I was happy to finally enjoy a bit of simple carpenty work. With the tsukimi-dai frame in place, I carefully measured the location for all the joists, then pre-installed all the Simpson LU26 joist hangers with a couple clamps, the palm-nailer, and a box of little 1-1/2 inch long 8d nails. I then ran a length of screen along the inside of each of the perimeter frame members, stapled to the back of the lumber and buried a few inches below the surface at the bottom. All that careful corner squaring measuring paid off when it came time to install the joists, and I was able to pre-cut them all to length in the shop then bring the whole stack out and bang them all in place very quickly. Another day was spent getting the cross members in place, then I turned my attention to the engawa joist framing. That required a little more time since each joist had to be cut to length and leveled during installation, but it still only took a couple days to finish the joist installation for that. The last bit of framing was the installation of the joist that runs the length of the engawa, which required a bit of router work to make a pocket for each of the step lights that illuminate the step down from the engawa to the tsukimi-dai. I scheduled a visit with the Building Inspector the day after Labor Day, and he said everything was looking great so far. I was ready to start installing decking... but of course I messed about with a bunch of other stuff instead.
Dealing with the Decking: Early Fall 2011
After much research and struggling with the decision for decking, we decided to just go for the inexpensive
option of 5/4 PT rather than Cedar, Ipe, or some manner of composite stuff. To understand why PT decking has
problems, I think it's helpful to understand exactly what it is: PT lumber starts out like Cedar or Ipe -
milled to size then kiln dried to remove excess moisture - but then the trouble begins. It's sealed in a huge
cylinder that's then filled with preservative and subjected to extreme pressure (140-150 psi) for several hours,
then a vacuum is drawn on the cylinder to remove the excess preservative and the lumber is removed and stacked
to air dry (sort of - mostly it's left to allow the excess preservative drip off, then bundled and shipped).
So much for the kiln drying step. The preservative reduces fungal growth, resists insect damage,
and helps prevents decay due to moisture. Prior to January 1st, 2004 the preservative was Chromated
Copper Arsenate (CCA), which was guaranteed to prevent insect damage and decay for 20 years, but also very
likely to leach a lot of Chromium and Arsenic into the ground. The E.P.A. started poking around and the
wood preservative industry wisely stopped selling CCA products for residential and consumer use in 2004.
That resulted in a number of new chemical preservative baths, with the most common made of Alkaline
Copper quaternary as a fungicide and quaternary Ammonium as an insecticide (ACQ). A close second is
Copper Azole (CA), which has a similarly high concentration of Copper as ACQ, but uses an Azole co-biocide
rather than the quat-biocide of ACQ. CA also seems to be more effective, since it provides the same
preservative properties as ACQ but with lower retention requirements to do so. Both ACQ and CA treated
lumber usually have a limited lifetime warranty as well, which is pretty impressive. A relatively new
method is to use micronized particulates of Copper (MC) suspended in water as a preservative, rather than
dissolving the Copper in a chemical solution as done with ACQ and CA - the idea being that it's easier to
get the Copper into the wood cells and to get the water out than with the chemical solutions. The two
micronized Copper systems in use are similar to the chemical based solutions, with MCQ utilizing a
quat-biocide like ACQ, and MCA employing a co-biocide like CA. The MC treatments also claim the wood
is more stable, since it's not as wet with chemicals when the PT process is finished - but no matter
what PT method is used, the lumber is still very wet when it's delivered to the lumber yard (the exception
being "kiln-dried after treatment" wood, marked KDAT, which is more expensive than Cedar decking).

Anyway, on to my stack of wet lumber. I read these horror stories of folks that have just finished their new PT deck, and a month later the boards are all cupped and split, pulling nails out and breaking screws while their little 1/4" gap during installation has become a 3/4" wide opening between each board. The problem, as explained above, is that the wood is wet. After having been pressurized in a tank for many hours, we're talking a moisture content equal to or greater than when it was green - 45% to 90%. Standard kiln-dried lumber has a moisture content of 12% and is pretty stable stuff when used for interior construction. Air-dried lumber usually has a moisture content between 15% and 20%, which is generally the moisture level where wood that's used for exterior construction is at equilibrium with the atmosphere and dimensionally stable (unless you live in a desert or a rain forest, of course). So my PT stack is at least twice as wet as it wants to be, which means it's going to shrink a lot as it dries. To make matters worse, the shrinkage that occurs due to moisture evaporation doesn't occur evenly throughout the board if it's installed on the deck. The top of the decking that's exposed to wind and sun will dry much, much faster than the bottom, which is what causes most of the problems with wet PT decking as it dries. As any board dries it shrinks across its width and that usually results in cupping. In a controlled drying environment, a board naturally shrinks more toward the pith-side than the bark-side. Because of that, the "rule" used to be always install decking bark-side up. The idea behind bark-side up is that as the exposed side of the board dries, the board will tend to cup down and shed water. The reality is that a deck in the backyard isn't a controlled environment, so whichever side is exposed is going to dry dramatically faster than the bottom and the board will cup toward the dry side regardless of how the growth rings are oriented. If the board is screwed down, it's also going to fight against the holding force of the fasteners as it shrinks and either break the fasteners, or crack and split as it shrinks away from them. Basically the worst thing you can do with PT decking is start installing it the day it shows up on site.
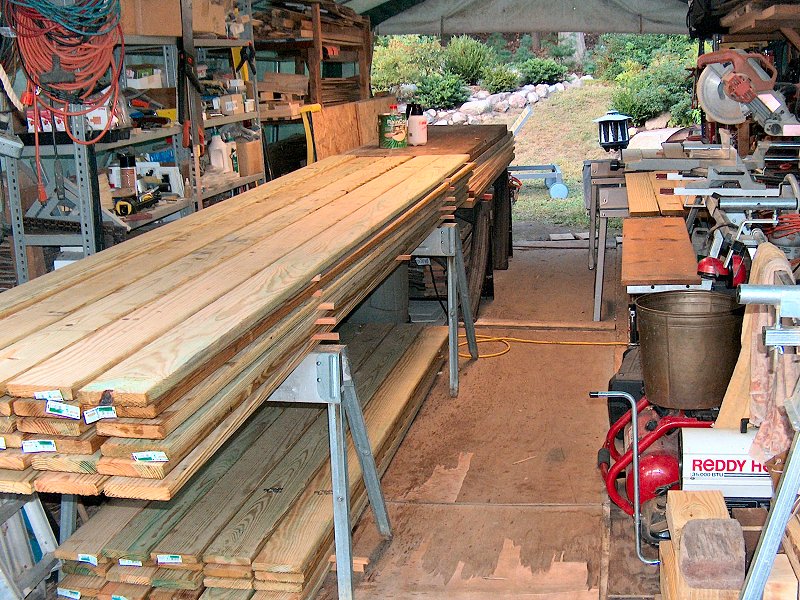
The shop crowded with stacked decking (1 photo).
It all sounds pretty grim, but the good news is there are easy ways to deal with all of the problems resulting from wet PT decking. First, don't leave the new stack of bundled lumber sitting in the sun. The outer boards on the bundle will dry rapidly compared to their inside faces and other boards in the stack, pretty much becoming un-useable. Second, don't install the decking as soon as it's delivered. It's likely still got at least a 50% moisture content and screwing that stuff down to sit in the sun will lead to failure within a few short weeks. Third, treat the decking with a water repellant and drying inhibitor to slow the drying process and lessen the likelihood of cupping and splitting. To deal with the first "stored in the sun" problem, I ended up purchasing all my decking from Home Depot. I'd checked around my local lumber yards and the state of their decking was pretty appalling - the stuff was getting blasted by the sun and wind even though it was often under an awning (although some of them just left the stacks sitting out in the rain too, which is even worse). If I wanted lumber in decent shape, I would have been sorting through their stacks all day. The stuff at Home Depot and Lowe's usually comes off the truck as a covered bundle, then goes right inside the building to a nice, climate controlled environment. They also sell through it so quickly it rarely sits around for more than a couple weeks - that means it's very wet, but also means it hasn't tried to dry while it's still bundled up. Additionally, Home Depot sells the WeatherShield™ brand of PT lumber now, which uses the MicroPro MCA preservative process resulting in a slightly less wet product to begin with.
Dealing with the second problem is simply a matter of patience - when the decking was delivered I immediately
un-bundled it and placed it in stacks with stickers in between each layer to promote air flow inside the shop.
Getting it all in there was a little tricky, but it's out of the sun and rain for now. Dealing with the third
issue is also simple, although finding someone that sells the water repellent / drying inhibitor was challenging.
Everyone sells water repellents it seems, but they're made for application to decking that's already dried for 6
months (so by definition it's already dry at about 20% moisture content). I don't want to wait 6 months to install
the decking, and happily there are a few manufactures that make preservatives especially formulated for fresh, wet
PT lumber. I selected Zinsser Company's Wolman® RainCoat® oil-based
Clear Water Repellent ![]() since Dr. Wolman's company pretty much invented the CA-C treatment process and likely has a clue of how to
take care of it (I ended up having to order it online from HomeDepot.com but at least shipping was free).
I applied the RainCoat® to the bottom of each decking board (pith-side, unless the
bark-side had damage that needed to face down) with a Solo sprayer as I stacked and stickered the lumber.
After the lumber sits a week or two I'll started planing the milling marks off the faces, then apply
the RainCoat® to the faces as I re-stack it all in preparation for installation.
Once the decking is coated with RainCoat®, I can start installing it, although I'll
try to give it as much time as I can before installing the boards that will get full sun exposure. The idea is that
the drying inhibitor will prevent the normal un-even drying problems between exposed side and bottom, but the longer
I can hold off the better. No matter what I won't be able to apply stain for at least 6 months, so the only rush
is how long we want to look at the exposed framing (which was also all coated with RainCoat®
during installation) and deal with the huge stacks of decking in the wood shop. For further information regarding RainCoat®, please see the
Technical Data Sheet.
since Dr. Wolman's company pretty much invented the CA-C treatment process and likely has a clue of how to
take care of it (I ended up having to order it online from HomeDepot.com but at least shipping was free).
I applied the RainCoat® to the bottom of each decking board (pith-side, unless the
bark-side had damage that needed to face down) with a Solo sprayer as I stacked and stickered the lumber.
After the lumber sits a week or two I'll started planing the milling marks off the faces, then apply
the RainCoat® to the faces as I re-stack it all in preparation for installation.
Once the decking is coated with RainCoat®, I can start installing it, although I'll
try to give it as much time as I can before installing the boards that will get full sun exposure. The idea is that
the drying inhibitor will prevent the normal un-even drying problems between exposed side and bottom, but the longer
I can hold off the better. No matter what I won't be able to apply stain for at least 6 months, so the only rush
is how long we want to look at the exposed framing (which was also all coated with RainCoat®
during installation) and deal with the huge stacks of decking in the wood shop. For further information regarding RainCoat®, please see the
Technical Data Sheet.
![]()

Soffit & rafter trim (4 photos).
Trim & Detail Work
I suppose it would be possible to make this project more complicated, although I'm not certain I could. With
the Summer of 2011 drawing to a close, I find I've been working on the engawa and
tsukimi-dai project fairly steadily for well over a year now (although the main ledger
was installed back when the siding was going on in 2008). During that time, the two decks have remained pretty
much as I originally envisioned them, but I've added and changed all manner of extras as I've gone along. My worry
has been that I'd neglect to take care of something before I start installing the decking, and once the decking is
screwed down there's no going back. With the decking boards stacked to air dry for a few weeks, I turned my
attention to taking care of installing all those extra features I'd cooked up over the course of this project.
The first detail project I dealt with was the soffit trim for the engawa. I had about 1-1/4 inches of exposed rafter below the soffit boards, so I ripped a bunch of stock from a few 2 by 4's to create enough 1 by 1-1/2 inch material to run an additional pseudo-rafter cross member the length of the center of the engawa roof, as well as to trim the gap in between where each rafter met the house. All the stock was pre-stained, then I started another round of walking back and forth to the shop and measuring each piece, then cutting it to fit. The rafters were supposed to be on 16 inch centers, but there was enough variation to warrant measuring each trim piece to avoid gaps. Once the 1-1/2 inch wide stuff was all nailed up, I then milled a load of 1/2 by 1/2 inch stock to use as trim between the rafters and soffit. When fitting the plywood soffits, I'd left a little gap to make things easier during installation - now that little gap needed to be covered. After cutting and staining over a hundred little pieces of stock, it was time for more trudging back and forth to cut and fit each piece. After a few days I got all the little trim pieces installed with the brad nailer, then took another day to carefully re-stain all the installed trim to give it a more even color. After a week I was glad to have the soffit trim finished and think the results were worth the effort.

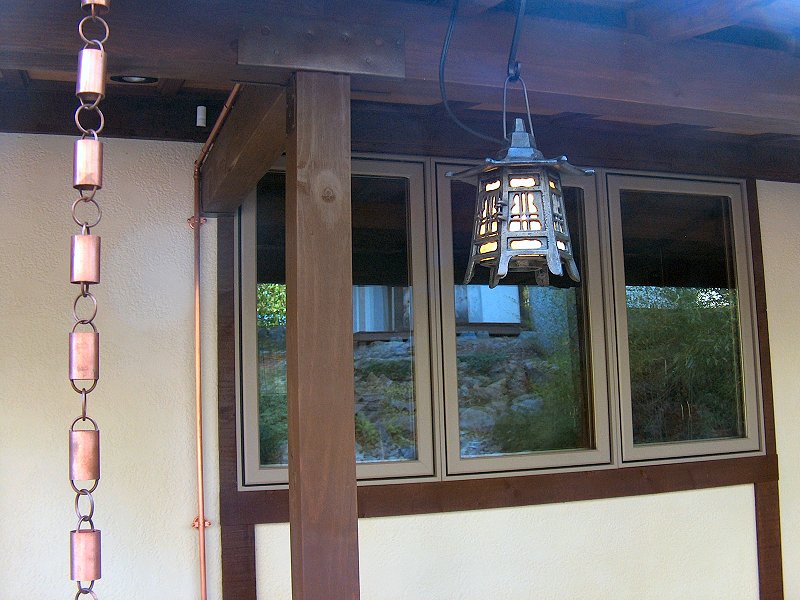
The Copper gutter (3 photos).
After re-staining everything under the engawa roof, I'd managed to dribble a little stain on the walls, and there was also a fair amount of mess on them from when rain water splashed soil up onto them before the roof was in place. I took a day to clean them up, then do a bit of painting to make them look new again. I figured I may as well get it done before I start decking so I don't have to worry about dripping anything on the decking, and I want the walls to look good since folks will be sitting next to them once the decks are finished. I also installed the baffles for the 4 inch recessed lighting, mounted some little hooks to hold the cooling misters, and installed the low-voltage lighting transformer.
With the trim and fussy bits under the soffit finished, I turned my attention to the gutter over the
tsukimi-dai. I discussed with the homeowner the idea of placing a short length of
Copper gutter on the section of the roof over where the tsukimi-dai attaches to the
engawa. She liked the idea, despite the considerable expense, and also really liked
the nice glow of new Copper. That meant I spent another couple days polishing and then clear-coating a 14-foot
section of Copper. I was a bit worried about doing the soldering to assemble the ends, one joint, and downspout
outlet, so just avoided the entire issue and used Jackson Industries Just-for-Copper™
![]() epoxy.
I don't know that I'd trust it for plumbing work (even though that's what it's made for), but it did the job
to hold together my gutter. I also picked up a link-style rain chain from Rain Chains Direct™
epoxy.
I don't know that I'd trust it for plumbing work (even though that's what it's made for), but it did the job
to hold together my gutter. I also picked up a link-style rain chain from Rain Chains Direct™
![]() which
we're very happy with. Eventually the rain chain will be shortened and empty into a natsume
style basin, which I'll most likely make next Spring.
which
we're very happy with. Eventually the rain chain will be shortened and empty into a natsume
style basin, which I'll most likely make next Spring.
Landscaping Around the Tsukimi-dai : Fall 2011
When I put in the drain basin (see above) I took care of transplanting a few Ferns and scattering
some of the wonderful new rocks we'd found while digging, which took care of the landscaping along the
engawa to the West of the tsukimi-dai. The Northwest corner was still a mess,
and the North and East sides were pretty much just mud and crabgrass. Because I wasn't going to be able to stain any deck
boards for at least 6 months (so March 2012?), I decided to try and take care of some of the landscaping now rather than next
Summer. I was also thinking it'd be nice to add some Japanese Iris to that Northwest corner area, and all the retailers with
a decent selection only shipped the rhizomes in mid-September. I guess the decking was going to air-dry another week or two,
since it was now mid-September and I didn't want to wait until next September to get some Iris in the ground.
Northwest corner landscaping (2 photos).
With the new Ferns and a nice pile of rocks waiting on the West side of the tsukimi-dai, that
seemed the best place to get started. I ordered three collections of Japanese Iris (9 plants) from Easy To Grow Bulbs.com
![]() , since they had a good price
as well as a lot of info about Iris on their site. While waiting for the plants to arrive, the lovely bride and I spent a
weekend removing rocks and transplanting Ferns from the edge of the tsukimi-dai right to the edge
of the pond. That also allowed us to re-work the soil and rocks around the few existing Iris in that area and re-route the
micro-irrigation units that were already in place. I also managed to score a few truckloads of good-sized rocks from a fellow
up the street on one of our evening strolls, so we got all those moved to our house as well. The plants showed up in just
a few days, and we got them in the ground the day they arrived. I had a small rock path in place from the West edge of the
tsukimi-dai over to the pond, so we managed to spread the Iris from that path around the corner to
just past the septic cover (which is where another stone path will lead up toward the karesansui).
The existing mini-misters would take care of about half the new plants, and the rest would get watered with new misters
on a branch I planned to run over from the East side.
, since they had a good price
as well as a lot of info about Iris on their site. While waiting for the plants to arrive, the lovely bride and I spent a
weekend removing rocks and transplanting Ferns from the edge of the tsukimi-dai right to the edge
of the pond. That also allowed us to re-work the soil and rocks around the few existing Iris in that area and re-route the
micro-irrigation units that were already in place. I also managed to score a few truckloads of good-sized rocks from a fellow
up the street on one of our evening strolls, so we got all those moved to our house as well. The plants showed up in just
a few days, and we got them in the ground the day they arrived. I had a small rock path in place from the West edge of the
tsukimi-dai over to the pond, so we managed to spread the Iris from that path around the corner to
just past the septic cover (which is where another stone path will lead up toward the karesansui).
The existing mini-misters would take care of about half the new plants, and the rest would get watered with new misters
on a branch I planned to run over from the East side.
The work on the East side started with lots of sod removal, over to the half way point between the tsukimi-dai and the future garage location. I'll deal with the other half when the garage is in. I also removed a lot of the turf running up the slope toward the karesansui now that I had more stones to give the banking near the shrubs a better edge. Next I ran a new mainline extension for the drip irrigation system from the shrub area down to where I was planning to put the Forest Grass, as well as to reach the new Cherry tree and the East side of the Iris area.
East side landscaping (5 photos).
Digging up the turf and re-grading the slope also gave me a chance to deal with the other septic system cover. When we installed the new system, the cover for the pump tank ended up getting buried about two feet deep, and I prefer to to have the covers exposed so I don't have to dig up the yard if I need the septic system serviced. The cast iron cover over the pump tank was a few years old when the new system was put in, and that was done nine years ago. When I unearthed the old cover it was pretty crusty, but still in decent shape. I knocked the thing off with a sledge, then added a couple more courses of concrete bricks to the single layer of bricks that was already in place. I made a temporary cover from OSB for the pump tank, and got to work cleaning up the old cover. I hosed the thing off, then loaded up one of my pump sprayers with 2 parts of Muriatic acid and 1 part water to clean off the rust. The acid worked really well to get off all the rust and scale, and after a little work with a wire brush the cover and frame looked like new. I gave it a coat of Rust-Oleum® Rusty Metal Primer, then hit it the next day with a couple coats of Rust-Oleum® Smoke Grey enamel. I also pulled the cover for the effluent tank that I'd installed a few weeks ago, and gave that a coat of paint too.
With the new covers in place, I raked out the final grade and got to work placing the largest rocks and marked where the
new plants would be located. For the East side, I purchased three Hakonechloa aureola and six
Hakonechloa albo-striata Japanese Forest Grass from Burpee.com ![]() and the plants arrived in excellent shape after a couple days. While waiting for the plants I also ran the 1/4-inch irrigation
lines to cover everything, and then got ambitious and installed a couple of TIC weatherproof Omni speakers
and the plants arrived in excellent shape after a couple days. While waiting for the plants I also ran the 1/4-inch irrigation
lines to cover everything, and then got ambitious and installed a couple of TIC weatherproof Omni speakers
![]() that I ordered from
Amazon.com (which also meant I had to go back under the house to run speaker wires - argh).
that I ordered from
Amazon.com (which also meant I had to go back under the house to run speaker wires - argh).

The completed landscaping (4 photos).
As long as I was running wires, I decided to get another 120v line installed before this landscaping was all in place. Looking at the way things were shaping up, we though it might be nice to add a yukimi style lantern just past the Northeast corner of the tsukimi-dai at some point. It's really too far from the 12v transformer to try and run as a low-voltage fixture (I didn't get a multi-tap transformer, which could handle longer runs), so I added a length of 14-2 UF wire that runs from past the pump tank cover back to the house, and connects to a junction box under the back door that feeds the existing back yard stone lanterns. I then got the plants in the ground the day they arrived, and started spreading lots of rocks around to finish off the planting bed. The mini sprayers got a little tweak to ensure everything would get watered properly, then I finished the whole area off with a few bags of "river rock" and "pond rock" from Home Depot. The Japanese Forest Grass should fill in the area nicely with a height and spread of 18-24", and the outdoor speakers sound surprisingly good. Time to install some decking!
Installing the Engawa Decking:
Late Fall 2011
So next I just started screwing down decking like crazy, right? Ha- you're funny. The decking
was sufficiently dry by mid-October that I was comfortable proceeding with installation, but the boards still required a
fair amount of work before I attached them to the framing. When the decking leaves the mill, its surface is covered with
small milling marks as result of the thickness planers used by the mill. There's also a lot of printing and sorting chalk
marks all over it, all of which I wanted to remove prior to installation. That meant I'd need to spend some time giving
each board a final finish surface before I installed it.

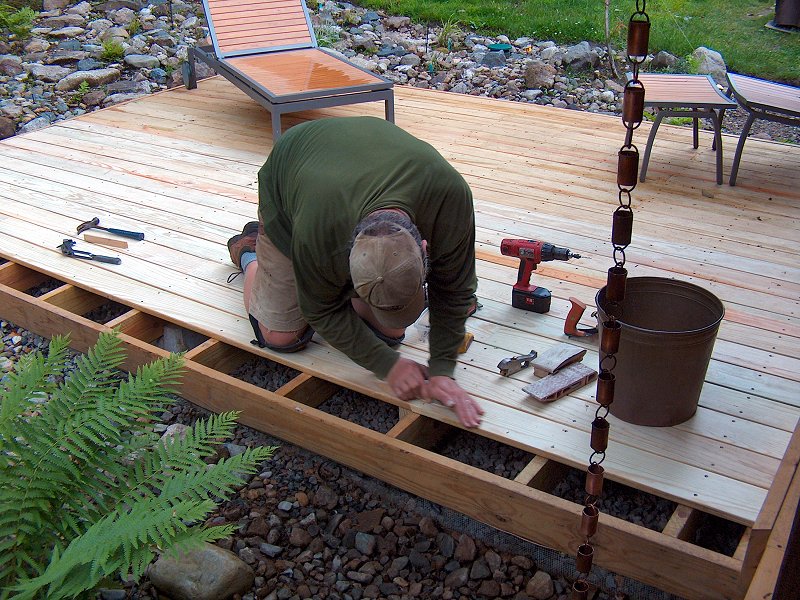
Prepping the decking (9 photos).
I'd done plenty of projects already that involved removing milling marks from purchased wood, but they usually involved small amounts of trim material that I could easily run through my thickness planer. With over 300 square feet of stock to deal with, I wasn't looking forward to re-planing all this stock with machinery. I decided instead to give it a go with hand tools, since that would allow me to only do the minimum stock removal required to get rid of the milling marks and printing. I started the process with a couple of the new Stanley "Premium" bench planes, followed by a quick finish with the belt sander. The hand planes significantly reduced the time needed for belt sanding, and I was able to get the stock prepped fairly quickly (please see the photos for details). The first few boards also required I cut out some notches for the engawa posts, which was done with jig saw and lots of careful measuring. I then set each board in place and marked the center-line for the joists, and returned it to the shop bench to pre-drill and countersink the holes for the deck screws. Finally, after a dab of sub-floor & decking construction adhesive on each joist, the deck boards were installed around the posts for the length of the engawa. Before I could continue the engawa decking installation however, I had another bit of detail work to take care of.
Low-voltage Lighting Wiring
The last thing that needed to be addressed
while I still had access to the framing was the low-voltage wiring for the post lights, step lights, and
tsuridourou hanging lantern. I had to get the first couple of
engawa deck boards down before I could proceed however, since the step lights had
to mount from the front of the trim board between the engawa and tsukimi-dai.
If I waited to attach the trim until after the deck boards were installed, as I had originally planned, I wouldn't
have any access to the back of the step lights for wiring.
Installing the 12v fixtures (6 photos).
The post light wiring had been threaded into the posts back when they were first installed, and the feed wire for the hanging lantern was put in place while working the engawa rafters. I had also cut the recesses for the step lights when working on the framing, so now it was time to connect it all together. Because direct current wiring suffers a good deal of line loss when running long distances, I had planned the system with a large, 10-gauge feeder line running the length of the engawa, rather than try and feed each fixture with inexpensive 14-gauge lamp cord. For the hanging lantern I ran a length of 12-gauge landscape cord directly from the transformer, up the wall behind the trim, then out to the lantern location along the center support beam. Each post and step fixture lead was then soldered to the main line, and the connections were sealed with "liquid tape" then wrapped with a bit of regular electrical tape. Another short length of 10-gauge line runs from the main feeder to the transformer, so there's only two wires connected at the transformer - the hanging light lead and the main branch lead.
Re-building the Narabe tsuru lantern (8 photos).
With all the wiring connected, I decided to take the time to deal with the tsuridourou hanging lantern as well. I had done a lot of searching for a proper Narabe tsuru style lantern back when I'd purchased the other landscape lights and construction supplies for the project, however I had no luck finding what I wanted. The only ones I could locate for sale were seemingly all from retailers in the U.K., so I ended up calling one of them to find out if they'd actually ship one to the U.S. The fellow I spoke to said that wouldn't present a problem, but he didn't have any in stock and was waiting for a container shipment from Japan to fill with orders before it was sent to his shop. I had him add my order to his list, but after a couple months of waiting with no word I decided I'd have to take care of it myself. I'd seen a few of these crop up on E-Bay from time to time, although most of them were either tiny little things, or extremely expensive original antiques. After a few weeks of almost daily searches, a pair of the style I was looking for popped up and I managed to win the auction. The lanterns were in pretty rough shape, but the price right and with a bit of work, I had a proper Narabe tsuru hanging from the engawa eave at last.
Continued Engawa & Tsukimi-dai Decking
Installation: Late Fall 2011
The detail work that had to get done before decking installation could continue
was finally finished by late October 2011. Since all the decking for the engawa had already been
prepped, installation proceeded without any problems. I managed to get all of the engawa decking
screwed and glued down over a few days, then applied a final coat of RainCoat® to the top
with a small foam roller.
All of the decking for the tsukimi-dai still needed to have the milling marks removed, and I was running out of time before it would become too cold to apply RainCoat® to the tops of all that materiel. Rather than push my luck (we were having an exceptionally mild Winter so far), I decided to just install the boards without planing them first. The end of the boards that were closest to the engawa fit into a rabbet in the trim board, so they would stay put without any fasteners. The other ends of those boards received an angle cut where a joint occurred with the next board, so that angled joint would also hold the next board in place. The only fasteners I needed then, were a pair of little 18ga. brads shot through the next board into a joist so that board couldn't slide out from under the angled joint. When the time comes in the Spring to finish the surface prep on all those boards, I can just pop them up from the brads and take them back into the shop. I put the brads through in the same positions that will eventually get a pair of screws, so even the nail holes will go away during final installation.
With the tsukimi-dai decking temporarily fastened down, I managed to get a coat of RainCoat® applied by mid-November. With that finished, the rest of the decking work will need to wait until Spring.
Tsukimi-dai Decking Installation.
Final Tsukimi-dai Decking Installation & Trim Work: Spring/Summer
2012
With the return of good weather in the Spring I finally got back to completing the installation of the
decking for the tsukimi-dai . All the boards spent the Winter temporarily attached to the framing,
so the process to finish it was similar to what I'd done for the engawa - remove a few boards at a time,
label them, then take them to the wood shop and plane off the milling marks and pre-drill the countersunk screw holes for
installation. I then trimmed each board to the proper length, and screwed and glued it back onto the framing. I also put a little extra
time into fitting the angled lap joints together while installing this decking, rather than dealing with the joints after all the
decking was down as I'd done on the engawa.
The work was rather tedious, and I found I'd only work on a few boards each week. I'd also have some delay whenever we got rain, since I'd then have to wait for the next batch of boards to dry before I could start planing them, or if the boards were ready and the deck framing had been rained on, I'd need to wait for that to dry so the construction adhesive would stick to it. Last year I worked only on the decks, and the rest of the garden suffered for it. This year I dedicated more time to weeding, pruning, pond care, etc., so between the garden work and the weather, I didn't get the decking re-installed until mid-June. The good news is that we had a decent looking yard by the time the decking was completed.

Installed Deck Trim (3 photos).
After a short break to enjoy a visit from the lovely bride's family in mid-June, work on the decks resumed with installation of the 2 x 8 trim boards around the perimeter of both decks. One trim board had been installed last Summer because it had to be in place to complete the low-voltage wiring installation. Now that the rest of the decking was down, I could proceed with the rest of the trim installation.
The trim had been kicking around the wood shop all Winter and was treated with Rain-coat last fall, so now I needed to determine which face would be exposed and which edge would be the top, then pull out the hand planes again and remove the milling marks and mill stamps to ready the material for installation. With the top and face cleaned up, I then made a few trips back and forth between the decks and shop to get the measurements just right, then cut and pre-drilled the lumber for installation. The trim was attached to the deck framing with plenty of construction adhesive, and a pair of screws every two feet. Corner joints were cut at a 45 ° angle, and end joints were lapped at a 30° angle. Some of the boards were a little stubborn to get lined up, but plenty of shims and a pry bar (I couldn't use clamps because of the screening around the bottom of the framing), I eventually got them all lined up and attached. The top edge of the trim is supposed to line up flush with the decking surface, however I ended up installing most of it just a little proud of the decking so I can later plane it flush for the final finish.
With all the trim installed, the only work left for the decks is to install the screw hole plugs, go over the entire thing with the hand planes to clean up the plugs and trim edges, then it will be ready for stain at last. If I can manage to get some plugs installed between friends coming over for cook outs, I should be able to have stain on the thing by the end of July.
Plug installation (4 photos).
Screw Hole Plugs & Clean-up: Summer 2012
To get the hole-plugging fun started, I first needed the plugs. After a lot of searching, I was unable to find tapered, face-grain
A.C.Q. Southern Yellow Pine plugs, and I certainly wasn't going to try and cut my own from scrap lumber. As I had suspected while
buying materials last Summer, I decided my best bet would be Poplar plugs since they have a greenish tint which should match the rest
of the pressure treated lumber when stain goes on. I purchased 1500 3/8" tapered plugs from Cincinnati Dowel & Wood Products
![]() (they had the best price for large quantity purchases), as well as a nifty little glue nozzle made by Pro-plug
(they had the best price for large quantity purchases), as well as a nifty little glue nozzle made by Pro-plug
![]() that turned out to be one of the best $5
tool purchases ever. Part of the problem when gluing wood plugs in place is that the glue all ends up in the bottom of the hole - when the
plug is then tapped into the hole, the glue at the bottom has no where to go and the air pressure under the plug pops the plug out of place
while trying to seat it in the hole. The Pro-plug nozzle is designed so it only applies glue to the sides of the hole
and leaves the bottom clean (it uses a little pressure sensitive tip so glue only comes out 4 tiny holes in the sides of the nozzle when the
tip is inserted in the hole). With a tapered plug and glue only on the sides of the hole, the plugs seat wonderfully and don't pop back up
due to air lock.
that turned out to be one of the best $5
tool purchases ever. Part of the problem when gluing wood plugs in place is that the glue all ends up in the bottom of the hole - when the
plug is then tapped into the hole, the glue at the bottom has no where to go and the air pressure under the plug pops the plug out of place
while trying to seat it in the hole. The Pro-plug nozzle is designed so it only applies glue to the sides of the hole
and leaves the bottom clean (it uses a little pressure sensitive tip so glue only comes out 4 tiny holes in the sides of the nozzle when the
tip is inserted in the hole). With a tapered plug and glue only on the sides of the hole, the plugs seat wonderfully and don't pop back up
due to air lock.
Another little gem of a tool that was a tremendous help was a little 8 oz. mallet from Lee Valley called an Oval Hammer. This little cabinetmaker's hammer has a "belled" face, meaning it's got a slightly convex shape. That allows the plugs to be tapped in without any chance of kissing the deck board around the plug and leaving a mark. I know it may seem silly to go on about these seemingly insignificant tooling details, but when faced with crawling around and installing some 1200+ plugs, having the right tools really helped make this task quite pleasant and satisfying, rather than tedious and frustrating.

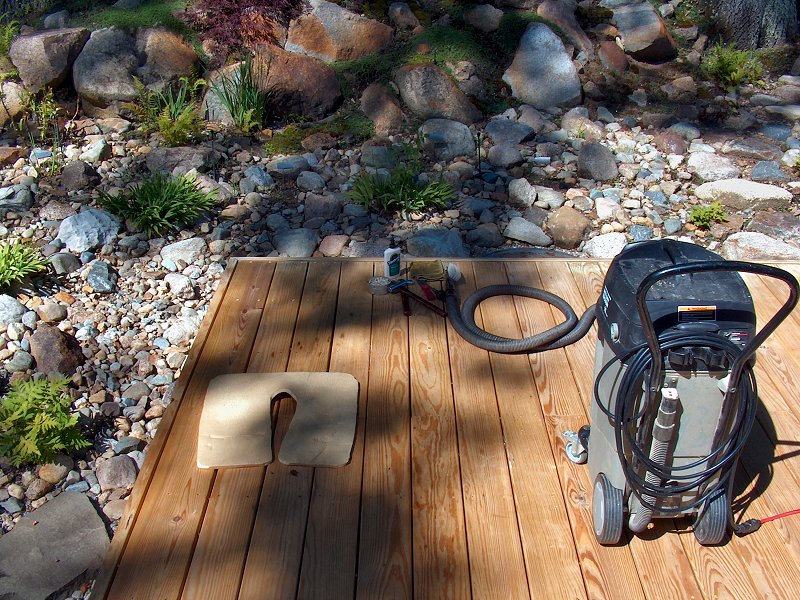
Plug clean-up (2 photos).
With all the plugs and tools ready to go, I grabbed a knee pad and the vacuum, and got busy. The first step was to vacuum out the dirt and crud that had accumulated in the holes, then put a little dab of Titebond® III "Ultimate" waterproof glue in each hole, working about 12 holes at a time. Next I scattered a few plugs out, then tapped each one home with the mallet. After a couple days I finished the plugs for the tsukimi-dai and all the trim boards. Total so far was 428 on day 1, then with morning rain I only managed 280 on day 2. Day 3 I finished the trim and started the engawa with another 238 plugs, and finally finished the engawa on day 4 with 294 plugs. By day 3 I was growing weary of the task, but luckily the lovely bride offered to help when she got home form work on day 4, so with her applying the glue and me following along tapping the plugs in, we finished very quickly. 1,246 plugs installed and now I just needed to plane them all down.
After a couple days for the glue to fully dry, it was time to clean off all the little plug tops and get all the surfaces ready for stain. I gathered a combination of hand planes, hand sanders, and power sanders for clean-up tasks, with 100 grit in the belt sander and 150 grit in the finish sander and hand sanding blocks. The planes worked extremely well to remove the plugs, as well as do a little joint and trim board clean up on the main area of the tsukimi-dai . Things slowed down a bit as I worked my way into the joint between the tsukimi-dai and the engawa trim. When there wasn't enough room for the No. 4 smooth plane or even the No. 60½ block, I'd turn to the little No. 100 block and the No. 75 bull nose to get at the plugs near the inside corners. After planing the plugs off a section, I used the belt sander to do some clean up, and then gave everything a final pass with the finish sander or hand sanders to help blend the rounded board edges with the freshly planed and sanded faces. Working around the posts on the engawa also required the small planes and was slow going, but after about a week of crawling around with hand planes and power sanders, the job was finished. I think we were both a bit surprised at how well everything turned out, and very glad we'd made the decision to counter sink and plug all the deck fasteners, rather than have a deck covered with exposed screw heads. At long last it was time to get some stain on this thing.
Staining the Decks: Late Summer 2012
The original plan was to slather the entire deck with a couple coats of the same Olympic Maximum®
Semi-transparent 707 "Tobacco" stain we'd used on all the other exterior trim, as well as on the decks for the tea
house and garden shed. After seeing how well the decking turned out with the hand planing and plugged holes, we were a little worried
that the really dark brown stain hide too much of that beautiful wood grain. I was having some difficulty balance the desire to show
off the wood with going for a mutli-color deck, since I had only seen a couple examples of engawas that had
different colors on them. In the end, we decided to at least try the lighter color of the decking - if we didn't like it, we could
always make it darker. The color we selected was a nice medium-brown 711 "Coffee".
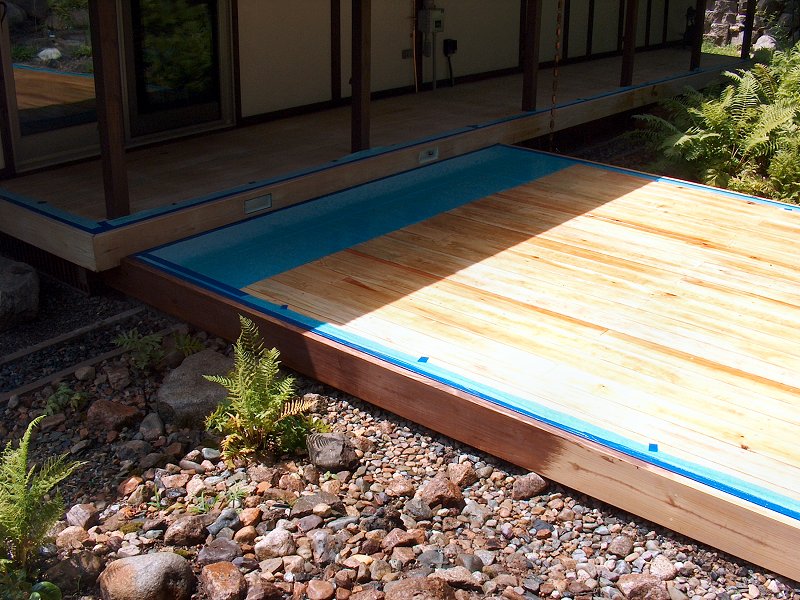
Deck trim staining.
The decision to go with multiple colors also meant staining would require a little more planning, since I'd have to mask off the trim stuff and wait a few days between coats to allow things to dry a bit before re-masking and continuing the staining work. The early August weather was also being very uncooperative, with the forecast calling for at least a 40% chance of rain every day. Each day I would go out and work on the masking with some blue painter's tape and a cut-up inexpensive plastic-backed drop cloth... then it would rain for 10 minutes which meant no stain that day. With everything masked to get started on the tsukimi-dai trim and a relatively clear sky, I finally decided to take the plunge one Sunday after church and opened the stain. I got about 6 feet of one trim board stained, and it started to rain. There was one little thunderstorm spec on the radar, and it had popped up right over our house. Oh yeah.. no work on Sunday. Got it. I cleaned the brush and put away the stain, and the sun came out again. Okay big guy, I'll try again on Monday. Sure enough, the weather for the next few days was perfect and I was able to get a couple of coats on all the trim.
I then re-masked the trim after it dried in the August sun for a couple days, and got to work on the decking. I grabbed a 6-inch medium nap roller, a 4-inch brush for back-brushing the faces of the boards, and a 2-inch to use to get into the spaces between each board. I started on the tsukimi-dai, since that was all exposed to the weather and I wanted to get after it while there was no rain in the forecast. I'd start by doing the cracks between a couple boards, then roll a wet coat into an 8-foot length of a 16-foot board. Next I grabbed the 4-inch brush and back-brushed the wet stain to even it out. After half of 2 or 3 boards was done, I'd move the paint tray down and do the remaining half of those boards. I was trying to work quickly so the stain on the first half wouldn't set up before I got the rest of each board coated. It wasn't working out too well. I noticed after 6 boards that they all had a much darker spot in the center where the two sections overlapped. Hmm... next I tried doing shorter sections of 5-feet or so. That resulted in boards with 2 sections of darker overlap rather than 1 in the middle. I realized that all the stain work I'd done in the past was either on rough-sawn trim, which drinks stain like a sponge so there's no dark overlap sections, or it had been on interior trim stuff that used oil-based stains that dry very slowly and allow plenty of time to brush out any spotting. This acrylic/oil stuff was drying too quickly to allow any blending with the brush. I considered loading up one of the sprayers, but those things make such a mess, and still require back-brushing, so I really didn't want to go down that road. I also thought about using a bigger roller so I could load it and do a pair of boards from one end to the other, but that would still mean back-brushing, which would lead to overlap marks.

With one very disappointing coat done on the tsukimi-dai and the brushes cleaned up, I took a ride to the big box stores to see what my other options were for deck staining. I'd seem some foam type stain pads that I thought might be worth the trouble to try, since I was not happy with how the thing was looking. What I found turned out to be a fantastic deck staining tool: The Shur-Line® Stain System #1799341, which cost around $25, made the rest of my deck staining project a complete joy to finish. The Stain System basically looks like a sponge mop, but it's got an on-board reservoir that holds the stain - no trips back to the paint tray to re-fill the roller. The stain is injected into the head through 6 ports with a simple squeeze of a trigger on the handle, and the head swivels easily to get into all the nooks and crannies, as well as in between the deck boards. It really made a huge difference in how I stained the rest of the decks. After the mess from the first day had dried overnight, I scuffed the entire surface with a Scotch-brite pad on the end of a drywall sanding pole, then went over the whole thing with the vacuum to pickup any sanding dust. I then filled the reservoir on the Stain System about half-full, and got to work. I'd start at the end of 1 board with the head of the mop pivoted to it only applied stain to 1 board at a time. I then gave the handle a couple pumps and started down the length of the board, giving another squirt of stain every couple feet. Once I got to the end of the board, I'd spin the head and backdrag the length of the board to even out the stain I'd just applied. 20 minutes later I'd stained the entire tsukimi-dai. That's right... 20 minutes and it was done. I've said it before: The right tool for the job makes all the difference.
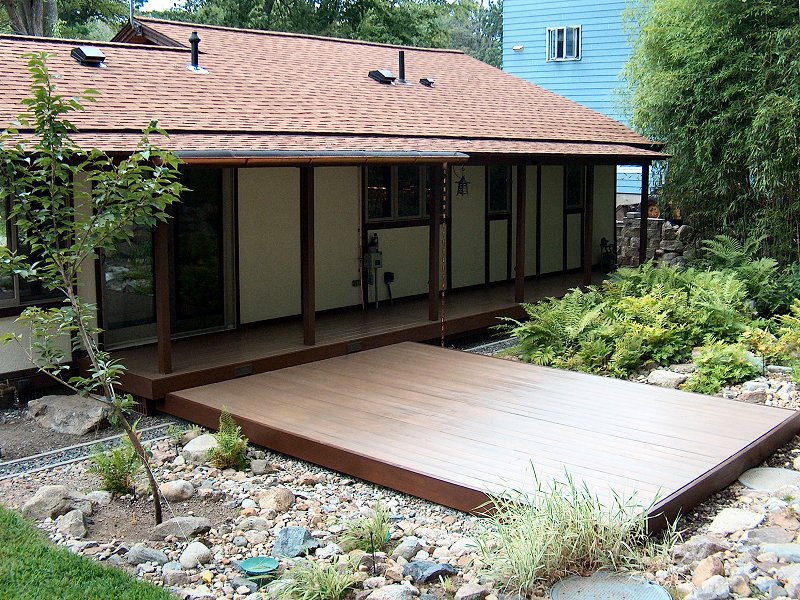
The stained decks (3 photos).
The next day I re-filled the Stain System, and put the first coat on the engawa, then the second coat on the tsukimi-dai. Clean-up was very easy, since the stain could be cleaned with soap and water, so the stain system just got flushed out with the hose and was good to go. The weather was holding, and I added a second coat to the engawa the next day. I just couldn't get over how easy this Stain System thing made stain application, with no streaks or dark overlapped areas. Getting a full coat on the took less than half an hour - I think it took longer than that to clean the Stain System when I was finished with it. Stain on the decks was done!
Making use of the new Engawa & Tsukimi-dai: The Grill & Outdoor Furnishings
With the major work finished on the engawa and tsukimi-dai in mid-August, I invited the
building inspector over for the final inspection. He was rather impressed, if I do say so myself, and with his visit the project was officially
completed. However, I'd been tinkering with a few other things for the decks on rainy days throughout the Summer, and even with the project
"officially" done, I still had a few things to take care of which kept me busy through the Fall of 2012.
First on the list of extras of course, was a new grill. I've never been a big fan of the gas grill - it seems to me if I want to cook food with a simple gas flame, I'll do it under the broiler in the oven. I also considered the kamado style grill, with its thick porcelain shell and ability to cook all manner of wonderful meals with just a handful of charcoal. I wasn't thrilled about spending $1,000 on a grill however, and for a kamado to "look right", I'd also have to build a bench to hold it. I was raised with a big red Weber® kettle in the back yard, so the choice of what manner of grill we'd end up with was pretty much pre-ordained from before we started building the decks. It was going to be a red Weber® kettle.

Our highly customized Weber® Performer® (6 photos).
After a bit of pokin' around on the web, we decided the
Weber® Performer®![]() was the best option for a charcoal grill, and it starts with a small propane tank to allow the charcoal to get going without the need for
any lighter fluids. One of the problems however, is that most places only sell it in black, green or blue. It's supposed to be red, darn it.
The good news is Ace Hardware had a deal with Weber® as the exclusive distributer of Brick Red
Weber® Performers® this Summer, and they even offered free shipping to the
local store. One week and about $300 later, all was right with the world and I was putting together the new grill in the shed.
was the best option for a charcoal grill, and it starts with a small propane tank to allow the charcoal to get going without the need for
any lighter fluids. One of the problems however, is that most places only sell it in black, green or blue. It's supposed to be red, darn it.
The good news is Ace Hardware had a deal with Weber® as the exclusive distributer of Brick Red
Weber® Performers® this Summer, and they even offered free shipping to the
local store. One week and about $300 later, all was right with the world and I was putting together the new grill in the shed.
The grill is wonderful right out of the box, but there a bit too much plastic for my tastes so I got busy making a few modifications.
The first thing to go was the big plastic table top, which was replaced with a slap of IKEA® butcher block
countertop cut to size. I also got rid of the tiny little 1 lb. disposable propane tank and replaced that with an adaptor hose connected to a
10 lb. refillable tank. The other major modification was to replace the stock steel cooking grate with a very nice 22.5" cast iron grate from
Craycort![]() with all the extras.
We also got a full set of Weber® Style™ tools to go with it, and then enjoyed some grilling well
into October.
with all the extras.
We also got a full set of Weber® Style™ tools to go with it, and then enjoyed some grilling well
into October.
We started shopping for the grill in the Spring of 2012 and finally made the purchase in June when there was still plenty of carpentry to get done on the deck. While that seems sort of the wrong order to buy stuff, the outdoor furniture was purchased even earlier than that... we made the decision about what we were going to get in the Fall of 2011, and purchased it in April of 2012 - long before we could put it to use. With the decks finally stained and ready for use in August, we could finally unpack all those furniture boxes and really enjoy our new outdoor living space.
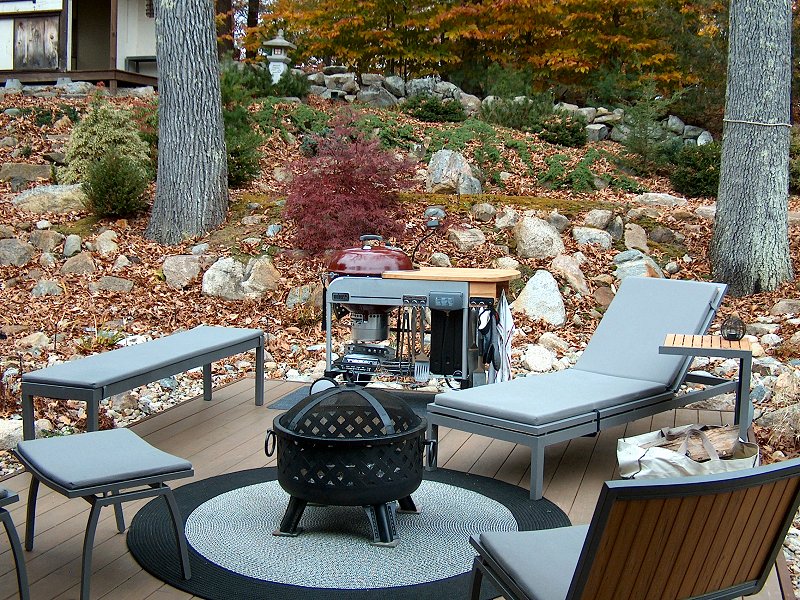
The outdoor furniture & custom covers (4 photos).
After far too many hours browsing through outdoor furniture on the 'net, we kept coming back to the "Alfresco
Natural" line from
Crate & Barrel![]() . Even buying it that
early in the year, there were a couple pieces I had to go pick-up from the local store near Boston because they were already sold out from the
warehouse. Popular stuff, I guess. We got it all on sale with free shipping, so the price was right. We really like the simple, clean look
of this furniture, and even though it looks like wooden furniture, the wood parts are resin that's completely weatherproof. We ended up
getting a small dining table with four chairs, a pair of lounge chairs with an ottoman, a chaise lounge, a bench, and a couple side tables.
It's light to move (Aluminum frames), and we've tried a few different arrangements depending on the number of guests we have when entertaining.
So far it's worked out very well.
. Even buying it that
early in the year, there were a couple pieces I had to go pick-up from the local store near Boston because they were already sold out from the
warehouse. Popular stuff, I guess. We got it all on sale with free shipping, so the price was right. We really like the simple, clean look
of this furniture, and even though it looks like wooden furniture, the wood parts are resin that's completely weatherproof. We ended up
getting a small dining table with four chairs, a pair of lounge chairs with an ottoman, a chaise lounge, a bench, and a couple side tables.
It's light to move (Aluminum frames), and we've tried a few different arrangements depending on the number of guests we have when entertaining.
So far it's worked out very well.
Even though this outdoor furniture is totally weatherproof, I still wanted to get a nice set of furniture covers for the stuff that
sits out on the tsukimi-dai. That was an exercise in frustration. Apparently the folks that make outdoor
furniture covers just take a sample of a few kinds of furniture then make covers that are big enough to fit pretty much anything. Even
the covers that Crate & Barrel offer for this furniture are not custom fit to the furniture (and the light green color was nothing to
get excited about either). I finally decided the only way I was going to get covers that fit properly was to alter them myself. I started
with the
Veranda series![]() covers from Classic
Accessories (purchased through Amazon). The Veranda covers have a nice fabric cover with a waterproof PVC lining, built in vents, straps
in the corners to tie onto the furniture, an elastic band around the perimeter, and the color was a good match to our deck colors too.
I also picked up some heavy poly upholstery thread, then pulled out the sewing machine and got busy. As I said above, this
was my rainy day project work that lasted well into the Fall. Some of the covers I could just make a few minor alterations to
and they'd fit well enough. For other items like the grill and the fire pit, I ended up pretty much tearing all the seams out of
an oversized cover and making something from scratch with the resulting pieces of fabric. I think I finished my last cover in the
first week of November.
covers from Classic
Accessories (purchased through Amazon). The Veranda covers have a nice fabric cover with a waterproof PVC lining, built in vents, straps
in the corners to tie onto the furniture, an elastic band around the perimeter, and the color was a good match to our deck colors too.
I also picked up some heavy poly upholstery thread, then pulled out the sewing machine and got busy. As I said above, this
was my rainy day project work that lasted well into the Fall. Some of the covers I could just make a few minor alterations to
and they'd fit well enough. For other items like the grill and the fire pit, I ended up pretty much tearing all the seams out of
an oversized cover and making something from scratch with the resulting pieces of fabric. I think I finished my last cover in the
first week of November.
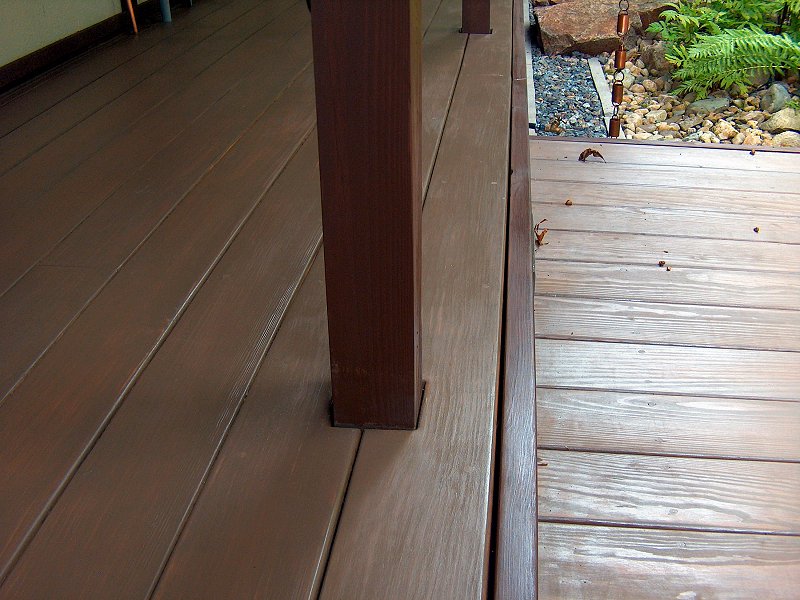
Post trim installation (5 photos).
Finishing Touches: Late Fall/Winter 2012
With the new grill and all the outdoor furniture taken care of, we were finally able to do some entertaining nearly every weekend throughout
the Fall of 2012. Spending a fair amount of time on the engawa & tsukimi-dai was very
enjoyable and well worth the effort to build it all, but I also noticed a few things that still need some attention. In addition to the
outdoor furniture, we also purchased a couple of outdoor rugs from Overstock.com, as seen in the photos above, as well as a grill pad to
catch any spills when cooking.
One of the areas that I wasn't happy with however, was the way the posts met the decking on the engawa. When prepping the deck boards I had just put the same 1/4-inch round-over on the openings for the posts that was already on the decking edges and ends. After looking at that for a couple weekends I decided to try adding a little trim around the posts for a more finished look. I had a pieces of 5/4 p.t. scrap in 1 and 2 foot lengths kicking around, so I ripped it all into 3-inch wide pieces with a 15° taper on the face. I then planed the faces smooth, and cut them into mitered corner trim pieces to surround the base of each post. I tired to measure and cut everything, but those posts aren't exactly square or the same dimensions from post to post, so I ended up cutting each piece to fit each post with many trips from the engawa to the wood shop to get them all cut and labeled. I then gave everything a coat of stain in the shop. After the first coat dried, I assembled the trim around each post with just glue and tape to hold it in place - no fasteners were used. After the glue cured, I gave the assembled trim a final coast of stain to even out the color. I think the results give the engawa a more finished look than just having cut-outs in the deck boards.
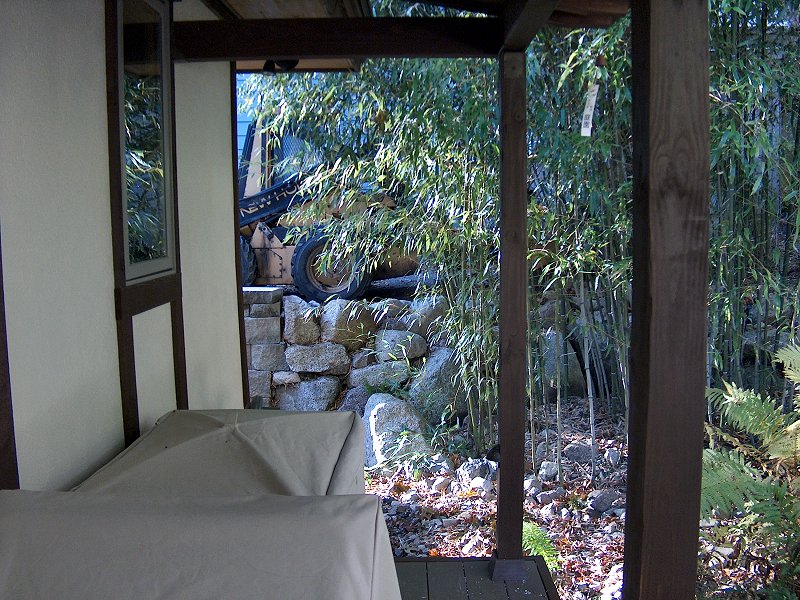
A good spot for the sode-gaki (1 photo).
The other thing that bothered me a little was the way the end of the engawa looked on to the neighbor's driveway. When planning out the engawa, I had always suspected I would add some manner bamboo fence at the far end, but wanted to finish the thing first to get an idea of how it would all work together. With the engawa construction done, it was clear that a sode-gaki, or sleeve fence, would be needed to enclose the end of the engawa and provide the proper look, as well as some additional privacy.
Building the Sode-gaki: Spring 2013
I actually started work on the sleeve fence in late Fall of 2012, however with the holidays and house guests, followed by a Winter with lots of snow,
the project didn't see any progress until this Spring. After lots of tinkering with the cars and a few health issues, I finally got back into
the wood shop in March, even though the weather was still lousy with below normal temperatures and occasional snow throughout the month.
Despite the cold I needed to make some progress on this thing, since I was also trying to find time to frame up a new dock extension before
the neighbors got too anxious to put their boats in the water, and I couldn't work on the dock with a half built fence in the middle of the shop.
I had worked out the design for the fence in the Fall before work started on the frame of course, and had assembled the frame from a single 12-foot long pressure-treated deck board. The fence would mount to the vertical trim on the house at the end of the engawa and then connect to the last post at the end, with an overall height just under 6-feet so it would clear the support beam too. Based on the materials I had on hand (a 2-inch diameter piece and a couple 1-1/2 inch diameter pieces left over from the shishi-odoshi ), and after browsing through Isao Yoshikawa's books regarding bamboo fence construction, I based the design on the kenninji-gaki style so the only additional materials I'd need to source were the vertical tateko and some black-dyed palm twine. I found a few places online with good prices on 1-inch bamboo (tateko), but the shipping costs were crazy. I ended up just buying a roll of 6-foot tall 1-inch bamboo fencing from Home Depot online, since they offered it with free shipping. I had wanted to use 2-inch diameter splits for the oshibuchi and kasa-dake (the horizontal supports and top trim), but the shipping costs were prohibitive since I only needed a couple pieces. I could use the 2-inch piece that I had for the kase-dake (top trim), and would just use pairs of the 1 and 1-1/2 inch material for the oshibushi. I found the black-dyed palm twine from Amazon.com, and ordered that at the same time as the fencing in the Fall.

Building the sode-gaki (13 photos).
After the frame was assembled and stained, the rest of the materials arrived and I attached the tateko to the main dôbuchi on the frame using regular black-dyed 1/4-inch cotton clothesline (see photos). With that tied off I spritzed the line with water so it would shrink as it dried and tighten everything up nicely. I then pretty much ignored working on the rest of the fence throughout the Winter as stated above. Work on the sode-gaki resumed this Spring, beginning with attaching the rest of tateko to the dôbuchi with screws through the vertical pieces every 5 or 6 pieces and into each dôbuchi. With the tateko well secured to the frame, I then split the pieces for the oshibuchi and kasa-dake and started playing with palm twine. I cheated a little when attaching the oshibuchi by first tacking each piece in place with a couple 18 ga. brads from the nail gun. I then unwound a 6-foot or so length of twine and twisted it together to create a double-thick 3-foot length for each knot. Those pieces were then soaked in a bucket of water for a few minutes to soften them up as well as to cause the knots to tighten up as they dried after they were finished.
With a pair of oshibuchi tacked in place and the twine ready, I tied the oshibuchi in place using a tokkuri-musubi style ibo-musubi knot, which is essentially a glorified clove-hitch with a couple half-hitches to hold the tails in place. Again, the wet twine made a big difference in how tight these knots became once they dried out. I alternated the number of ties for each oshibuchi between 3 on one and 4 on the next until I reached the top of the fence, where I tied the 2-inch diameter kasa-dake splits in place with 4 of the very decorative tamabuchi knots.
I was pleasantly surprised by how well the sode-gaki turned out, and also by how relatively easy it was to put together. After enjoying a season on the finished engawa & tsukimi-dai looking over the garden, I think I'll try my hand at a couple more bamboo fence sections behind the tea-house and next to the garden shed. This simple sode-gaki will do for now, however, as I really need to spend some time cleaning up all the leaves and branches covering the yard from our very windy Winter.
↑
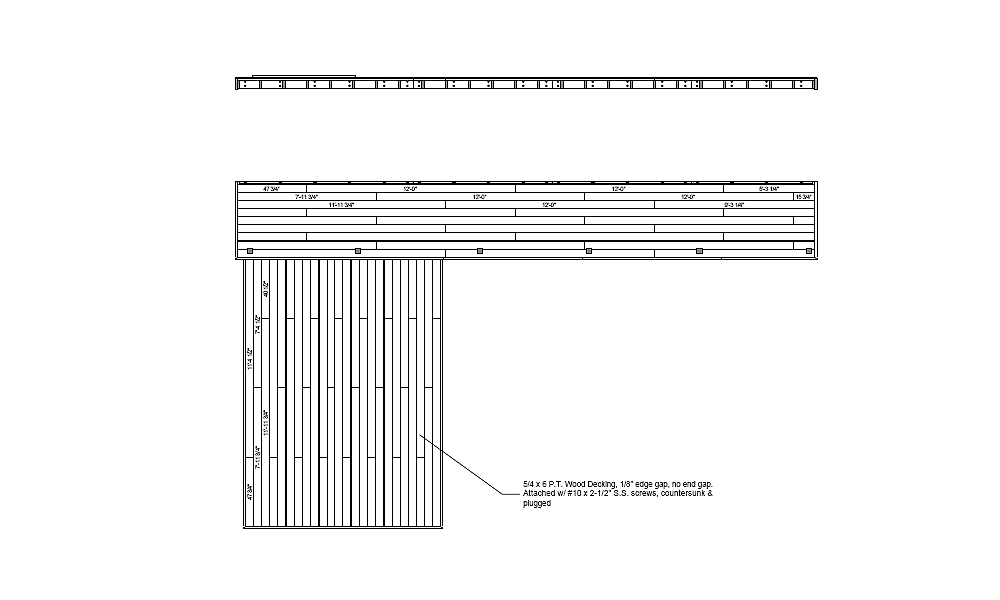
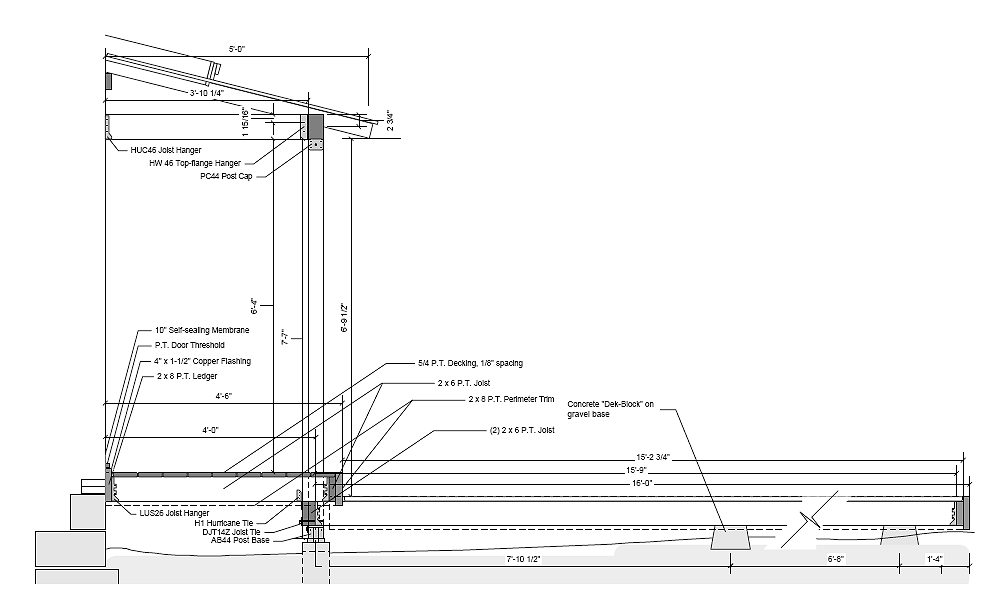
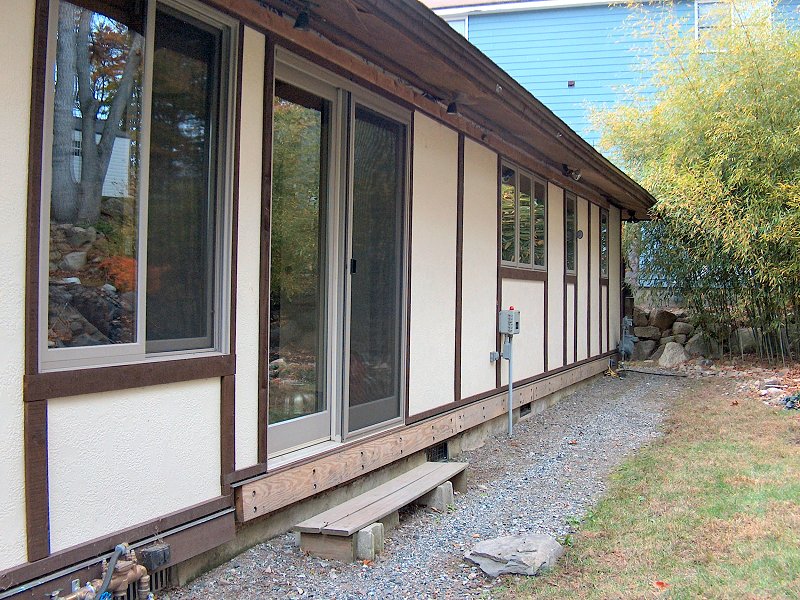
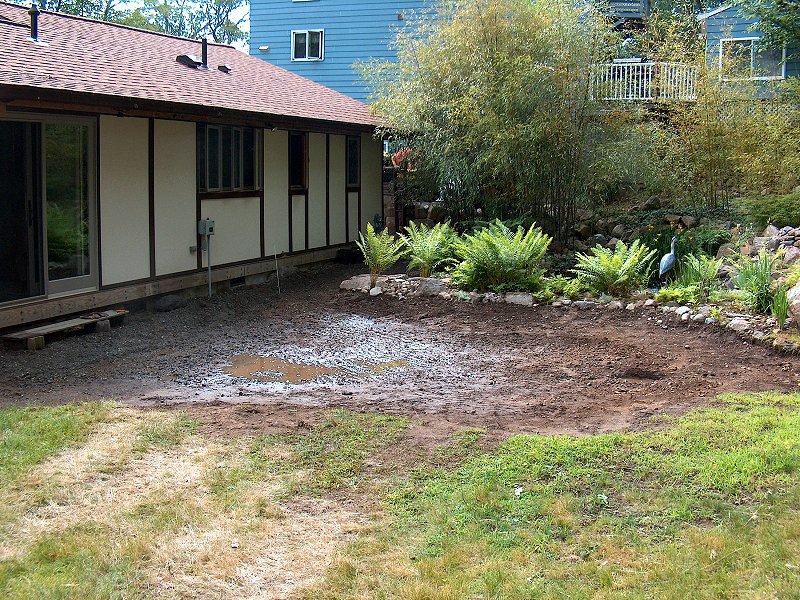
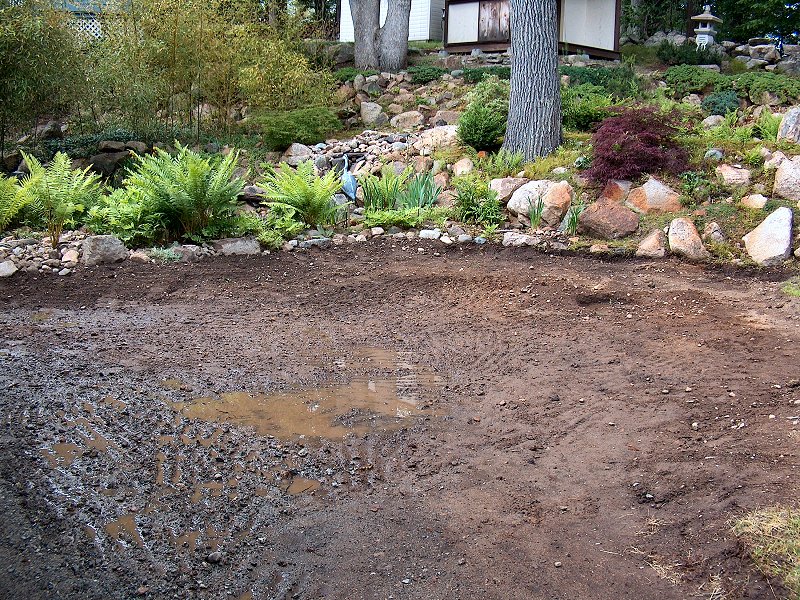
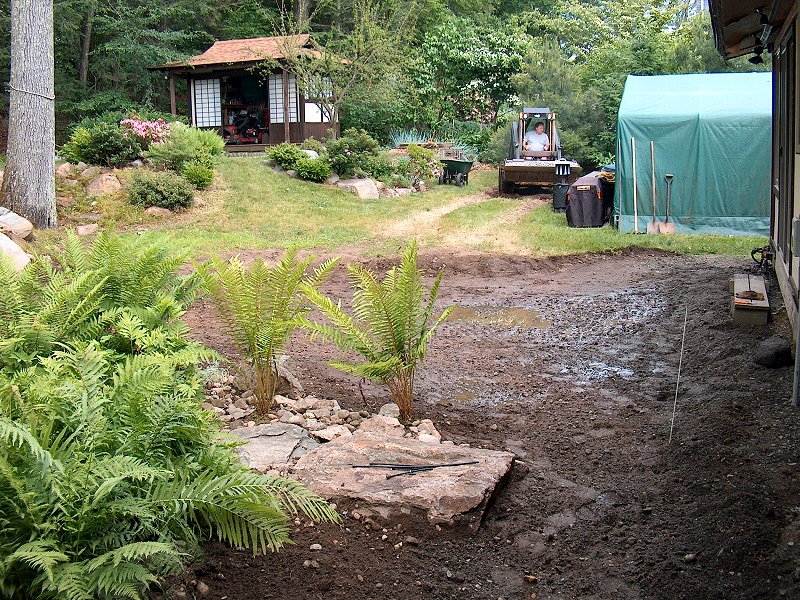
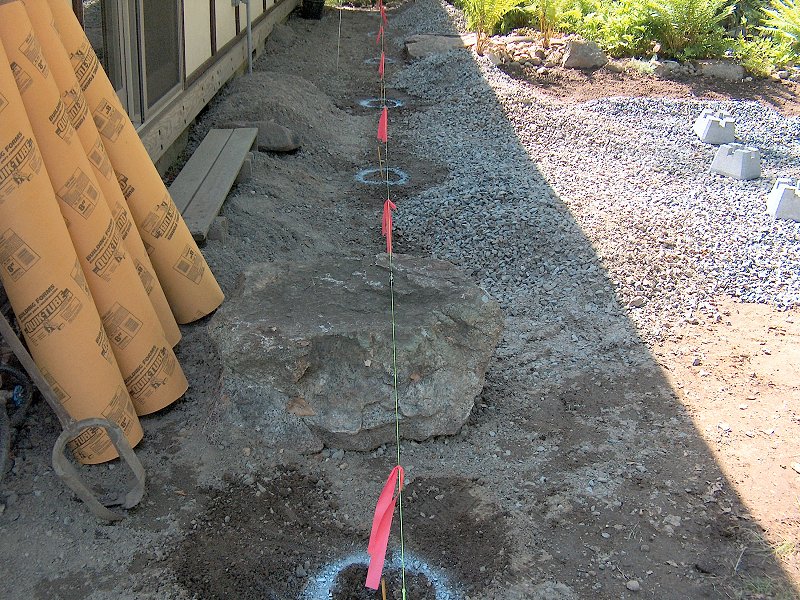
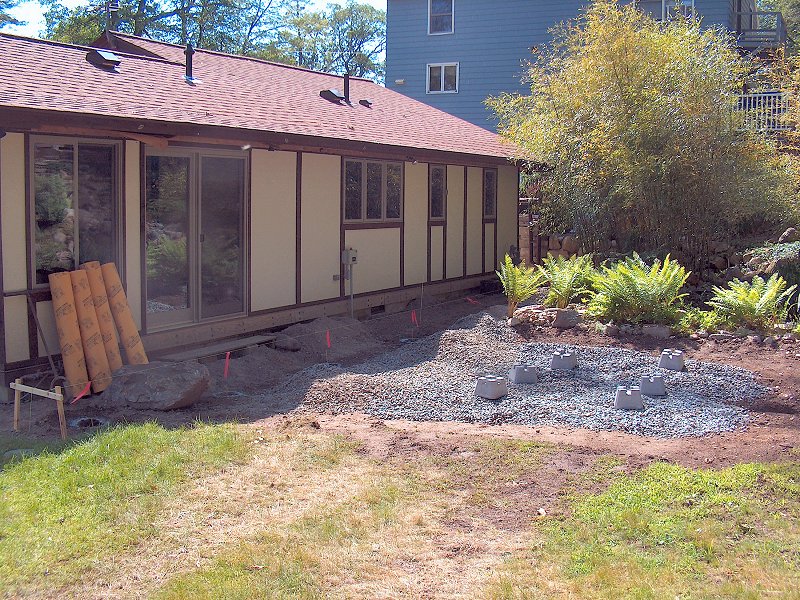
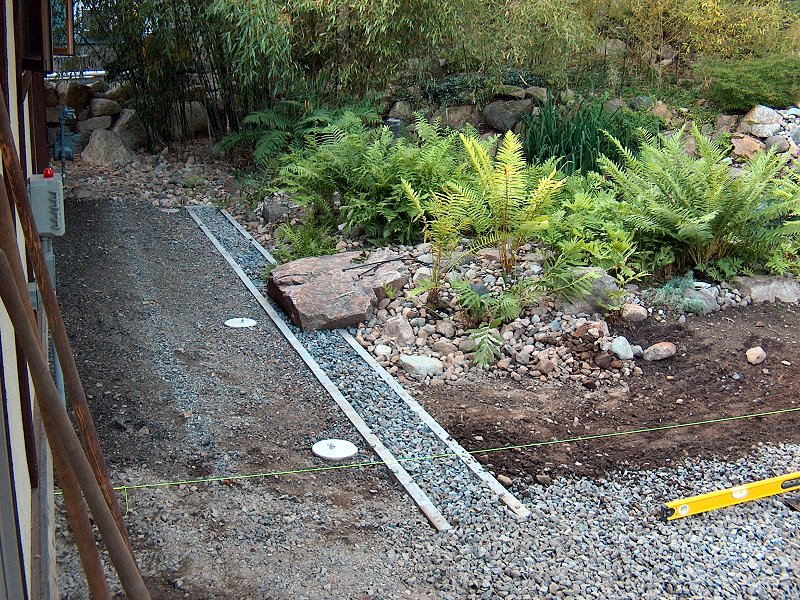
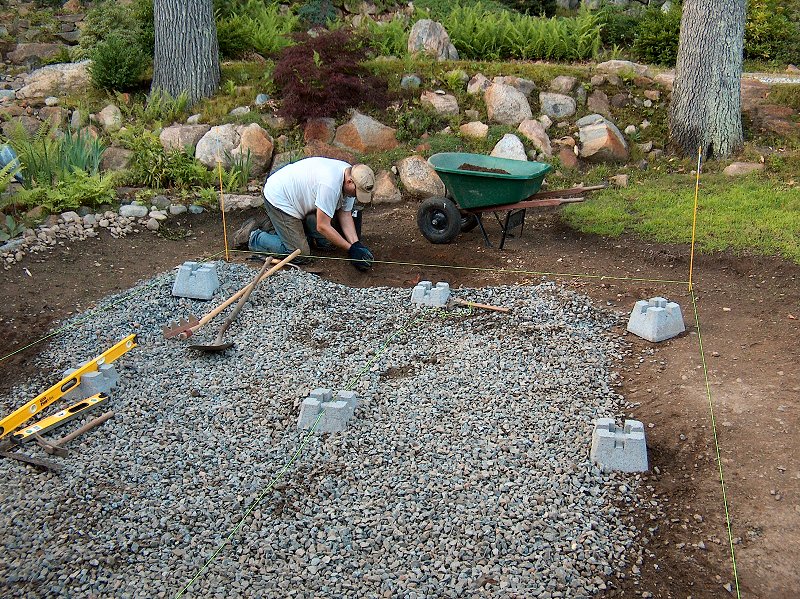
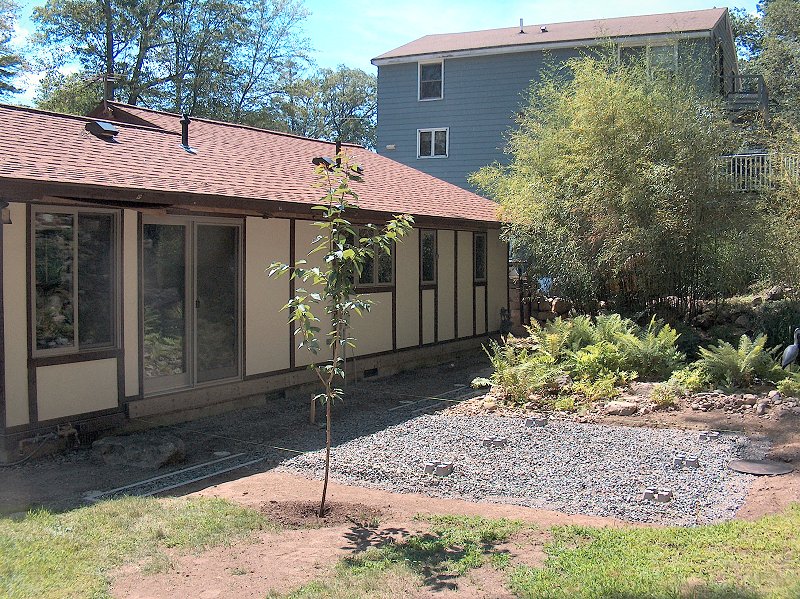
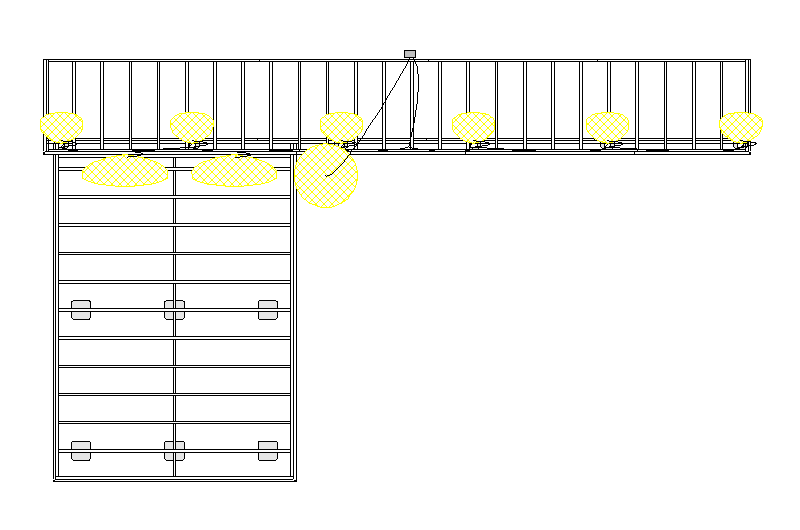
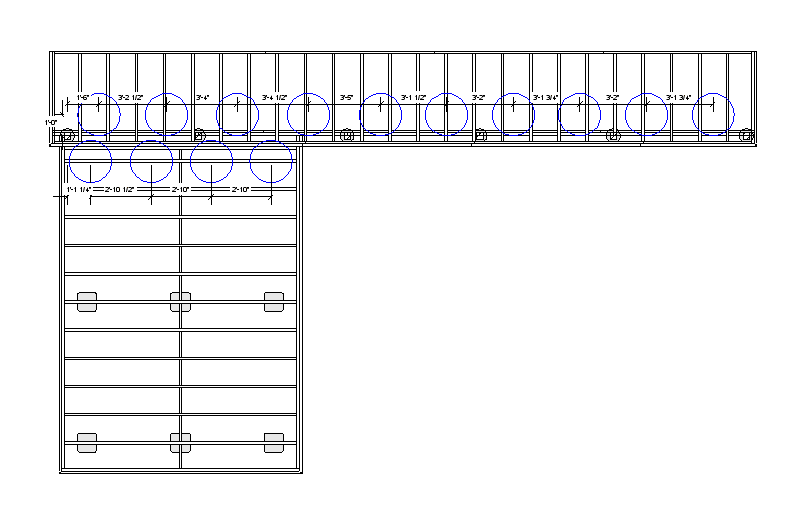
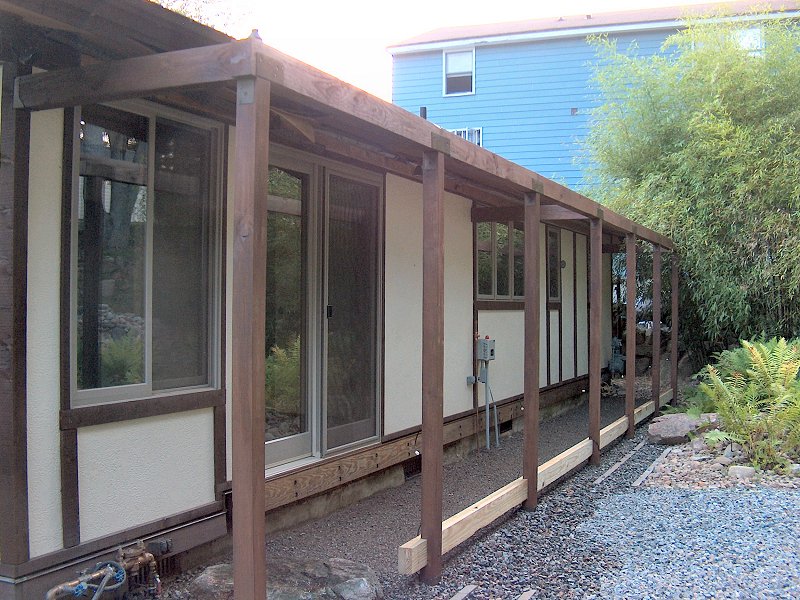
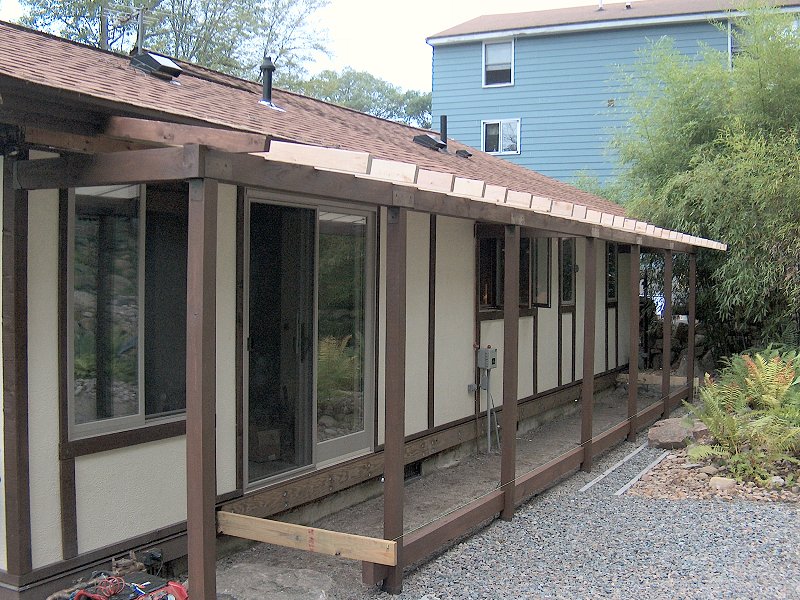
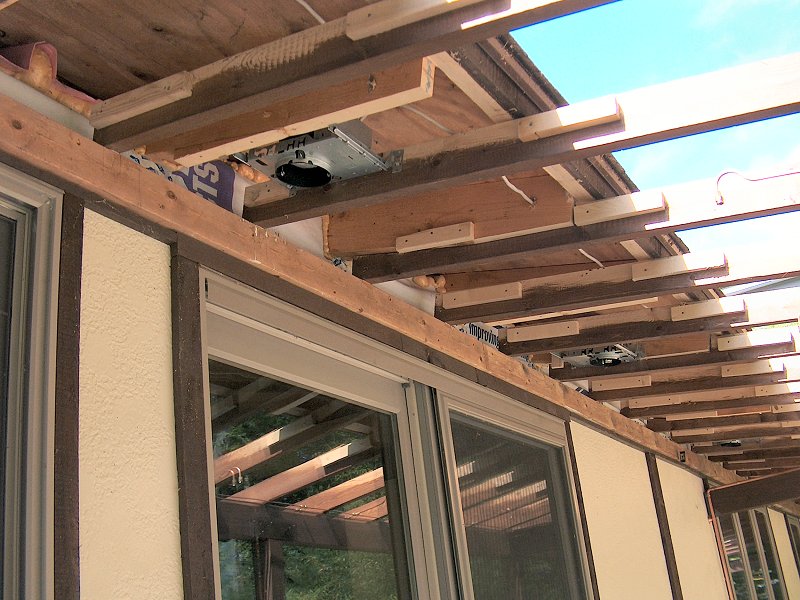
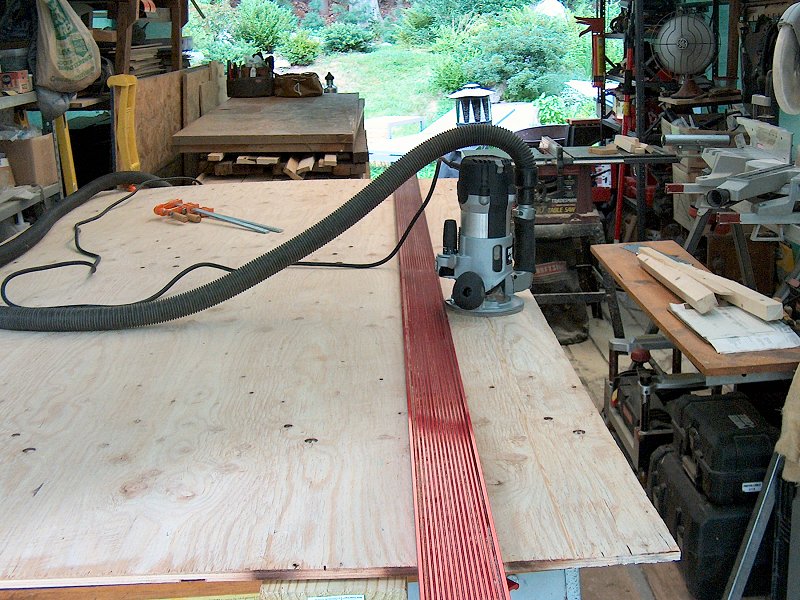
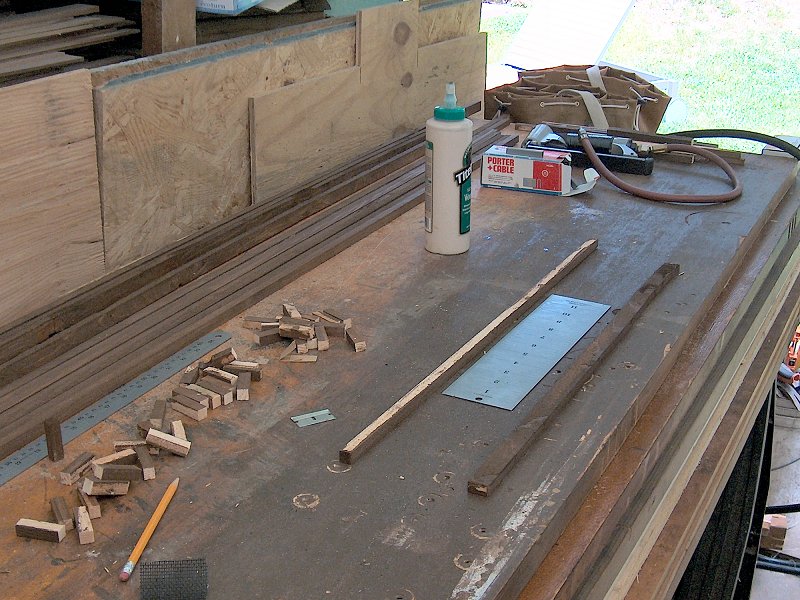
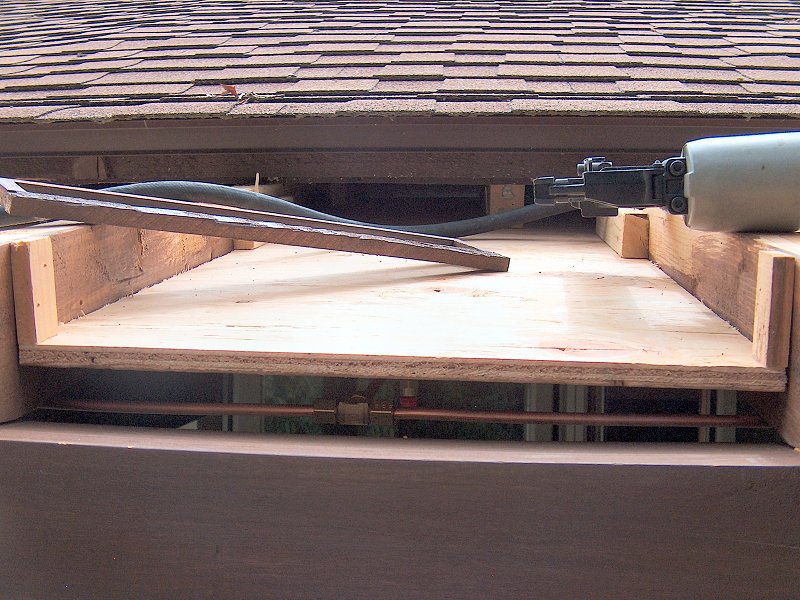
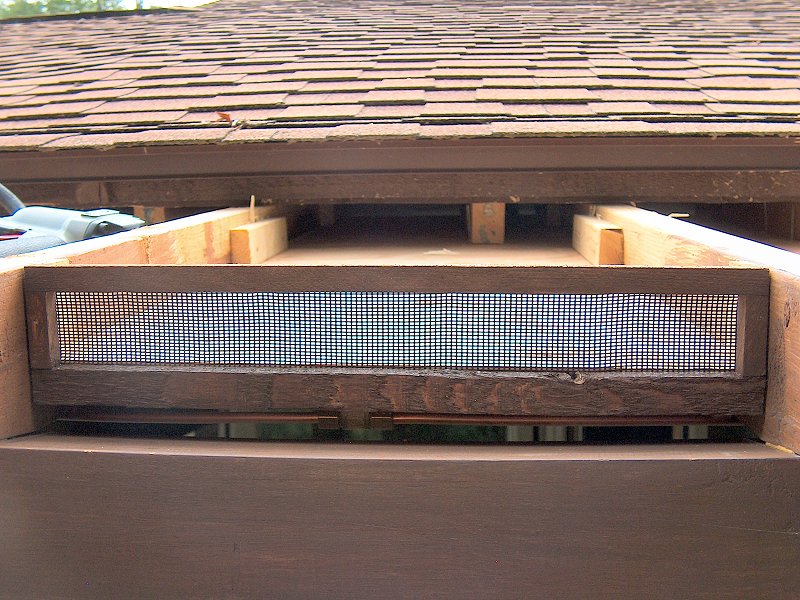
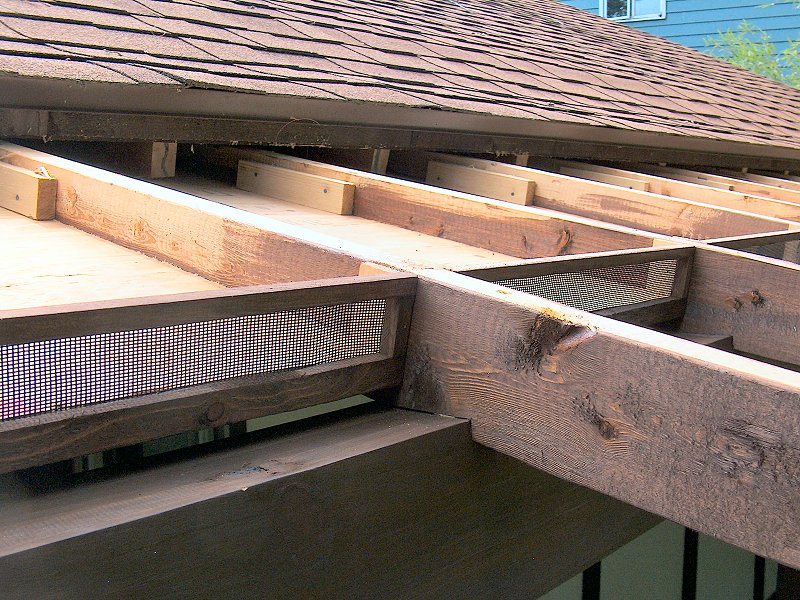
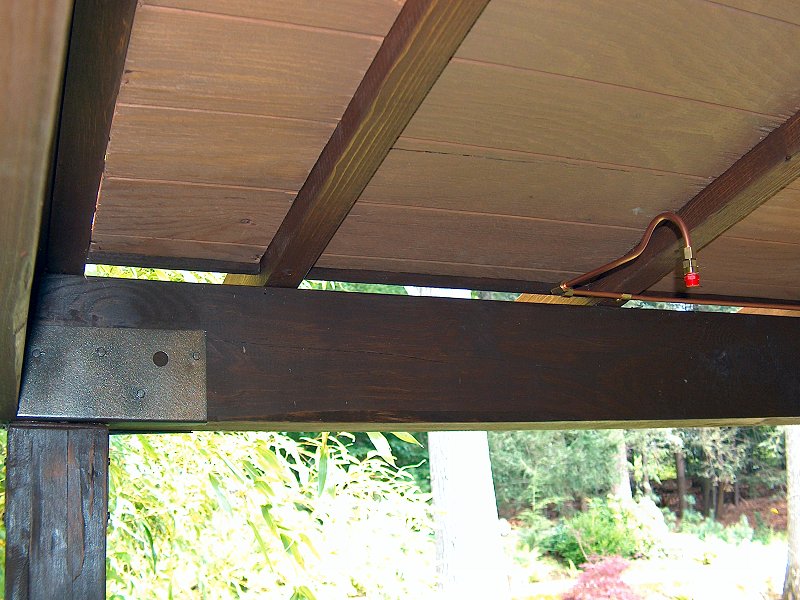
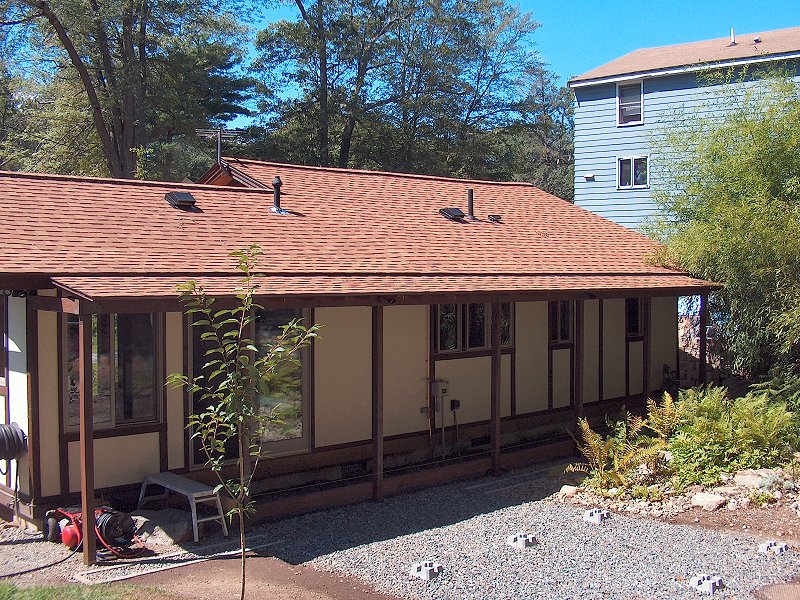
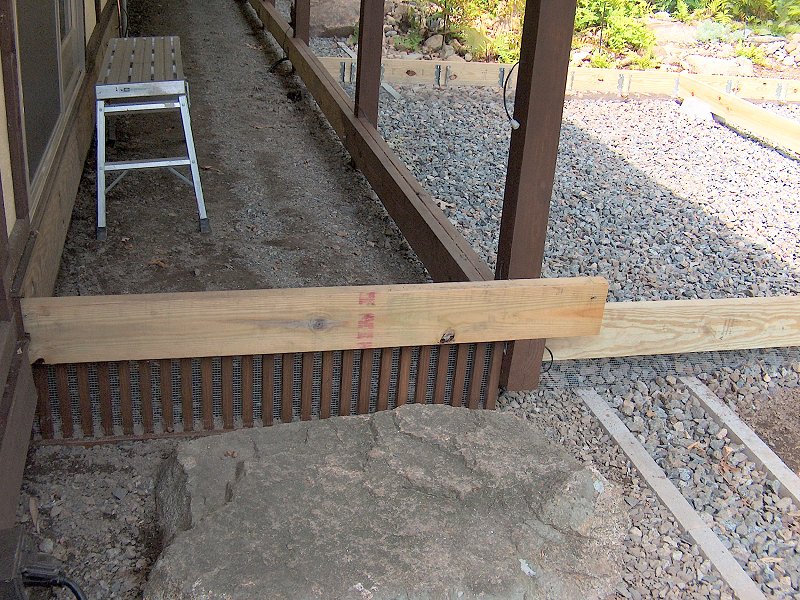
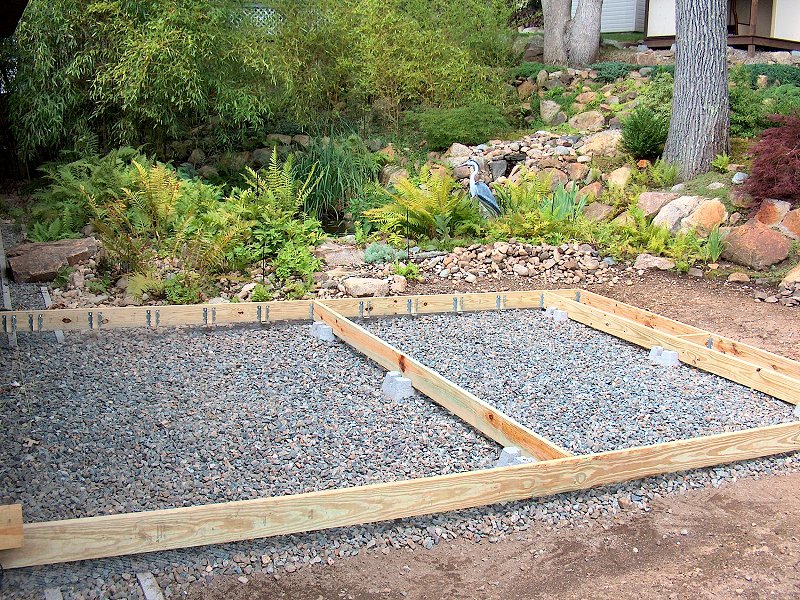
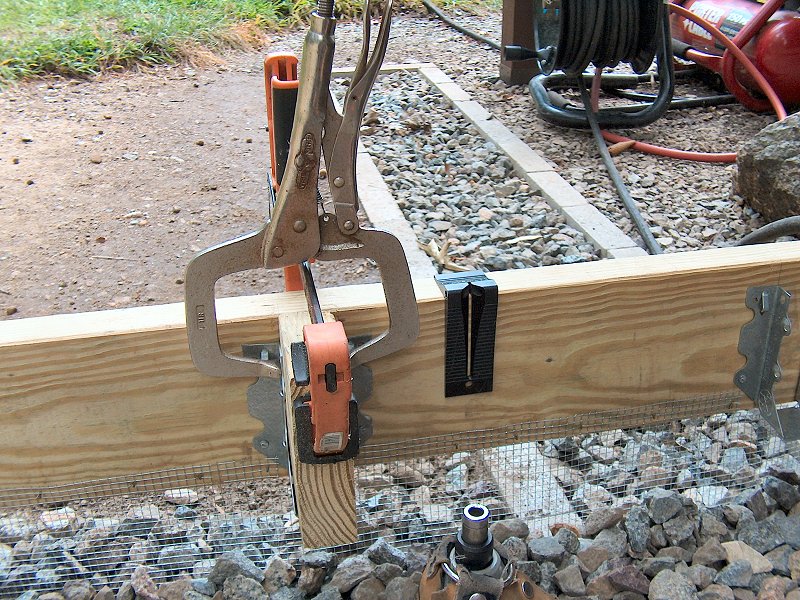
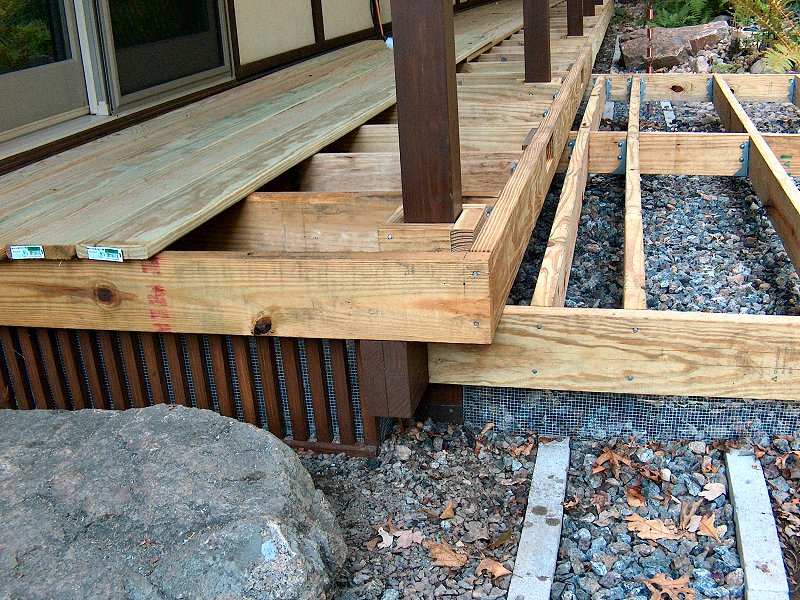
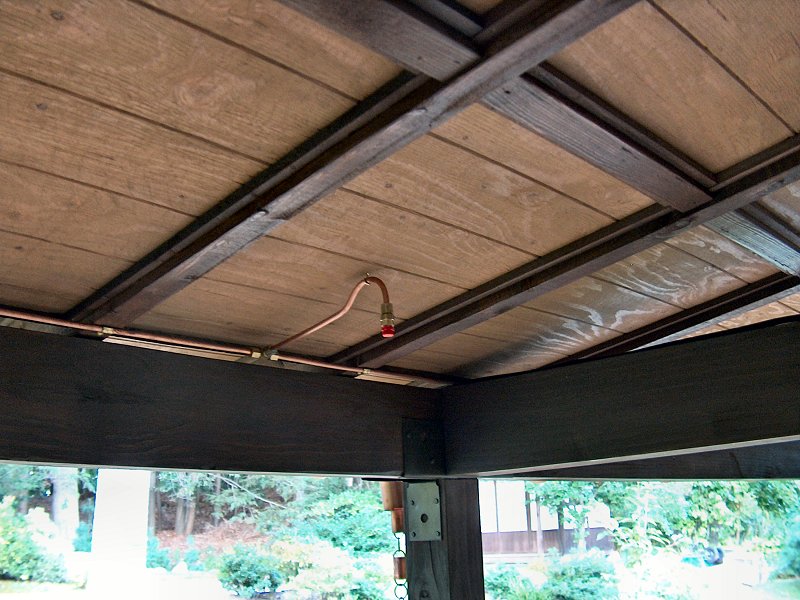
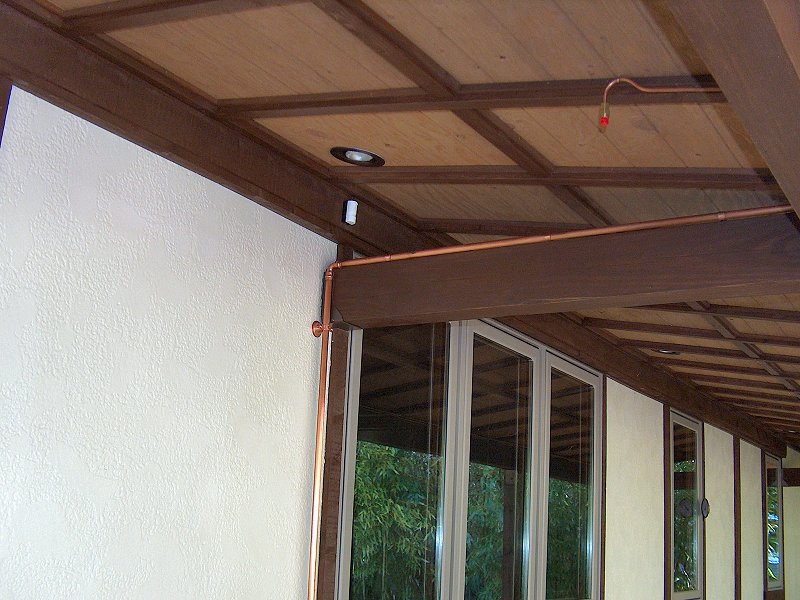
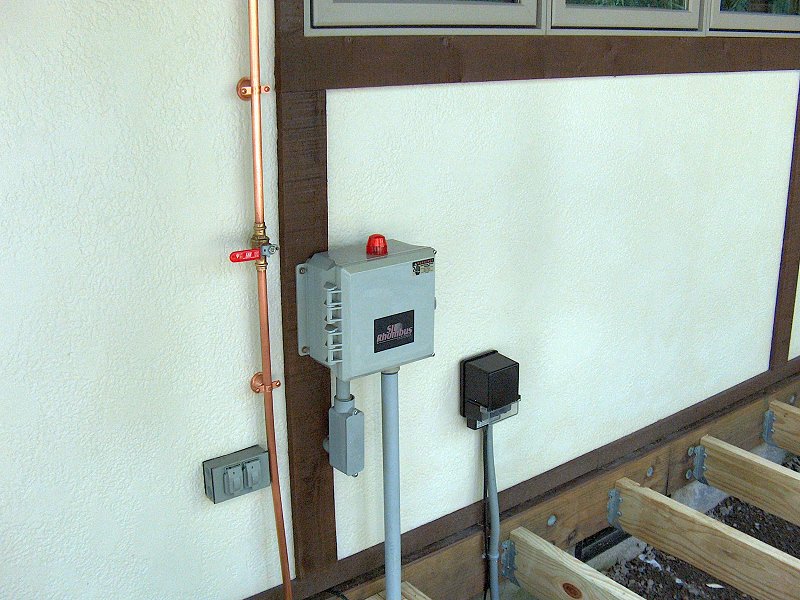
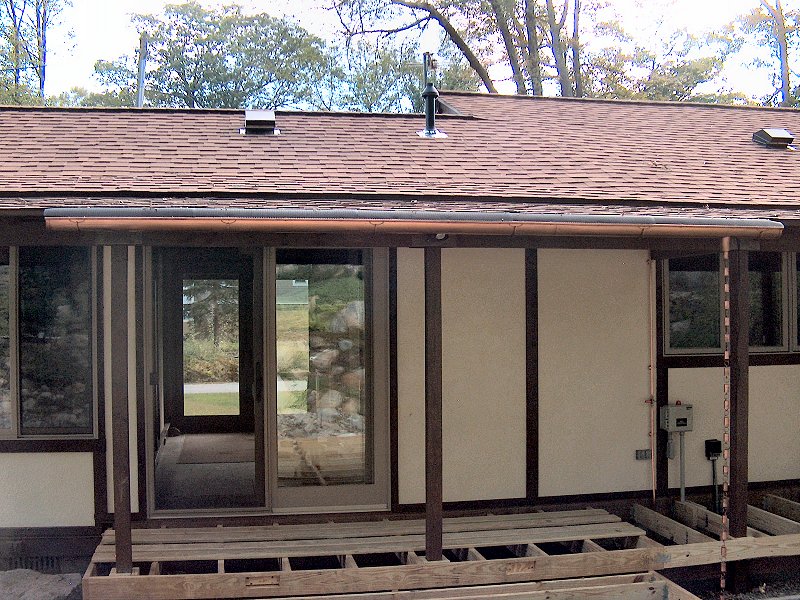
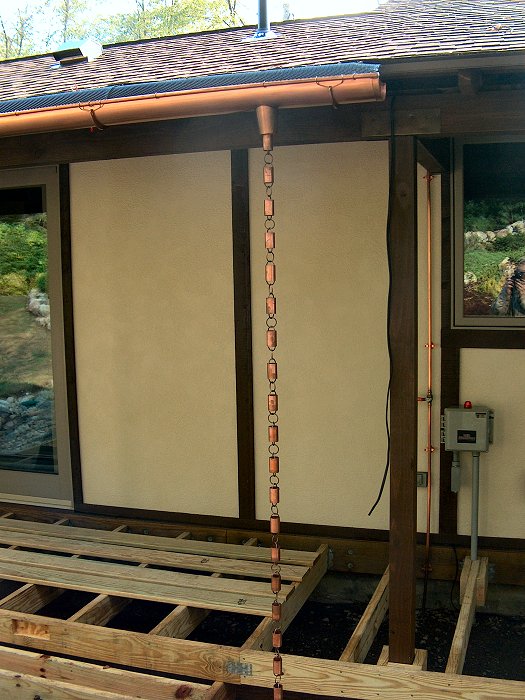
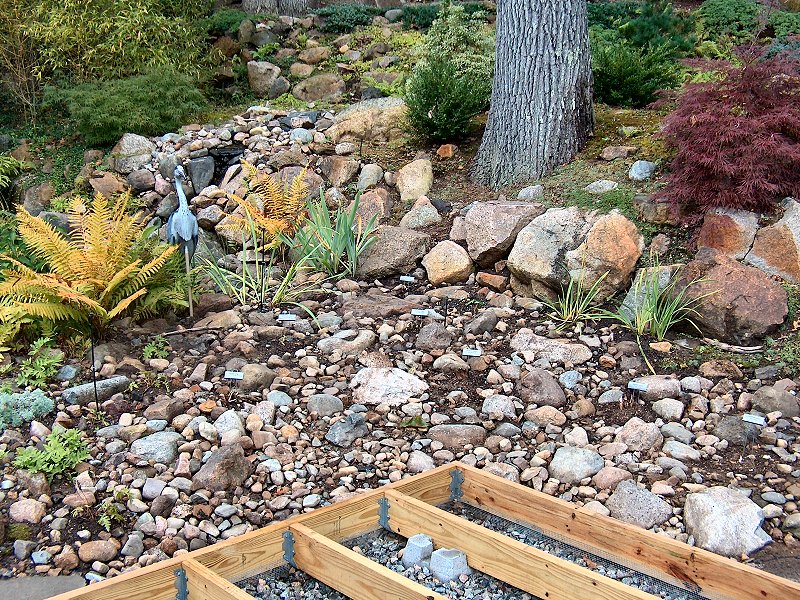
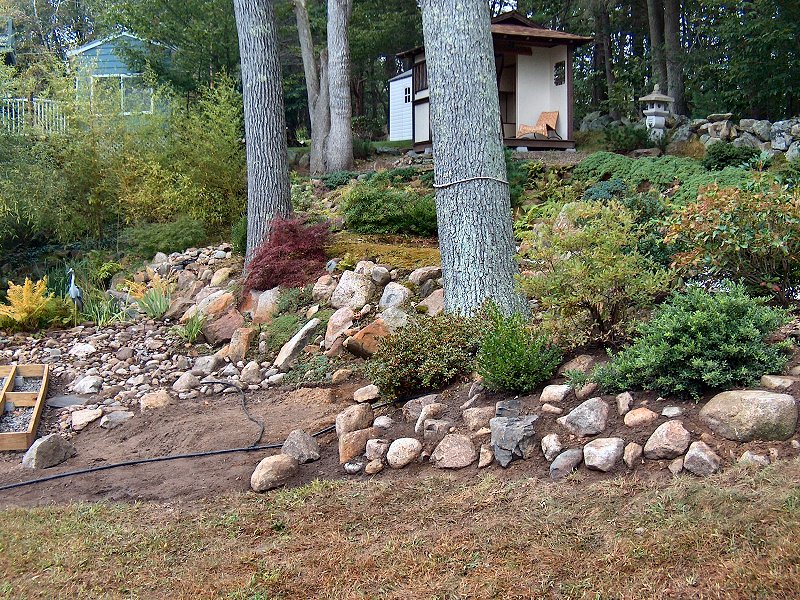
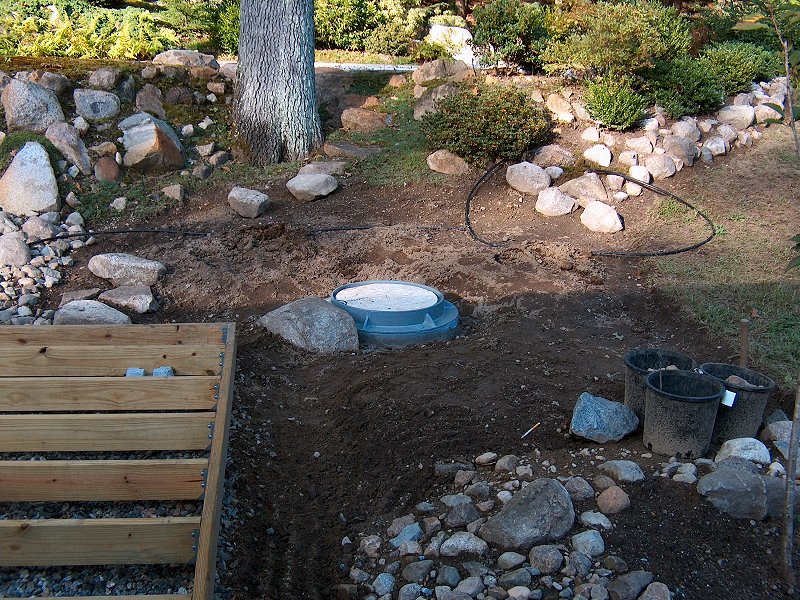
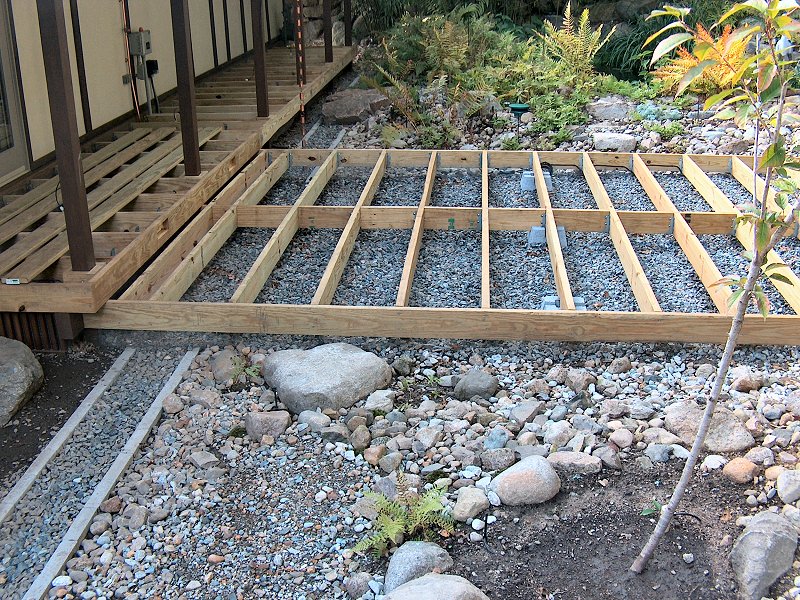
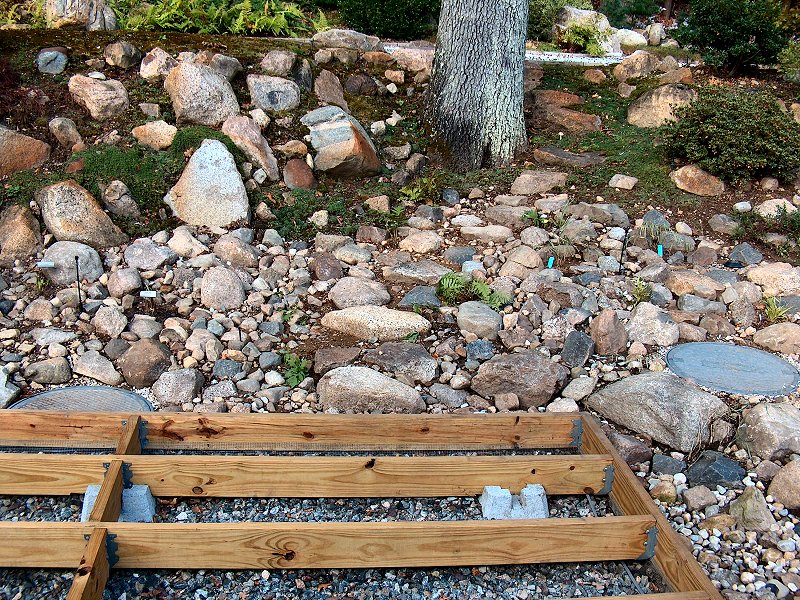
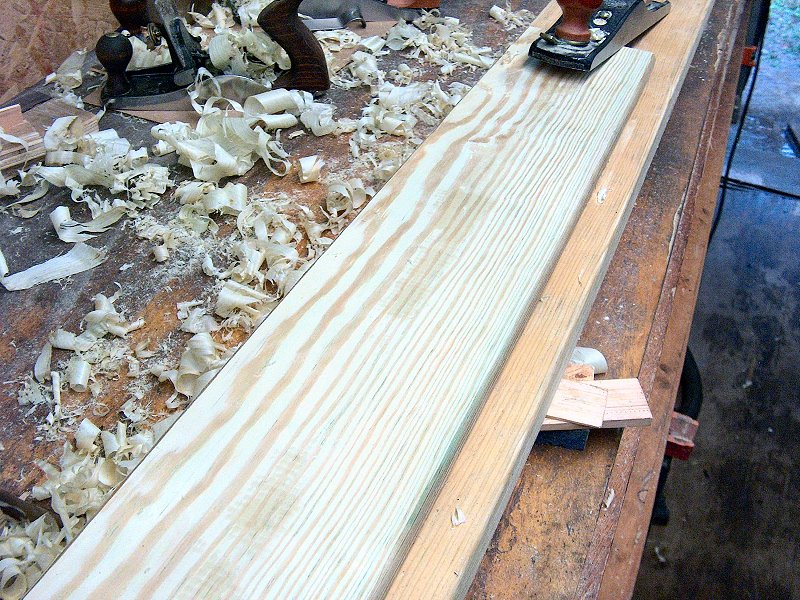
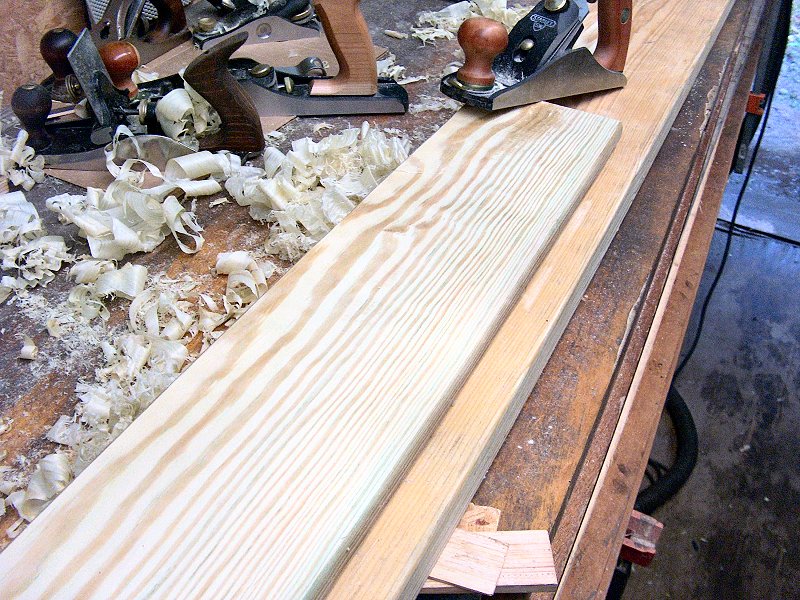
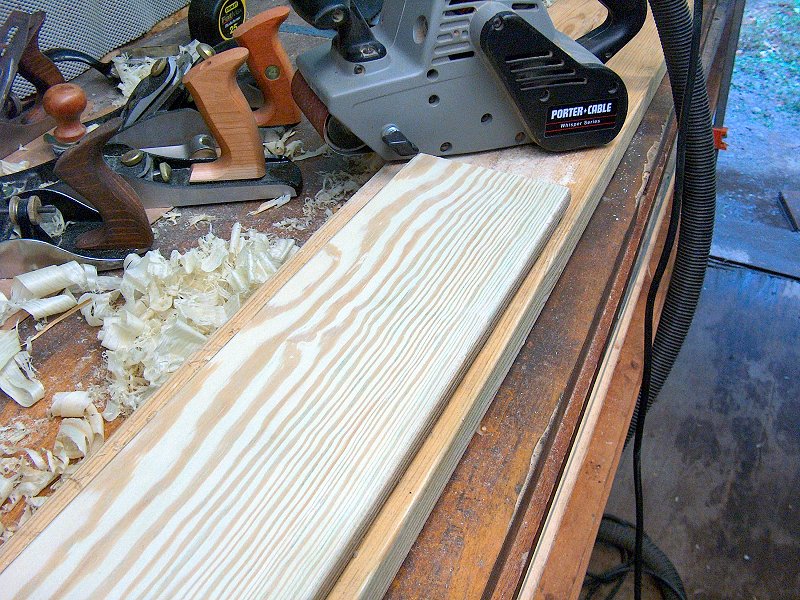
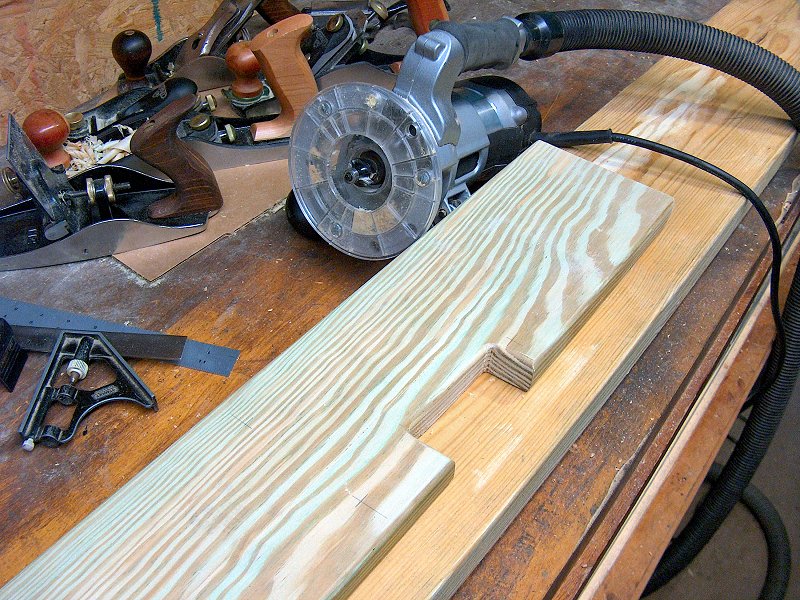
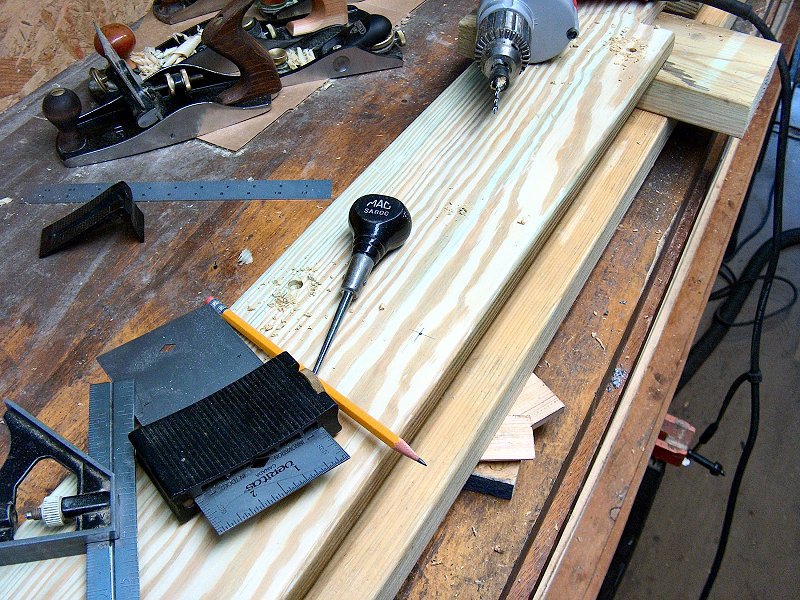
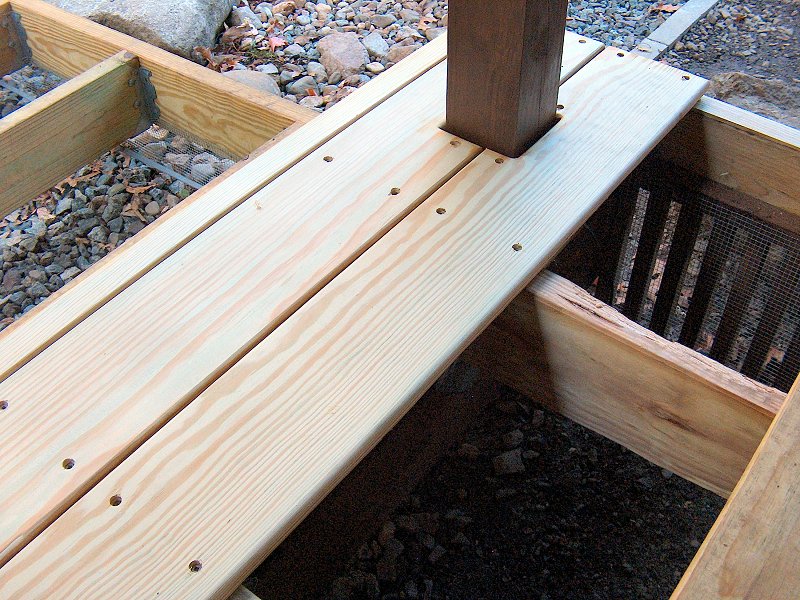
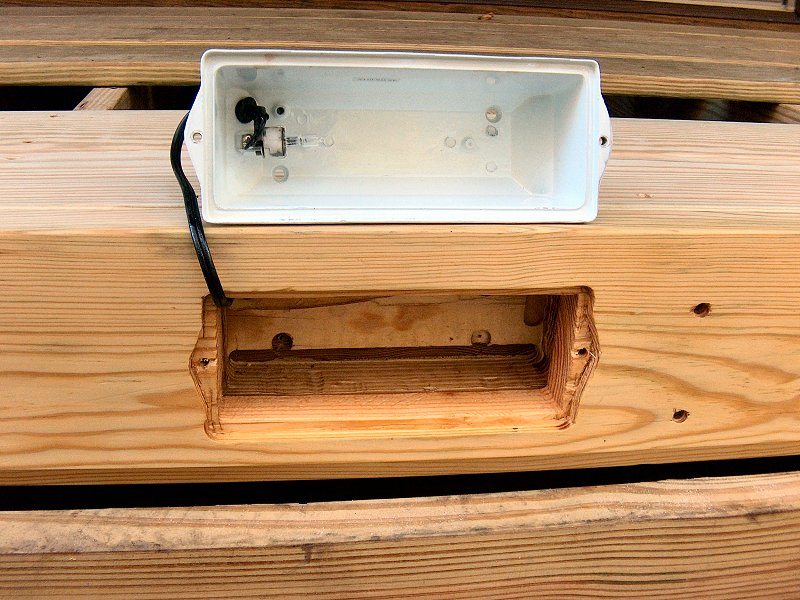
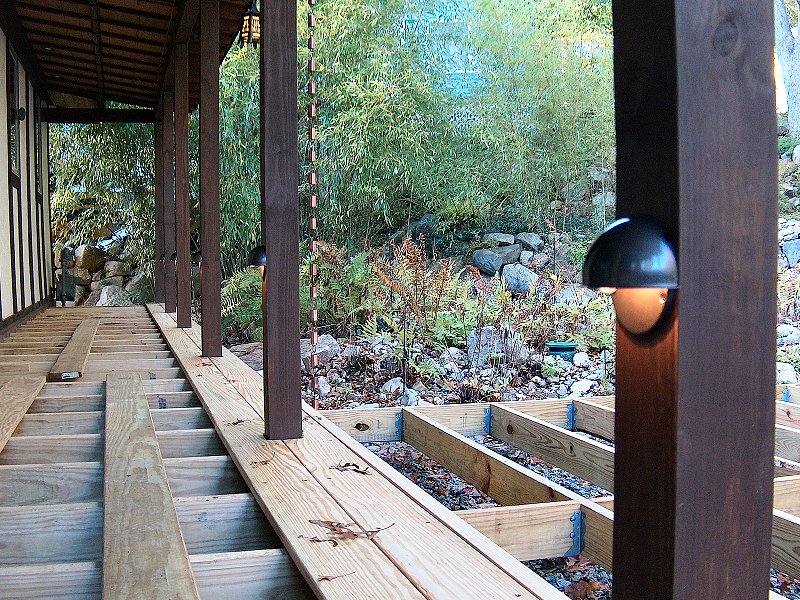
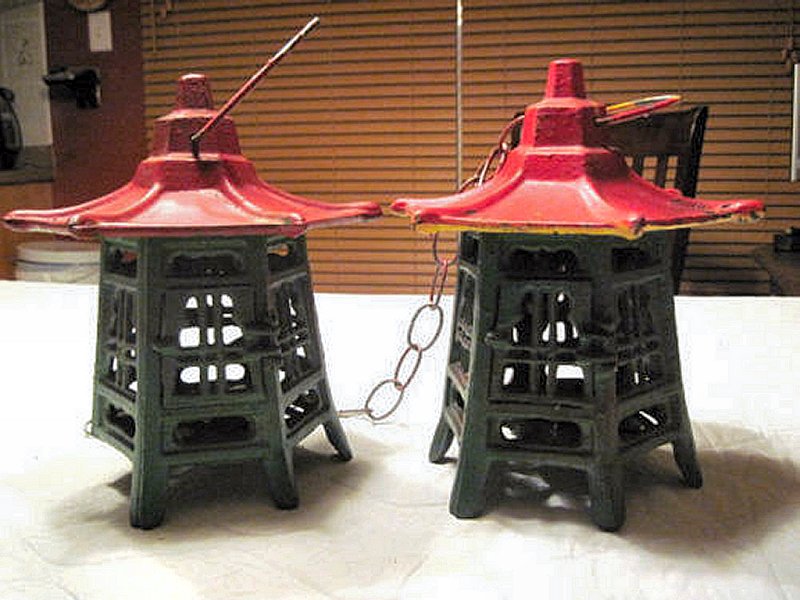
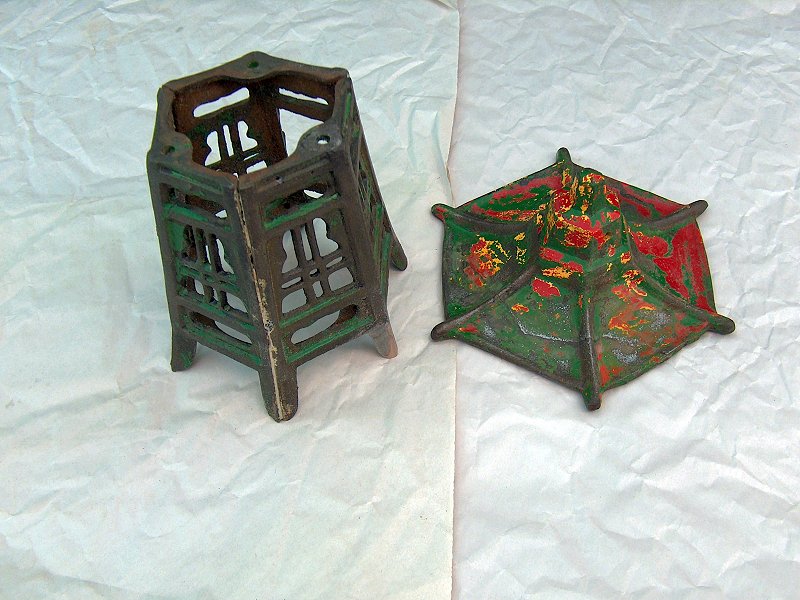
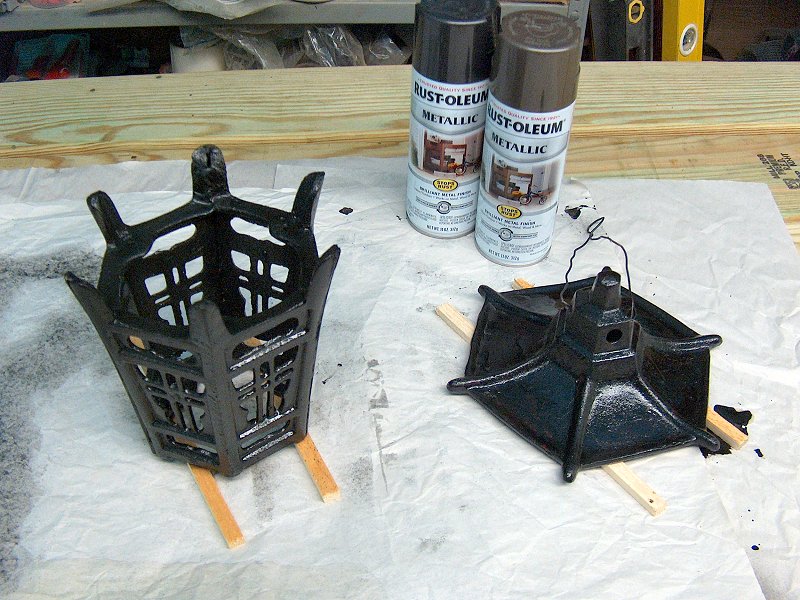
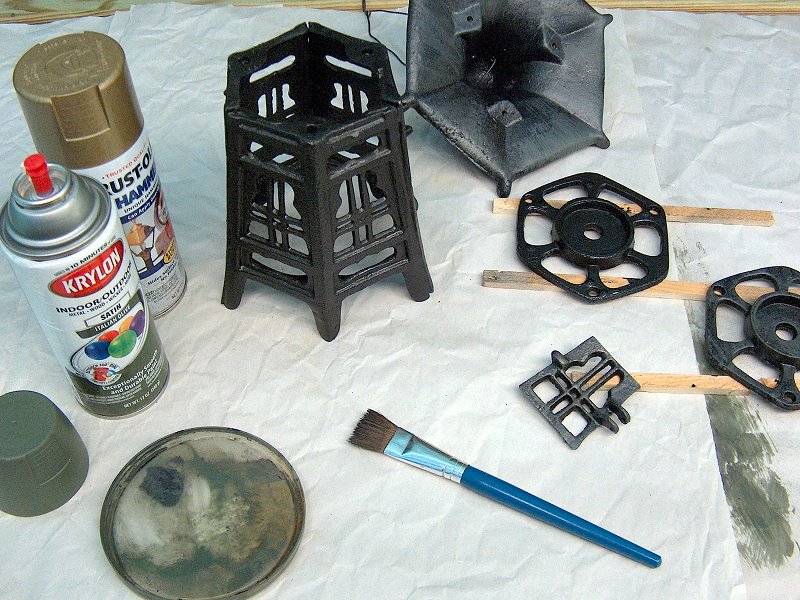
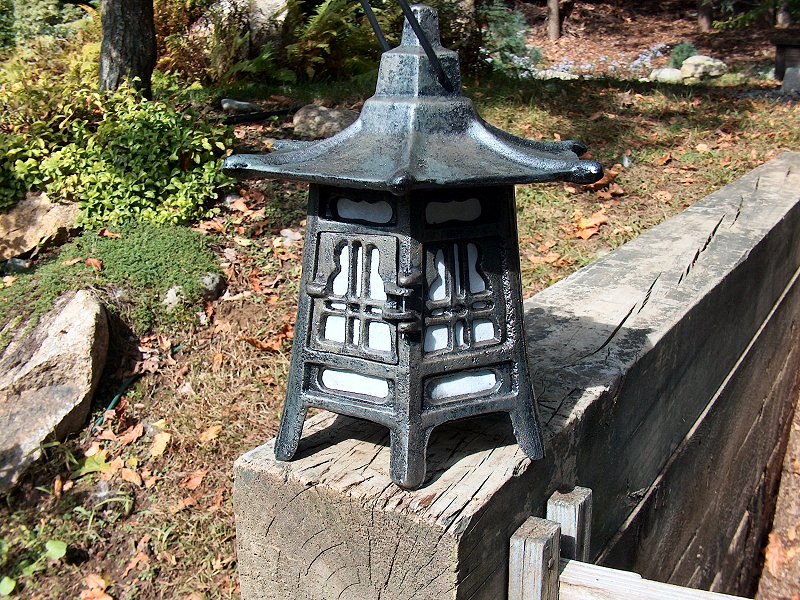
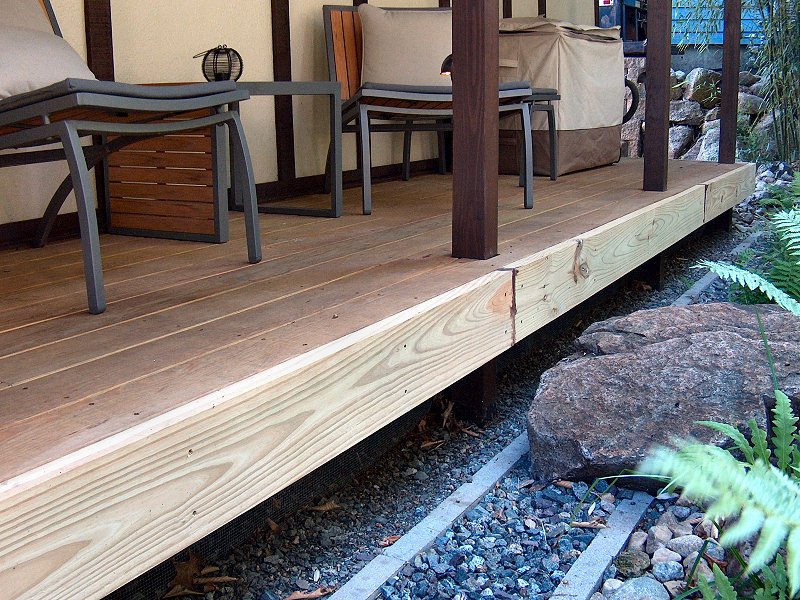
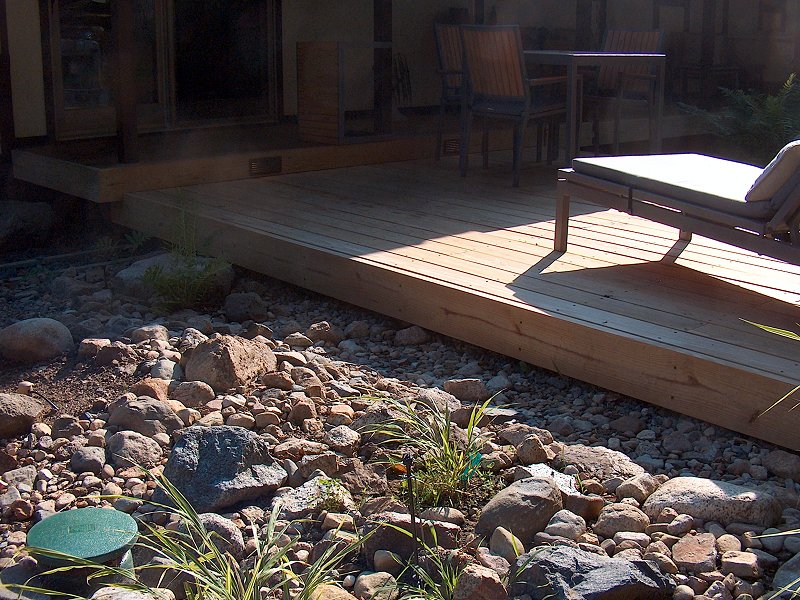
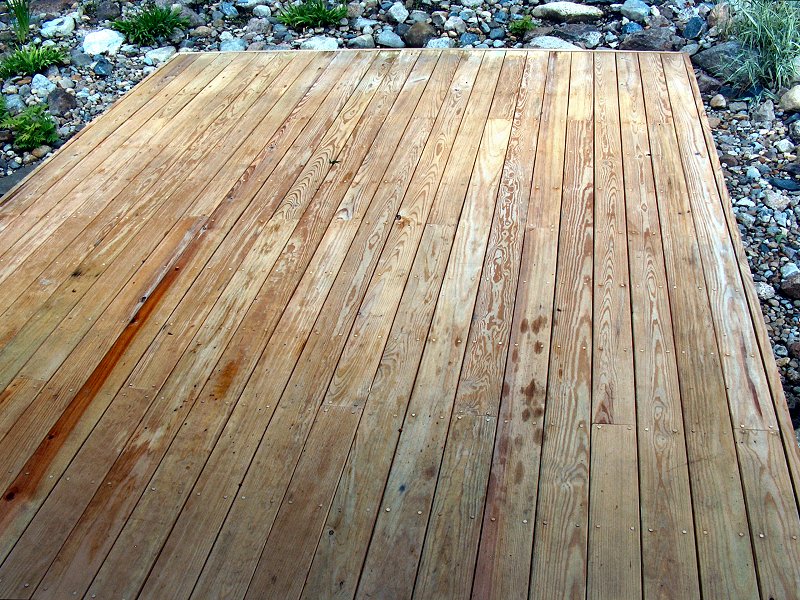
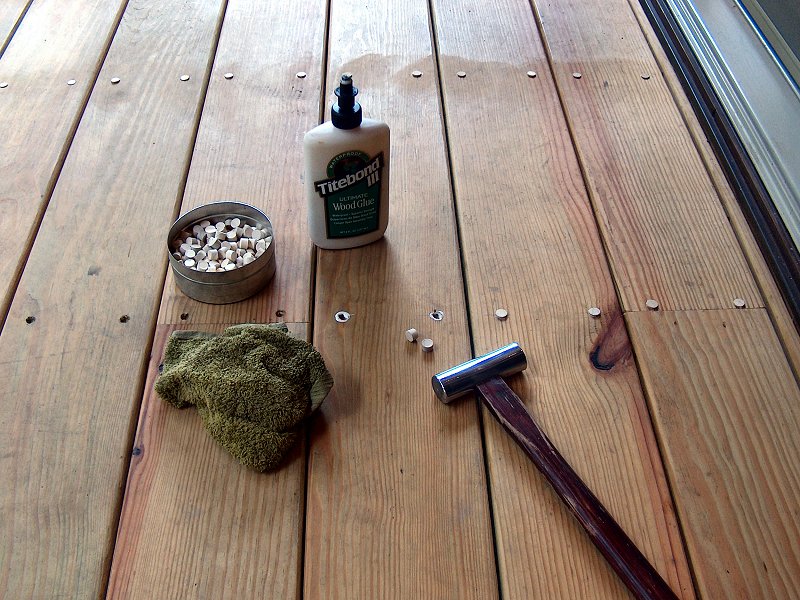
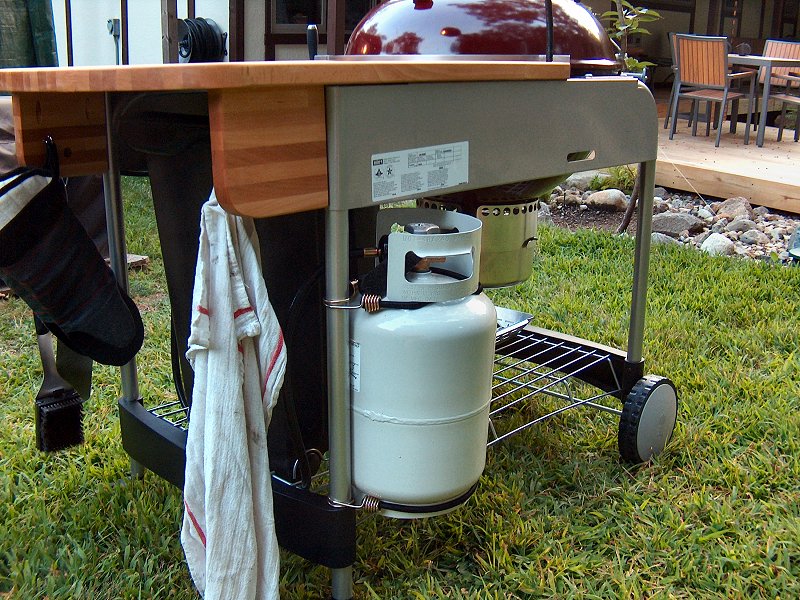
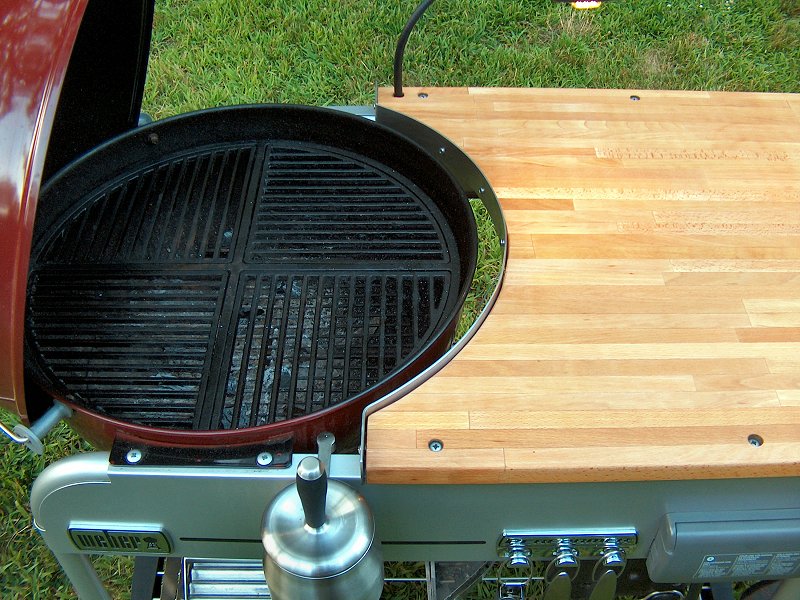
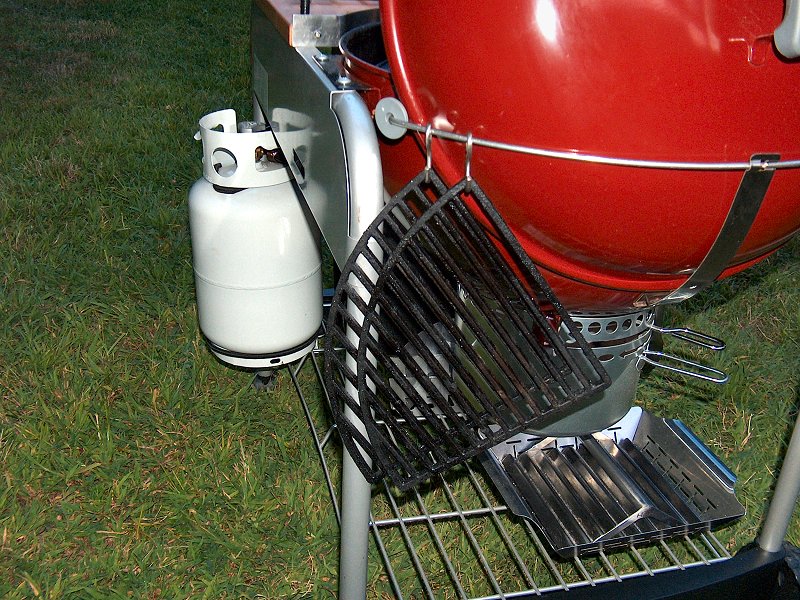
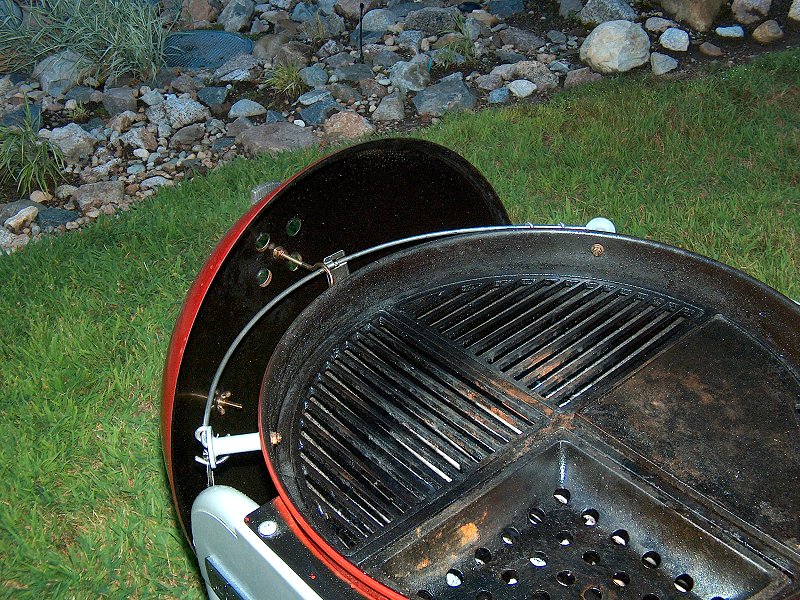
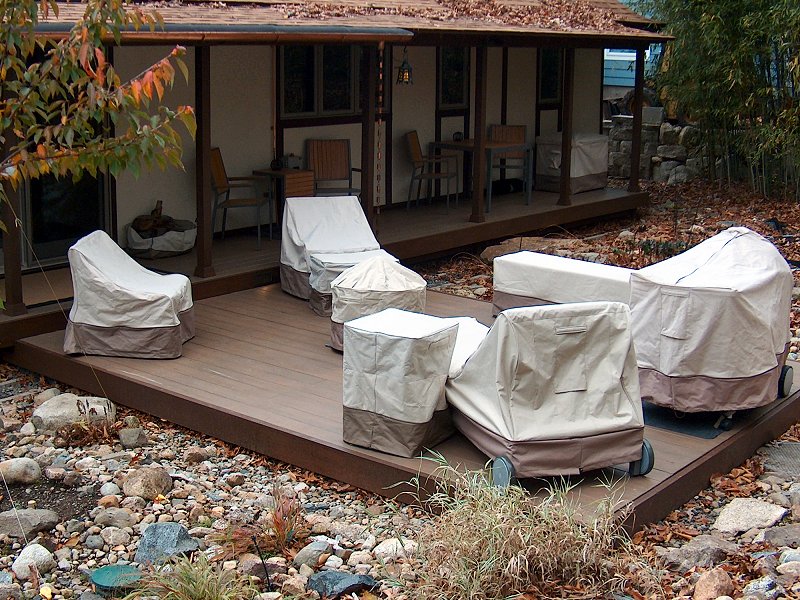
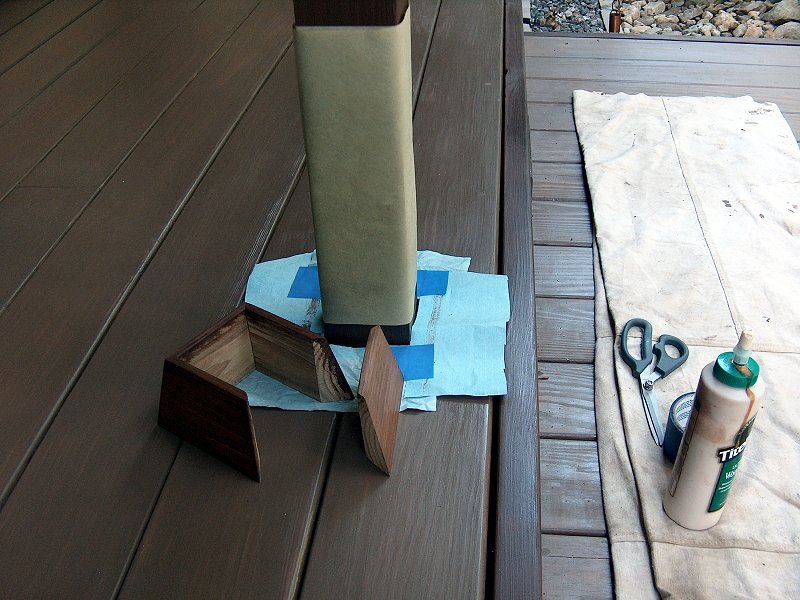
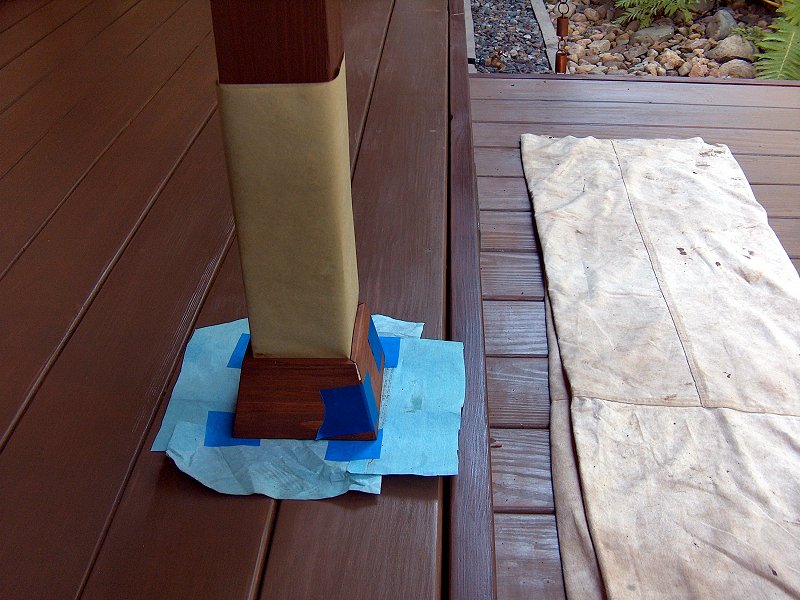
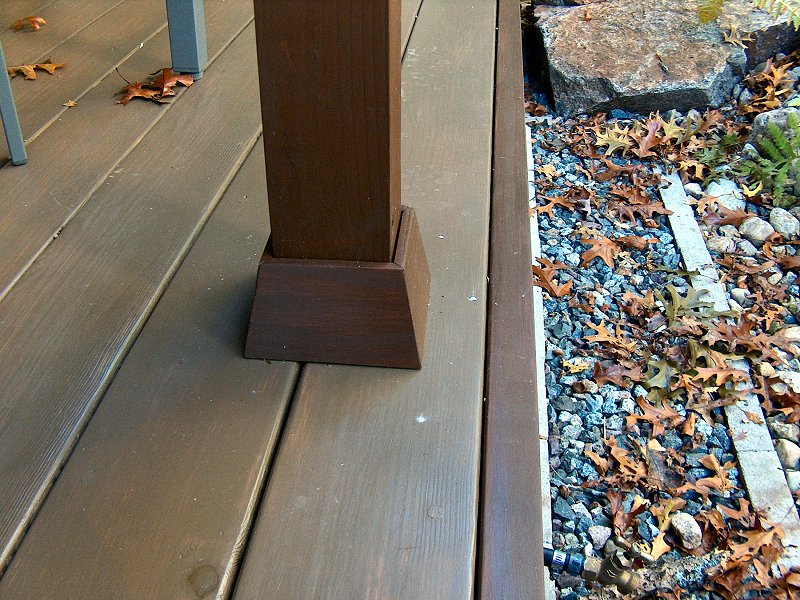
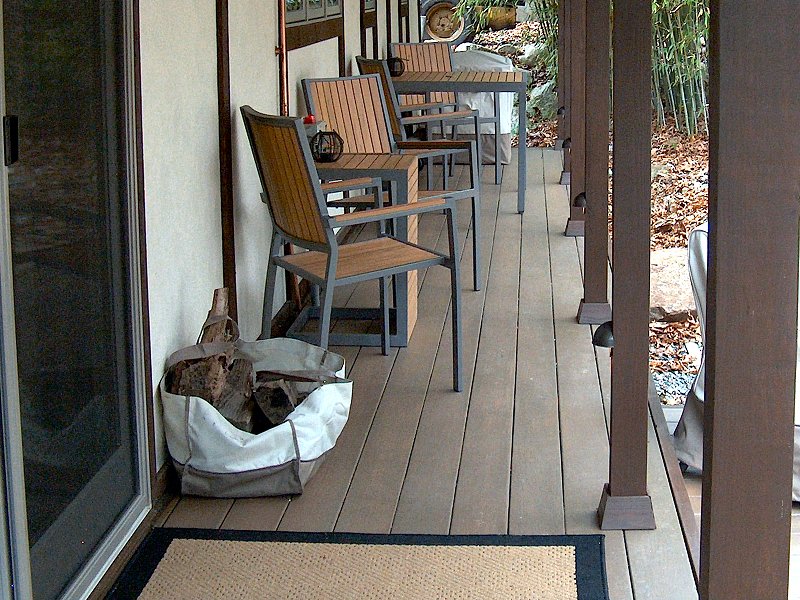
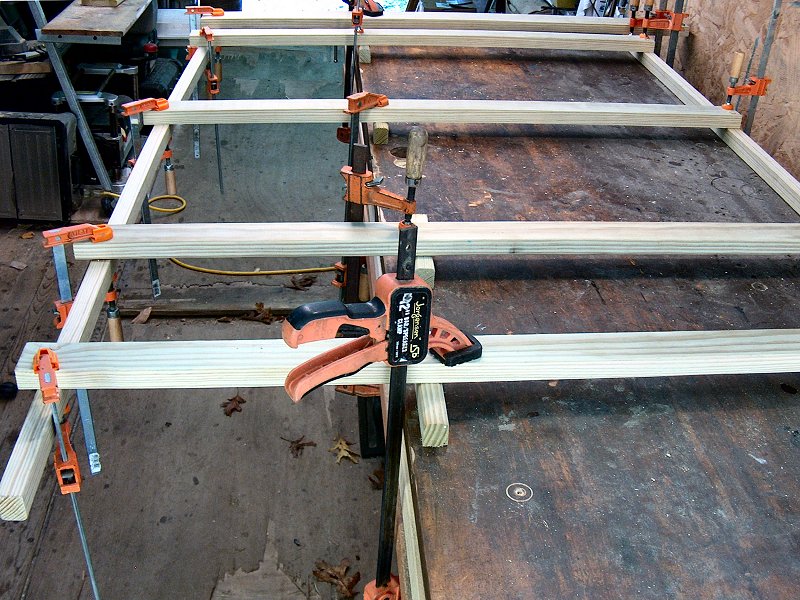
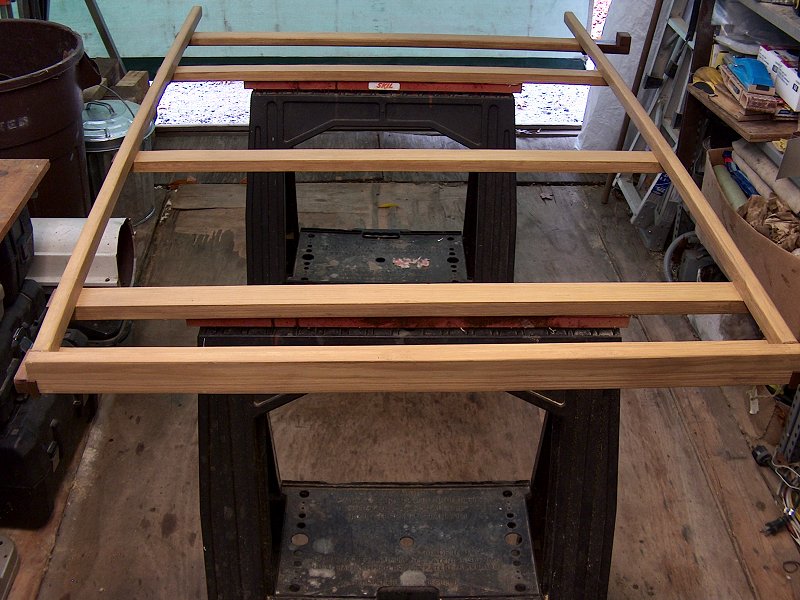
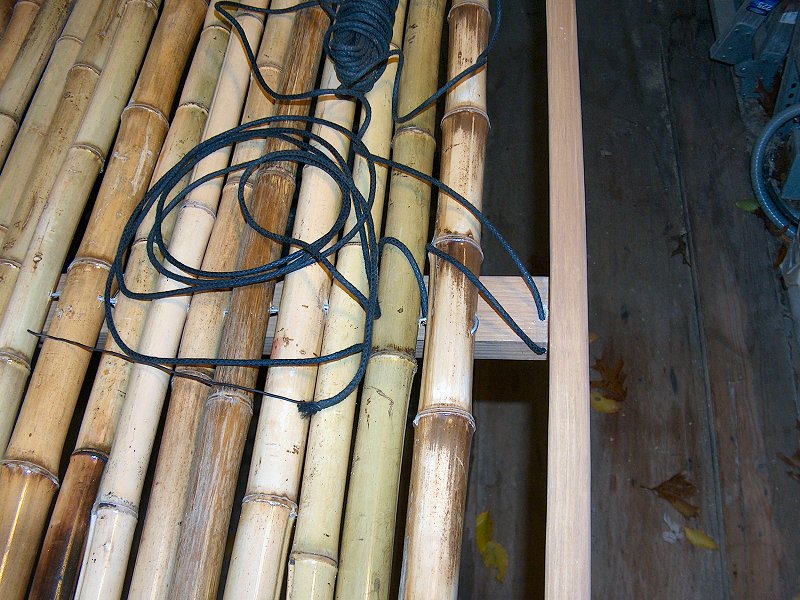
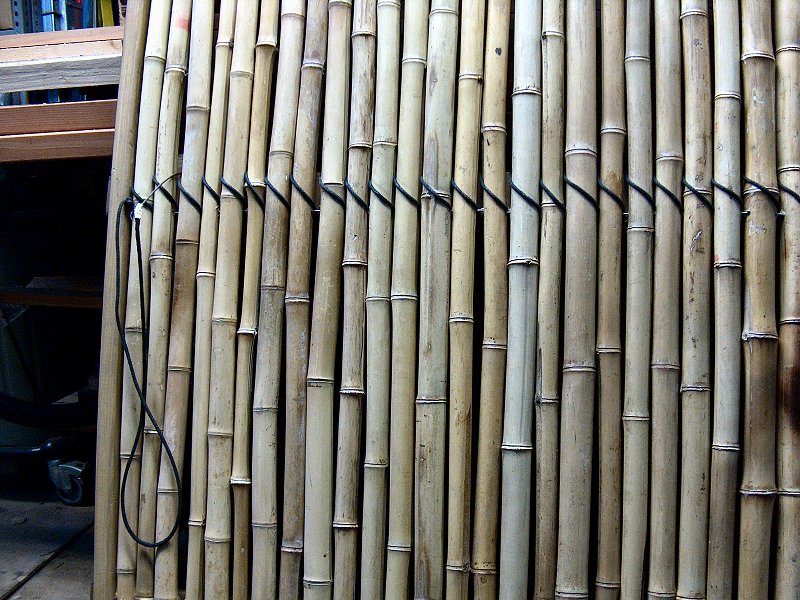
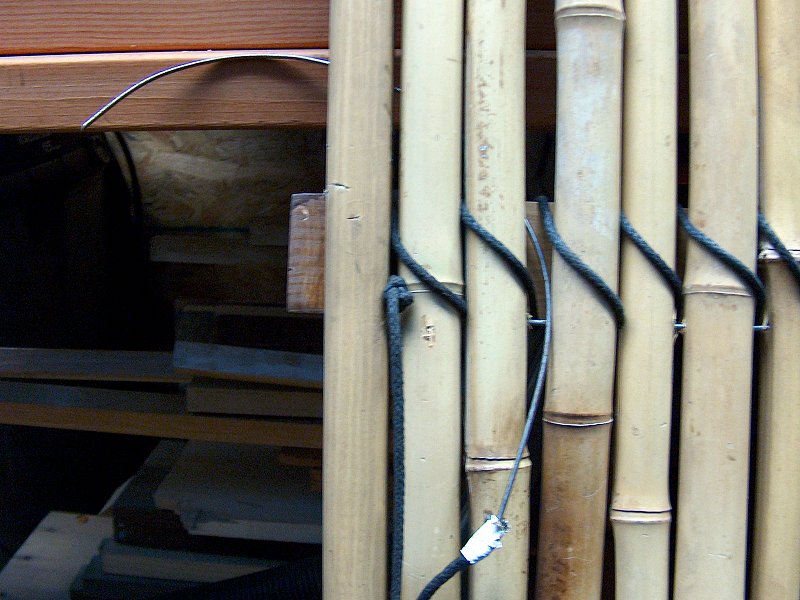
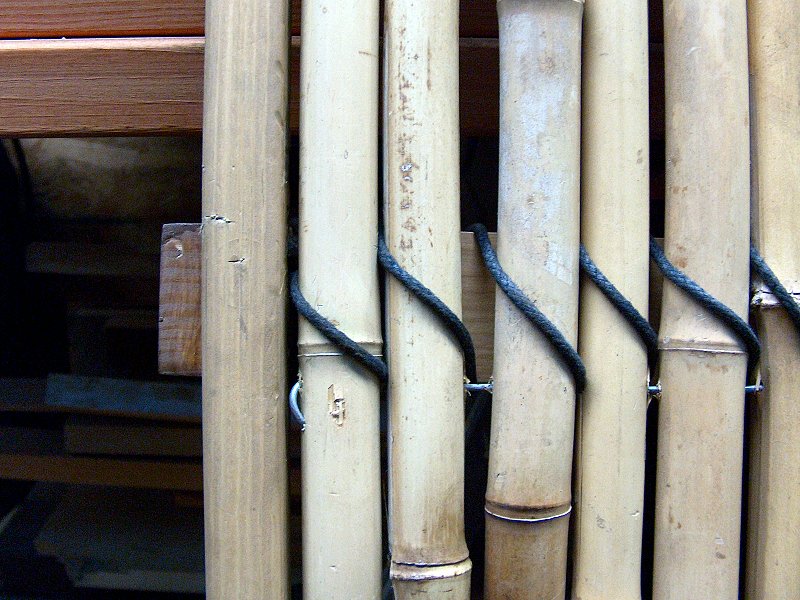
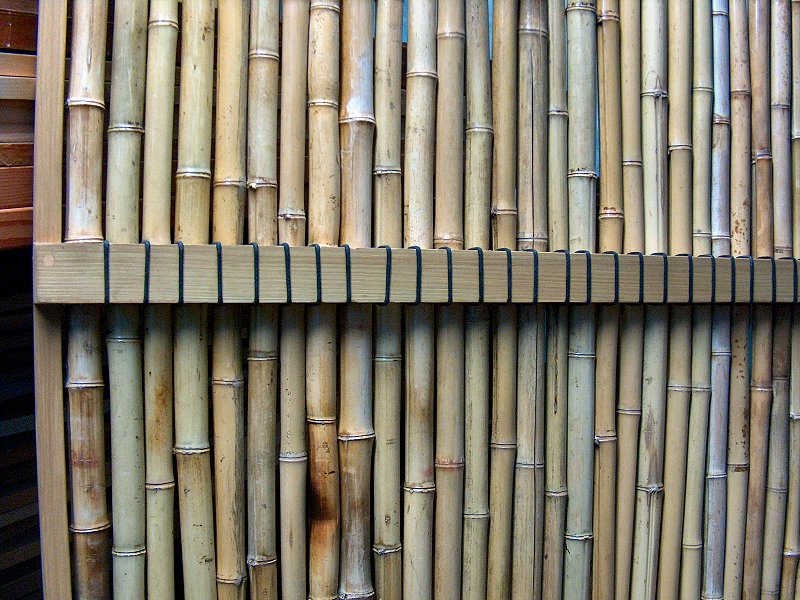
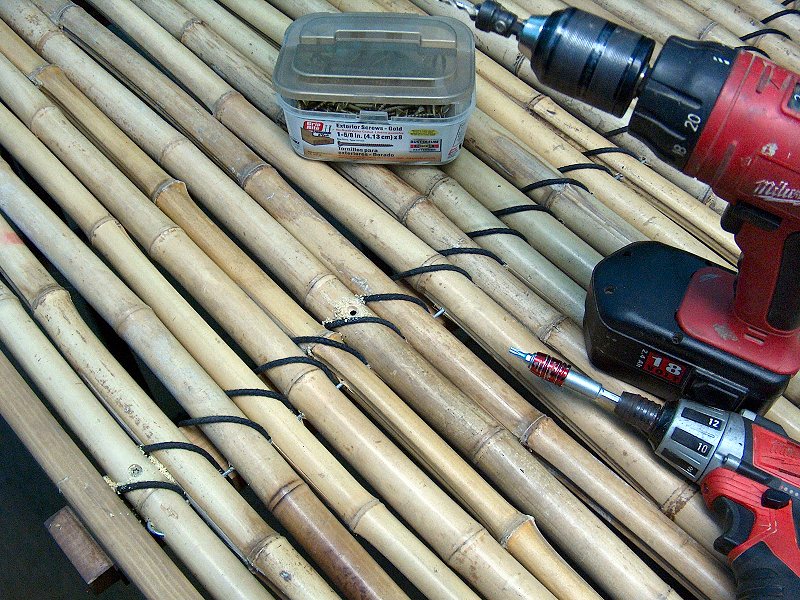
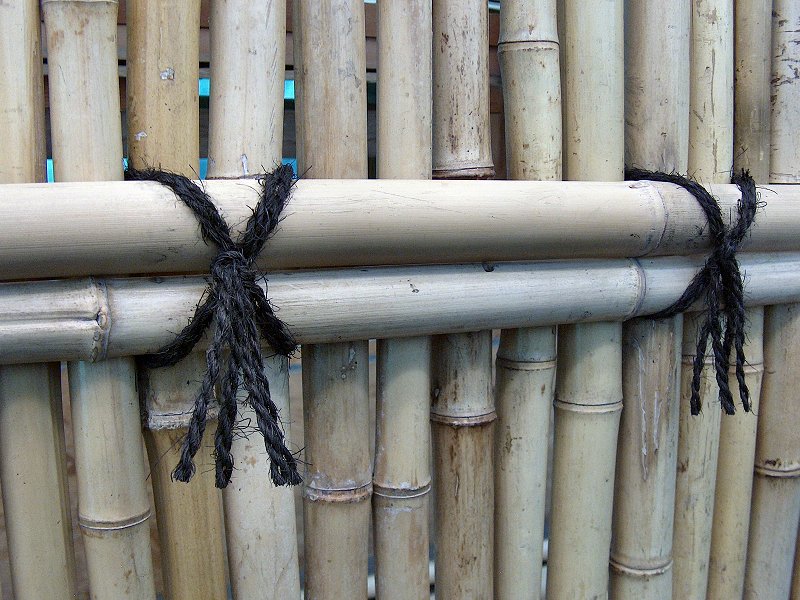
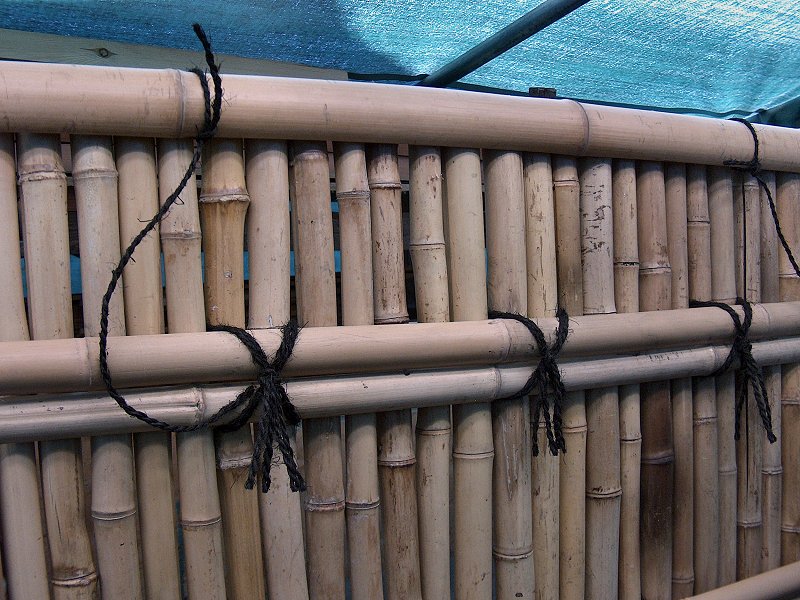