

Interior Projects
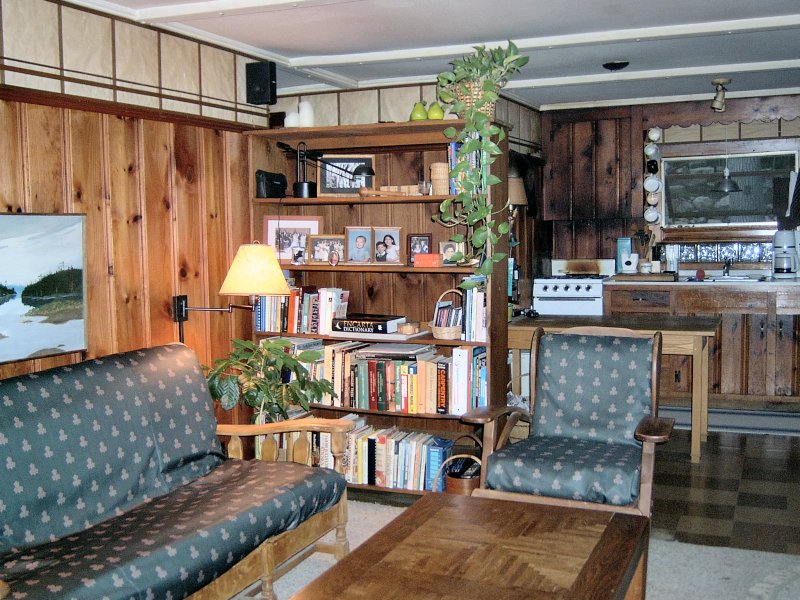 The living room / kitchen area, September 2003.
The interior is basically unchanged from the time the place was built in 1952, with linoleum tile floors throughout, tongue & groove "Pickwick" pine panelling in the living room, kitchen and bath, and sagging homesote ceilings in the living room and kitchen. The bedrooms and bath have 1 foot square acoustic tile ceilings, and the bedroom has some funky looking greenish panelling for walls. The old screen porch had open stud walls and open rafter ceilings, with 5/4 T & G subflooring as the finish floor.
The only way we could see to deal with the old interior was to rip it all out and start over. Starting with a blank slate can be a daunting task (at least it is for me), so it's been slow going on interior projects. The trouble I seem to have is that I don't want to keep doing things over, so we're trying to get all the final decisions made about a room before we tear the room apart. It may seem silly to be picking out light fixtures or towel bars when there's just stud walls and platic sheeting up, but I want to get the blocking and wiring in the right place the first time so I don't have to tear into a new wall as we make additional interior design decisions half way through the project.
The other big problem with the concept of "rip it all out and start over" is that we're trying to live here during this entire renovation. It seems like that shouldn't be a big deal, but with such a tiny house and too much "stuff", trying to have a "normal" life while tearing out ceilings, floors and walls is a difficult proposition. Add to that the fact that I'm doing everything myself (which slows down the project considerably), and I'm often amazed that we're still relatively sane and happily married.
Rather than literally rip apart the entire interior (since the entire interior needs to be replaced), we've been slowly tackling one room at a time, and I do my best to completely finish that area before starting the next room. That allows us to move all the stuff from the work area to some space that's not getting gutted, then when the new area is finished everything can go back and the new area becomes useable space. That's the idea anyway... it hasn't really worked out like that yet. The entryway is mostly complete, but because I need a place to store materials, and don't want to destroy the new floors when doing drywall work and moving materials in and out of the house, the floors aren't done out there. We've also had to do some demolition on almost every room of the house in order to get the mechanical systems in order - wall coverings have been removed to get the old wiring removed and the new wiring in place, and the kitchen and bath were recently destroyed in order to get the plumbing work roughed in. Bottom line: the whole interior is ripped apart and we've been living out of storage bins for years. It's getting old.
Interior Design
Figuring out the interior design of the house has been a slow and difficult task. I really enjoy trying to decide what elements of the traditional Japanese style interior I want to incorporate in our home, but we've always got to be aware of costs and practicality. The costs are mostly a problem with the materials (obviously, since the labor is free), and while I'd love to panel the ceilings with 18 inch wide Hinoki Cypress for example, it's just not gonna happen with our limited funds. That's where the difficulty comes in - when browsing photos of traditional Japanese style interiors, I have to figure out how to create a space that appears exactly like the "real" thing, although I'm using modern materials and building practices to re-create that look, and I have no intention of importing the authentic materials from Japan to pull it off. The practicality aspect if the traditional Japanese interior is also of some concern, since our lifestyle is an important consideration in the design. I'm not building a museum after all, so the spaces must be comfortable and useable - a room with no furniture is nice to look at, but if we're enjoying the Red Sox for a few hours, sittin' on the floor for the whole game ain't gonna make it.
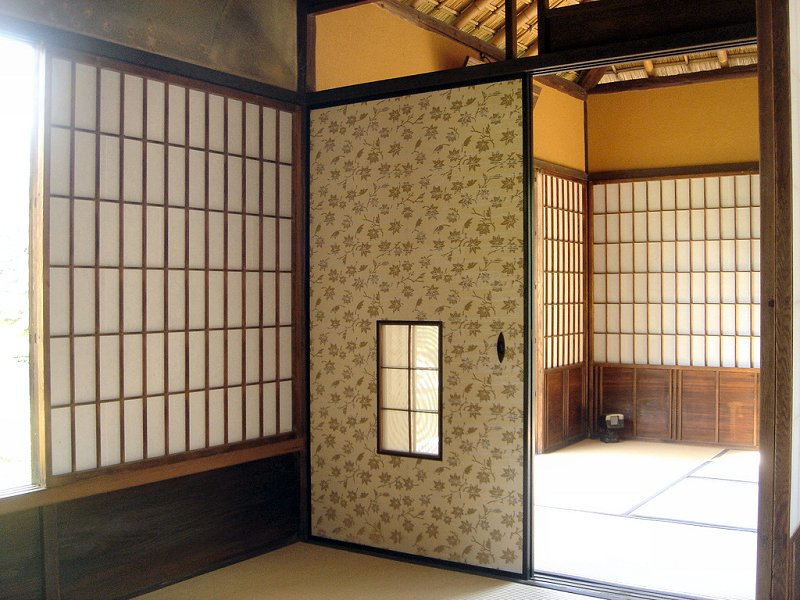
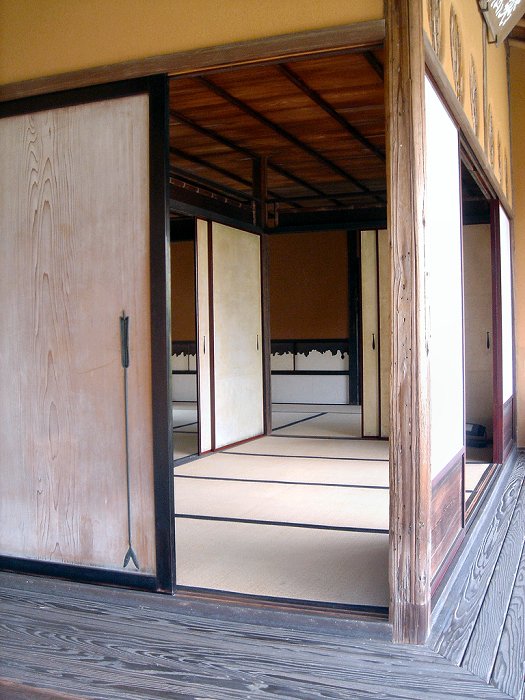
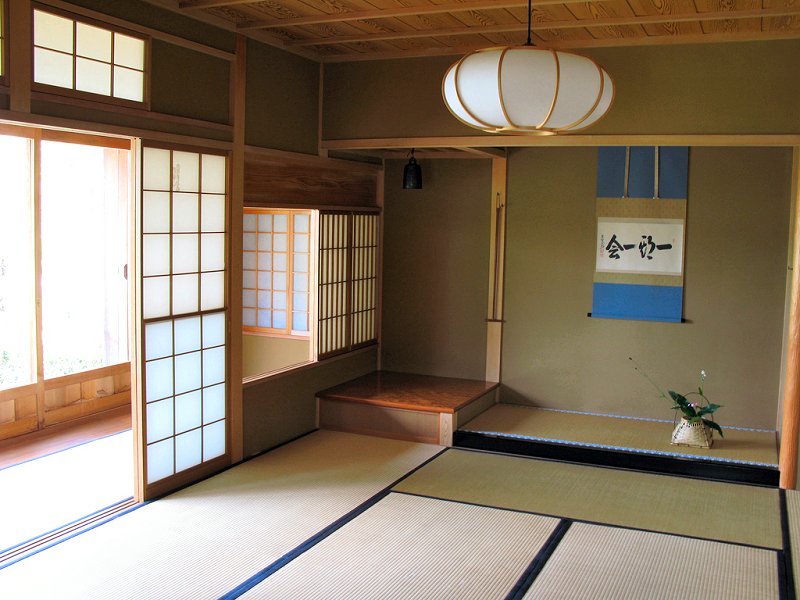 Samples of the Sukiya style (4 photos).
I should also note here that when I say "traditional Japanese interior", I'm specifically talking about the Sukiya style introduced in the Katsura Imperial Villa and tea houses of Sen Rikyu in the mid-1600s, and popularized in residential interiors throughout the mid to late Edo period (1750-1867). The Sukiya style finds its roots in the Shoin style, and incorporates the same major design elements of shoji and fusuma sliding panels to partition the interior space, tatami mat floor coverings, the tokonoma display alcove, often with chigaidana staggered shelving and tsukeshoin built-in table or desk nearby. While sharing these elements of the Shoin style, the Sukiya style employs a much simpler and more delicate, natural, unadorned style than the grand, ornamented reception halls typified by the Shoin style of the Azuchi-Momoyama period (1568-1615).
Now that we've cleared that up, I still need to figure out how to get a home theater, comfy seating, and storage space for all our stuff squeezed into this house. Perhaps one of the reasons those Sukiya style interiors look so appealing is because the folks that lived there could fit all their junk into a couple of tansu and didn't sit around for hours watching TV. Rather than throw away nearly everything we own so we can have a rather barren interior, we've come up with some reasonable design compromises to make a comfy, inviting interior that retains a strong influence of Sukiya style in it.
We'll still use wood with a natural finish for the most of the ceilings and trim, but it's just going to be local White Pine and Spruce. Floors are getting "click-lock" laminate flooring, which looks very much like real wood and the price is right. The jury is still out on the tatami mats, although the lovely bride's office is definitely getting a pair of tatami and a tsukeshoin . We've decided to use Slate tile for the kitchen, bath and entryway floors, since those areas are relatively small (so it won't be too awfully expensive), and there's just nothing like natural stone under foot. Since we had a chance to experiment a little with wall coverings and paint colors when finishing the interior of the teahouse, we decided to utilize the same paint and trim colors in the main house with a neutral beige that looks very close to the natural mud plaster color of the Sukiya style, and a dark brown stain for the wood trim.
We also decided to use a few interior decorating "rules" to guide our interior finishing decisions. Since the exterior of the house is stucco, we thought the inside of the exterior walls should also be stucco (rather than perfectly smooth plaster). The exterior is supposed to emulate a post & beam with mud plaster Japanese style building, so it makes sense that the inner surface of those walls should also look like troweled plaster. Interior partition walls are all getting a light brown, natural grass paper wall treatment (reminiscent of the sudare reed screen room dividers). Since our house is so small, we didn't feel the need to decorate every room with a different paint color or other wall treatment, so these guidelines make it easy to figure out how we're going to finish each room.
Interior Floor Plans
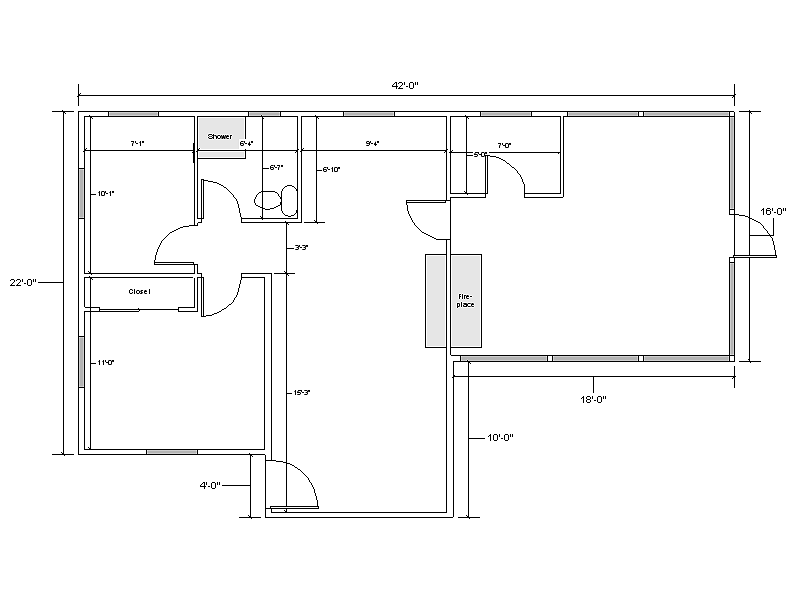 The original floor plan.
I've been fiddling with floor plans pretty much since the day I moved into this place 20 years ago - and I think I'm finally satisfied with how things are looking on paper. Moving the entrance from the Southwest corner to the middle of the old screen porch was an easy decision. With the fireplace gone, we stumbled into a good layout for the flow into the house from the entryway, as well as the basic kitchen footprint. The problem has been all the chopped up space that defines the bedrooms, bathroom and living room. Ideally the living room would face the garden in the back yard, but I have no intention of "flipping" the entire floor plan, so we're trying to work out the best solution based on the existing floor plan.
The area that gave me plenty of grief in the planning was that mess of doors in the little hall for the bedrooms and bathroom. The bedroom in the Northwest corner is really tiny, so rather than try and make a 2 bedroom house, we decided to turn that area into a walk-in closet and put the laundry in there too. The laundry used to be in the utility room on the back porch, but it seems to make a lot more sense having it in the walk-in closet. This also makes it a bit easier to keep all the waste lines and vent stacks in the same area.
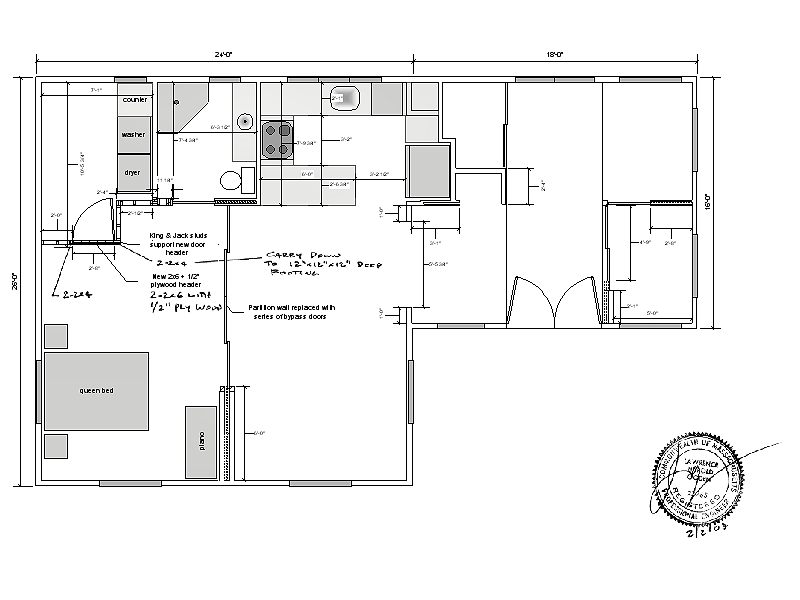
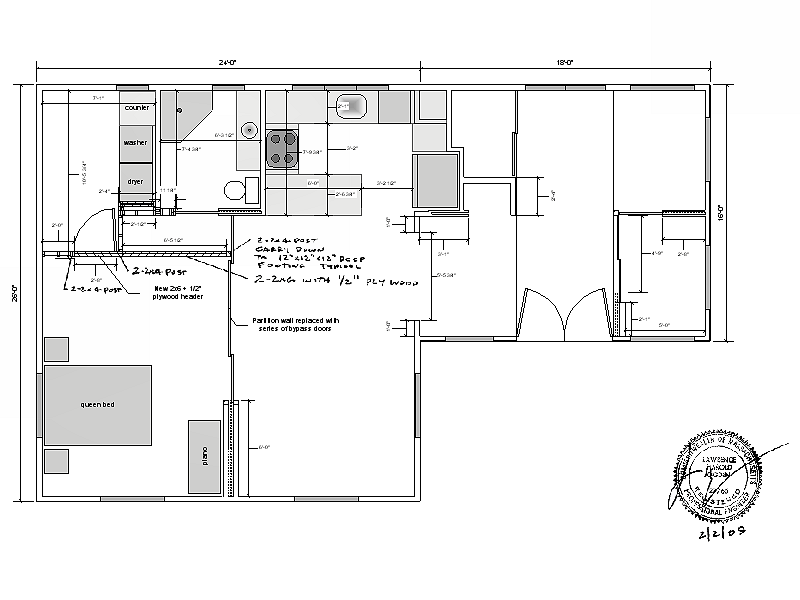 The final floor plans (2 sheets).
The old utility room was re-built along with the rest of the screen porch when the fireplace and chimney were removed, and I managed to get the boiler, hot water storage tank, well controls and pressure tank, and heat recovery ventilator all stuffed in the little space I created there, as well as a small coat closet near the entrance. With the fireplace gone we also created a nice open entryway into the kitchen / living room area. Another change in the living room we're looking forward to is the removal of the wall between the living room and bedroom. It's not a bearing wall, so I thought it would be nice to replace it with a series of four sliding fusuma doors. Unfortunately the ceilings are too low to include a proper ranma or transom over the doors, but I think the fusuma themselves will make a dramatic statement toward a traditional Sukiya style interior design. The doors will slide into a hollow wall when open, and that wall will create a good backdrop for a tokonoma display alcove in the Southwest corner of the living room.
Trying to find a solution to the area around the old bedrooms and bath has been difficult with regard to how we can maintain privacy in the bedroom while allowing overnight guests access to the bathroom, as well as how to allow one to discreetly use the bathroom when there's someone in the kitchen (the idea of sitting at the breakfast island and enjoying the sounds of the bathroom with its door next to the island didn't appeal to me). We also had to get into the attic somehow, and the access for that is located in this same area. After much agonizing over plans, and some advice from my brother the architect, I think we've addressed all our concerns.
For bathroom discretion, we created a soundproof wall between the kitchen and bath by re-building the wall to be 5-1/2" thick rather than the standard 3-1/2" thick. This allowed me to stagger the studs within the wall, so there's no physical connection between the wall board on the kitchen and the wall board in the bathroom. With the wall fully insulated, there is very little sound transmission between the two rooms now. We also needed the thicker wall in order to place the main waste vent inside the wall, rather than boxed into the corner behind the toilet as it was originally. We also "sound-proofed" the living room side of the bathroom by orienting the pocket door on the kitchen-side of the bathroom and insulated both sides of the pocket door wall. For bedroom privacy while allowing guest use of the bathroom, I finally listened to my brother's sage advice of "don't worry about it". I had been wrestling with some manner of closing off the bedroom at night from the bathroom so guests wouldn't have to walk through our bedroom to get to the bathroom. No matter what I tried, I always ended up with something closely resembling the old "fun house doors" set-up of the original floor plan. My brother finally managed to convince me that it just wasn't worth the trouble to re-build the house to accommodate the very rare occasion of overnight guests. He suggested we should build it for us , and if and when someone is spending the night we could just open that last fusuma near the bathroom so they can get at the bath, then stand a folding screen in the bedroom for our privacy. Fair enough, I tried a few plans and it worked out much easier to just keep the open plan as he suggested.
 A fine kaidan dansu .
As simple as the plans might appear, I still would need to relocate a couple of bearing walls between the bath and bedrooms to get things located the way we wanted. After a visit by the building inspector while getting interior remodeling permits squared away, he suggested I have an engineer double-check what I was planning to ensure it would work. I submitted two floor plans with very minor differences, since I'm still not certain how I'll deal with the ceiling in between the bathroom and bedroom. He made a couple of notes on the plans and verified that the design would work out fine. He also commented that the rafters and joists we're in surprisingly good shape for an old lake cottage of this vintage.
The last tricky bit of the floor plan was allowing some manner of attic storage access in the new plan. The Eastern half of the attic has angle braces nailed in between the rafters and ceiling joists (since there's no bearing walls between the kitchen and living room) so that part's not much good for storage, however the Western half (over the bathroom and bedrooms) is all open space. In order to get up there now we need to use a step ladder, which is no fun. A pull down staircase requires a fair amount of open floor space below it, so that's not something we really wanted to put in either. Luckily,the Japanese carpenters of old figured out a solution to this little dilemma in the form of a stair-shaped storage cabinet called a kaidan dansu or "step tansu". Often used in merchant shops for access to loft storage space, the step tansu is a wonderful piece of furniture that will give us a good amount of storage space just outside the bathroom for bedding and towels, act as a room divider between the main house and the walk in closet, and provide a stable means of getting to the attic when the need arises. Now I just have to build one.
Interior Renovation Work
Most of the interior work was delayed for many years while we addressed the more important renovation issues after the initial purchase back in 2002. The first thing we took care of was the new septic system and landscaping, then we addressed the mechanical work for the electrical system, heating, and plumbing, while also working to get the exterior buttoned up with new doors, windows, and a roof. Many of those projects also required no shortage of interior demolition work, so a lot of rough carpentry for the interior was dealt with at the same time. The various interior work projects occurred along this timeline:
- Late Fall 2005 - re-frame old window openings for new windows and entry doors for the genkan
- Winter 2005 / Spring 2006 - rough carpentry for genkan while installing the heating system and wiring
- Late Summer 2006 - rebuild original entryway (which enlarged the bedroom) and front living room window framing for new windows
- Late Winter / Summer 2007 - finish carpentry for genkan
- Summer 2008 - rough carpentry for new windows for the kitchen, bathroom, and closet/laundry room
- Fall 2008 / Winter 2009 - rough carpentry for kitchen and bathroom interior walls and floors
- Spring 2009 / Summer 2013 - finish carpentry for the bathroom (with many gaps for exterior deck work and gardening)
- Fall 2009 / Spring 2011 - finish carpentry for the kitchen
- Summer 2010 - demo bedroom and closet/laundry room wall for A/C installation
After getting the finish work done for the kitchen in 2011, and then the bathroom in 2013, there was pretty much no progress on interior work for a few years. I was a bit stumped about how to proceed with dealing with the ceiling and floors for the living room and bedroom, and I was also spending most of those Summers working on the brutal task of trying to install a new bamboo root containment barrier out in the garden, which seemed to be a never-ending battle. We made a little headway in 2017 when we finally cleaned out a load of old boxes from the attic and took down the ceiling in the living room (which resulted in more delays while I continued to wrestle with how to make the ceiling right). We eventually got the ball rolling again in 2020 when we got ourselves a new mattress (and disposed of our very old mattress and box spring), and then bought a bunch of bedroom furniture from IKEA®. Then I finally finished that damn bamboo root barrier work in the Summer of 2021 and could focus on the interior once more. Things then began to move along quickly, as follows:
- Winter 2021 / 2022 - remove bedroom & living room floor tile and underlayment, install new OSB underlayment
- Spring 2022 - remove attic floor planks and plywood
- Summer 2022 - re-configure network & audio wiring for entertainment area in living room; start installation of "smart" light switches
- Winter 2022 / 2023 - level living room ceiling; rough carpentry for tokonoma
- Spring 2023 - install first layer of living room ceiling panels
- Summer 2023 - raise, level, and insulate attic floor over living room and kitchen
- Summer / Fall 2023 - rough carpentry for closet/laundry room floor and walls; level bedroom and closet/laundry room ceilings
- Fall 2023 - install first layer of bedroom room ceiling panels
- Fall / Winter 2023 - raise, level, and insulate attic floor over bedroom and closet/laundry room
- Winter / Spring 2024 - finish carpentry for closet/laundry room
- Summer 2024 - finish carpentry for bedroom walls
- Fall 2024 - bedroom ceiling finish panels installation
- Winter 2024 / 2025 - install tokobashira and daikokubashira
- Winter / Spring 2025 - living room ceiling finish panels installation
- Winter / Spring 2025 - closet/laundry room floor and floor trim installation
- Summer 2025 - bedroom ceiling and window trim carpentry
- Fall 2025 - bedroom floor and floor trim installation
- Fall / Winter 2025 - bedroom furniture assembly
- Winter 2025 / 2026 - living room finish carpentry
For more information and photos about the interior projects, please see the specific interior sections available through the menu.
↑