

The Extras Page

Totomi sanchu, Thirty-six Views of Mt. Fuji, #34, ca.1830-33, Katsushika Hokusai.
When I'm compelled to blather about something that's not specifically related to the house renovation project, this is where I'll post that information...
This page contains a bit of information about our sailing dinghies and restoring our British Seagull 40+ vintage outboard. I've also recently added a section about my days as a VW mechanic and electric vehicle builder, which led to the old Volkswagens we currently own. The most recent addition is a lengthy description of the process of upgrading all the bulbs on our VWs from incandescent to LED.
If you're re-visiting this page looking for information regarding hand planes, shop equipment, or other vintage hand tool stuff, I've done a bit of re-arranging to make things easier to find (although none of that information is on this page any more).
The information about restoration and tuning of hand planes now has its own Hand Planes page here in Etc. section, while all the Hand Plane Data as well as other Vintage Hand Tool Data and Hand Tool Reference Books are on the Hand Tools page within the Specifications section. The old section of this page that had stuff about Shop Tools & Equipment has been moved to a new Shop Equipment page. Finally, I placed all the old Original Condition Hand Plane Photos onto another new Vintage Tools page. All the new pages may be found through the navigation menu on the left under the Et cetera section.
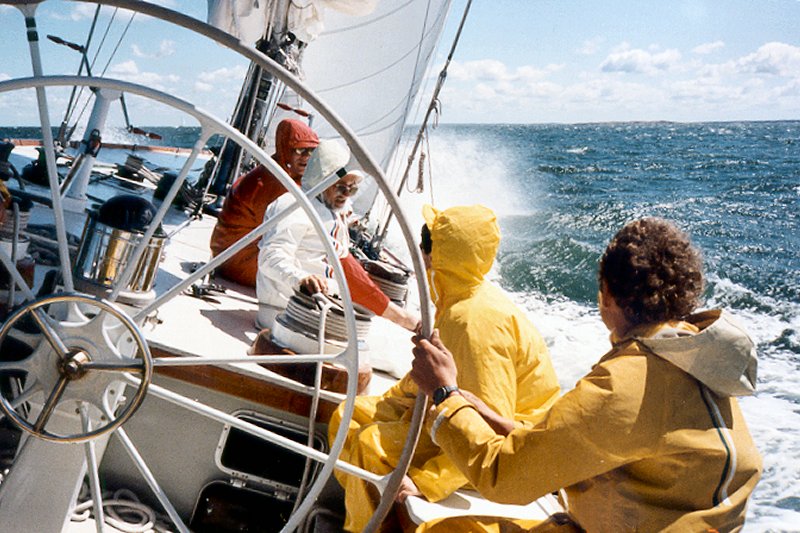
Messing About in Boats

I learned to sail on the wooden 12 meter "Valiant" US21 (2 photos).
We live next to a lake. We have access to a very nice dock on that lake. Part of the deal with helping the neighbors put in the dock each Spring then take it back out each Fall is that we get a spot on the dock to tie up a boat... the problem is we'd need to actually have a boat to take advantage of that deal. When I first moved here 20 some years ago, I got myself a little 14' Aluminum fishing boat and used to go puttin' around the lake fishing nearly every night after work. After a few seasons of that I got busy with other stuff and just sorta lost interest in the whole boating / fishing business and sold the boat. A series of events with work and various friends eventually landed me a job working on a wooden 12 meter race boat based in Marblehead, where I learned to sail and enjoyed a couple seasons as part of the delivery and race crew for that boat. I really enjoyed sailing and decided to try and find a little dinghy to play with on the lake.
My first sailboat - the 9' Dyer "Dhow" (4 photos).
The Peapod
The first sail boat I came up with was a wonderful little 13' fiberglass Peapod dinghy with a "leg-o-mutton" rig.
The Peapod belonged to a woodworker friend that used it as a tender for his Alden 42. He was rebuilding his Alden behind
his wood shop, and the Peapod was sitting in the corner of his shop in pretty rough shape. He loaned me the boat under the
terms that I'd fix it up and be able to use it until he got his Alden going again. I did a little fiberglass and paint
work on the thing, cleaned and refinished the wood rail, replaced the rigging, then enjoyed a summer of sailing on our little
lake with that. He got his Alden back in the water the next year and I said goodbye to the Peapod. We figured I'd get it back
whenever he wasn't off cruising with the Alden, since he kept his boat in a slip in Boston Harbor and didn't need the Peapod
on a daily basis. Unfortunately he got caught in a late season blow off the coast of Maine and lost the Peapod to Neptune
(he also lost his rudder, and nearly the Alden, but he's quite a good sailor and managed to save his boat and the 4 souls on
board as well - however, chasing the Peapod down after that storm wasn't high on his to-do list at the time). I was sad to hear of
the demise of the Peapod, but it wasn't my boat so there was nothing to be done.
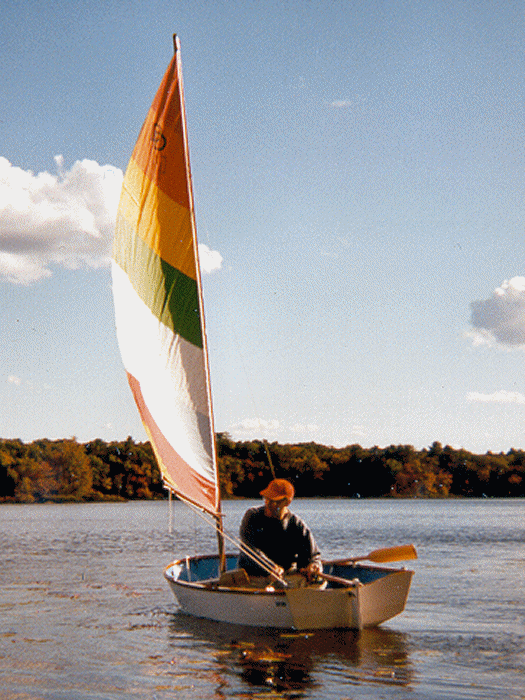
The Nine-foot DYER® Dhow
The first sail boat I actually owned was another basket case donation given to me by the neighbor that lives here on the water. He'd seen
me sailing the Peapod from time to time, and had his own sailing dinghy that was in need of a great deal of work. Based on what I'd done
to bring the Peapod back to life, he decided I'd make a worthy owner for his little gem of a dinghy since he wasn't interested in
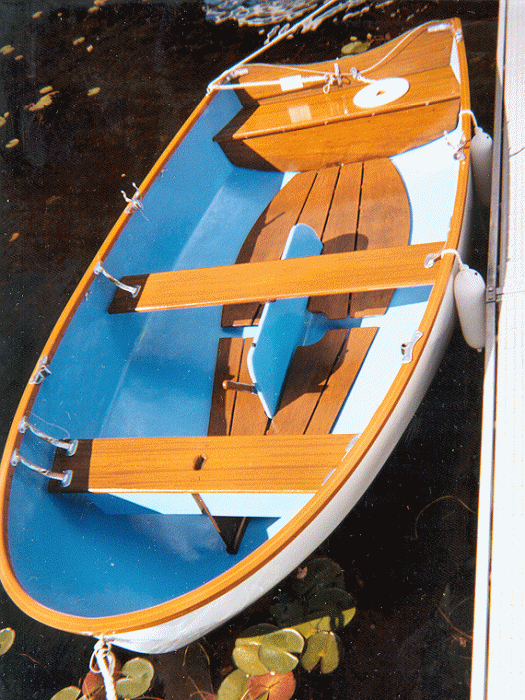
trying to repair it himself. He gave me a 9' DYER® "Dhow" dinghy that he'd owned for over 30 years. The Dhow had
been stored upside-down for many years next to the lake, and while the seats and interior fittings where in fair shape, the outer wooden
rail that gives the fiberglass hull all of its strength had been completely rotted away by all those years of sitting exposed
to rain and snow. I was quite happy to have a new dinghy to play with, and contacted the DYER® Boats company in
Rhode Island to see if they still had parts available for these things. Surprisingly they still manufacture the 9' Dhow, so I was able to get
everything I needed to restore it to like-new condition. I put quite a bit of work into the Dhow, and I think the results speak
for themselves. We kept that in the lake for a couple months, and I noticed the hull was really starting take on a nasty brown
stain from the murk of the deep. That was simply unacceptable - so the Dhow went to storage (after a thorough cleaning and fresh
coat of wax), and there it stays until I have a garage to keep it in. It's just too nice to leave tied up at the dock. I'll
gladly sail it from time to time when I have a place here to properly store it. The other problem with the Dhow is while it's
a very nice dinghy and quite easy to sail, it's pretty cramped to try and go for a sail with the lovely bride in a little 9' boat.
Autumn 2022 Update
Back in 2016 I was contacted by a reader that also owns a couple nine-foot Dhows who asked about the floorboards that he noticed in one of the photos above.
He was curious if I might be able to take some measurements of what I had, so he could make himself a couple sets for his dinghies. I let him know I would
try to take care of it when I had some time… a year later he sent along another note asking the same thing, since I had completely neglected to make
any progress. I promised to collect the floorboards from storage and get to measuring them soon. Every year or two he would send along another note to
see how things were going, most recently in early November. I finally took the time to take a load of measurements and draw up a set of plans for him, so
I'm including those here too. I hope they help him get the job done, and I apologize for the lengthy delay: DYER Dhow
Floorboards ![]() .
.
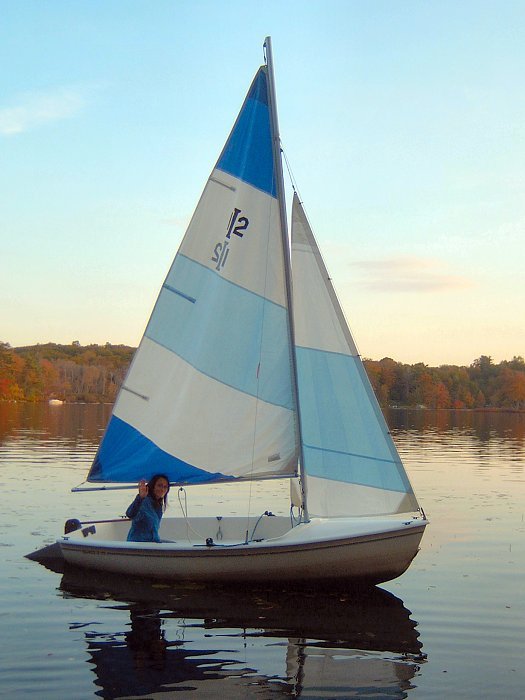
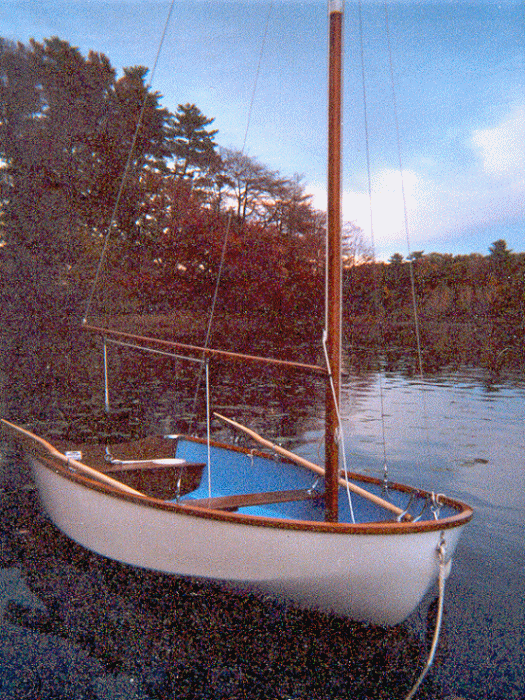
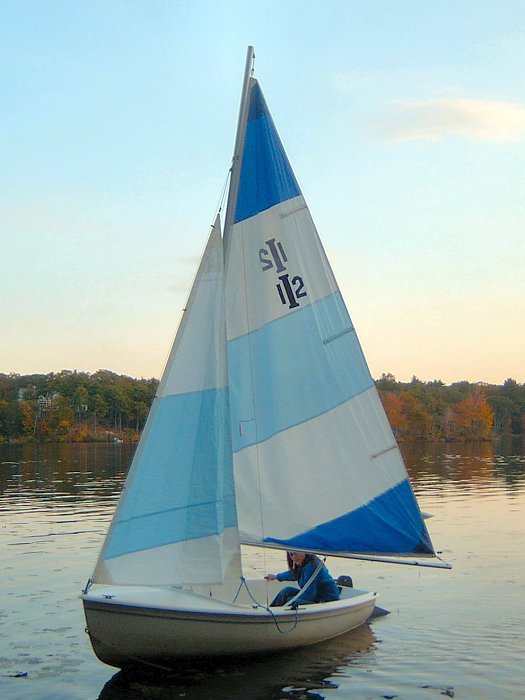
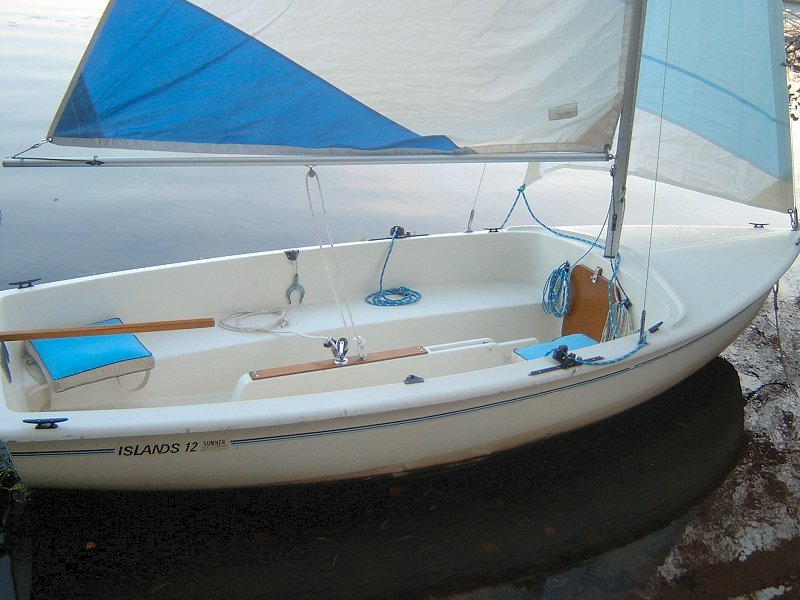
The Sumner "Islands" 12 (4 photos).
The Sumner Islands 12
So I kept helping with the beast of a dock, and every season I'd threaten to find a less pristine dinghy to leave tied up there
to enjoy sailing on the lake with the lovely bride. The neighbors seemed to not like having a big blank spot on the dock, and as their
kids have gotten older, their kids friend's have starting showing up with boats of their own to tie up down there. We finally decided
we'd better get something to tie up or we were going to lose our "slip", so I starting looking for a new sailing dinghy in earnest. I'd
noticed a decent sized fiberglass dinghy for sale nearby by a few times in 2008, but by early 2009 the boat wasn't out near the road
with a sign on it anymore (although it was still in the same guy's yard). I finally stopped by one Spring day and had a nice chat with
the fellow who lived where the boat was stored. It turned out the boat didn't belong to him, but was owned by a friend of his from
Essex that often travelled on business and wasn't using the boat as often as they'd like. It was still for sale, and after a bit of
haggling on price (they were offering 2 outboard motors with the boat, which I had no interest in and negotiated a lower price for the
boat sans motors), we purchased our second sailboat - an "Islands" 12 built by the Sumner Boat Company of Amityville, New York.
I didn't do a full-blown paint and restoration job on the Islands, although I did replace all the running rigging, give the hull a good scrubbing, and go over the old gel coat with a couple coats of polish and wax/sealer just to make it a bit easier to clean. Oh, there are a few pieces of Teak here and there on this thing, so I refinished those and gave them an application of Sikkens Cetol® Marine finish. It's not perfect, but I'm happy with the condition knowing what happens to it sitting in the sludge of our lake. It's a fine sail, and easy to handle solo with plenty of room for both of us to go out for an afternoon and toss anchor at the far end of the lake for a snack and an adult beverage. I still need to get a proper set of oars for this one, and next season I'll see if I can get my old British Seagull outboard motor in working order for those windless days when the water beckons.
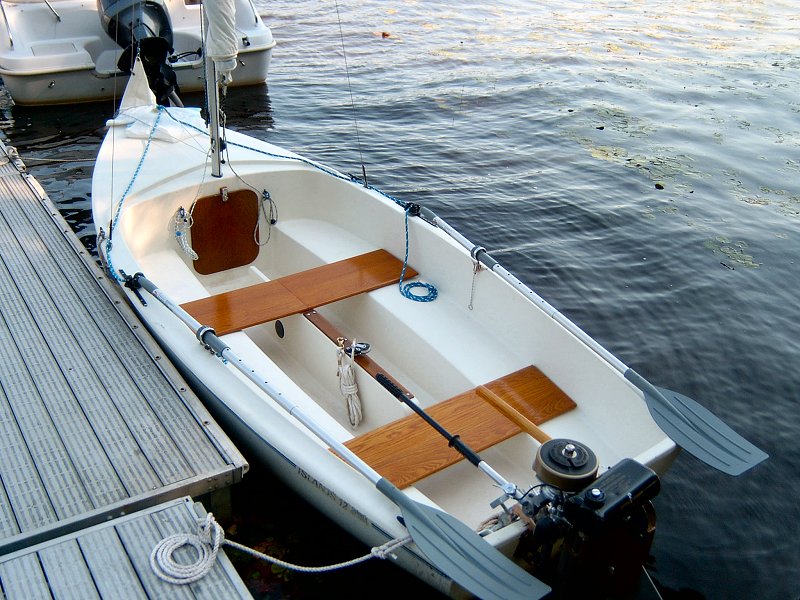
I'm happy with the current state of the dinghy now (4 photos).
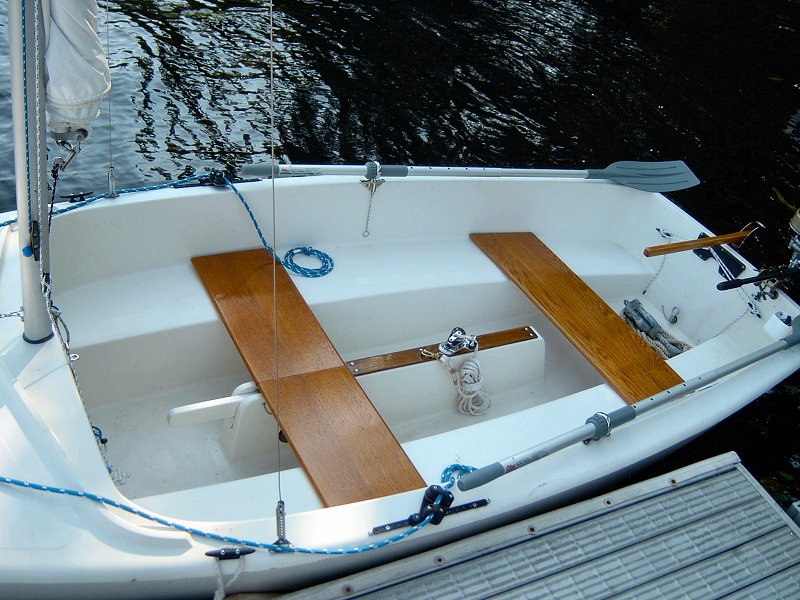
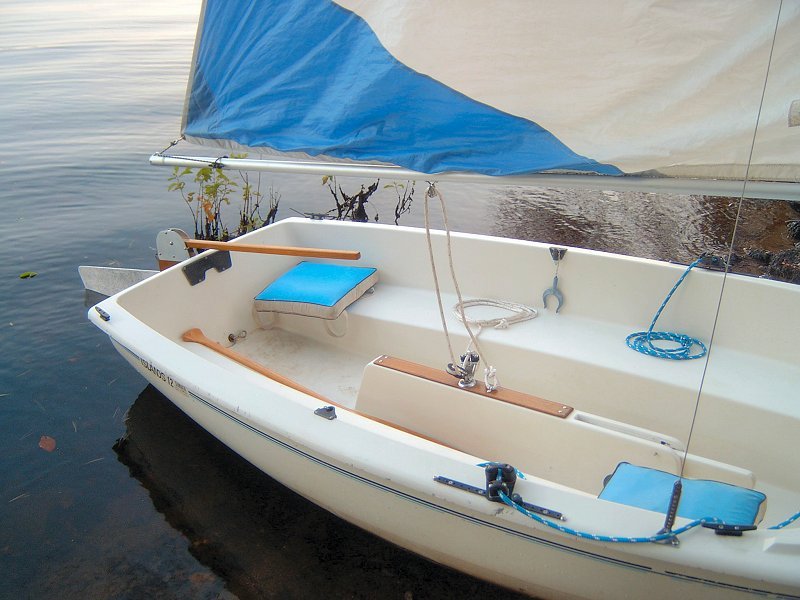
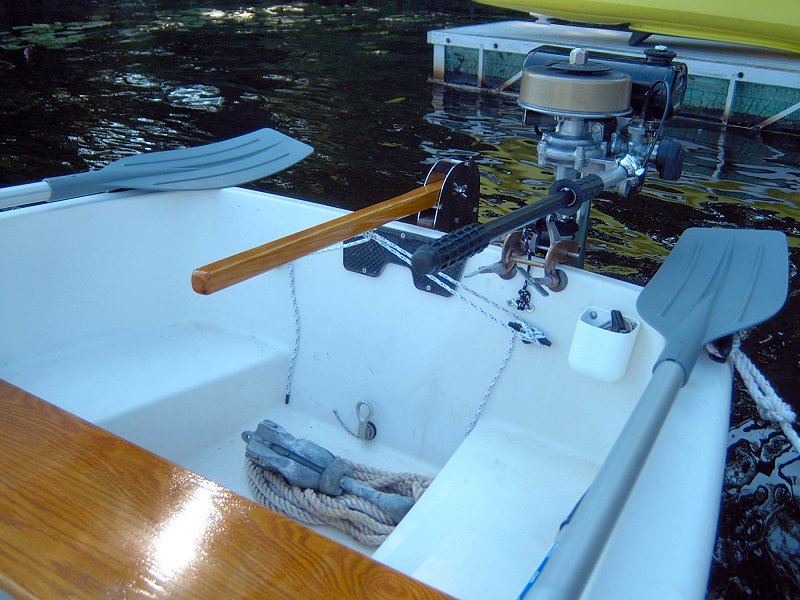
Summer 2010 Update
With the boat getting an outboard this season (see below) and oars, I wanted to address the seating layout and see
what I could do with the rigging to enable going from rowing to power to sail without too much trouble. The two
molded-in bench seats running lengthwise were fine when sailing (although I usually knelt down on the floor just aft
of the centerboard compartment when sailing, which could get uncomfortable after a while), but there really wasn't
anywhere to sit when rowing or motoring. To make the boat a little more comfortable, I added a pair of wooden bench
seats this season. I made the seats from Red Oak, scribed to the hull lines so they fit nicely without shifting
around too much. The forward seat is hinged in the center, and has a pair of wooden cleats attached to the bottom
that fit into the handle slot of the centerboard compartment. When rowing, that forward seat is a lot more practical than
trying to sit on the centerboard compartment, and for motoring it provides a comfy place to enjoy the ride. When
sailing, the seat folds in half and fits into the forward storage compartment, allowing access to operate the centerboard
handle. The rear seat is too long to fit into the storage compartment, although it doesn't need to be removed when
sailing (and is a lot more comfortable than kneeling on the floor while under sail).
Other changes include shortening the tiller by about 8-inches (a made a new shorter tiller with some scrap Ash I had, rather than just chop off the end of the original one with a saw), so it doens't hit me in the back when sitting on that rear seat. I picked up a proper set of aluminum oars that collapse and fit nicely in the forward storage compartment, and replaced the plastic oarlocks with some more substantial stainless steel ones. I also added a couple cleats near the tiller to tie off the rudder when motoring, and a small "compass pouch" near the motor to keep the starter pull-cord handy. To keep the headsail in place when motoring I made a big loop of shockcord with a clip on it that fits around the two bow cleats then clips to the mast, providing enough tension to tuck the rigged headsail underneath and prevent it from blowing around. The mainsail was a little more challenging because the boom needs to be unhooked from the mast in order to fold it up (the gooseneck starts to bind once the boom is raised 45° above horizontal or so). Now we can take the boat out with all the sails attached and ready to go, either rowing or motoring off the dock. If the wind is good, we can then enjoy a sail for a while, then drop all the sails and just motor home. The new rigging and motor allow us to take the boat out with much less of a hassle than last year, so we've been enjoying a lot more boating after work this season. It's not quite the same as the 12 meter, but it'll do.
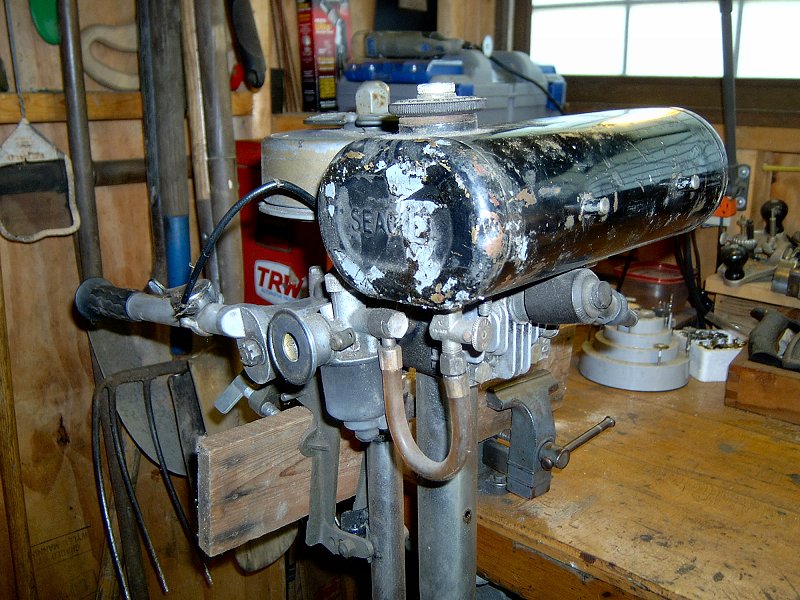
"The Best Outboard Motor for the World"

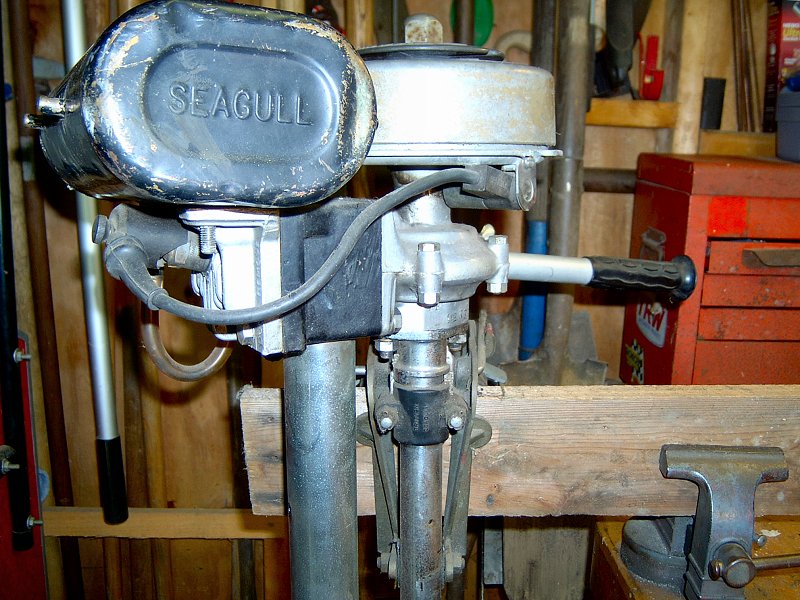
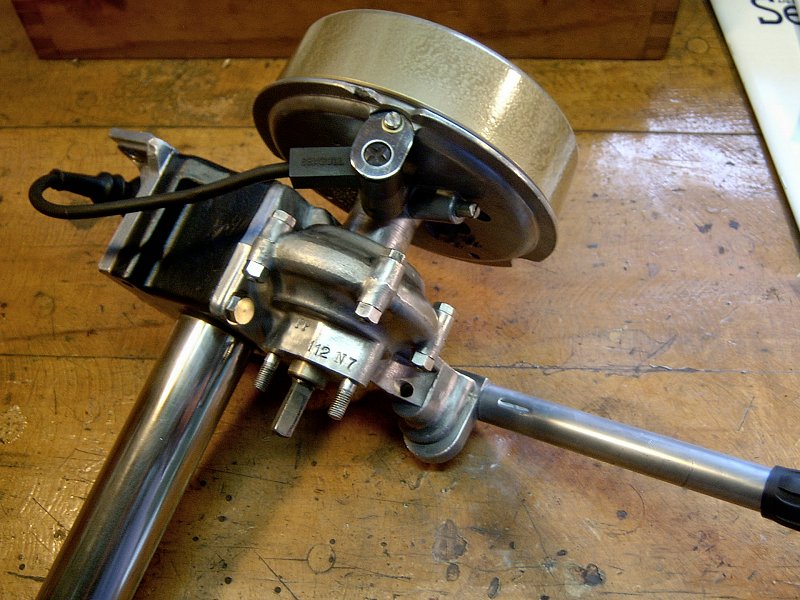
The British Seagull 40+ as found (7 photos).
At least that was the company slogan of The British Seagull Company Ltd. back in the day. Since the design of these little smokers was essentially unchanged from the early-30s until the end of production in the mid-90s, they may have been on to something. There's really not much to this little outboard, but based on everything I've read about these engines, I can't imagine using any other motor on my dinghies - besides, the thing is just gorgeous.
I picked mine up about 10 years ago for a hundred bucks from a friend I used to work with at a VW shop a while back. He had a nice collection of goofy outboards in his shop, and not long after I got the Dyer Dhow, I spied the old Seagull hanging off a saw horse in the corner of his place and asked if he'd sell it to me. It's missing a couple of nuts here and there, the throttle cable is destroyed, and the fuel-tap screen is completely mashed, but it otherwise looked complete. Since the Dhow remains in storage, I really haven't had any need to spend the time to bring the Seagull up to working order and it just sat in a corner of the garden shed. Now that the Islands 12 is in the water (and considerably heavier than the Dhow), I think it's time to get the Seagull up and running for use on the new dinghy.
First things first, I needed to figure out exactly what manner of Seagull I own, then find some literature and a parts
supplier. After a bit of research into the engine number - FP 112N7 - I've determined it's a 2-3hp Model 40 plus,
with a Villiers carburetor and a Wipac Mark II ignition system. The motor was manufactured in December of 1967. As for
shop and owners manuals, proper tools and replacement parts, I looked over E-Bay from time to time, but the prices were
wildly variable, and buying used parts didn't seem like a great idea. There's a couple suppliers in the U.S., but their
websites look pretty out-dated, so no telling if they still actually have anything. I decided the best source would be
from the U.K. Without a doubt, the most reliable source appears to be the
Saving Old Seagulls
![]() Company, with John
Williams at the helm. Not only does John have a wealth of information on his site, he even sells a custom set of
Whitworth/BSF tools he put together specifically for servicing the Seagulls (I've been very hesitant to start dis-assembly
without a manual and only a "several-sixteenths" adjustable wrench to fit the odd hardware of the Seagull). He also
obtained the manufacture's stock of spare parts when they stopped production, so he certainly seems to be the go-to guy
for all things Seagull. I recently contacted S.O.S. and am currently putting the final touches on my first order of goodies
from John. Hopefully, I'll have a few books, tools and parts to get started in a few weeks.
Company, with John
Williams at the helm. Not only does John have a wealth of information on his site, he even sells a custom set of
Whitworth/BSF tools he put together specifically for servicing the Seagulls (I've been very hesitant to start dis-assembly
without a manual and only a "several-sixteenths" adjustable wrench to fit the odd hardware of the Seagull). He also
obtained the manufacture's stock of spare parts when they stopped production, so he certainly seems to be the go-to guy
for all things Seagull. I recently contacted S.O.S. and am currently putting the final touches on my first order of goodies
from John. Hopefully, I'll have a few books, tools and parts to get started in a few weeks.
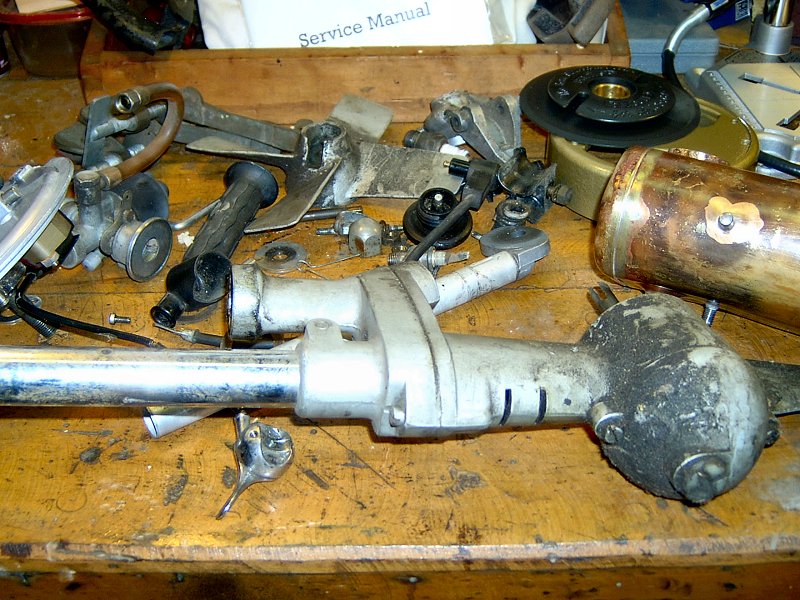
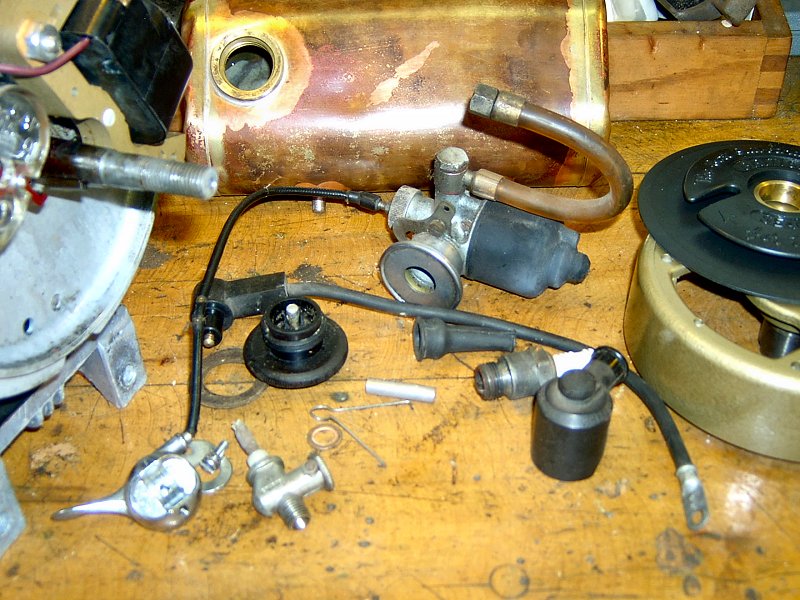
It's a motor no more! (4 photos).
Dis-assembly & Cleaning
The parts arrived a couple weeks after they were ordered, and after a thorough perusal of the new Service Manual and Spares
List, I proceeded to completely take apart my poor little Seagull. I found a couple more broken bits, but managed not to
break anything else in the process so I dashed off a message to S.O.S. for a replacement fuel cap and spark plug cover.
Everything got a good going over with a fine wire brush and a bio-degradable degreaser, followed by a few hours of detail
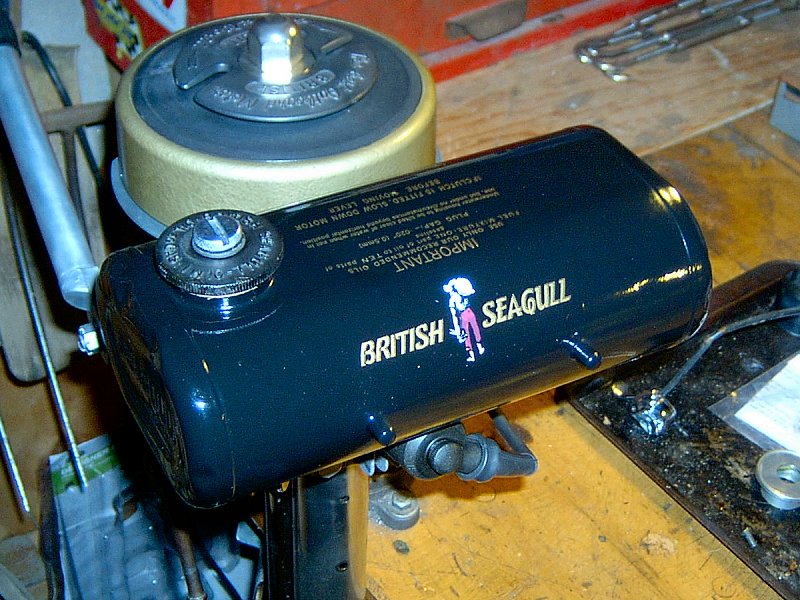
work with the Dremel® and the bench buffer. I stripped the fuel tank, and gave that a fresh
coat of Rust-Oleum® High-Performance Gloss Black enamel (hopefully it's fuel proof). The flywheel
was repainted with Rust-Oleum® Hammered Gold enamel (#7210) paint that's a perfect match to
the original. The cast bronze motor mounts cleaned up nicely, so those got a couple coats of clear enamel, then everything else
received a few coats of Renaissance Wax to help keep things shiny. With all the bits cleaned up and ready to go back together, it's
time to clean and rebuild the carburetor.
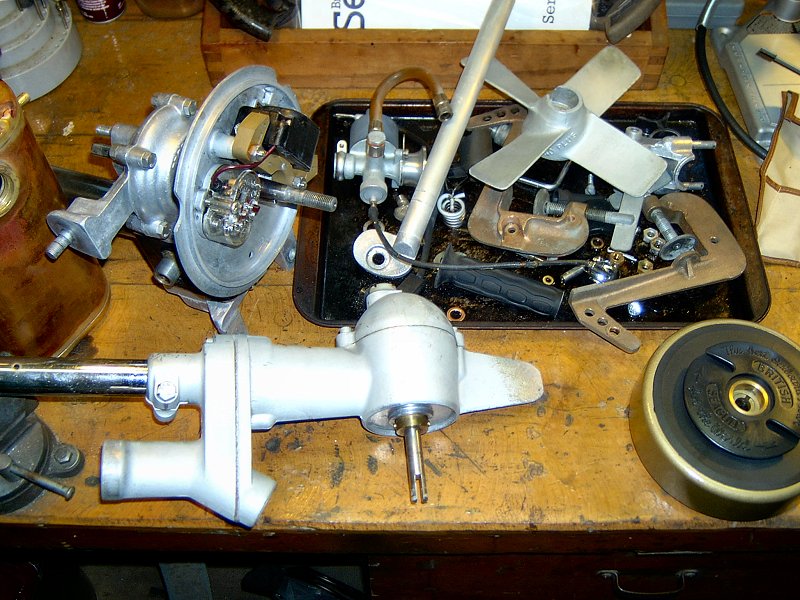
Re-assembly
The first bit to go back together was the lower end and motor mount section, which was just a few bolts to re-assemble the
bronze mount - I didn't take apart the gear box and water pump, since there's nothing wrong with it. The prop got a new drive
spring and pin, although I'll need to remove it again when I run the motor in a test tub.
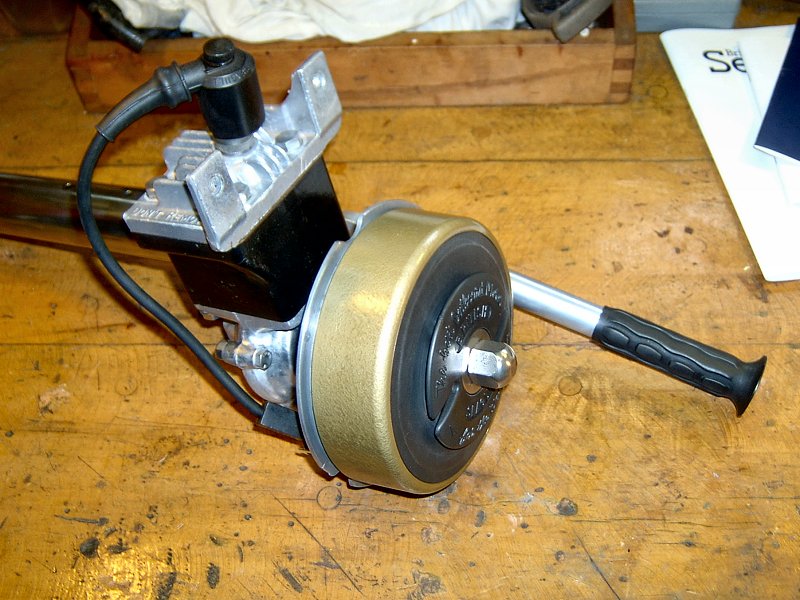
Putting it back together (6 photos).
The upper half received the most attention with regard to the ignition system, since the thing has been sitting so long the magneto was completely "de-energized" - in other words the magnets inside the flywheel weren't magnets anymore. I unscrewed the points from the base plate, and after making the contacts nice and clean, I touch the end of the coil wire to a AA battery then grounded the end of the battery to the base plate for just a second to re-polarize the coil. The points went back down and got adjusted to .020", then I placed the flywheel back onto the shaft and grabbed the 1/2" drill. After a couple squirts of oil into the cylinder, I chucked the end of the shaft into the drill and gave the motor a good spin for about 5 minutes with the drill. Ah, the wonders of electro-magnetism! The tiny induced charge in the coil from the battery was enough to get things started, and as the flywheel spun and the points opened and closed, the coil built up a healthy amount of magnetism in the two flywheel magnets. That should do the job nicely to provide a good strong spark when it comes time to run this thing.
With the ignition system happy, I re-attached the upper half of the motor to the lower end, then turned my attention back to the fuel delivery system. I haven't heard back from the parts supplier, so I managed to get the fuel cap taken apart after a good soak with penetrating oil (the vent screw was well encrusted in the cap), then spent some time cleaning up the soft Aluminum vent screw after I mangled it pretty well when trying to get it to move again. It all fits together the way it's supposed to now and turns freely, so this fuel cap should work for now. I applied the nifty water-slide instruction decal to the tank, then when it was dry gave it a couple of coats of clear enamel and installed the tank.

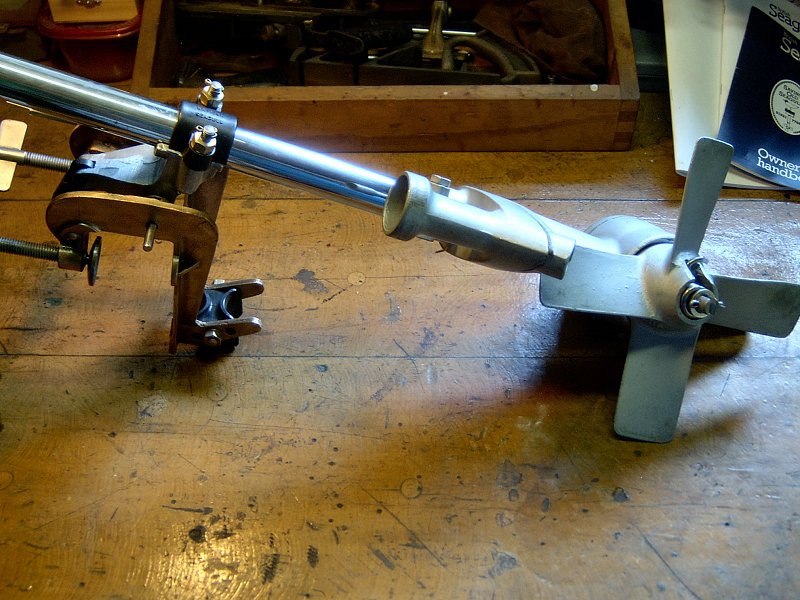
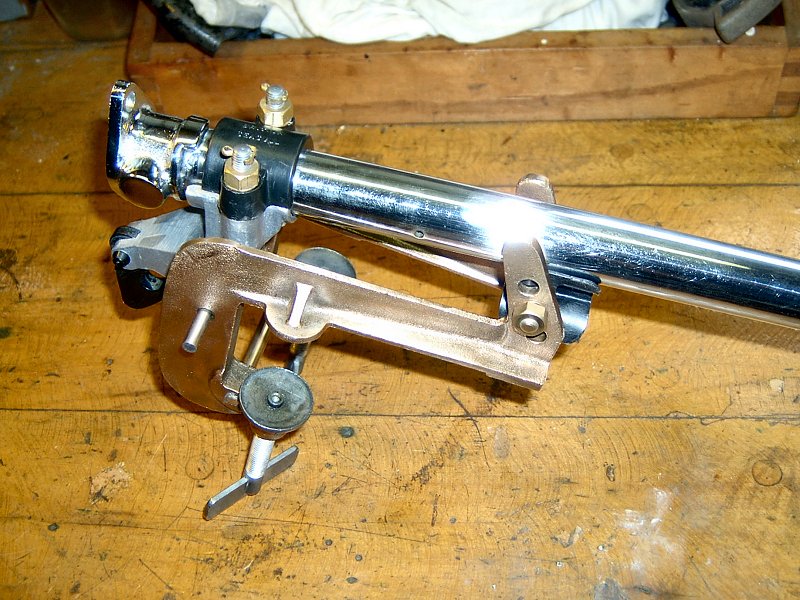
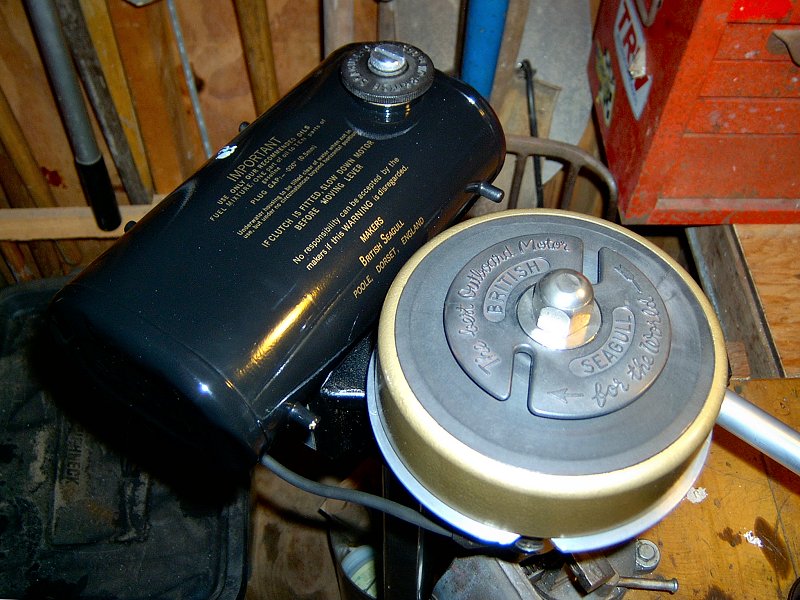
The carb is back on and assembly's complete (3 photos).
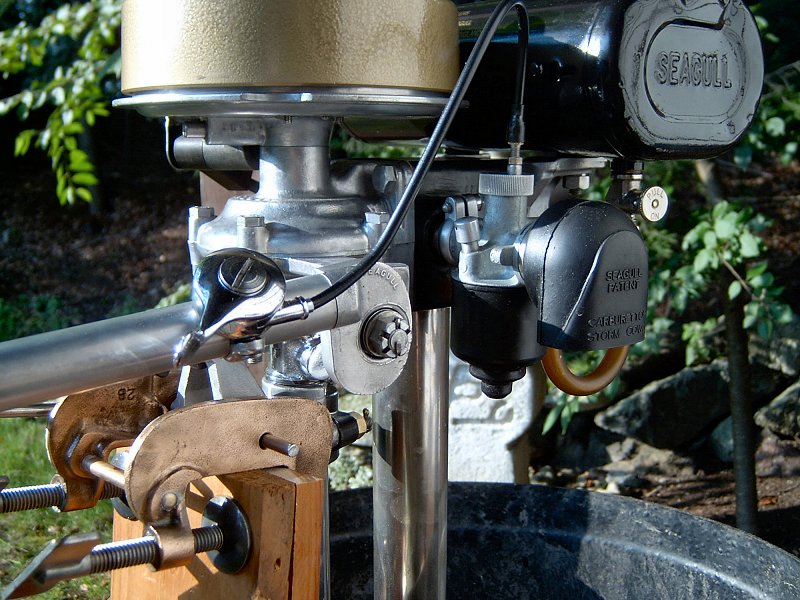
The carburetor, like the rest of the motor, only has a couple parts to it so dis-assembly and cleaning was very simple. The throttle cable was replaced and adjusted, then all the pieces went back together after polishing and the whole works was clamped back onto the engine block. The fuel tap was also cleaned and polished, and after a few minutes in some boiling water the original cork fuel stop swelled enough to provide positive fuel control. The cork was coated with oil then the tap and line were attached to the motor and it was all ready for a test run. I set up a barrel of water on the porch of the shed, clamped the motor on and mixed up a gallon of fuel at 10:1 with some 2-cycle outboard oil. On the third pull, the old girl sprung to life!
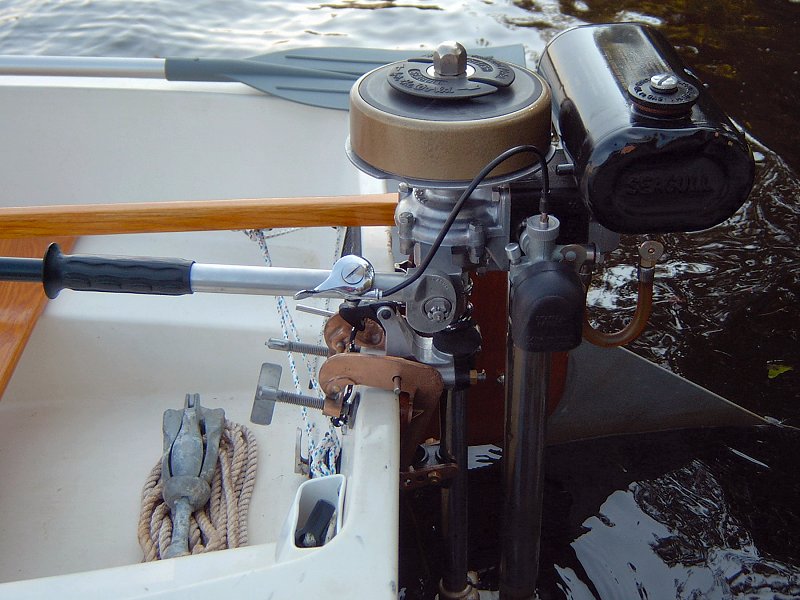
I made a wooden wedge for the transom of the Islands 12, and added a little pad-eye so I'd have some place to attach a safety lanyard for the motor, and we were ready for a putt around the lake. Out first attempt was met with mixed success - the motor ran great, but it's no match for the dense lily pads around the dock, and after about 2 minutes the prop was so entangled with weeds the motor stalled out. Lesson learned - row the boat past the lily pads before starting the motor! I also needed to make a little depth adjustment collar for the motor shaft, since it was sitting very low in the water. If it's not mounted at the correct height, there's too much back pressure in the exhaust tube which causes hard starting and reduced power. Our second trip was much smoother, since the motor was at the correct height, and I'd made a few adjustments to the mounting wedge to get the of the prop angle just right.

The restored 40 plus mounted on the Islands 12 (2 photos).
Having a motor for our little dinghy makes enjoying the lake a real pleasure, since there's no longer any worry about trying to get back to the dock if the wind dies, or having to tack all the way home if we get blown to the far end of the lake. It's very surprising how quiet the Seagull is, and even though it's running on a 10:1 mix it doesn't put out clouds of smoke. It moves the boat along at a pretty good clip, despite it only being 2-1/2 horsepower. All in all, we're very happy with the "Best Outboard Motor for the World".
Old Volkswagens
I've mentioned some of my past work in a few places here and there on the KesterHouse site, so I've decided to go ahead and add a section to address my early introduction to working with my hands - and that started by tinkering on old cars. My young car life in the midwest started with Jeeps. There were plenty of woods to explore in Michigan with lots of state land open to weekend adventures with a 4WD vehicle, so the first vehicle I purchased myself was a 1957 Willy's Station Wagon. I completely rebuilt the Willy's and then sold that to get a 1968 Jeep CJ-5. That Jeep also got a full restoration and customization, which I completed when I moved to New England (I'll add a photo of that thing if I can figure out where I put them). Living near the coast in Massachusetts meant not a lot of places to go four-wheelin' (at least not many within range of the original F-head, 4 cylinder engine it had), so I sold the CJ-5 to a fellow on Martha's Vineyard that wanted it for playing on the beach. My first real job here in New England was at a VW repair shop called Jitterbug, so I also started to gain a real appreciation for how the Germans built cars. I was the guy in the shop that would take care of electrical and fuel injection problems, and also did a few restorations for customers with old Beetles. That's when I got my first VW, which was a 1982 Diesel Vanagon.
That old Vanagon was not very fast, but it got great fuel mileage and could carry almost anything. It was pretty beat up and I think I finally got rid of it in favor of a nifty, Mk1 Jetta coupe, which was a blast to drive. I also left the shop I'd been at for about 6 years and after a short stint working at a BMW motorcycle shop, I went off to start a company in the early 90's with a couple friends called GreenWheels Electric Car Company, with the idea of converting old VWs to electric vehicles.

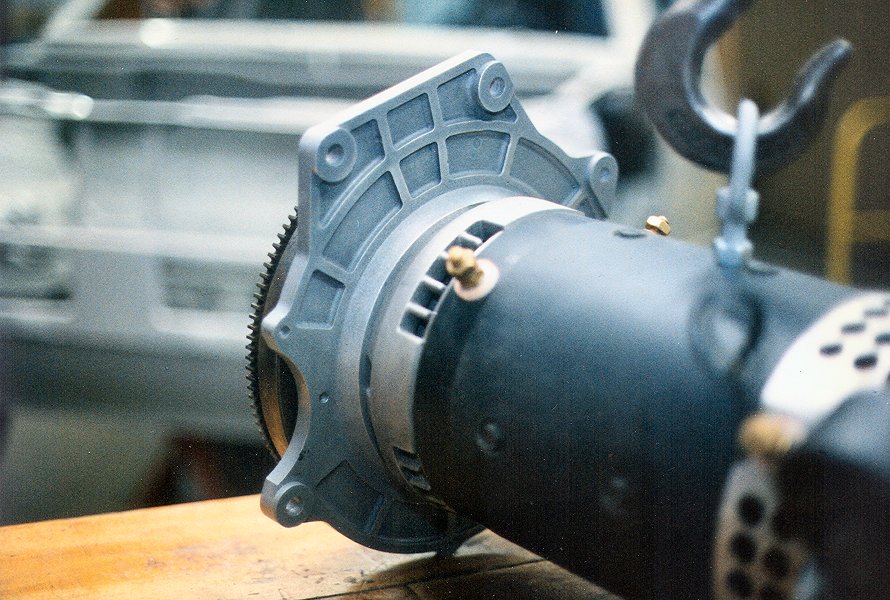
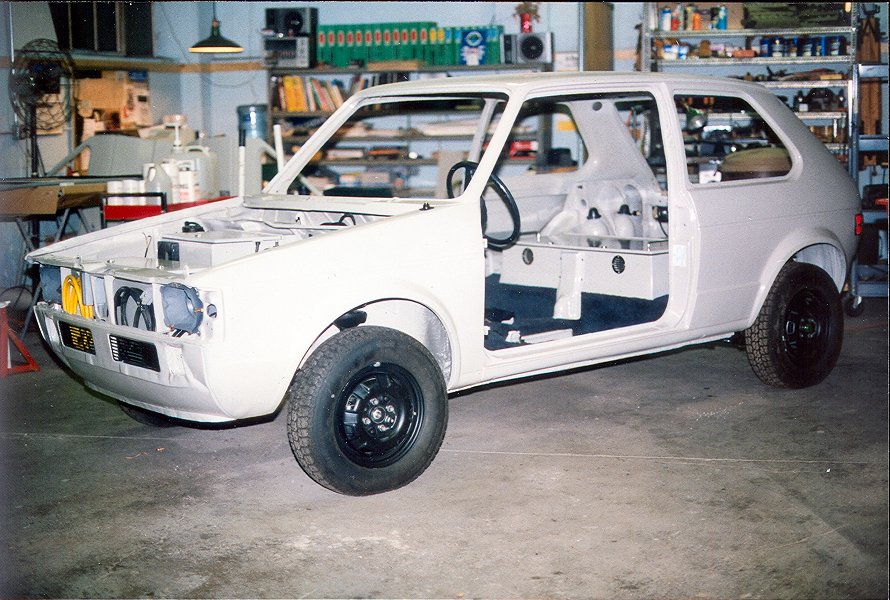
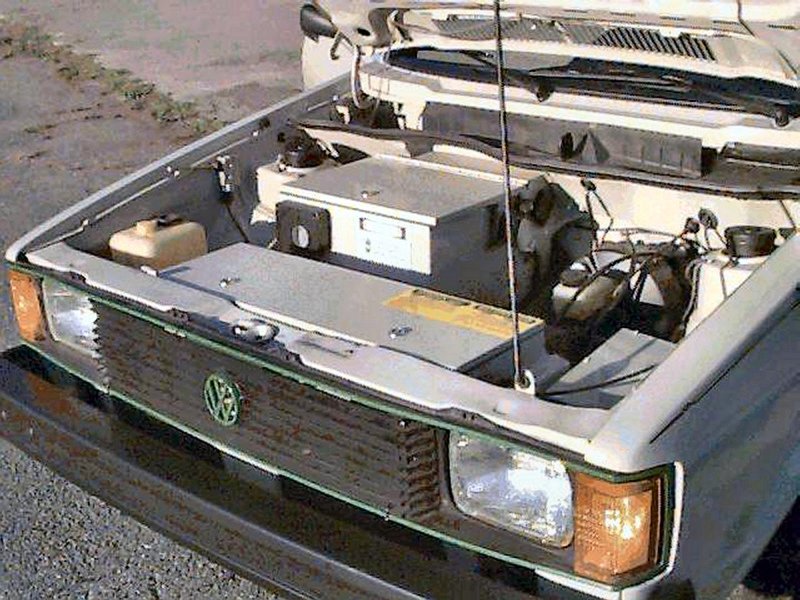
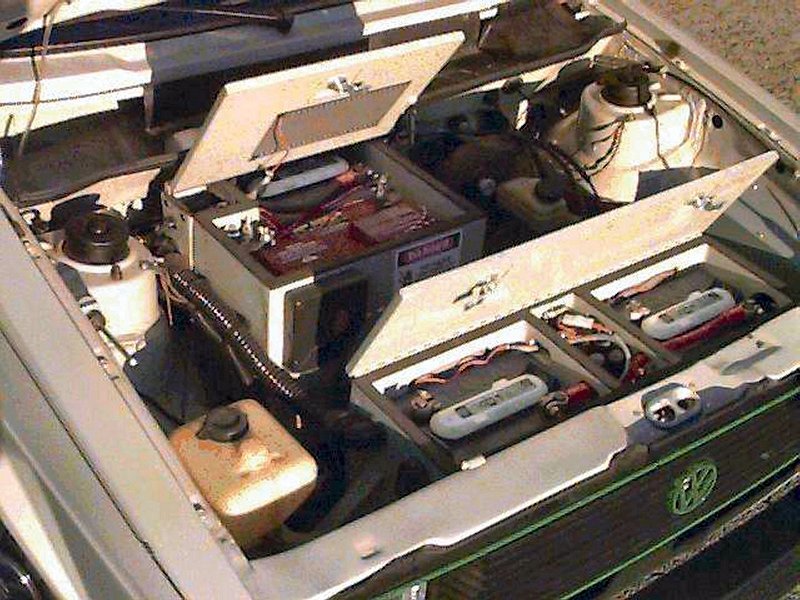
The GreenWheels Electric Vehicle (13 photos).
GreenWheels Electric Car Co.
GreenWheels was a good experience over all, and while we were a bit early to the electric vehicle market, we were one of the few
companies trying it that actually had a "car guy" on board (me), and not just a bunch of electrical engineers that didn't know
anything about making an actual car. Our approach was that we were making a safe, reliable, attractive car, that happened to have an
electric propulsion system. We got a prototype built, and while there was plenty of interest in what we were doing, no one wanted to
cough up twenty grand to buy an old electric Volkswagen back then. The good news is that I met the lovely bride back in those days,
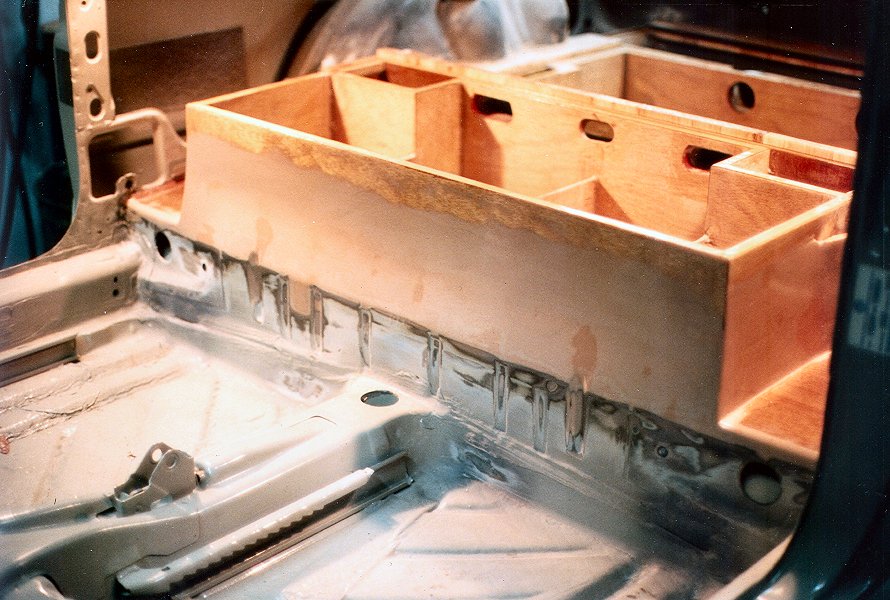
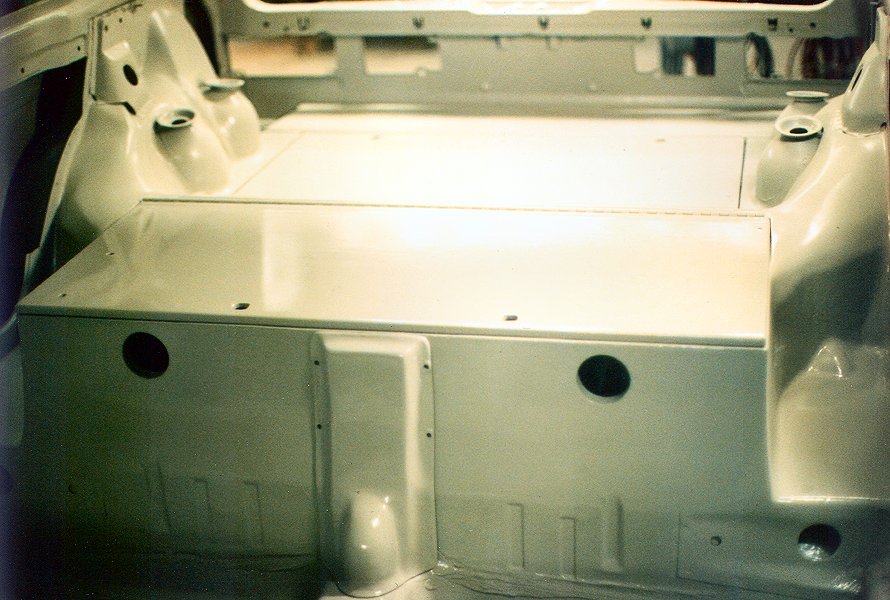
and even had some success with the storage boxes I'd designed to hold all the batteries the vehicle required. Other conversion companies
were making battery boxes of plywood or angle iron, but I used stress-skinned foam core panels that were coated with West System
epoxy resin, and laminated together using a vacuum bag clamp system. The boxes were nearly indestructible, lightweight, impervious to
battery acid, and provided an insulated storage container (both thermally and electronically) to house the batteries. I ended up making a
half a dozen battery boxes for the National Center for Atmospheric Research (NCAR) to use for solar powered weather stations along the
Northern Pacific rim, but I wasn't interested in becoming a battery box company (and there was nothing about the box design that was patentable
since it was all existing technology) so we eventually closed down the company and sold the car. I didn't take any pay during the few years
we operated GreenWheels, however any tools we purchased (in addition to all the tools I had brought to the company from my professional
mechanic days) were given to me by the partners as compensation. Those are all sitting in a storage locker waiting for me to get a
garage built here at home. I was also thoroughly convinced that I'd never drive anything other than a VW by that time, which
led to the cars we own now.
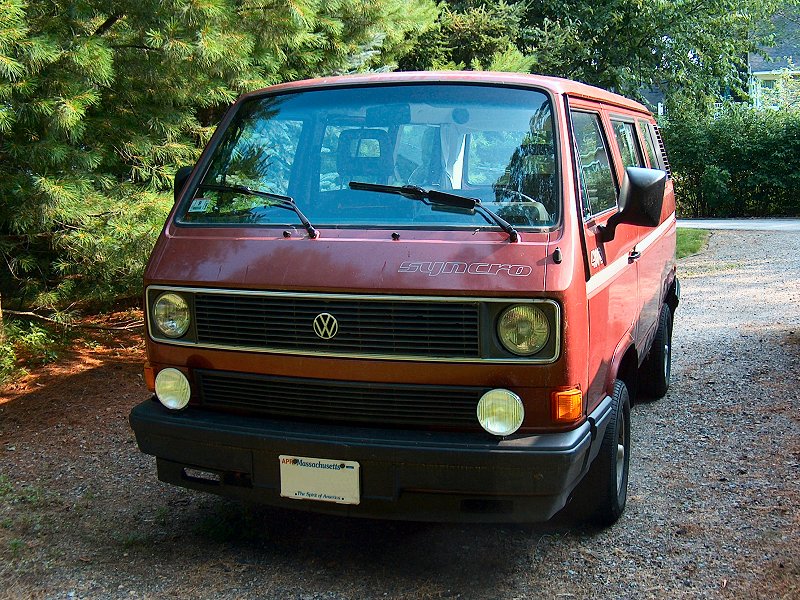
The 2.1l 1989 Vanagon Synchro (2 photos).
The (Old) Vanagon Synchro
Just before getting into GreenWheels, I got rid of the Jetta and picked up a 1.9l 1986 Vanagon
"Weekender" edition. It provided plenty of cargo space and ran fine without too much attention, but it was slowly rotting from
the bottom up thanks to our New England Winters and liberal use of salt on the roads. Eventually I had to take that off the road as
the brake and cooling lines in the under carriage were rusting away and creating an unsafe vehicle. I replaced that with
a 2.1l 1989 Vanagon Synchro. This vehicle belonged to one of my partners from GreenWheels who purchased it
long ago from a friend of his in Oregon. It was only used in Oregon to haul the family on occasional ski trips, and when my friend purchased
it he did the same thing with it here in New England - it sat most of the year, and only made a few trips to Vermont for family outings. He
took good care of it mechanically, and it has very little rust since it didn't get driven much. As his kids got older, he found he didn't need
it anymore and offered it to me at a very attractive price.
I'd done basic maintenance on it for the few years I had it, but recently (the 2010s) it needed a little more attention as it wasn't getting any younger. Last Fall (2013) I finally decided to get into the engine compartment and take care of some stuff that had been worrying me for a few years. That meant I pretty much stripped the engine bay down and rebuilt the whole intake and fuel delivery system with all new stuffs - new fuel lines, new injectors and seals, a new air-flow meter, all new engine compartment wiring for senders and such, new intake hoses and clamps, and on and on. While waiting for parts during that process I also tore down both power mirror units and got those adjustment motors working along with the heated mirror elements, and got into the doors to rebuild the power window units and power lock system. It's running better than ever now, and everything works fine. I suspect the exhaust system (which is like a couple of pretzels braided together under the motor) is going to need replacing soon, and I'll likely go with a stainless steel system from GoWesty so I'll only need to do that once (which happened in late 2014). I'll also need to replace the tires soon, and I'd like to upgrade from the existing 14" OEM alloy wheels to some 15" Steel wheels and tires that are a bit more aggressive (which I did in 2015). I kept trying to get the thing to my body man to deal with the many dings and dents, and give it a fresh coat of paint, but that never happened. Although there wasn't any really noticeable rust on the body panels (other than one of the rocker panels that was gettin' rough), the undercarriage and frame was getting quite bad. In late 2022, one of the rear control arms finally rotted through just behind the wheel hub, and that pretty much sealed the fate of this vehicle.
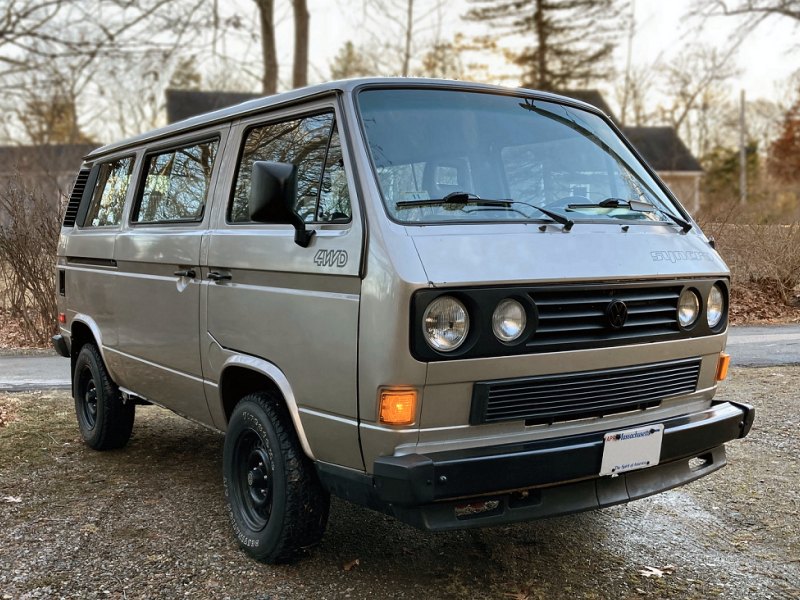
The 2.1l 1991 Vanagon Synchro (1 photo).
The New Vanagon Synchro
With the broken rear suspension component taking the '89 Vanagon off the road, the initial plan to correct the problem was to send it to my
friend's shop for a complete underbody re-build. He had a couple of "parts Vanagons" in his yard he could pull components from (the
rear control arms are the same on the 2WD and 4WD Vanagons). The notion was to get it to his shop, have the entire under-side sand blasted,
then patch in new panels to replace any rot, and replace anything that needed replacing (springs, shocks, coolant pipes, brake lines, bushings,
and anything else that could be replaced). These vehicles just keep going up in value, and my motor, electrical system, and interior was in fine
shape so this all seemed reasonable. The thing sat in our driveway throughout Summer 2023 (as that's the busiest time for his shop), then
finally got loaded on a ramp truck in late 2023 to go get re-built. Once he got the vehicle on a lift to give the undercarriage a closer look, we
found we were going to have to abandon the re-build plan… there just wasn't enough structural integrity left of the underside to save the poor
thing. The '89 Synchro was to be no more.
The search for a replacement vehicle began and after a few weeks of looking we managed to find a decent candidate in Maine. It was a '91 Synchro with a rear locking differential, a clean interior, and no motor — which is exactly what we were hoping to find. Vanagon Synchros in good running condition and a fair body are nearly impossible to find for under $20,000. This one had almost no rust at all (a couple seams showed some rust, and there was no shortage of stone chips all over the nose, but underneath was pristine), and we managed to get the thing for under $10,000. Apparently the fellow in Maine had purchased the vehicle from Penn State back in 2012, after they had removed the engine as part of an electric vehicle conversion project that was abandoned. He was going to restore it and add it and another running Synchro he'd picked up somewhere to his Westphalia rental business, but found the campers were more popular so he was selling the Synchros as a pair (the other one was older and needed a lot of body work). We managed to get him to let this one go, and the changeover work began in late 2023.
After a month or so the shop had gotten my old motor into the new vehicle and it was running, but it still had a long way to go. I'd check in every couple months throughout 2024 on the status, and by June it just needed some finishing touches to take care of the existing minor rust spots and the undercarriage (in order to avoid what had happened to the Jetta and the old Vanagon) The seams and shelf behind the front bumper were sandblasted, then everything got a full P.O.R. 15 treatment of metal prep and rust preventative to keep things from rusting any further. With all the mechanical and body work done by late October, I finally took delivery and got my registration and insurance transferred in early November, 2024. It still needs a bit of work to make it the way I want it (mount the fog lights, re-wire the headlights and high-beams to run on relays, add the third brake light and auxiliary back-up light, put my old dual-horns in, install the spoiler and mud flaps from the old van, etc.), but for now I'm just trying to get the thing cleaned up before the weather gets too cold. The interior had quite a layer of grime from sitting for all those years, so I spent most of November 2024 just cleaning the interior to remove the filth, and taking care of many missing or broken bits of trim. I'll take care of the headlight wiring and auxiliary lighting stuff in the Spring. For now, it's lookin' good, and at long last I can fetch building materials and supplies whenever I need them. I've got a Vanagon again (but not for long… ).

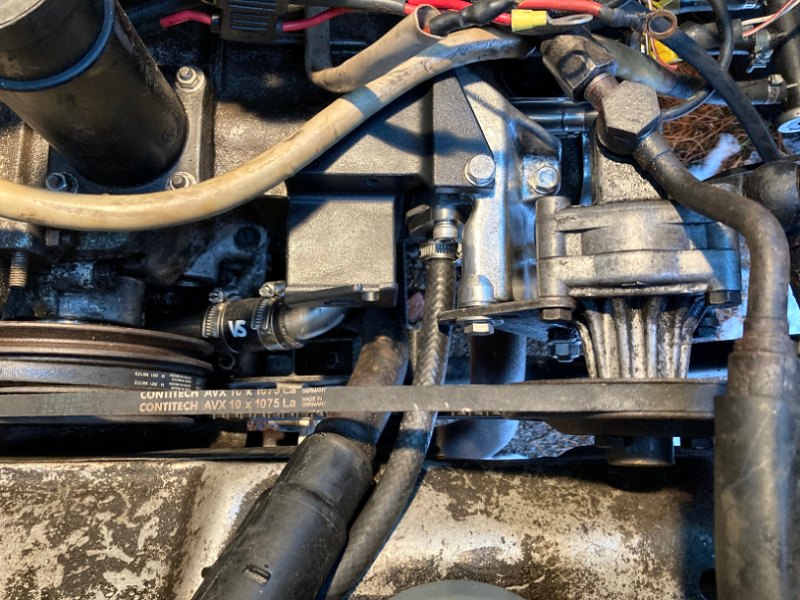
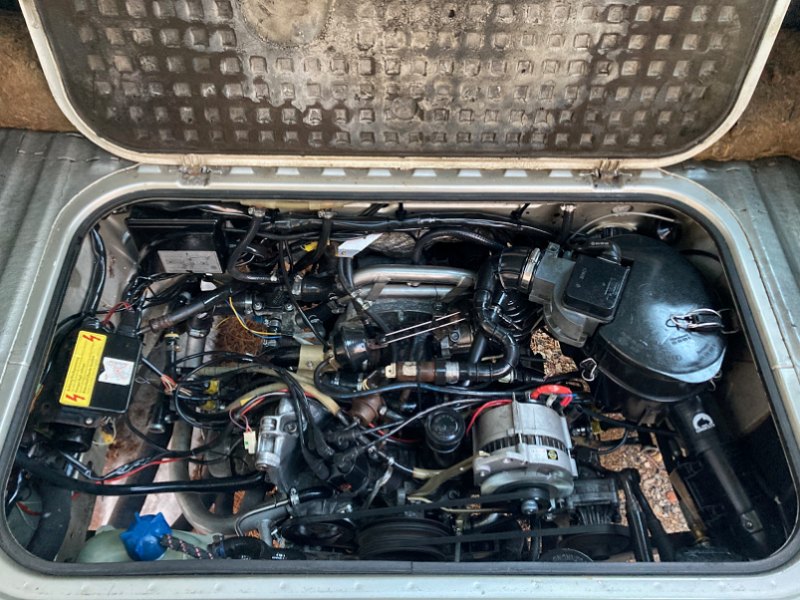
New Vanagon engine compartment work (4 images).
One of the first things that I noticed on the new Vanagon was that the clutch release point was really low when using the pedal — as in, mash the pedal to the floor to shift. There's a rather odd wear point in the pedal linkage that can cause this to happen (and GoWesty now has a repair kit to address this without the need to remove the entire dashboard to service the linkage). I took it back to the shop to see if having them bleed the clutch hydraulics would take care of the problem, but they noticed some moisture around the clutch master cylinder, and bleeding didn't help. We decided to order a replacement clutch master and slave cylinder, and just replace the whole works (and I ordered the GoWesty linkage repair kit too, as long as we're gonna be in there). It'd be at least a week before the parts arrived, so I would continue to drive the thing with the mushy clutch for the moment. That lasted a whole day, then on the way home from the grocery store it started blowing a big white cloud of steam out the back, indicating a coolant leak in the engine compartment. I limped the thing home without overheating, then spent New Years Day taking apart stuff in the engine compartment to determine what was leaking.
I suspected it was one of the four oil cooler hoses or steel pipes for those that had let go, since I'd already replaced most of the other hoses in the engine compartment with silicone hoses from VanCafe, and most of the pipes with stainless steel when the engine was in the old Vanagon. Once I got the A/C compressor and alternator out of the way, I put on a pressure tester and found the leak was a pin-hole in the "peace pipe" hose at the left cylinder head. I ordered a replacement for that, as well as a set of the four oil cooler hoses and the two stainless steel pipes that connect those to everything else. I also noticed I hadn't replaced the short hose that connects the pipes from the right cylinder head to the water pump (see the image for what's what), so that's on the way as well. Once the first batch of parts arrived I started with that cross-over pipes hose work, and noticed the hose for the "air bleed nipple" at the top of the cylinder head on the right was at an odd angle. I wiggled it a little (which I should'nt be able to do) and the hose fitting came off the head. Not sure if I cracked that when taking apart the alternator brackets, or if it was just waiting to spring a new leak when I re-assembled everything. So, that delayed things another week and a half while I waited for the repair kit for that thing to come from GoWesty. Once this bunch of cooling system work is done, almost every hose in the engine compartment will now be the silicone rubber hoses from VanCafe, and all coolant pipes and clamps will be stainless steel. All that leaves is one of the rear radiator hoses (the one from the junction block to the radiator feed pipe), both front radiator hoses, the pressure tank hoses, and all the heater hoses. Perhaps I'll take care of those when the weather's warm. For now, I'm focused on getting the thing running again so we can have the new clutch hydraulics and linkage installed.
However, I also found a lot of little things in the engine compartment that needed more attention. The shop had done what they deemed required to get
the motor from my old Vanagon installed in the new one and get it running, but nothing more (and considering all the other stuff they worked on –
power locks & windows, exterior lighting, lots of bodywork, etc. – I suppose that's okay). I guess I was just a little surprised to find
some stuff that wasn't replaced or cleaned up when they had the motor out of the vehicle. They had replaced the alternator with a new, 90A Bosch alternator
for example, but re-used the old bent and welded bottom alternator bracket (which also didn't align the pulley correctly) instead of putting in
a new bracket. The power steering pump had a nice layer of grime all over it, as did the all the brackets for that, and there were many nuts & bolts
that were looking pretty crusty for the alternator, power steering pump, and A/C brackets and adjustors. Sure, it would run fine with that stuff
as it was, but all of those items are things that need regular service (to adjust the belts) so why not deal with them when the motor's out of
the vehicle on an engine stand? It's just not how I would have done it. Since I was waiting for cooling system parts from all over the country, I
also took apart all those brackets to clean and re-paint them, then ordered all new stainless steel hardware for re-assembly (which I get from
BoltDepot ![]() at fantastic prices with no minimum order quantity, and they're right here in Massachusetts). I then went over the entire engine compartment
wiring harness to check all the various plugs and connectors (and repaired a couple that were a little suspect), then re-mounted the harness
around the engine compartment with new wire ties to clean things up a bit. So, as of late January 2025, the new Vanagon has had the engine compartment
cleaned up and got lots of little tweaks to make it the way I want it. That'll do for the rest of the Winter. Ah, life with a Vanagon.
at fantastic prices with no minimum order quantity, and they're right here in Massachusetts). I then went over the entire engine compartment
wiring harness to check all the various plugs and connectors (and repaired a couple that were a little suspect), then re-mounted the harness
around the engine compartment with new wire ties to clean things up a bit. So, as of late January 2025, the new Vanagon has had the engine compartment
cleaned up and got lots of little tweaks to make it the way I want it. That'll do for the rest of the Winter. Ah, life with a Vanagon.
2026 Vanagon Synchro Update
For most of last year I just enjoyed having a vehicle again to make supply runs for house work. I picked up a few parts to make little updates (LEDs
for a few dash lights, a new rear heater core and one of the last upgraded silicone hoses for the engine compartment, and a new GoWesty throttle body to
try to address the final bit of "idle stumbling" the thing had experienced since I got it back), but I never got around to taking the time
to get any of that stuff installed – hopefully I'll get to it this year.
But, despite the Winter of 2025-26 being one of the coldest and snowiest in recent memory, I ended up spending a few days in the driveway workin' on the Vanagon again. On New Year's Eve 2025, on the way back from the grocery store, the thing stumbled a couple times then died and wouldn't restart. While the lovely bride cranked the thing, I checked for spark from the coil wire in the engine compartment and there was nothin'. After a tow home, I started researching the possible problems and most of them were gonna be pretty pricey (like a Hall unit for the distributor, the entire distributor, or perhaps even the Electronic Control Unit). In order to troubleshoot all that stuff, I'd need a correct Volkswagen US 1115 LED tester to work through the steps in the VW Digifant I & Digifant II Pro Training Manual, which is pretty much a must have book for Vanagon owners. I've got the book, but no US 1115 tool (a regular incandescent 12VDC test light won't work, as it allows current to flow in both directions and could fry the ECU when testing stuff). After ordering an LED test light, along with a 300Ω, .25W resistor to limit the current through the thing, I made a proper tester and starting checkin' stuff. Based on the troubleshooting, I would need to replace the ignition coil (the least painful of all the possible issues). After another few days of waiting to get a new coil delivered from VanCafe (and after another foot of snow), I braved the weather and got the new coil installed. The thing fired up on the first attempt, and the problem of occasionally missing and sometimes stalling at idle is gone. The lesson from this is that I'll never go to the grocery store again on New Year's Eve.

The 1989 Cabrio Mk1 Clipper (1 photo).
The Cabrio
As I said above, I met the lovely bride while working at GreenWheels, and she was driving a nasty green Honda Civic station wagon that was
more rust than green. I got a hold of my mechanic friend from the Jitterbug days (who had also left and opened his own shop at about the
time I went off to work on BMWs), and had him keep me informed of any decent cars he ran across to replace that Honda of hers. It wasn't
long before he came up with a 1981 VW Rabbit Convertible that we purchased to replace the Honda. We got a few years out of that first
convertible, but because it was her year 'round daily driver, eventually the rust started to prove too much and we had to get rid of it
as the brake and fuel lines underneath started to have issues. A few days before we were going to haul the thing to the junkyard, she saw
an older gentleman getting out of his 1989 VW Cabrio one day during her lunch hour, and on a whim asked him if he had any interest
in selling it. Surprisingly he said he'd consider it, so we went to his house a few days later to see if we could make it happen.
We arrived in my Vanagon, which scored some points, then started to chit chat about old VWs. It turned out we knew a lot of the same people who had old VWs (former customers and associates of mine from the Jitterbug days), and he took us into his barn to show us the treasures he'd collected. This guy had a pair of 1968 Karmen Ghias - same year and color, one hard top and one soft top, a '52 split window Beetle, a '84 GTI with less than 5,000 miles on it, and the '89 Cabrio we were interested in. The Cabrio was basically perfect, and he'd never driven it in the Winter which meant no rust underneath. Apparently he'd had other offers to sell the Cabrio, but he'd never let it go because he didn't "approve" of the prospective buyers. We had made a good enough impression however, so after a bit of haggling over price this became the lovely bride's new ride.

The 1.8l 1986 Jetta Mk2 GLI (1 photo).
The Jetta GLI
For the first couple years we had the Cabrio, we both worked at the same company so we'd ride to work together in the Vanagon (which
has also been replaced with the Synchro version during that time), and parked the Cabrio as soon as snow and salt showed up on the roads.
When I left that company to start working on the house, we needed to get another car to use as the "Winter beater" so she could
keep the Cabrio off the road in the Winter, and I could use the Vanagon for construction work. My old mechanic friend found us a decent
1986 Jetta GLI from New Hampshire that would do the job nicely. The body was a little rough, but the thing runs very well, and whoever
purchased this thing from VW back in the day apparently ordered it with every option that was available at the time. It has the
Recaro special seats, the Pirelli rims, an in-dash MFA trip computer, the six speaker AKTIV sound system, and power everything. About
the only things that would make it better would be if it were the 2-door coupe, and had the 16-valve engine. Of course my friend that
found it for us has a couple of those (yes, he has multiple 2-door Jetta coupes, one with the 16 valve engine, and I drool over them
every time I take a car to his shop for service).
As we've owned this car for a few years now, I've come to like it more and more so last year (2013) we sent it to the body shop for a complete "rustoration". They removed all the glass and trim, got rid of all the rust and dents, and re-painted it with 2 coats of color and 4 coats of clear to bring it back to shiny new condition. While it was in the bodyshop I set about finding replacement parts for all the little things that had worn out or broken over the last 20 years (a couple signal lenses, speaker grills, little interior trim pieces, etc.), then spent a couple weeks tinkering with all that stuff when we got it back from the re-paint. I even managed to come up with all the parts to replace those useless rectangular headlights with a four headlight European style front end (like what's on the Cabrio), and hope to get that stuff installed before we take the Cabrio of the road for this coming Winter (2014).
While we made good use of the Jetta for a few more years, unfortunately it is no more. Besides not having a place to do any serious work on our cars with the gravel driveway, that gravel driveway also doesn't help with the under-carriage rust situation — moisture's constantly under the vehicles, and when combined with a little road salt from our Winters here, the under-carriage just slowly disintegrates. In the Summer of 2020, the lovely bride had been driving the Jetta on errands, and when she returned home she mentioned that the rear end seemed to be making a new "rubbing noise", and the handling was a little "funny". I took a quick look at the car, and saw that the rear left wheel was at about a 45° angle to the ground! The rear axle had simply rotted apart, and the wheel hub was no longer connected to the axle. The only thing holding the wheel in place was the tip of the rear anti-sway bar. I wasn't sure how she made it home with that mess, but the car was no longer road worthy. Most of the uni-body was just tissue-paper thin from all the rust, so there wasn't really anything left to attach new parts. I basically stripped anything of value off the vehicle, then sent it to our mechanic to dispose of (his shop used to have a salvage yard across the street in Salem). He pulled the "P-rims" and their center caps for me, then the engine and 5-speed transaxle came out for him to re-use, as those were both fine. The car was then dragged across the street and made very flat. We talked about a replacement, and decided to go with a 1989 Jetta coupe with less than 50k original miles. He had originally gotten that beauty for one of his kids, but she wanted a Cabrio instead, so the coupe was available for us. Rather than have it rot into our driveway like the last one did, he's got the car stored at his place until we get the garage built. I'm fine waiting for it — I don't want to destroy another old Jetta.
So that's it for now on the old Volkswagens we have. With all my mechanic's tools still in storage and no garage, there's only so much I can do in our gravel driveway to keep these things going. I'd like to never have to replace these vehicles (or at least the two we still have), however the only way that's going to happen is if we get our own garage built sooner rather than later. In order to do that, I need to get the rest of the house interior done first. It'll happen eventually…
Volkswagen Exterior Lighting
All Those Little Bulbs - Upgrading to Light Emitting Diodes (LED)
With three automobiles all over 25 years old, one issue I seem to constantly have to deal with is burned out light bulbs. The
Commonwealth of Massachusetts requires annual vehicle safety inspections, and all bulbs must be working to pass. It has worked out that
our vehicle inspections occur about every four months, based on when I first registered each vehicle. Over the past few years, every
time I checked whichever vehicle was due for inspection, I'd have to replace a couple bulbs before taking that vehicle to the shop. Last
Autumn (2015), I was checking the Vanagon in preparation for its September sticker, and sure enough, a licence plate bulb and rear side
marker both needed replacement. That was it - I made the decision to convert all exterior bulbs on all vehicles to LED. LEDs last much
longer (practically forever), and their electrical load is negligible, so even if left on they won't draw enough power to drain a battery
over night.
Replacing all bulbs with LED turned out to be a little more complicated than I originally thought (and more expensive), but I believe it was worth the trouble. The first problem was to simply identify all the bulbs for each vehicle, which wasn't too bad. Next, an appropriate replacement must be found, which is where things became a little tougher. Finding an LED bulb that has the correct base was simple enough - the trouble was ensuring the bulb will fit within the original lens housing, and that it would be at least as bright as the incandescent bulb it replaced. That's were I got in to calculating watts into lumens, then comparing the lumen output of the incandescent bulbs to the lumen output of their respective LED replacements. This also led to figuring out what kind of LED chips each prospective replacement bulb used, and how many of those chips are on the bulb with the base that matches what it was replacing.
Types of LEDs
When automotive replacement LEDs first showed up a few years ago, most of them made use of a little glass-encased LEDs, designated as a
3-mm or 5-mm LED based on the physical dimensions of the LED. These used about 2-watts per LED to produce around 4 lumens each. Basically
they weren't as bright, and only slightly more energy efficient than incandescent (which provide nearly 12 lumens per watt). However, they
were rated for 10,000 hours of operation, as opposed to the incandescent that would only last 1,200 hours (some are rated as high as 5,000
hours, but that's a little suspect). For bulbs that were difficult to get at to replace (especially for marine applications), the change
made sense. The next big change was the introduction of the Surface-Mounted Device (SMD) LED, which is an LED chip that's mounted on some
manner of printed circuit board (PCB). The designations for different types of SMD LEDs are usually represented as a 4-digit number based
on the physical dimensions of the chip. Common sizes for automotive use are the 3528 (3.5-mm x 2.8-mm) and the 5050 (5.0-mm x 5.0-mm),
which are then packed onto little PCBs and stuffed together into an appropriate size bulb base. The 3528 produces about 5 lumens per chip,
with a draw of just under 0.1 watts, so now we're getting some where. Compare the 50 lumens per watt of a 3528 LED to the 12 lumens per watt
of an incandescent, and things were looking up. If we then consider the 5050 SMD, things get even better, with those producing 15 lumens
per chip at 0.2 watts (or 75 lumens per watt). Additionally, the lifespan ratings for most SMD LEDs are at least 30,000 hours.
Replacement Bulb Specs Table
With all these numbers about lumens and watts and chip sizes spinning around in my head, it was possible to return to the original specs
for the automobile bulbs and start looking for appropriate replacements. The 5050 SMD was the chip I decided to use, since this offered the most
output from the restrictive area available for a replacement bulb at a reasonable cost. In order to find the correct replacement for each of
the original bulbs, I laid out the following table to make the comparisons:
| Bulb Position / Use | OEM Base / Bulb | OEM Watts | OEM Lumens | LED Replacement | LED Watts | LED Lumens |
| Tail Light | BA15S base, SAE 5008 / N177-192 | 10 W | 120l | 13-5050 SMD, Red | 2.6 W | 195l |
| Rear Fog Light | BA15S base, SAE 1156 / N177-322 | 21 W | 252l | 18-5050 SMD, Red | 3.6 W | 270l |
| Back-up Light | BA15S base, SAE 1156 / N177-322 | 21 W | 252l | 18-5050 SMD, White | 3.6 W | 270l |
| Back-up Light (upgraded) | BA15S base, SAE 1156 / N177-322 | 21 W | 252l | 12-5050 "CREE" SMD w/lens, White | 13 W | 600l |
| Stop Light | BA15S base, SAE 1156 / N177-322 | 21 W | 252l | 27-5050 SMD, Red | 5.4 W | 405l |
| Rr. Turn Signal | BA15S base, SAE 1156 / N177-322 | 21 W | 252l | 18-5050 SMD, Amber | 3.6 W | 270l |
| Rr. Turn Signal (upgraded) | BA15S base, SAE 1156 / N177-322 | 21 W | 252l | 27-5050 SMD, Amber | 5.4 W | 405l |
| Frt. Turn Signal / Parking | BAY15D base, SAE 1157 / N177-382 | 5 W / 21 W | 60l / 252l | 27-5050 SMD, Amber | 5.4 W | 405l |
| Frt. Turn Signal / Parking | BAY15D base, SAE 1157 / N177-382 | 5 W / 21 W | 60l / 252l | 22-5630 SMD, Amber | 11 W | 880l |
| Third Brake (Cabrio/Jetta) | Mini-wedge base, SAE 194 / N177-352 | 4 W | 48l | 5-5050 SMD, Red | 1 W | 75l |
| Side Marker (Jetta) | Mini-wedge base, SAE 194 / N177-352 | 4 W | 48l | 5-5050 SMD, Amber | 1 W | 75l |
| Side Marker (Cabrio/Vanagon) | BA9s base, SAE 1891 / N177-172 | 4 W | 48l | 5-5050 SMD, Amber / Red | 1 W | 75l |
| Lisence Light | BA9s base, SAE 97 / N177-182 | 4 W | 48l | 5-5050 SMD, White | 1 W | 75l |
| Dome Light | 36mm Festoon base / N177-232 | 10 W | 120l | 6-5050 SMD, White | 1.2 W | 90l |
| Mirror / Glove Box Light | 28mm Festoon base / N177-262 | 3 W | 36l | 3-5050 SMD, White | .6 W | 45l |
You may notice if looking over the lumens output for the replacement LEDs that I tried for almost every replacement to ensure the LED was brighter than the incandescent I was replacing. The only one I didn't worry about were the replacement back-up lights on the Vanagon, since I added a dedicated rear 55 watt Halogen flood light that comes on when in reverse. For the other two vehicles, I replaced their back-up lights with special "CREE" LEDs that have a projector lens on the end of the bulb. Even with the LED inside the original tail light lens assembly, the projector lens does a wonderful job of sending a couple bright white beams out behind the vehicle when in reverse. I also ended up getting a different set of LED replacements for the rear turn signals for all three vehicles. I originally purchased the 18-SMD replacements, which are just a little brighter than the 1156's they replaced. When I installed them and compared them to the originals, the result was very disappointing. Perhaps it was simply due to "optimistic" specifications published regarding the actual brightness of the LEDs (even though other bulbs like brakes and tail lights were certainly considerably brighter than the originals). Whatever the cause, the 18-SMD rear turn signal replacements were unacceptable. I instead upgraded the rears to much brighter, 27-SMD bulbs (same as the brake lights), and things looked much better. After the poor performance of the rear turn signals, I also decided to upgrade the front turn signals (the dual-filament 1157 bulbs) with the 27-SMD bulbs on the Cabrio and Jetta. I then went to an even brighter unit on the Vanagon (since it also serves as the front side marker light), which uses a fairly new 5630 SMD (5.6-mm x 3.0-mm). These are the latest and greatest SMD LEDs, producing a very impressive 40 lumens per chip, consuming .5 watts per chip, and rated at a 50,000 hour life.
LEDs & Late Model Vehicles
If your car is less than 10 or 15 years old, I'd recommend staying with OEM bulbs - bulb reflectors and lens designs are engineered on late
model vehicles to meet standards of Effective Projected Luminous Lens Area (EPLLA), and if you monkey around with the bulb the lamp was
designed to use, you'll likely reduce the EPLLA, possibly rendering the vehicle illegal to operate and unsafe. The other thing to consider
with newer vehicles is that many now have a Controller Area Network Bus (CAN Bus) system, which is there to inform the operator when a bulb
is out. CAN Bus compatible LEDs are available, but keep in mind that if you use them you're probably going to screw-up the EPLLA the lamp
was designed for. Basically, if you have a new car, don't swap out the OEM bulbs with after market LEDs. If you're not sure about whether
or not your exterior lights are EPLLA compliant units, open the unit and see if the reflector area around the bulb is a simple, smooth silver
curve, or looks like a mirror with a bunch of little bumps and creases. If it's smooth and even, you should be okay to upgrade to LEDs.
LED Colors & Hyper Flashing
Even with older vehicles, replacing OEM bulbs with LEDs means you'll also have to keep a few extra things in mind: In order to make the
replacement LED most effective, the color output of the LED should match the color of the lens behind which it is installed. A red lens, for
example, blocks all wavelengths of light except red. So, if you place a white LED behind a red lens, most of the output from the LED will then
be blocked by the lens, making the lamp fairly dim. If you match the LED color to the lens color, all of the output from the LED will get through
the lens, which is what we want. The other change that will need to be made is for the vehicle's flasher relay. With incandescent bulbs, the
flasher relay operates based on the current flowing through a bi-metal strip or resistance wire inside the relay when the turn signal bulbs are
consuming power. As current flows through the bi-metal strip, it heats up and distorts to "click" the relay open and the bulbs turn off.
With no current flowing through the strip, it then cools rapidly and "clicks" back to the closed position turning the bulbs on again.
The repeated heating and cooling of the contact strip inside the relay causes the bulbs to blink on and off (usually twice per second) as long
as enough current load passes through the strip. If a bulb is burned out, the reduced current flow will either cause the turn signals to stay on
(the strip doesn't get hot enough to distort), or blink very rapidly (the resistance wire gets hot too quickly), depending upon the design of the relay
- this is called "hyper flashing". The simplest method to correct hyper flashing or constant-on turn signals when upgrading to LEDs is
to replace the OEM flasher relay with a solid-state LED flasher, which uses a built in timer circuit to turn the bulbs on and off, rather than
resistance and electrical load (and these may be purchased with a built in "clicker", so it sounds like the original relay).
There are also resistors available for LEDs that may be added to the circuit for each bulb, although the power consumption of the resistor
negates the advantage of LEDs using less power than incandescent bulbs.
Upgrading all the bulbs on three vehicles has turned out to be quite a project (and I still haven't finished as I wait for warmer weather in 2016), but it has been worth the trouble. All the LEDs are significantly brighter than the OEM bulbs, and given the smaller and less effective design of these older vehicle's tail light units compared to late model cars, I believe this results in improved visibility and safety. Sure, upgrading to LEDs cost a lot more than replacing an incandescent bulb, but with the much longer bulb life of LEDs, I doubt I'll ever have to replace them again. So with brighter lights, bulbs never needing replacement, and the much lower power consumption of LEDs, I'm very pleased with the results.
↑