

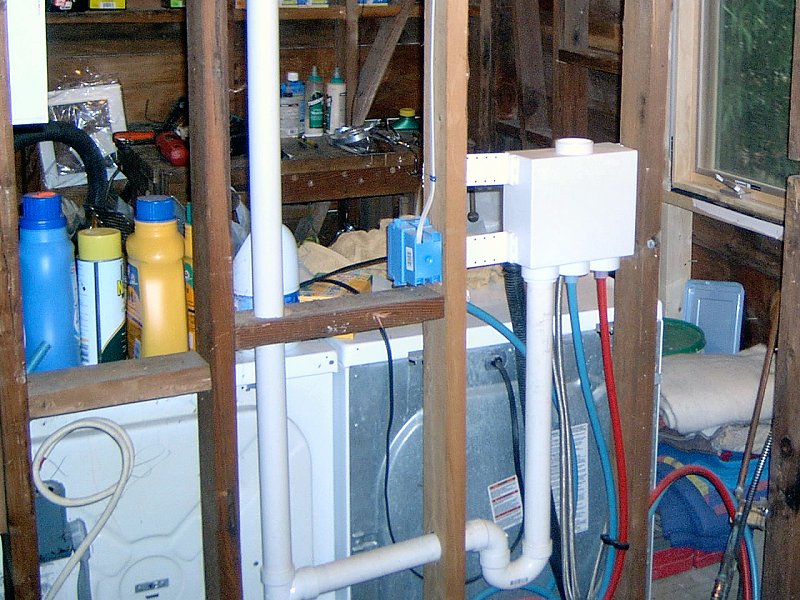
Ah, here's the problem - there's wires in these pipes!
 Modern plumbing is a wonderful thing.
Yep, we had a Three Stooges plumbing system, and I felt like Curly most times I tried make a repair to it. I'm not good at plumbing, and I don't enjoy trying to fix it - probably because I'm not good at it. The good news is that my neighbor's a plumber. The bad news is I like my neighbor and want to remain friends with him, so having him do the plumbing work here while staying on speaking terms with him has been quite a balancing act (with mixed results over the years, but we're still speaking at least - I can't blame him, I wouldn't want to work for me either). The trouble with the plumbing repairs, like many of the projects in this house, is that we have to live here while the system is under repair. Since the entire system needs to be replaced, it's difficult to figure out which parts to work on while keeping the house functioning.
The plumbing tasks we were faced with included replacing pretty much everything invloved in household plumbing - we just had to figure out where to start. The priority was to get a roof and heat for the house when the renovation project began (since it began by making a big hole in the roof and removing the fireplace - which had our woodstove in it). We'd decided early on to go with a radiant floor heating system, so the plumber was going to be involved in the project right from the start. The location for the new boiler was going to be the re-built utility room, which meant removal of the old hot water heater and relocation of the water main and meter to allow the room to get torn apart and rebuilt. As long as the water main was going to get disturbed, we went ahead and planned to remove most of the existing copper supply lines that were under the house at the same time.
Updating the Plumbing
 The simple plumbing plan.
Planning the New Plumbing System: Fall 2005
I decided without hesitation to jump on the PEX bandwagon when it came time to determine how to re-plumb the house. "PEX" is shorthand for
cross-linked polyethylene tubing, which has been around the plumbing industry for a long time, but mostly as a radiant floor heat tubing.
PEX is wonderful stuff, in that it's semi-rigid and really tough, yet it's easy to cut, and can make a pretty tight bend without kinking.
Even if it does kink by accident, a couple minutes with a heat gun on the stuff and the kink pops right out. It can also get exposed to
freezing conditions without harm, since it just expands to accomodate the ice then shrinks back to it's normal size when things thaw.
There are basically two different methods of connecting the tubing to fittings (there are lots, actually, but these two are the most
popular) depending upon which manufacturer you get your fittings from.
Uponor/Wirsbo
![]() makes ProPEX®
expander fittings, which use a special tool to expand the inside diameter of the end of the tubing so it can slide onto thier specially
barbed fittings. The tubing shrinks back to it's normal diameter in a minute or two and you slide a little collar up over the
connection to secure the tubing in place. My neighbor the plumber had been using the ProPEX® system for
a while for radiant heating systems, and already had the tools and all the supplies on his truck to work with it. The other common
attachment method uses the
Watts®
makes ProPEX®
expander fittings, which use a special tool to expand the inside diameter of the end of the tubing so it can slide onto thier specially
barbed fittings. The tubing shrinks back to it's normal diameter in a minute or two and you slide a little collar up over the
connection to secure the tubing in place. My neighbor the plumber had been using the ProPEX® system for
a while for radiant heating systems, and already had the tools and all the supplies on his truck to work with it. The other common
attachment method uses the
Watts®
![]() CrimpRing™ fittings, which are
a different type of barbed fitting that the tubing slides on to and is then secured with either a copper compression ring, or a little
stainless-steel cinch clamp. As it turns out the cinch clamps are exactly the same as the ones I'd been using for years when servicing
Bosch® fuel injection systems on European automobiles and motorcycles - I call 'em Oetiker camps, Watts
calls 'em CinchClamps - whatever they're called, I have bags of 'em in my mechanic's tool chest along with a very nice Oetiker cinch tool.
Guess which kind of fittings I used?
CrimpRing™ fittings, which are
a different type of barbed fitting that the tubing slides on to and is then secured with either a copper compression ring, or a little
stainless-steel cinch clamp. As it turns out the cinch clamps are exactly the same as the ones I'd been using for years when servicing
Bosch® fuel injection systems on European automobiles and motorcycles - I call 'em Oetiker camps, Watts
calls 'em CinchClamps - whatever they're called, I have bags of 'em in my mechanic's tool chest along with a very nice Oetiker cinch tool.
Guess which kind of fittings I used?
With the decision to mostly use Watts® fittings done (the plumber still managed to sneak in a couple ProPEX® fittings on the things he connected), the next step was to layout where the new plumbing would go in the house. I drew up a quick plan to determine how much tubing I was going to need to order (I insisted on purchasing red for hot and blue for cold, of course, even though at that time they only stocked white so it took a while to get the colors). PEX plumbing layout is a little different than copper, in that instead of running a hot and cold main line down the center of the house with lots of tees and valves coming off it to feed each fixture, the PEX system uses a "home run" method (although I suppose you could still install PEX tubing with one main line and lots of tees and elbows under the house, but I don't know why anyone would when the stuff just bends around corners instead). With the home run system, every fixture is fed with an individual tube that connects to its own valve on a distribution manifold located in the utility room. There's lots of tubing, but very few fittings (so very few places where stuff can leak). It's also ideal for our prolonged renovation project, since both the hold and cold water for each fixture can be turned on or off independantly without the need to shut down the water for the whole house when working on a single plumbing fixure. In 2005 we also needed to get a special permit from the state to allow PEX for use with residential potable water systems, since it wasn't in the code book yet (but was going to be in the next book, so getting the permit was no big deal). We didn't get around to actually installing the stuff until early 2006, so the state permit wasn't required after all.
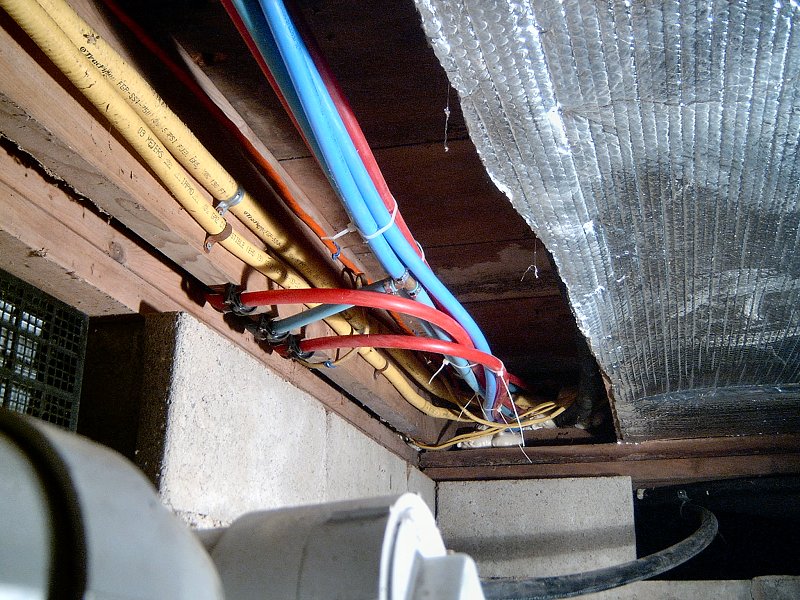
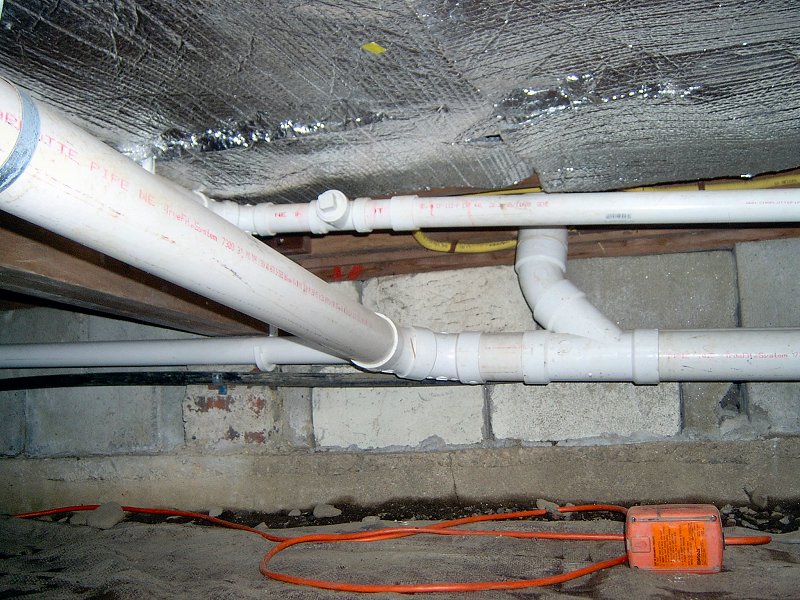
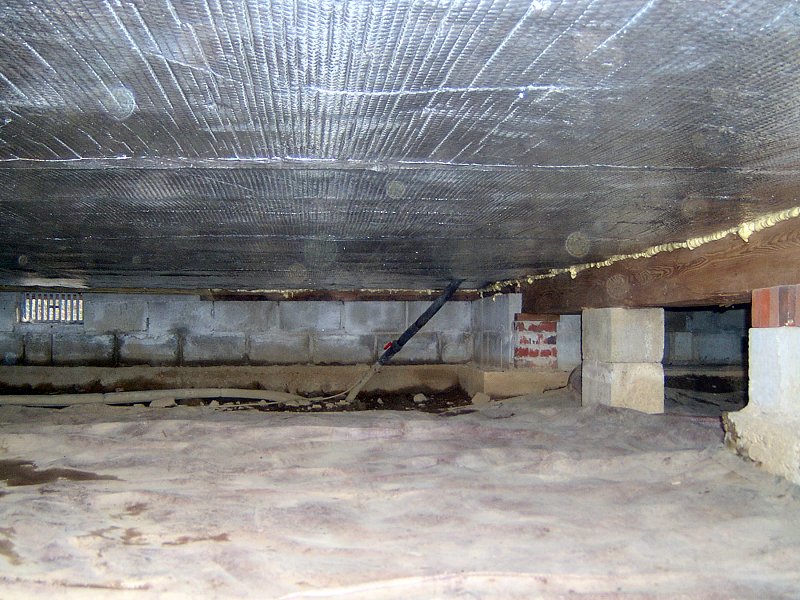 The new water main under the house.
Installing the New Main Line: Winter 2006
I got the utility room rebuild started during the Fall of 2005 while all the plumbing decisions were being discussed and parts ordered.
Getting the plumbing installed was an integral part of installing the radiant floor heat tubing under the floor, since we had to get
all that leaking copper out of the way for heat tubing, and get the boiler hooked up in about the same spot as the existing water meter.
We finally took the plunge in early Winter 2006 and started cutting out copper pipes. The plan was to just get the meter moved to
the new spot and re-connect the supply to the hot water heater and old copper main line so we could get started on the boiler.
Crawling around under the house in the dead of Winter was no fun, but it wasn't the worst place I've ever had to work... I went
under first and spent the day drilling holes through floor joists with a massive Milwaukee HoleHawg drill and a 1-1/4" Self-feed bit.
I then threaded a large chunk of 3/4" PEX tubing through all the joists and then it was the plumbers turn. We dug around in the front
yard a bit to find the water main for the house (since the gate valve under the house looked like it was ready to explode if we touched it - no
way I was going to leave that thing in service), and turned off the water so he could replace the valve and connect the new PEX main line.
To connect the new ball valve to the old copper main, he used a
Viega ProPress®
![]() 3/4" ball valve
with a ProPEX® barb adaptor already attached. He crimped down the ProPress®
fitting, expanded the PEX, stuck it on the barb, slid the collar into place and was done. No torches - no solder - no leaks.
He was finished under there in a couple minutes.
3/4" ball valve
with a ProPEX® barb adaptor already attached. He crimped down the ProPress®
fitting, expanded the PEX, stuck it on the barb, slid the collar into place and was done. No torches - no solder - no leaks.
He was finished under there in a couple minutes.
Back in the house, he made the rest of the connections in a few minutes with just a handful of Propress fittings and a couple chunks of copper from his scrap bucket. The Viega ProPress® System is really quite amazing - it consists of special copper fittings that have a groove and O-ring inside each opening of the fitting. The fitting slides over a copper pipe, then gets crimped down over the O-ring onto the pipe with a fairly massive crimp gun (which costs a couple grand, depending upon the size range). The only downside is it's pretty much a one-shot deal, in that if repairs are needed to the plumbing, the Propress fittings need to get cut out and new fittings installed and crimped further along the pipe run instead of hitting the fitting with a torch, sliding out the bad fixture, cleaning up the pipe and re-soldering like in the old days.
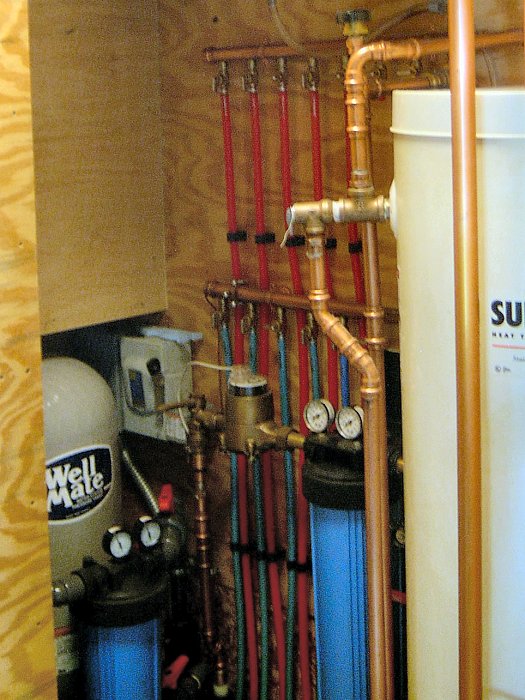
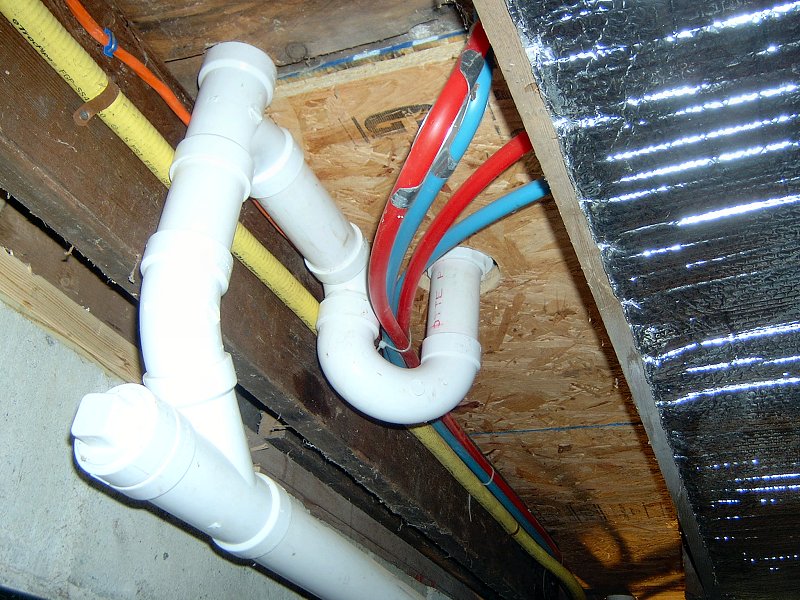
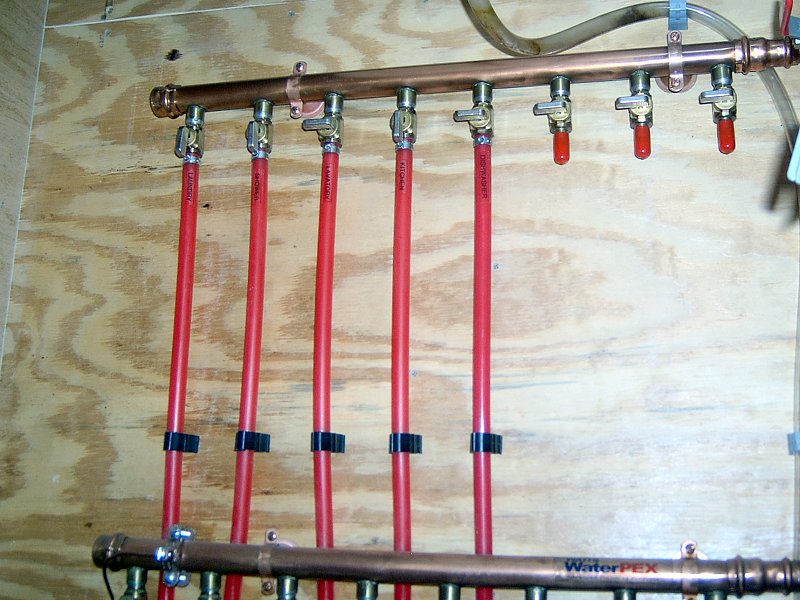 The distribution manifolds and supply PEX (3 photos).
Installing the Manifolds & Fixture Lines: Early Spring 2006
Once the water meter was moved, I finished the utility room then worked on getting at least one loop of heat tubing installed
under the house while the plumber worked on the boiler installation. By March we were ready to get rid of the rest of the old copper
under the house and install all the new PEX tubing and distribution manifolds. We wouldn't make the final connections at each fixture
until it came time to actually install the new fixture, but instead connected each of the hot and cold PEX tubes to the existing copper
pipes just below each fixture. The plumber made up a handful of little adapters that consisted of a barbed PEX adaptor sweated to a
little chunk of copper pipe with a Propress coupler crimped on the other end of the little pipe, and we were ready to roll. I ran all
the PEX tubing from the manifolds in the utility room, through the floor, and off to each fixture (either to the piping under the house
or up into the walls where I could get at the plumbing if that section was already exposed). I left a few extra feet of tubing coiled
up at the end of each run so we'd have enough available when it came time to connect the PEX directly to the fixture at a later date.
As we'd done on the main line installation, I did all the crawling around "grunt" work, then the plumber would stop by after his work
day was done with his Propress gun and tubing cutter to cut the old copper off and crimp the PEX/Propress adaptor in place. In less
than an hour we'd bypassed all the old copper pipe under the house and I'd never have to worry about freezing pipes again. I can't
imagine trying to schedule a plumber to come and perform the work my neighbor did, since it was all little piece meal stuff done over the
course of a week. We are certainly lucky to have him available and his efforts so far have been greatly appreciated.
I tried very hard to ensure there were no plumbing fixtures of any kind under the house (elbows, tees, etc.), with the idea that every PEX supply tubing we installed would only have 2 connections in it: one at the manifold, and one at the fixture, period. I was mostly successful with this plan, with one exception that came up in 2008 when doing some kitchen design work. We decided to add a pot-filler in the kitchen so even though I was breaking my own rule, I had to cut one of the PEX lines under the house so I could add a tee to the kitchen sink feed and get water for the pot filler (there's no space to add another line to the manifold, or I would have done that instead). I try not to lie awake at night and think about it.
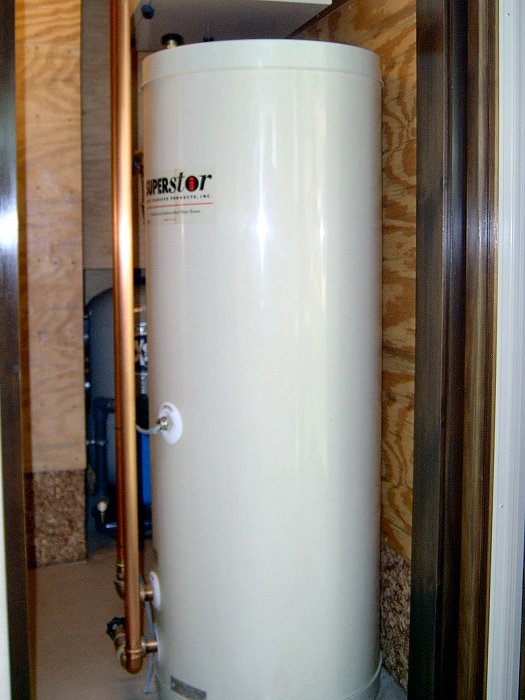 The installed SuperStor (3 photos).
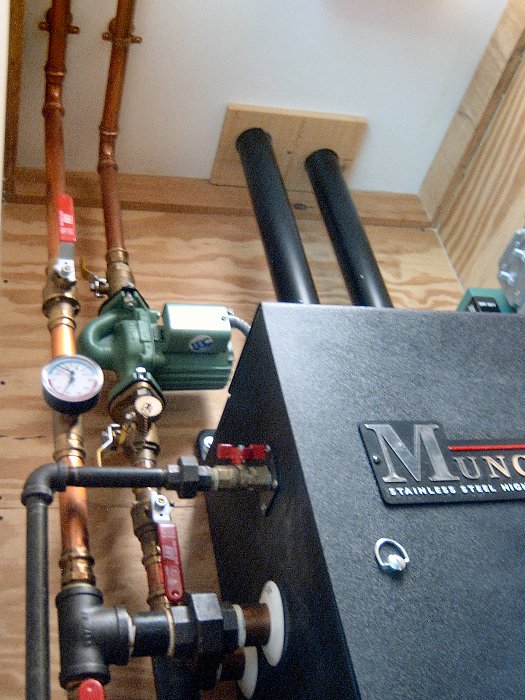
Installing the Hot Water Heater: Spring 2006
With the PEX supply lines in place under the house and temporarily connected to the old fixtures, we next installed the new hot water
heater. The hot water heater is actually part of the boiler installation, since we're using an "indirect water heater". It looks
pretty much like a "normal" water heater, but it operates quite a bit differently. An indirect water heater doesn't have an
electric or gas heating element in it (one less thing to break) - instead it has a coil inside it and a temperature sensor that's
connected to the boiler control. When the temperature of the water in the storage tank drops below a certain threshold,
the boiler fires up and a pump kicks on that circulates hot water from the boiler through a coil inside the hot water tank to
heat up the water stored in the tank. Nice and simple.
We installed a SuperStor SS-40 from Heat Transfer Products, Inc., which is a 40 gallon stainless steel tank with a heating coil also made of stainless steel. The outer shell is plastic, and the tank is insulated with 2 inches of foam insulation. Hook up is very simple: connect a pair of lines to the boiler, connect cold in and hot out for potable water, and connect the probe to the boiler control. Using the Propress gun, the plumber had the unit up and running within half an hour of getting the boiler mounted. A bonus was that we got the thing for cheap money since it was "slightly" used. It had been installed in the plumber's house for about a year, but he had decided to upgrade to a 60 gallon unit to keep up with three bathrooms and two teenage daughters. In 2006 these things were fairly new to the market, so they were pretty expensive (and they still are, for that matter), but because the plumber wanted to upgrade his own unit, he gave us the 40 gallon one for half of his cost, which I had no problem with. It's essentially just a stainless steel tank so it's not like it's going to wear out anytime soon... or ever.
The 40 gallon unit has been plenty to keep up with our needs, and I really like the idea of the indirect since there's nothing on it that requires any maintenance. Another thing I like about the indirect is that it makes the use of the boiler even in the summer months, so the boiler doesn't just sit idle for 4 or 5 months of the year and then decide to not work on the first chilly day we need it in October.
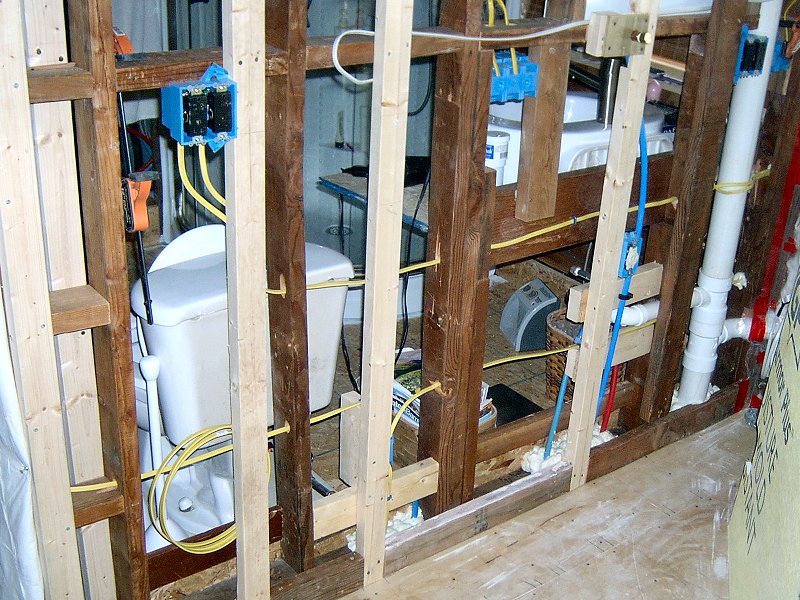
 New PVC waste lines (4 photos).
Installing New Waste Lines: Fall 2008
Nothing much happened with the plumbing for the next couple years while I worked on other projects around the house, but with more work
taking place on the interior as the exterior neared completion, we turned our attention once again to the nasty old cast iron under
the house. We had done a little bit of waste line work in 2007 when we finally got our laundry system working again, (I needed
to finish the genkan and old porch re-build so I could move our home office out of what would become the closet/laundry room,
then get the walls stripped in the old office to get at the plumbing and wiring for the new laundry... sometimes it seems like it never
ends), but we still needed to do the major overhaul of the drain and vent systems. At that time, we just added a 1-1/2" dedicated
vent stack for the laundry into the attic, got a supply / drain box mounted, installed a trap in the wall, then tied the drain into
an old 2" clean out on a cast iron tee-wye under the house.
I discuss some of the waste line upgrade in the bathroom section (and have some photos of the plumbing happening there in that first set of images too). To sum up, a new vent stack was installed in the wall between the kitchen and bathroom, with in-wall drain lines running to the lavatory and kitchen sink/dishwasher. Under the house, the stack pipe was connected to the new run from the toilet flange as well as the new shower trap. The line that was installed earlier for the laundry was connected to the main waste line, then the whole works was routed through the foundation and tied to the new septic system. In the attic, the laundry vent, shower vent and main vent were connected together and routed to the vent pipe stub I'd installed back when I put on the new roof. The plumber and his helper made it all happen in a day, and I just tried to stay out of the way for the whole thing.
Connecting Fixtures & Finishing the Plumbing
With the installation of the waste and vent pipes in the Fall of 2008, the plumbing was completed for the most part. The only fixtures
that are actually finished are the shower and laundry, but everything else is connected to the new PEX supply tubes and tied in to the
new PVC waste lines one way or another. The kitchen sink and dishwasher will get final connections once there's a tile floor and
cabinetry in place, and the same goes for the rest of the bathroom fixtures. The main thing for now is that everything works, nothing
leaks, and it's all been done correctly (as opposed to that old mess of dripping copper and cast iron we used to have). There's great
peace of mind in knowing that all the plumbing is new. The remaining handful of tasks for final installation are all simple enough,
and best of all no one will need to crawl around under the house to finish it up.
Reviving the Well
When this area was originally developed in the early 50's, everyone got a deep well for their water supply. Some time in the 70's municipal water was brought into the neighborhood, and the folks we bought the house from had disconnected the well and tied the main supply line under the house to the new town water at that time. Water in this part of the country is still pretty inexpensive, but I thought it would be a good idea to try and get the old well working to use for car washing, irrigation, and mostly importantly, for water changes when maintaining the pond. Refilling 1,500 gallons of fish pond once or twice a year shows up on the water bill, not to mention the cost and trouble of adding dechlorintor every time we added water to the pond.
 The well controls and filter.
When we first purchased the house and starting poking around at the wiring and plumbing as homeowners, I pulled out all the old well controls that had been mounted under the house and tossed 'em in a box... The controls were pretty crusty after many years in the damp crawl space (the pressure tanks were complete trash), but I figured I'd hang on to them to at least pull some specs off of when the time came to get the well working again. As I was working on the utility room rebuild and the rest of the plumbing, it came time to get some outdoor water hooked up, so I re-visited the old well. My first task was to try and find some well guys to check the pump and see if it was any good. I grabbed the yellow pages and went for the first big ad I saw for some well company in Rowley, MA that looked like it'd been in business forever.
Now doing business on the phone with old Yankees can be a bit "interesting"... if I call a business some afternoon to ask how late they're open, for example (no one around here lists their business hours in the yellow pages), they'll respond with "Well, where are you coming from?". Apparently my travel time to their shop determines how long they're going to stay there. I expect to hear something like 4:30 or 5:00, but "Where are you coming from?" just boggles my mind. Does that mean they're going to stay there and wait for me if I'm near by? Does that mean they were planning to bail out at 3:00, then I called and ruined their day? I still haven't figured that one out. Usually when I tell them where I'm coming from, they say "Oh, well we'll be closed the time you get here. You should come over in the morning." They never actually tell me how late they're open. Anyway, I call this place and ask if they can come determine if my well is still serviceable, fully expecting to get the "old Yankee treatment". After explaining that it hadn't been used in at least the 20 years I'd lived here as a renter and owner, and likely another 20 years before that, the older gentleman on the phone asks me where I'm calling from (naturally), so I tell him the town. "No" he says, "I mean what's your address?" So I tell him our address, thinking no one knows where this tiny little street is anyway, but what the heck... "Ah, you mean Burt's old place? Yeah, you've got a nice view of the lake down there." I nearly dropped the phone. Burt was the original builder/owner of the place, and the 80+ year old fellow we'd bought the house from. He continued, "I remember when we put that in... 220 feet I think. Have you tried to run the pump at all?" "Nope, I need to get a new pump start capacitor and hook up the wiring, but I didn't want to put the time into it if the pump is junk" I said. "Ah, it'll be fine. As long as the bottom of the casing never dried out, it should start right up. That close to the lake I'm sure it never dried up. Give us a call back if it doesn't fire up and we'll come pull it for ya." Well okay then, if you say so buddy... crazy old Yankees. I thanked him for the advice and accepted the fact that like pretty much everything else on this project, I'd have to do it myself.
I managed to pull enough information off the old motor control to figure out that I have a Franklin 1/3 HP, 4" motor, 3-wire,
single phase, 230 volt pump. The old disconnect switch looked okay (I did re-paint the box), so I ordered a new Franklin pump
control and pressure switch from Grainger
![]() .
A couple days later I had the parts and a couple of fuses, and connected up the controller and cut-off switch. I was fully expecting a
little puff of smoke as the controller melted and the cartridge fuses popped from trying to start a 20 year old seized motor. I threw
the switch and waited. Nothing happened. I checked the breaker and it was fine. I opened the cover on the switch and both fuses looked
fine. I stuck my head out the back door again to look at the end of the 1-1/4" black poly pipe laying on the ground, and heard a little gurgle sound coming
from it and growing louder. Within a few seconds a 6 foot long column of brown, rusty liquid was blasting out of the pipe! It was nasty
looking, smelly stuff, but the pump was working just fine. I flushed the well by letting it run for 10 or 15 minutes at a time, then
turned it off for 5 minutes or so to "settle" it. After a couple hours of this the water was crystal clear (although it still smelled a
little funky). I guess he wasn't crazy after all.
.
A couple days later I had the parts and a couple of fuses, and connected up the controller and cut-off switch. I was fully expecting a
little puff of smoke as the controller melted and the cartridge fuses popped from trying to start a 20 year old seized motor. I threw
the switch and waited. Nothing happened. I checked the breaker and it was fine. I opened the cover on the switch and both fuses looked
fine. I stuck my head out the back door again to look at the end of the 1-1/4" black poly pipe laying on the ground, and heard a little gurgle sound coming
from it and growing louder. Within a few seconds a 6 foot long column of brown, rusty liquid was blasting out of the pipe! It was nasty
looking, smelly stuff, but the pump was working just fine. I flushed the well by letting it run for 10 or 15 minutes at a time, then
turned it off for 5 minutes or so to "settle" it. After a couple hours of this the water was crystal clear (although it still smelled a
little funky). I guess he wasn't crazy after all.
Getting the well hooked up and working was pretty straightforward once I knew the pump was functional. I ordered a new fiberglass
WellMate WM-20WB 20 gallon pressure tank from World Wide Power & Pump (free shipping, of course), then picked
up a load of CPVC fittings from McMaster-Carr![]() so I could stuff all the well goodies into a little cubby in the utility room. It's a tight fight, but everything's in there and I
still have room to get at the controls and tank valve. I made all the connections under the house with 1-1/4" poly pipe and barbed
fittings, then connected the output to three frost proof, anti-siphon sillcocks located out front behind the bamboo, at the Northwest corner of the
house near the pond, and on East side of the house for a hose reel. The water has an obscenely high Iron content, so there's too
much rust staining for irrigation system use, but it doesn't bother the fish so it's been wonderful having "free" water available
for pond maintenance.
so I could stuff all the well goodies into a little cubby in the utility room. It's a tight fight, but everything's in there and I
still have room to get at the controls and tank valve. I made all the connections under the house with 1-1/4" poly pipe and barbed
fittings, then connected the output to three frost proof, anti-siphon sillcocks located out front behind the bamboo, at the Northwest corner of the
house near the pond, and on East side of the house for a hose reel. The water has an obscenely high Iron content, so there's too
much rust staining for irrigation system use, but it doesn't bother the fish so it's been wonderful having "free" water available
for pond maintenance.
A New Well Cap: Fall 2021
Back when we were working on the new roof in 2006, we had to take a "rain delay" due
to constant rain, and took the opportunity to relocate our driveway from the West side of the house to the East side. That put the driveway
right next to the 6-inch well casing that had been sticking up in the front yard since the thing was installed. We had to take some care
when opening a car door to not whack it into the well casing, but got used to dealing with it eventually. Then in 2010 we
made the driveway a little wider and re-landscaped a bit of the front yard (to finally match
the size and shape driveway we'd planned). That also meant the well casing was now sticking up in the driveway rather
than next to it. A few minutes with a metal-cutting blade in the Sawzall™ solved that problem, and I cut the casing down to put the top
pretty much level with the new gravel driveway. I also added an extra 1-inch "tee" fitting to the black PVC pipe that connected to the
cap frame with the wires from the house, and ran a new length of 1-inch PVC into the green "garage" to serve as a vent for the well.
I then put the old cast Aluminum well cap back in place, and sealed it well with silicone to prevent surface water from getting into the
well (and because the cap was no longer vented, my new 1-inch vent pipe would still allow air into the casing when the pump ran).
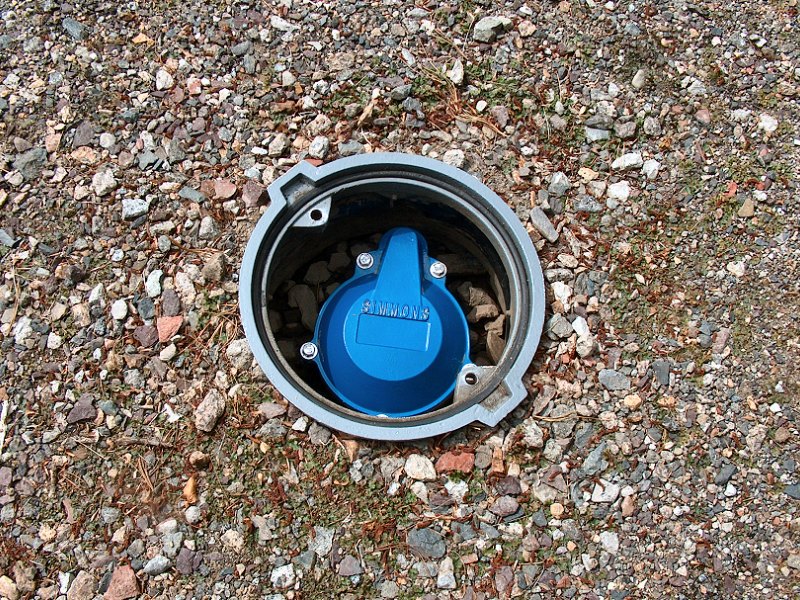
 The old well gets a new cap (3 photos).
That original cap held up pretty well while occasionally getting run over in the driveway. However, at some point the vent/wiring fitting part of the cap cracked off, so I just slathered the thing with 2-part epoxy and put it back together. Every time I'd be out in the driveway I'd think about how to get that well cap lookin' a little better and protected from traffic, but never got around to doing anything with it. When the big Red Oak behind the deck lost a limb and had to be removed in 2020, that was also the end of the old well cap. Cicoria Tree came to remove the Oak with their huge, new Liebherr crane and pulled it into the driveway to get at the Oak — right on the old well cap, which immediately shattered from the weight of the crane. A broken well cap was the least of my worries at the time, so I just put the pieces back in place to sorta cover the thing for the Winter.
I finally started looking for options to deal with the broken cap in the Summer of 2021. I really liked the idea of putting a little
"mini manhole cover" over the well, similar to the metal covers typically used in gas station parking lots for fuel delivery ports.
I found many companies with manhole covers on the 'net, but ended up getting something from
Enviro Design
Products![]() in North Carolina, as they actually
manufacture these things, unlike all the other re-sellers (and shipping a manhole cover up the East coast wouldn't be any near as costly
as getting it from California). I got their 12-inch x 12-inch EMCO Monitoring Well Manhole cover with the poly skirt, as I figured it
would leave enough interior space to accommodate the new well cap. For the cap itself, I got a Simmons Mfg. "Watertight" cast-iron well
cap from Amazon. I had to cut another couple inches of the casing to get the new cap below the new manhole cover, so after a bit of digging
around the casing, I got in there with the Sawzall™ again and took of it. I then wire brushed the casing exterior and gave it a quick shot of
Rust-Oleum to ensure I had a clean, smooth surface for the new cap frame to seal to. I sealed the small vent hole in the cap frame with
a rubber stopper siliconed into place, then re-connect my vent pipe and the well pump wiring. Before I sealed it up, I tried running the pump
to make sure everything was right, but nothing worked. I double-checked the pressure switch and pump control in the utility room, which were
both working, and the multi-meter showed I had power at the well cap — the pump just wasn't working. The only reason I can think of for
why this pump motor stopped working is it may have been cooked by the near-miss lightening
strike we had in the Fall of 2019. Well, the job was mostly done at this point, so I finished putting the cap together, then set the
manhole skirt and frame in place and backfilled the area. The new manhole cover should hold up quite well to traffic, and it looks a lot
better than that old well cap. Now I just need to pull the well pump and figure out why that doesn't work anymore.
in North Carolina, as they actually
manufacture these things, unlike all the other re-sellers (and shipping a manhole cover up the East coast wouldn't be any near as costly
as getting it from California). I got their 12-inch x 12-inch EMCO Monitoring Well Manhole cover with the poly skirt, as I figured it
would leave enough interior space to accommodate the new well cap. For the cap itself, I got a Simmons Mfg. "Watertight" cast-iron well
cap from Amazon. I had to cut another couple inches of the casing to get the new cap below the new manhole cover, so after a bit of digging
around the casing, I got in there with the Sawzall™ again and took of it. I then wire brushed the casing exterior and gave it a quick shot of
Rust-Oleum to ensure I had a clean, smooth surface for the new cap frame to seal to. I sealed the small vent hole in the cap frame with
a rubber stopper siliconed into place, then re-connect my vent pipe and the well pump wiring. Before I sealed it up, I tried running the pump
to make sure everything was right, but nothing worked. I double-checked the pressure switch and pump control in the utility room, which were
both working, and the multi-meter showed I had power at the well cap — the pump just wasn't working. The only reason I can think of for
why this pump motor stopped working is it may have been cooked by the near-miss lightening
strike we had in the Fall of 2019. Well, the job was mostly done at this point, so I finished putting the cap together, then set the
manhole skirt and frame in place and backfilled the area. The new manhole cover should hold up quite well to traffic, and it looks a lot
better than that old well cap. Now I just need to pull the well pump and figure out why that doesn't work anymore.
Water Quality
With all the new plumbing and fixtures going in, we decided it would be a good time install a "whole house" filter to help
keep all those pipes and fixtures clean. I was also very interested in getting rid of the any Chloramine and/or Chlorine the city
puts in the water supply as a disinfectant. Our household drinking water (and ice) is already filtered with a PuR filter that's
installed in the refrigerator, however that doesn't do anything for the water we use for cooking and washing. The more I researched
water filters, the more concerned I became about not having one. I thought about installing a reverse-osmosis system, or perhaps a
KDF cartridge system, but those are either too expensive or just too big. I decided to keep it simple, and went with the
Pentek ![]() Big Blue® filter housings and Pentek cartridges. There's plenty of cheaper options out there
for housings and cartridges, but I don't want to mess with cheap junk when it comes to something that can have a profound, long term
effect on our health. I purchased the Pentek housings from Ohio Pure Water
Big Blue® filter housings and Pentek cartridges. There's plenty of cheaper options out there
for housings and cartridges, but I don't want to mess with cheap junk when it comes to something that can have a profound, long term
effect on our health. I purchased the Pentek housings from Ohio Pure Water
![]() , and I used to get the cartridges directly from
Siemens, although it looks like I'll need to get them from Amazon these days.
, and I used to get the cartridges directly from
Siemens, although it looks like I'll need to get them from Amazon these days.
 The Pentek filter.
For the incoming municipal water, we installed a 20" Big Blue® housing in the main line just after the meter. The filter uses a Pentek EP series charcoal-briquette cartridge with a 5 micron pre-filter wrapped around the Carbon block. No single cartridge does everything, but without room for multiple housings, I decided it'd be best to just try and get rid of the Chlorine, which this cartridge does very well. The difference in the taste and odor of the water was immediate, and quite surprising, on the day I installed the new cartridge. The shower especially is an entirely different experience with the Chlorine filter in the system. It's hard to explain, but it feels "clean" now, instead of like I just stepped out of a swimming pool full of Chlorine. The improvement in the feel, taste and odor of the water is really quite impressive with the whole house filter.
For incoming well water, we installed a 10" Big Blue® housing. As I said above, the Iron content in the well is off the charts and there's not much to be done about it unless I put in a water softener, which I'm not going to do. Iron in the water doesn't change the appearance of the water at the tap, but when the water is exposed to air, the Iron quickly oxidizes and stains whatever it contacts with lovely orange rust stains. When I connected the well to the irrigation system, it took about a week of daily waterings for those micro-misters of mine to turn half the rocks in our garden orange. The irrigation system went back on municipal water, but with the well still servicing outdoor sillcocks and the pond, I wanted to get a filter in there to try and deal with the taste, odor and sediment. I selected the Pentek NCP series non-cellulose carbon-impregnated pleated cartridge, 10-micron filter for well use, which does a fine job of cleaning up the taste and odor of the well water (it's essentially a cartridge built specifically for residential well use).
The final bit of water "treatment" I most recently added is a little goofy, but it actually seems to be working... I installed a set
of "magnetic water conditioners" which supposedly reduce water "hardness" and Calcium deposits in the plumbing. I was noticing some
deposits in the shower fixtures after a couple months of use, and there was a lot of white water spotting on the lower parts of the
shower and the glass doors. We squeegee off the shower walls and doors after showering, and usually give all the fixtures a quick
wipe with a micro fiber cloth too, just to keep the thing looking nice and make bathroom chores less of a hassle on cleaning day.
Still, there was a definite build up of white crusties going on in there, so I figure the magnets can't hurt, and might even help.
Of course running water through a couple magnets doesn't "remove" anything from the water, but the theory is that it changes the way
Calcium and Lime crystalize, so they'll stay in suspension and run through the system, rather than build up inside pipes and
fixtures as scale. Sounds reasonable enough, so I purchased a few sets of Neodymium water treatment magnets from
CMS Magnetics
![]() to see if they'd do anything. I installed three sets, with a pair on the incoming well line, a pair on the incoming municipal
line, and the last pair on the water heater output line (the water stored in the water heater supposedly "loses" the effect of passing
through the first set of magnetics when it enters the house then sits in the tank for a day, so it must be "re-conditioned" when
it exits the water heater). Before installing any of them, I did a thorough scrubbing in the shower with CLR so I could start with
a clean slate. It's been about 6 weeks now, and so far there are no signs of any water spotting or build-up in the fixtures.
to see if they'd do anything. I installed three sets, with a pair on the incoming well line, a pair on the incoming municipal
line, and the last pair on the water heater output line (the water stored in the water heater supposedly "loses" the effect of passing
through the first set of magnetics when it enters the house then sits in the tank for a day, so it must be "re-conditioned" when
it exits the water heater). Before installing any of them, I did a thorough scrubbing in the shower with CLR so I could start with
a clean slate. It's been about 6 weeks now, and so far there are no signs of any water spotting or build-up in the fixtures.
↑