

Kitchen Design
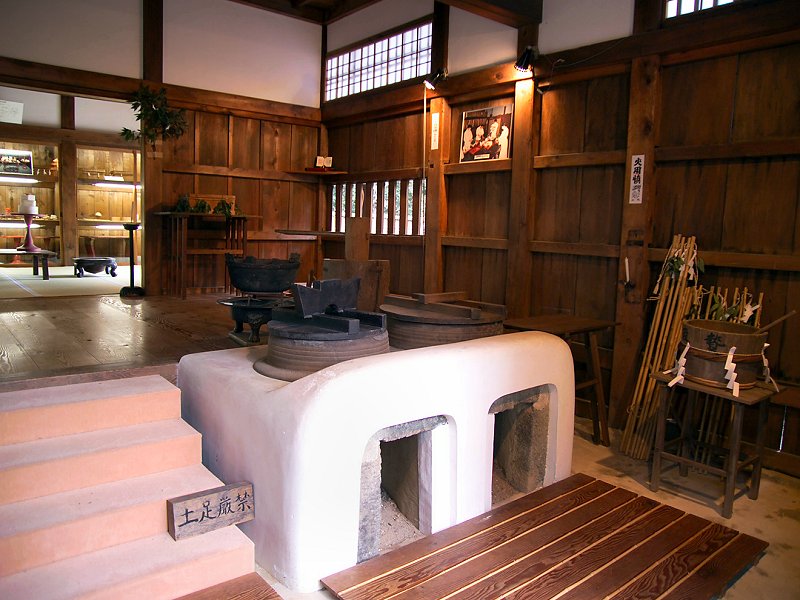 The traditional daidokoro - not something we're eager to re-create.
Like everyone else in America (or so it seems), we're remodeling our kitchen. When trying to decide on anything for a kitchen these days, we're faced with so many choices it's nearly impossible to decide the direction we want to take for style and finishes. With all the styles available, we decided early on to simplify and just concentrate on the basics: get appliances, layout the cabinets, wiring and lighting, and don't worry about the finishes and colors until we really need to. Another way to narrow down the daunting array of design choices is to determined what we don't want to do. Despite the design direction we're taking on the rest of the house, the traditional daidokoro Japanese style kitchen of the late Edo period is not something in which we have any interest in trying to re-create.
Some of the kitchen design decisions were made very early in the renovation project, since installing windows and re-building the utility room and old screen porch had a direct influence on where walls and appliances would end up in the kitchen. In order to make progress on the old screen porch, new appliances were purchased in the Fall of 2006 (and the dishwasher is still sealed in the carton) so we could get the refridgerator "cubby" built. With the fridge and a couple cabinets temporarily installed, the kitchen was largely ignored until late 2008. It was when I needed to figure out the exact location of the new kitchen window in the Fall of 2008 when I had to finally make some real decisions about the kitchen and start working on it.
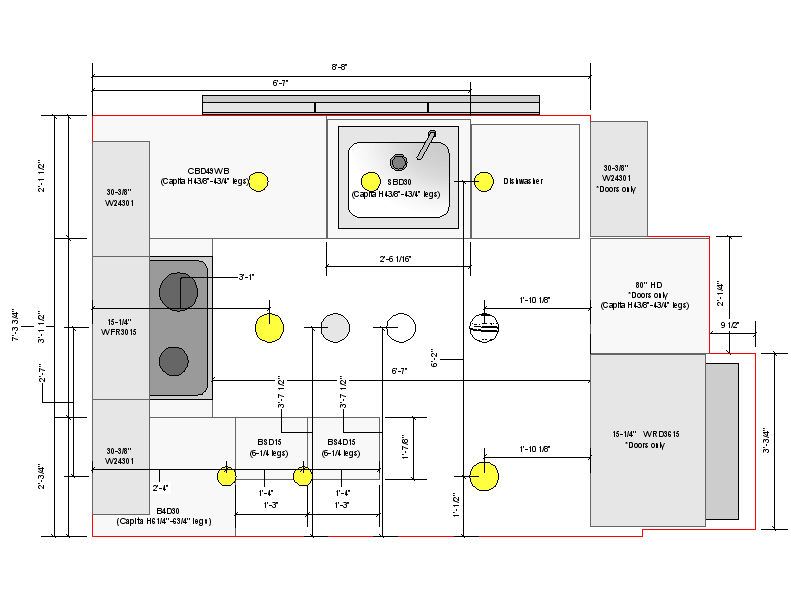 Kitchen plans (2 sheets).
We had pretty much determined that we'd go with stainless steel appliances, natural wood cabinet faces, and a dark grey or black countertop just to have some basis to work from, but that left many, many details to address. I guess we'd call it a contemporary or modern style if we had to label it, but mostly we're just interested in a well lit, functional kitchen that's not too "busy" looking. For cabinetry we selected all IKEA® "AKURUM" units, since the price can't be beat. The IKEA® cabinets aren't the same quality as solid wood custom cabinetry obviously, but if you just put them together and install them, they are pretty rugged. The trouble comes in if you do a lot of handling of the assembled units - those little particle-board fasteners they use can't take much tweaking of the case before they fail (I found this out the hard way, and had to re-assemble the free-standing pantry unit with glue and screws after I tried to move it alone one too many times). We haven't made the final decision on the cabinet doors, and I'm not too worried about it - we'll just pick something that's in stock for now. If we decide to get fancy later on, I can build my own doors without too much trouble.
Lighting the new kitchen has been a primary concern for both of us, since we've been living with our extremely poorly lit kitchen for so many years. As I'd come up with new lighting ideas and show them to the lovely bride, she became a little concerned that I was getting carried away (and if you look at the plans, you'll see there's a lot of lights in such a tiny room). My take on lighting a work area is to put in plenty of lights, then control them with dimmers and multiple switches. If there's "too much" light, just dim the fixtures down, or don't use all the lights all the time. It's certainly much easier to install abundant lighting when the walls and ceiling are open than it is to find that areas of the room need more light after everything is finished. An extra $10 for a recessed fixture here and there is no big deal - tearing into finished drywall and installing additional wiring when the room is done is not something I want to have to do.
The lighting we installed includes a basic CFL flush-mount ceiling fixture for general room light (which took a really long time to pick out - there's some awful light fixtures out there), five non-dimmed 4" recessed Halogen fixtures over the counters for task lighting, a pair of dim-able 6" recessed fixtures for ambient light (these are part of a circuit of recessed fixtures that will run around the perimeter of the living room as well), wall-switched GE® Xenon under-cabinet lighting which can also be dimmed at each fixture, and a loop of wall-switched LED rope light that runs around the inside of all the base cabinets. Now that the lighting is in and working, I've had no complaints from the homeowner about "too much" light - and in case of medical emergency, we've got better lighting than an operating room if we turn everything on at the same time.
Building the New Kitchen
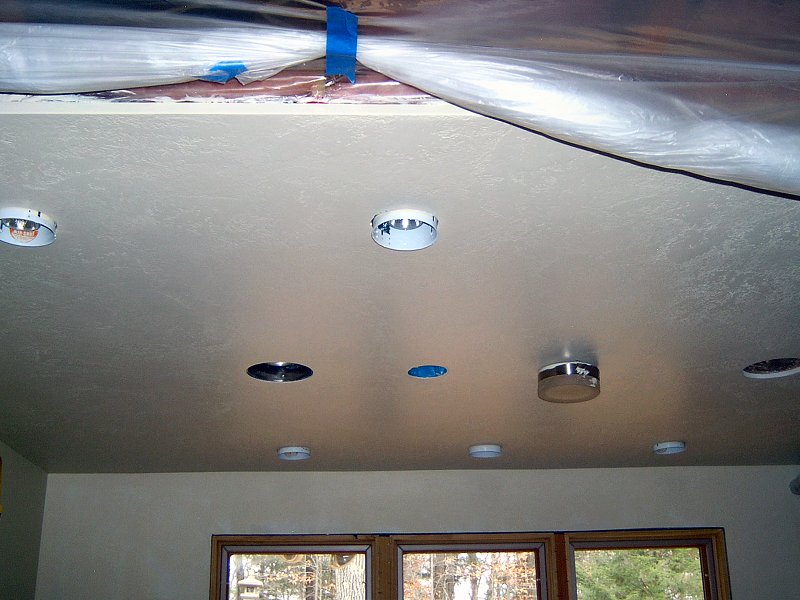
 The half-torn apart kitchen, ready to get the rest torn apart (8 photos).
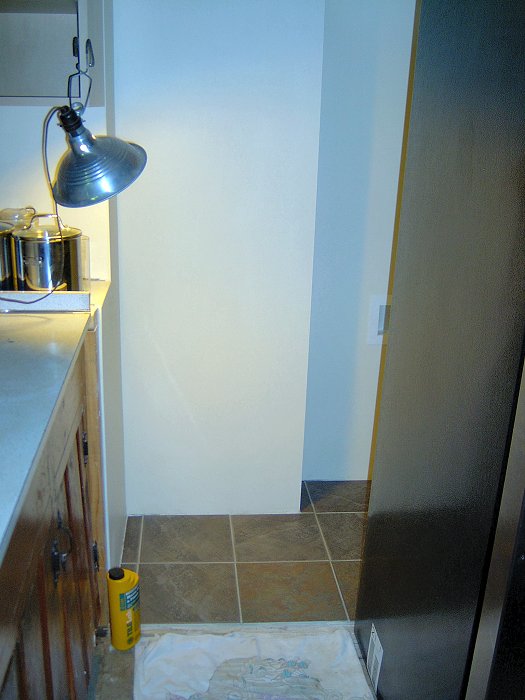
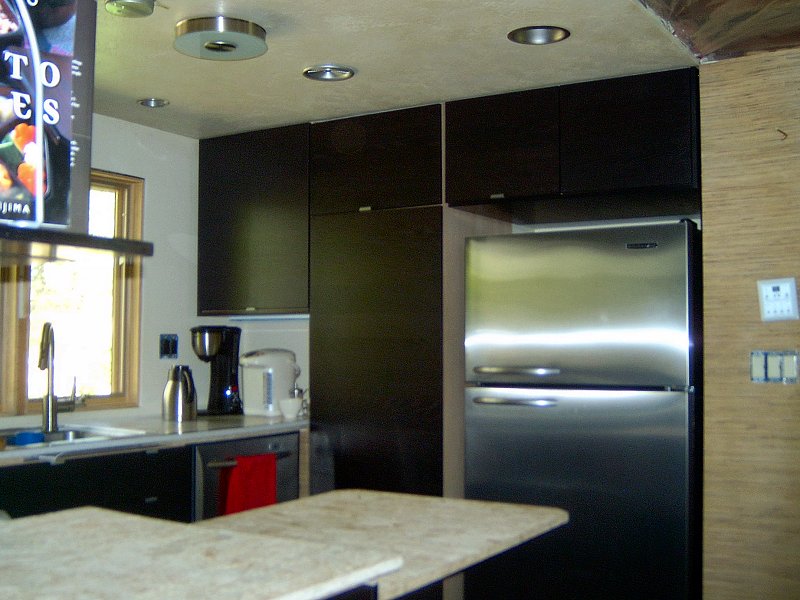
The Fridge "Cubby": Fall 2008
The first job, after a bit of planning work to get the window appropriately centered in the room, was to finish the East wall that
separated the kitchen from the utility room. I installed gypsum wall board (GWB), a few layers of plaster, then primed and painted. These
walls didn't get any texturing and glazing, since that entire wall will be covered with cabinets or hidden by appliances. The next bit
was to deal with the floor under the fridge "cubby". The floors in the kitchen (and the entire house, for that matter) all run downhill
from North to South at a pretty good pitch (about an inch for every 10 feet - scary), and I wanted to try and get them a bit closer
to level. After some discussion we decided to go with natural gauged Slate tile for the kitchen floor, but I didn't want to try and
put that stuff under the appliances and floor cabinets since it's so uneven. We picked some porcelain floor tiles with a color and
texture that closely matches Slate, then used those in all the out-of-sight areas to provide a smooth, maintenance-free floor covering
under all that stuff. The porcelain is also a lot easier to get level (and install in general) than gauged stone tile, since it's all
uniform thickness.
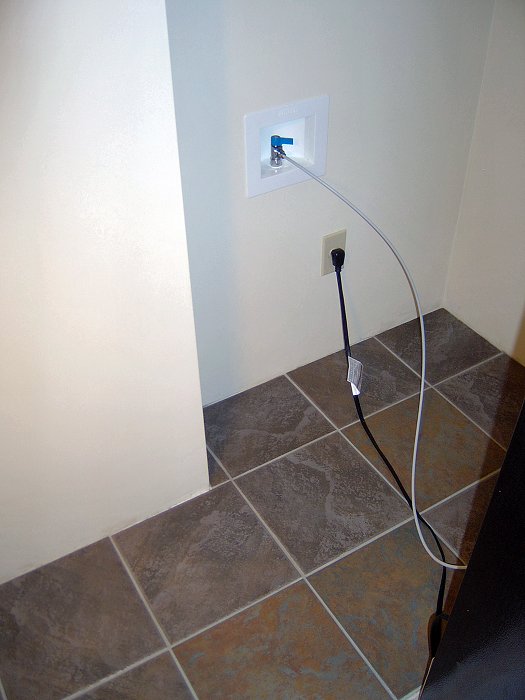
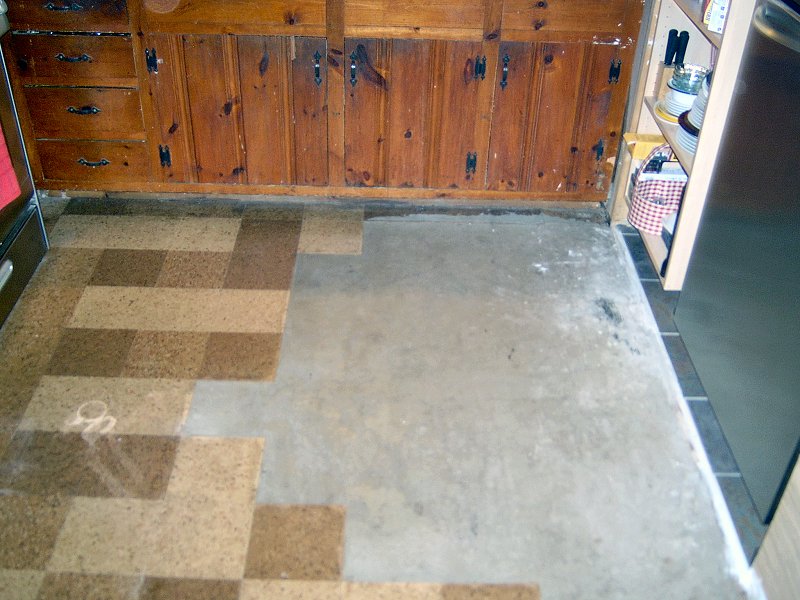
With the "cubby" floor and walls finished, we hung the wall cabinets for that space, put in the re-built pantry unit, and rolled the fridge into its permanent home. The next task would be the ceiling and walls, but we also had to deal with some plumbing issues before we got too far along. I had installed cross-linked polyethylene (PEX) tubing for all the water supply lines in 2006 when building out the utility room and working on the heating system under the house, but we hadn't done anything about the old cast iron waste lines at that time since replacing those would have required gutting the kitchen and bath. Now we were finally ready to do just that, so we set a date with the neighbor / plumber to remove the cast iron and install new waste lines and vent stacks. Most of the work would take place in and under the bathroom, but we also had to relocate the kitchen sink drain that went through the floor into the back wall, as well as move the main vent into the wall between the kitchen and bath. To prepare for plumbing, I stripped the T & G panelling off the remaining kitchen walls, then turned my attention to the bathroom for a few weeks.
Wall & Ceiling Framing: Winter 2008/2009
A few weeks turned in to a few months, with some delays in the plumbing, and then most of my efforts focused on getting the bathroom
in to semi-working order. We also took a relaxing trip back to the Midwest for the holidays and spent some long overdue time with both
our families. It was nice to get out of the house for a while and stop worrying about the projects for a couple weeks. When we returned
and went back to work, my next task was to deal with the old kitchen ceiling and ready the walls for GWB.
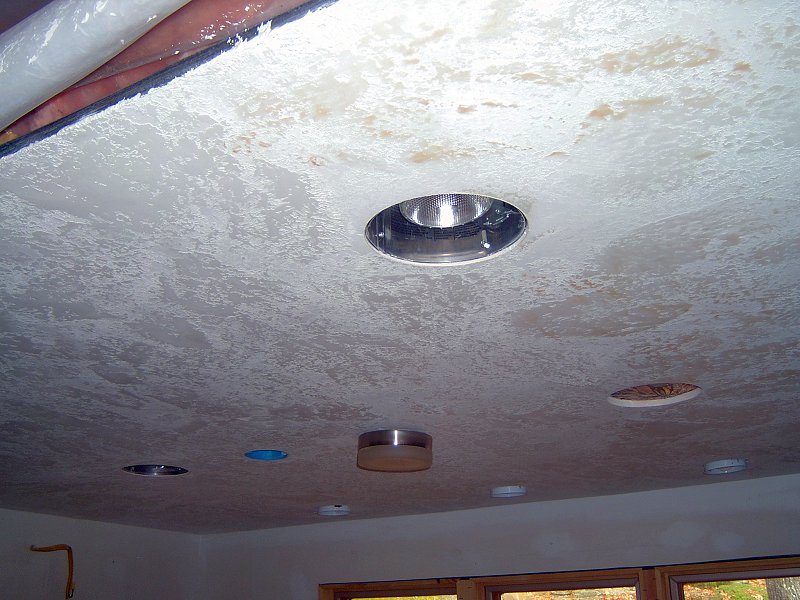
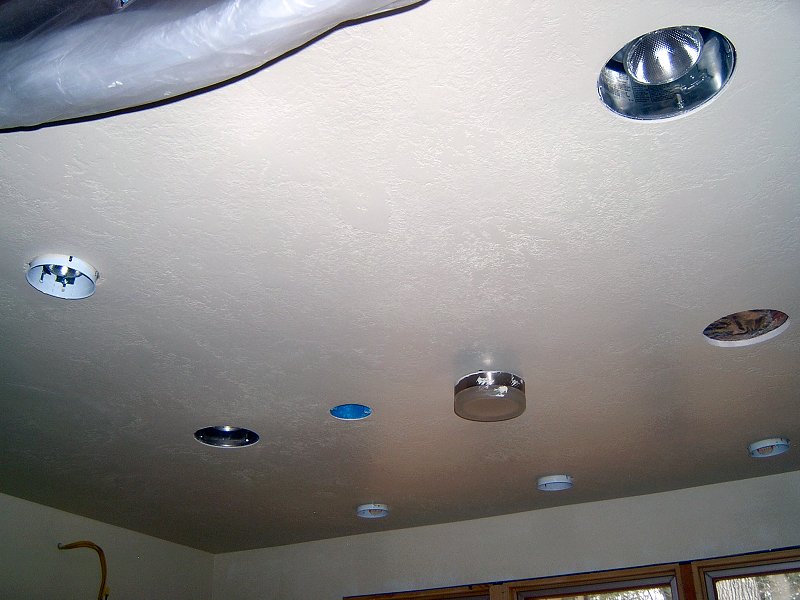
 Readying the kitchen ceiling and walls for GWB (5 photos).
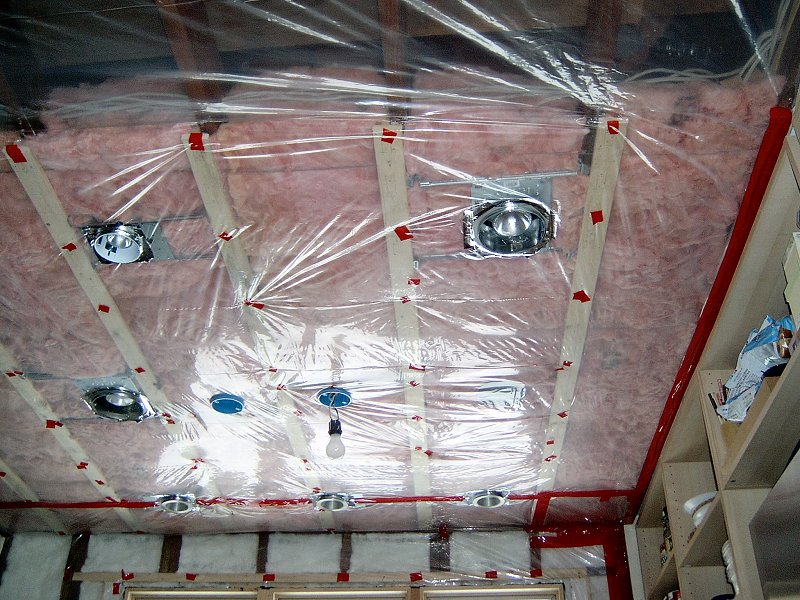
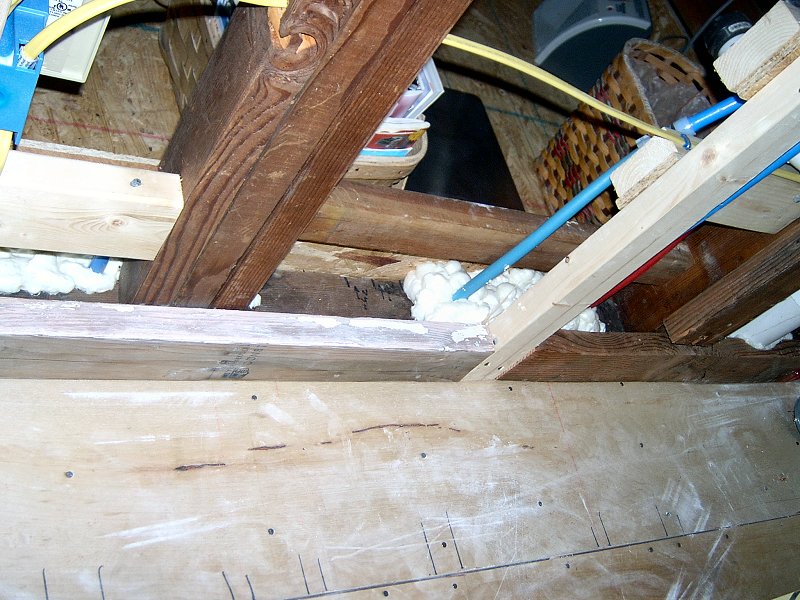
The first order of business was to get all the new wiring into the framing, and as mentioned earlier, there was plenty of lighting circuits to run, as well as a couple of circuits for multiple wall receptacles along the countertop. I had installed the new wiring circuits a couple years earlier when we installed the new service panel, but I had just left extra wiring for the circuits coiled up in the attic close to where I was planning to drop it into the walls. It was nice to finally get the boxes mounted and lose the extension cords hanging from the ceiling that we'd been using to run kitchen electrics. The homesote ceiling was removed and replaced with poly sheeting, then I insulated the back wall and got some poly over that while I figured out how to make a level ceiling for the kitchen without having to replace all the ceiling joists.
The ceiling was out of level to the tune of about 3 inches from one corner of the room to the other, and I didn't want to spend the money on a load of 10' 2x6 to attach to the sides of the existing joists, so I came up with a cheaper alternative. To level the ceiling, I used a bunch of inexpensive 1" by 3" furring strips that I attached to the existing joists to create a sort of drop ceiling support system that would hold the new GWB finish ceiling. To prep the strips, I attached a series of 6" long pieces of 1x3 perpendicular to the face of the long strips with screws and glue on 8" centers (they sort of looked like someone had cut a wooden ladder in half, except the "rungs" were 90° to the way they should have been, if that makes any sense). When the glue had dried, I then dabbed each "rung" with a bit of construction adhesive, and clamped the strip in place along the side / bottom of the joist. I'd level the strip along the length of the joist, then attach it with a couple more screws into the side of the joist through the "rung". Once the first strip was up and as level as I could get it, I worked on the joist next to it and used the first one to level the next until I'd gotten the entire ceiling furred down. I then installed and connected the light fixtures and electrical boxes, filled the joist bays with R-19 unfaced fiberglass insulation, and re-attached the plastic sheeting.
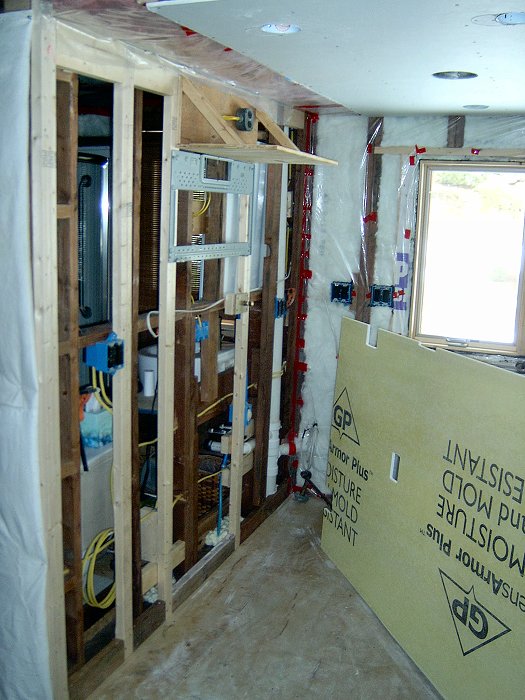 Inside the kitchen / bathroom wall (3 photos).
The wall behind the sink didn't need any special attention, other than some careful sealing of the vapor barrier around the wiring and plumbing penetrations. The wall between the kitchen and bath was a little more complicated, since there's a good amount of stuff going on in that wall. As mentioned earlier, I tried to minimize the amount of physical contact between the framing members of the kitchen side and those of the bathroom side to eleminate sound transfer. I still had to make some attachments so the thing would be solid, since it's going to support the microwave and wall cabinets on the kitchen side, and the oversized medicine cabinet and counter on the bathroom side. There's also a lot of blocking in the wall to support electrical boxes for receptacles and switches, as well as plumbing fixtures on both sides of the wall. We also placed the main vent stack within the wall cavity, which meant we had to make the wall thicker. To make the wall thick enough for the main stack, I used 2" by 3" framing members, glued and screwed to the existing top and bottom plates along the kitchen side of the wall. This had the added bonus of providing enough material at the top plate to properly anchor the top of the wall into a ceiling joist (since it was a non-bearing wall, I found it was just sorta flopping around when I stripped it, and the only thing that had been holding it up were a few 8d toenails through the bathroom acoustic tile furring strips).
Gypsum Wall Board (GWB): Early Spring 2009
With all the framing completed and hopefully all the wires and PEX in the right place, I was finally able to get some GWB installed
in the kitchen. The ceiling is covered with normal 1/2" thick paper-faced GWB, and will eventually get a textured, stucco-like plaster
finish. For the wall coverings, I tried a fairly new material from Georgia-Pacific called
DensArmor Plus®
![]() High Performance Interior Panels (also
known as "paperless drywall"). I'd never heard of the stuff until a few years ago when I was working on the entryway and grumbling
about dealing with the paper backing while making complicated cuts in standarad GWB. The lovely bride had apparantly over heard my
Yosemite Sam impression ("Rassin' frassin' drywall varmits...") and sent me a link the next day about some information that she'd found
on the 'net about this new paperless drywall stuff - chalk one up for the homeowner! This stuff is absolutely fantastic. The basic
concept is that mold thrives on moisture, and the paper backing on GWB holds moisture like a sponge. Take away the paper, and the mold
doesn't have anything to feed on, at least according to the GP propoganda. I didn't find any signs of the nasty black blight in the walls
while tearing down the bath and kitchen, but I figure why take a chance at this point. I was eager to try the stuff, so I picked up a dozen
4 x 8 sheets to use in the kitchen, bathroom and behind the laundry in the walk-in closet. I may end up using it for everything else in
the house, even if there's no plumbing in the walls.
High Performance Interior Panels (also
known as "paperless drywall"). I'd never heard of the stuff until a few years ago when I was working on the entryway and grumbling
about dealing with the paper backing while making complicated cuts in standarad GWB. The lovely bride had apparantly over heard my
Yosemite Sam impression ("Rassin' frassin' drywall varmits...") and sent me a link the next day about some information that she'd found
on the 'net about this new paperless drywall stuff - chalk one up for the homeowner! This stuff is absolutely fantastic. The basic
concept is that mold thrives on moisture, and the paper backing on GWB holds moisture like a sponge. Take away the paper, and the mold
doesn't have anything to feed on, at least according to the GP propoganda. I didn't find any signs of the nasty black blight in the walls
while tearing down the bath and kitchen, but I figure why take a chance at this point. I was eager to try the stuff, so I picked up a dozen
4 x 8 sheets to use in the kitchen, bathroom and behind the laundry in the walk-in closet. I may end up using it for everything else in
the house, even if there's no plumbing in the walls.
DensArmor Plus® does have a bit of a learning curve if you're used to dealing with normal paper-faced GWB. To begin with, it's more expensive: a 1/2" thick 4 x 8 sheet is about $12 here, whereas regular 1/2" stuff is about $8. It's faced with a very thin layer of fiberglass, so gloves, long-sleeves and a dust mask are highly recommened. It's heavy - a 1/2" sheet of DensArmor Plus® weighs about as much as a 5/8" sheet of standard GWB (or a 3/4" sheet of plywood). That might not sound like much, but the weight difference is enough to make solo handling of full-sized sheets nearly impossible. When hanging the stuff, great care must be taken with the counter-sink depth of the drywall screw heads - the fiberglass face is thin, and much less forgiving than paper if you've got the screw gun set a click or two too deep (you do use a dedicated drywall screw gun, right?). It's very easy to blow through the face so practice with a few scraps until you get the depth just right. Now for the good news. It cuts SO much easier than that nasty paper faced stuff that you'll actually look forward to hanging GWB! You still cut it the same as usual: score a line through the face, then fold and score the back... fold again and snap it in two. The better news is you don't actually have to cut the back with this stuff. Do the normal face cut and fold business, but then just fold it back and forth a couple times, then sort of close the face cut by folding the front back on itself and the backing will snap cleanly along your line. The first time I did this, quite by accident, I was shocked at how clean both sides of the cut were (try this with paper backed GWB and the paper just crumples and peels off, making a useless mess of the sheet). This method is especially nice when working solo, since I can make all the cuts from one side of the stack of material I've got leaning up against a wall, rather than have to pull each sheet into an open space so I can get at both sides for the cut (it doesn't take much room behind the sheet to work the fold back and forth enough to get the backing to snap). The other nice thing about cutting this stuff is there's no balled-up bits of paper hanging off the cuts after you dress the edges with a "sure-form" (you dress all your cut edges, right?). Finally, another thing I noticed was that I never changed the blade in my utility knife - I didn't even flip it around - and this was after doing 9 full sheets, including all the little cuts for electrical and plumbing. The fiberglass facing doesn't chew through blades the same way the paper does, or perhaps I should say it doesn't care if you use a dull blade on it the way paper does. All in all, I'm perfectly happy to spend an extra $4 per sheet to enjoy the ease of working with this stuff.
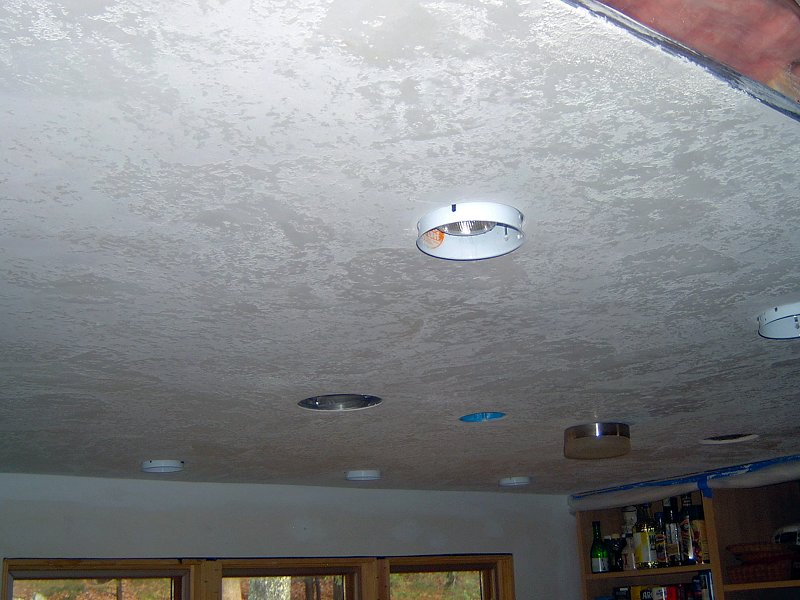
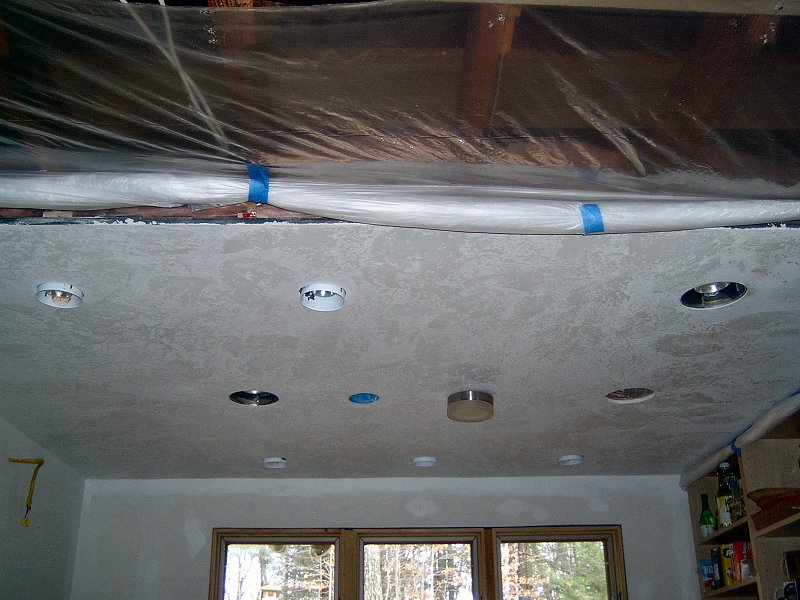
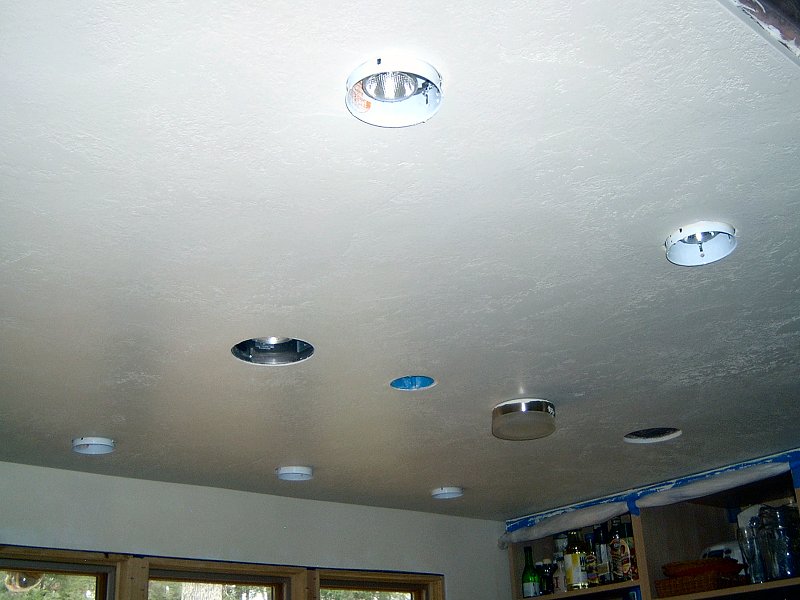
 Finishing the kitchen ceiling (12 photos).
Ceiling Finish & Wall Cabinets: Fall 2009
Once the GWB in the kitchen was up and I got the room back in semi-working order, I turned my attention back to the bathroom for the
Summer, working on the bathroom panelling for the walls and ceiling. I eventually got
back to kitchen work in the late Fall, after taken care of some odds and ends under the house before the weather got too bad. We
had spent a few hours last Fall going over the IKEA® kitchen catalog and figuring out which cabinets
were going to go where when we started tearing up the kitchen, and as Thanksgiving approached (with my brother and his family coming
for the holiday), I thought I'd pick up the cabinets then try to make a little more progress on finishing the kitchen before the holiday.
We had spent the Summer of 2009 with the microwave sitting on the living room floor, pots, pans and dishes in plastic bins, and wires sticking out of the walls in the kitchen for under cabinet lights. To clean that stuff up, I'd need to get the ceiling and walls painted so we could hang some wall cabinets to hold the microwave and perhaps empty a couple storage bins too. I'd like to get the base cabinets installed as well, but I don't want to move them around too much after they're assembled so I'll need to tile the floor before those can be set-up. The ceiling in the kitchen would get the same textured, faux-stucco finish as we'd already used in the genkan and bathroom. I made a big plastic tent to keep the dust out of the living room and the appliances in the kitchen, then used the same technique to apply the finish and paint as explained in the bathroom textured wallboard section. It went on over the course of a few days, then it was ready for primer.
The kitchen walls are going to get covered with tile, so I merely gave the existing first coat of joint compound a light sanding to get rid of any big bumps, then I primed the walls and ceiling all at the same time. The sections of wall below the counter top level were painted with ceiling white paint after the primer had dried, while the ceiling was given a coat of Valspar's Interior Latex Eggshell in "Drumskin", number 7003-10. The next day I applied a glaze to the ceiling with just a hint of Valspar's "Caraway Seed", 3005-9C in it for little darker tint to enhance the texture. The final step was to add a little of the original "Drumskin" paint to a fresh batch of glaze and apply it to a few spots as highlights. We really like the look of the texture and glaze combination, and while it may prove challenging to keep clean, it's certainly more interesting than the typical smooth, flat white ceiling.
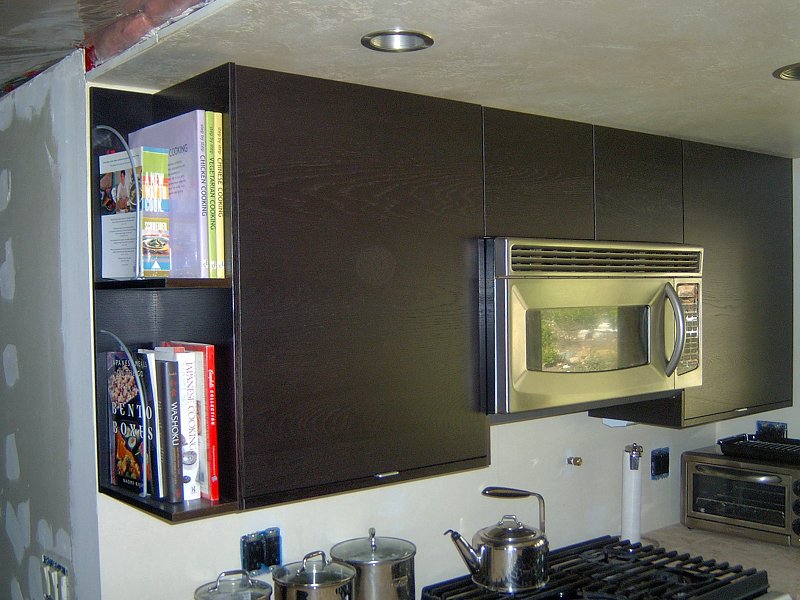
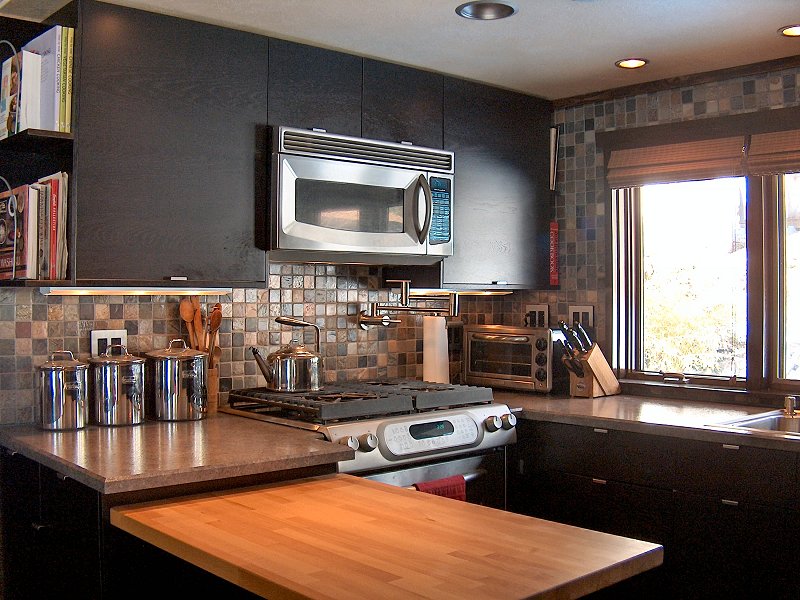
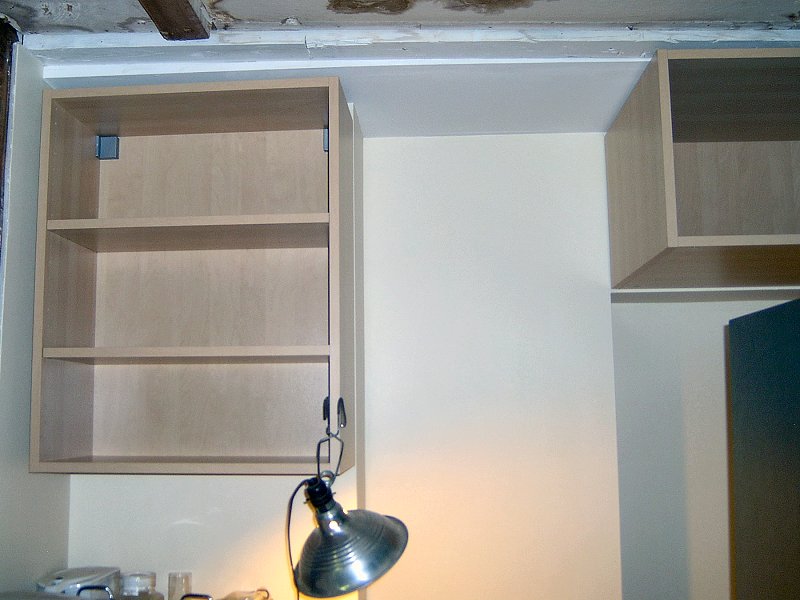
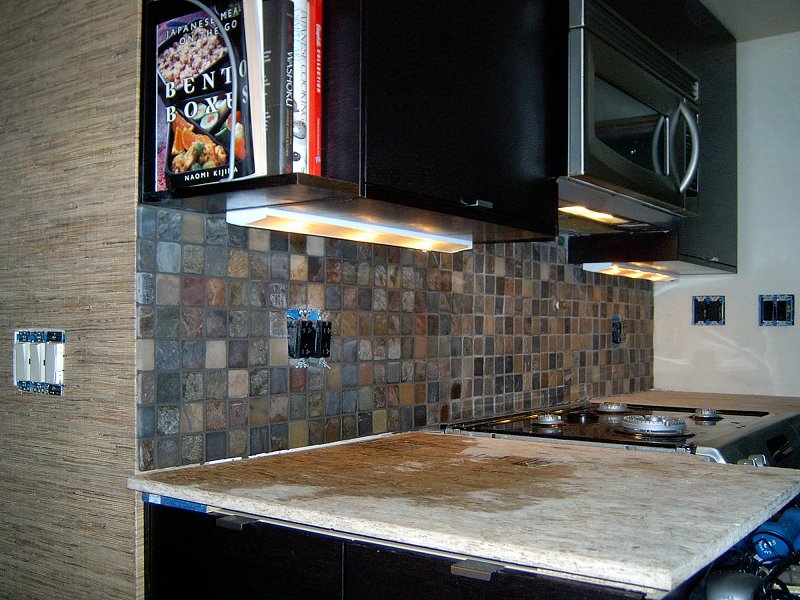
With the ceiling finished, it was time for wall cabinets. When designing the kitchen we opted for lots of light rather than lots of wall cabinets, so the largest section of the kitchen wall is occupied by the 6-foot wide window over the counter. That still left some wall space around the "fridge cubby" area (see above), and the wall between the kitchen and bath, behind the stove. For that area, we selected a 24-inch wide by 30-inch high cabinet for above each side of the stove, and a 30-inch wide by 15-inch high cabinet for directly over the stove to hold the microwave. I had to do some "customization" of the cabinet over the stove (I shortened it by about 4-inches) to allow adequate clearance between the microwave and the cook top, as well as do some cutting to make space for vent ductwork and electrical connections inside the cabinet. I also did a little extra work when assembling all these cabinets by sanding off the finish with some 60-grit paper between all the joints, then I glued the joints during assembly (in addition to the fasteners supplied by IKEA®). To attach the backs, I used glue and medium-crown staples from a pneumatic stapler, instead of just the little brad nails that come with the cabinets.
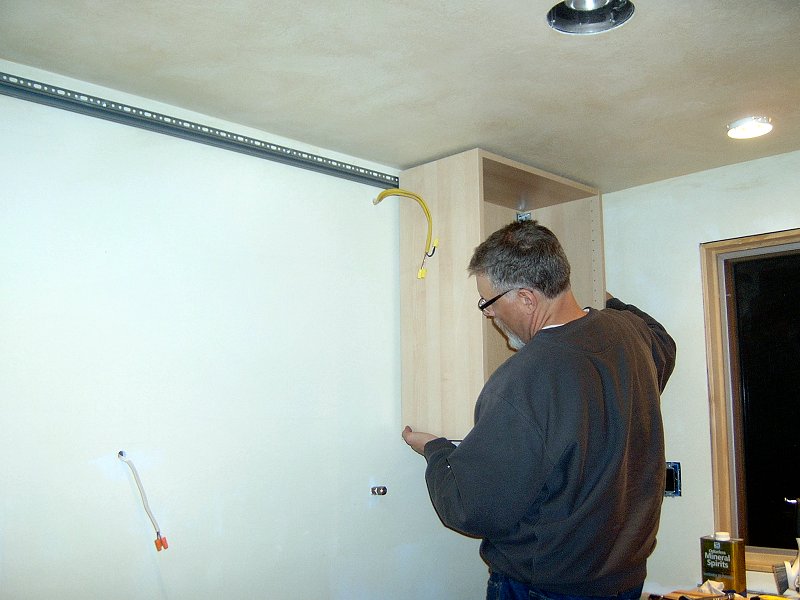 Hanging wall cabinets (6 photos).
I already had marked the walls with layout lines for height and spacing of the cabinets when I finished installing the GWB. After each coat of paint, I'd refreshed the lines, so now it was a simple matter of figuring out where the hanging rail would mount that holds up the cabinets. Rather than try and measure, I found it much easier to just hold the cabinet in place, then mark the wall where the mounting hardware would land. Once the 6-foot long rail had been shortened by a few inches, I attached it to the wall with 1/4-inch by 2-inch long lag screws. When building the "thicker" wall, I had added a 2 x 6 along the top so I didn't need to worry about finding studs or using wall anchors. I installed a fastener about every 12-inches, and we were ready to hang cabinets. Between the play in the fastening rail hardware and the large mounting holes in the cabinet, there's about 3/4-inch of "wiggle room" to get the height just right, so the once the rail is up hanging the cabinets is very easy. Once the two tall cabinets were loosely fastened to the wall (and the hardware in place between them for the center cabinet), I hung the center cabinet, aligned it with the centering marks on the wall, and tightened it down. I then slid the side cabinets up against either side and snugged up the fasteners for those.
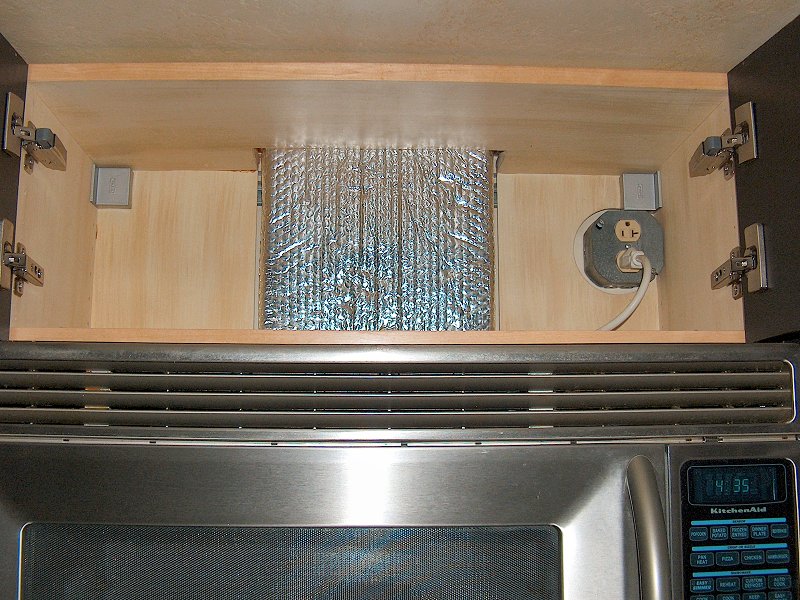
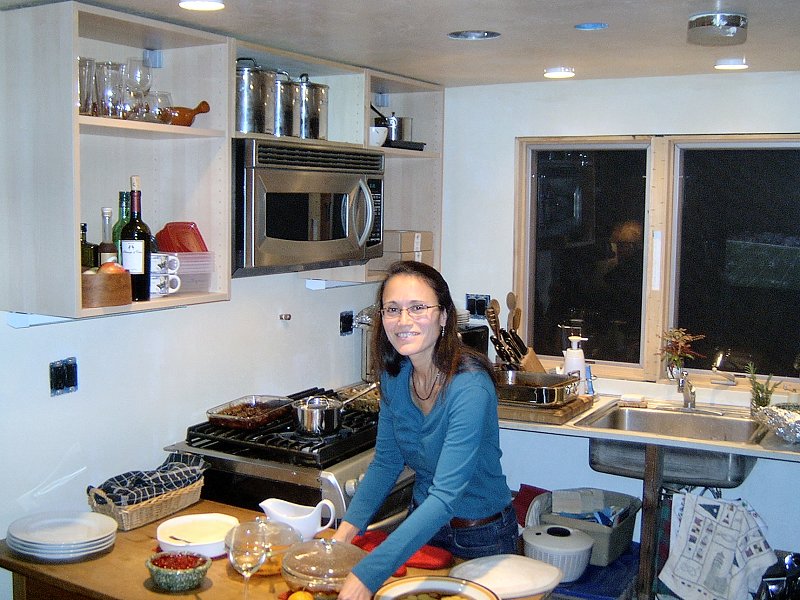
Next I attached the microwave mounting plate on the wall, which was done with the same 1/4 x 2-inch lags, and cut a hole in the ceiling for the exhaust vent duct. Again, knowing ahead of time what I needed behind the drywall made this installation very simple, as I'd already run a pair of vertical studs for mounting this unit when I'd built the wall. With some help from the lovely bride, we lifted the microwave into place and snugged up the hardware. Everything fit nicely the first time, and we finally got our microwave off the living room floor. The last bit was to mount a couple 24-inch GE® Xenon hard-wired under-cabinet light fixtures under each of the tall cabinets, and we were ready to make Thanksgiving dinner!
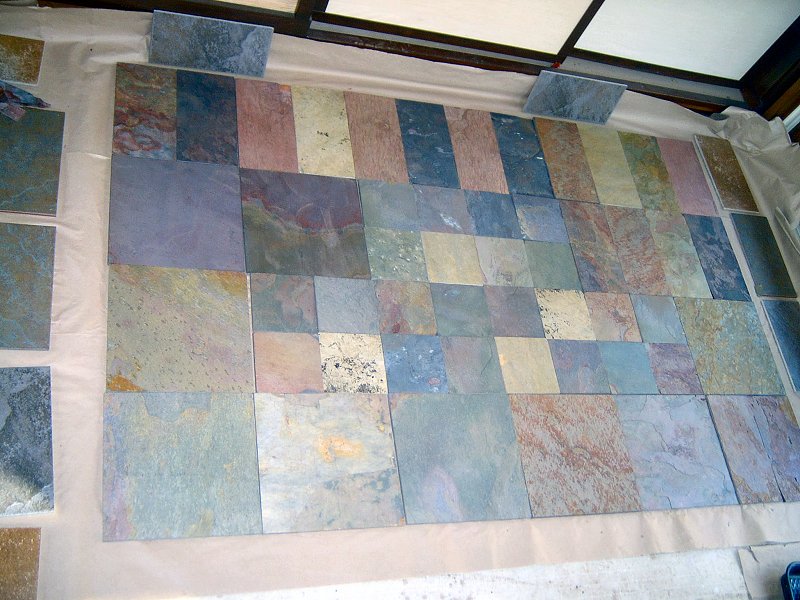
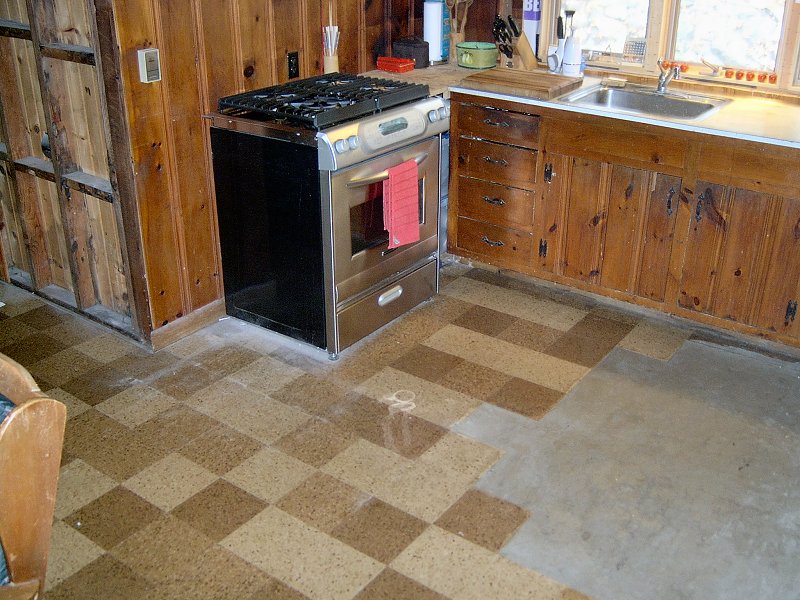
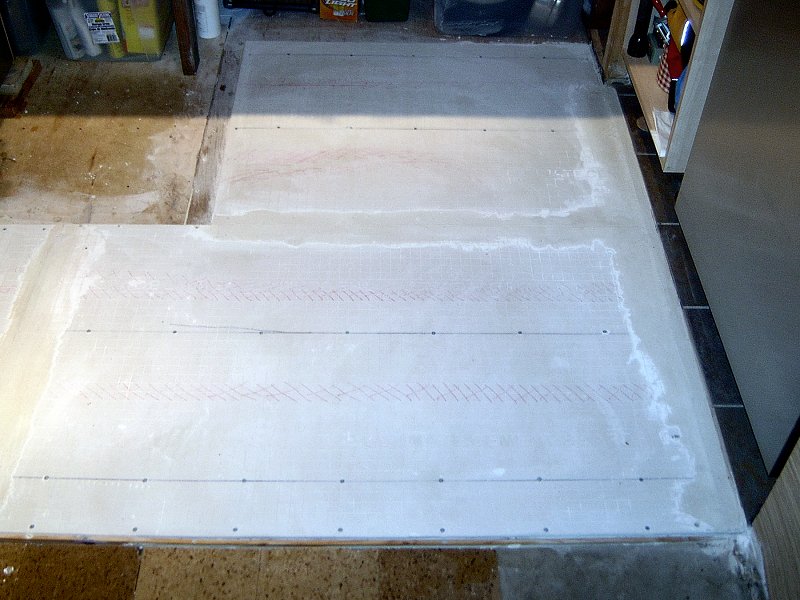
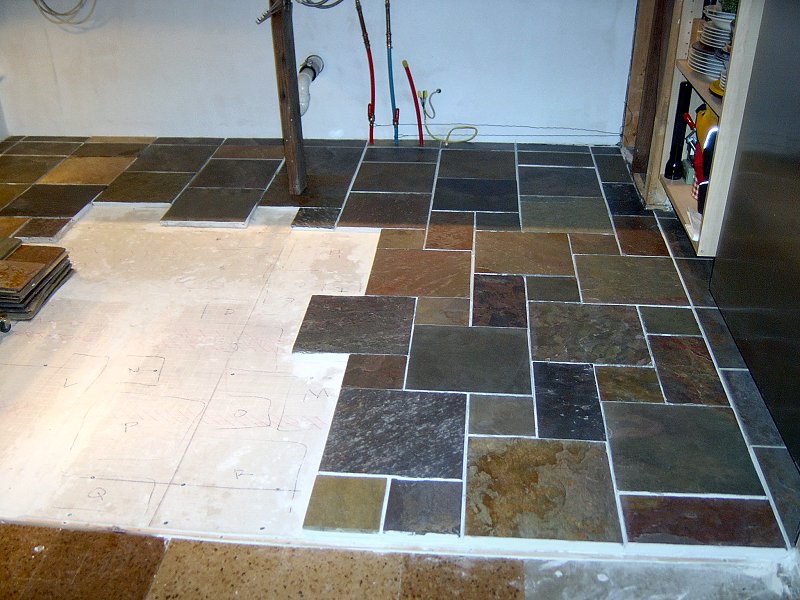
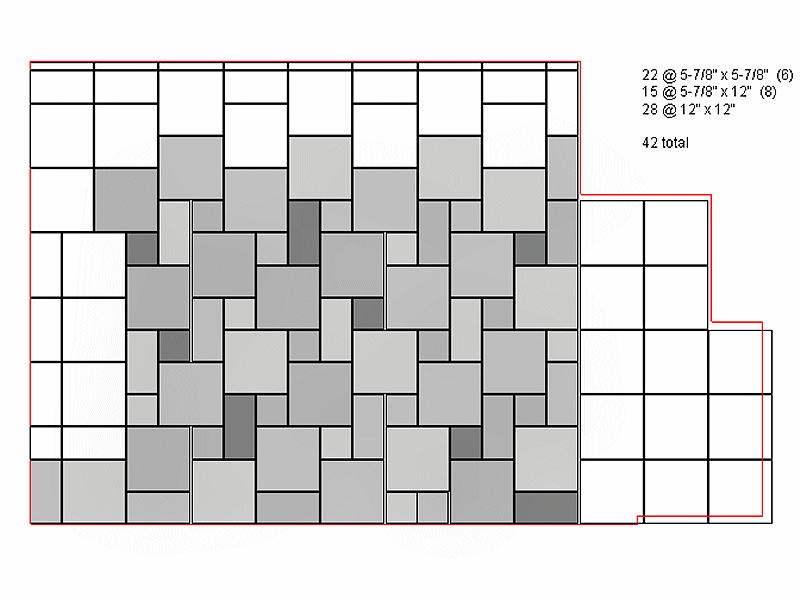 The Floor Tile Pattern.
Tile Floor Installation: Winter 2009
With the Vanagon full of the rest of our IKEA® kitchen cabinets and hardware, getting the tile floor
down so I could get those cabinets installed was the next kitchen project. As discussed above when finishing the 'fridge "cubby", we
selected a "slate look" porcelain floor tile to run around the perimeter of the room underneath appliances and base cabinets, but the
main part of the floor would be gauged Indian Multi-color Slate. I wanted a semi-random look for the floor tile pattern, as opposed
to trying to maintain perfect grout lines in the floor for a straight criss-cross pattern. After browsing some patterns on-line and
in tile books, I couldn't find anything I that really appealed to us, so like the genkan, I designed my own
pattern to work from for the kitchen.
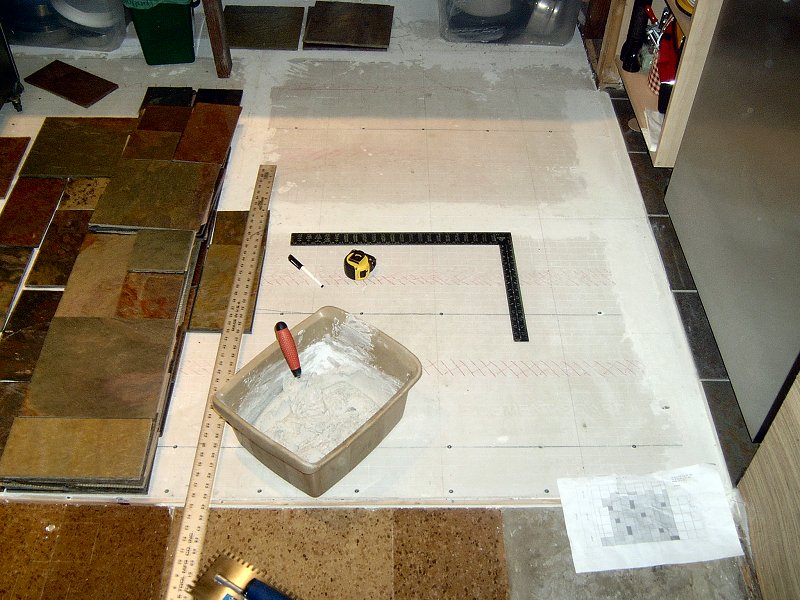
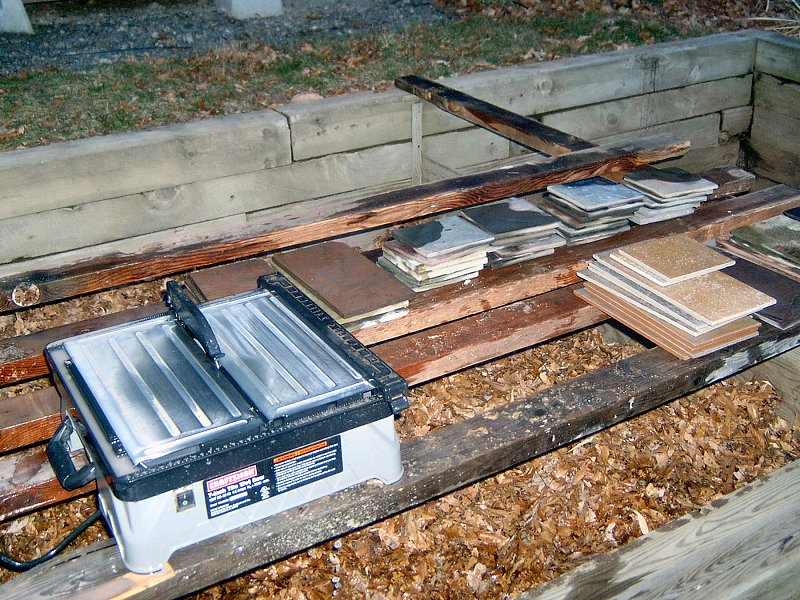
Once the pattern had been determined, I could figure out how many tiles I'd need to put together the pattern then start the floor prep work. First I purchased the tiles, which required a little trial and error - Home Depot and Lowes both carry multi-color Slate for about the same price, but Home Depot's Slate comes from China and after looking through a few boxes in the store, only about half of each box were useable tiles. The rest were either in pieces, or flaking apart very badly. The Indian Slate from Lowes looked to be in much better shape, and Lowes also carries pre-cut boxes of 6-inch square tiles, which would save me a good deal of time at the wet saw (even though I'd still need to trim the 6-inch tiles down to 5-7/8-inch square to allow for grout). I bought all the tiles according to the plan, plus an extra box of both the 6-inch and 12-inch tiles to allow for breakage and just plain ugly tiles, then set up the wet-saw.
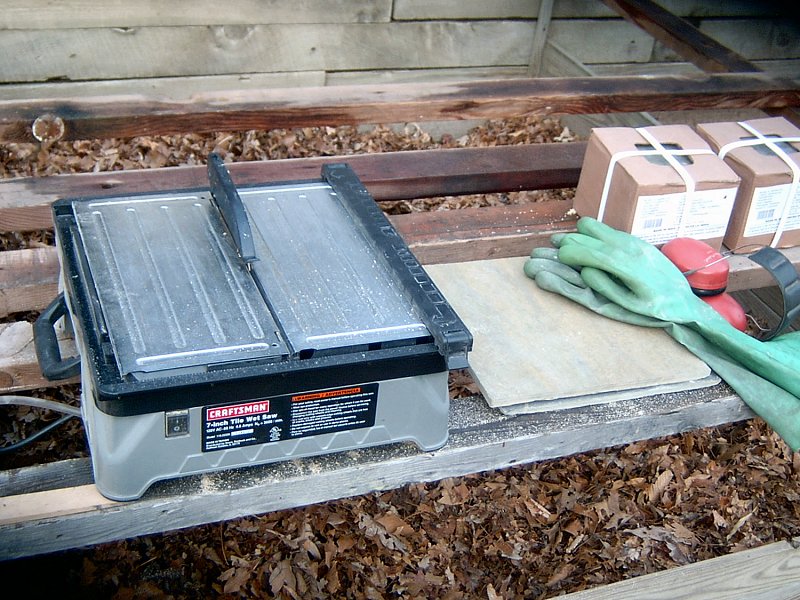 Tile cutting (2 photos).
Cutting & Cleaning Tile
I probably could have saved a few days of outdoor work if I'd purchased the tile from an actual tile store, but a box of 10 Slate tiles
from Lowes cost about the same as a single slate tile from the tile store - I'm not in that big of a hurry. The problem was going to be
the weather, since el-cheapo Slate is a mess right out of the box so all the tiles would need to get cleaned and rinsed before I could
think about installing it. Also when I cut a tile with the wet saw, that applies a fresh coat of mud to the tile as it's cut. Very messy
business, and not something I was looking forward to doing in the snow. Luckily we were enjoying a fairly mild winter so far, so with
the weather in the upper 40's I set up the saw on a few old 2 x 4's over the compost bins, and started cutting. I set the saw-fence to
5-7/8-inches, then cut all the 12-inch halves first (plus a few extras), then ran through the 6-inch tiles on 2 sides to trim those down
to 5-7/8-inches square. By cutting all the tiles slightly undersize, I'd have enough space in between the tiles to allow a 1/4-inch grout
line when they're installed. Once the tiles were all cut, I washed them all in a mortar tub with a little dish soap and a natural bristle
scrub brush to remove the cutting slurry, and gave them a good rinse. I did the cutting and washing in the morning, then laid the tiles
out over the compost bins to let them drip-dry a bit while I worked on the rest of the floor prep. Each evening, I'd bring in that days
batch of cut and cleaned tiles to allow them to finish drying inside the house.
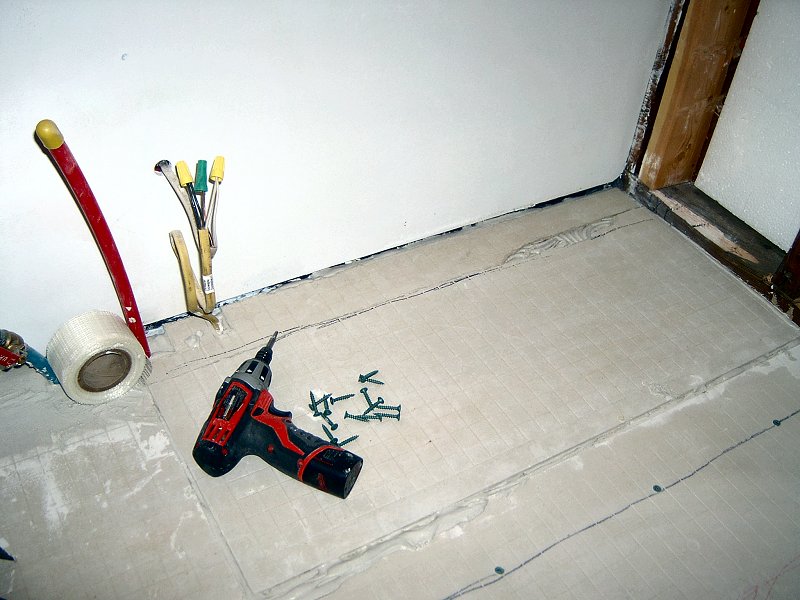
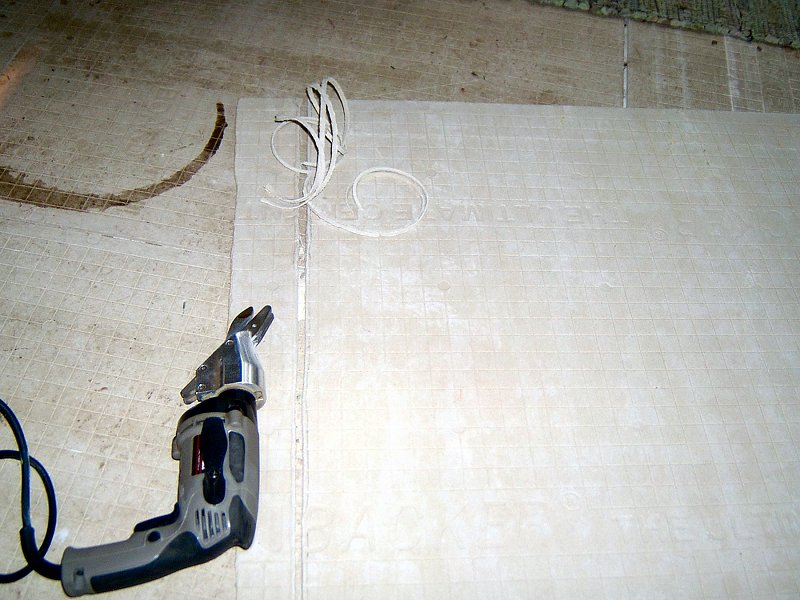 Installing HardiBacker® (11 photos).
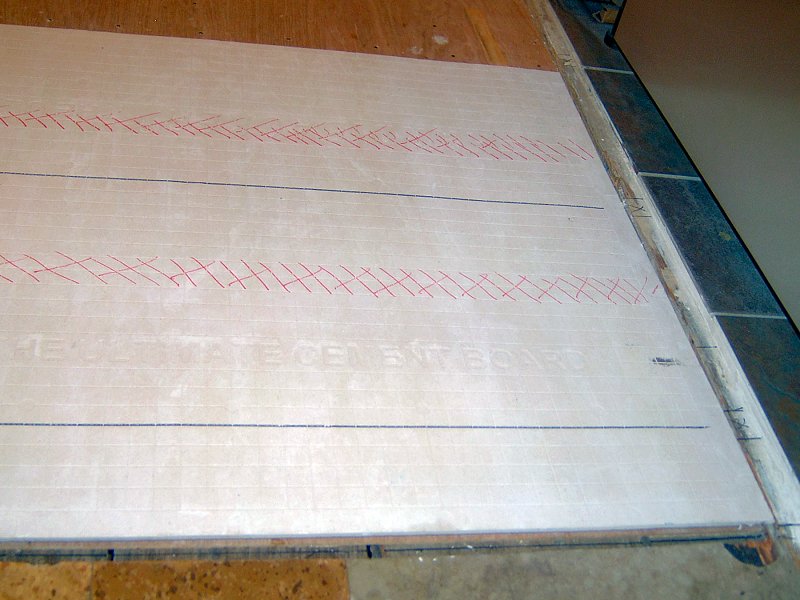
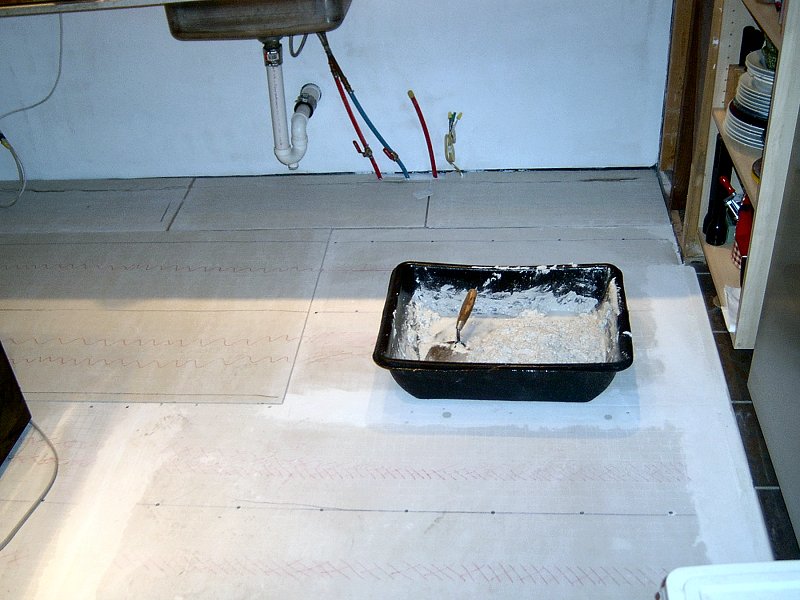
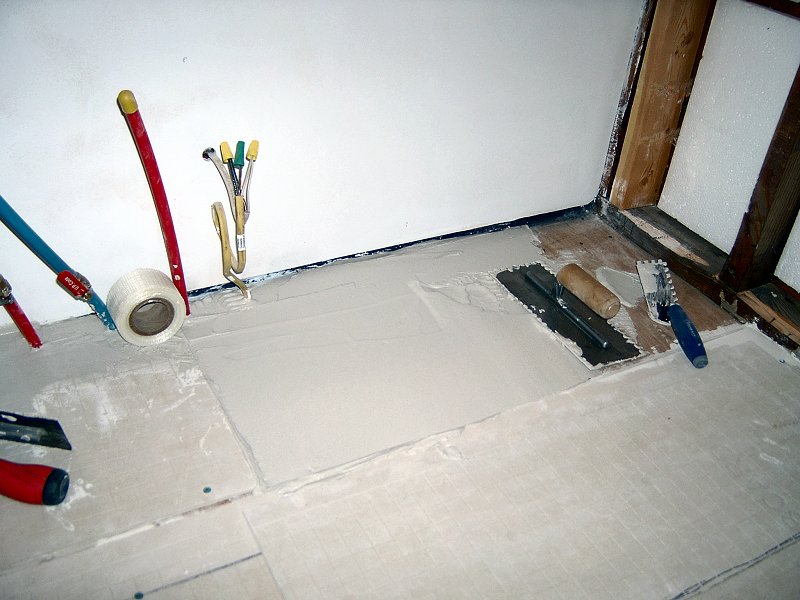
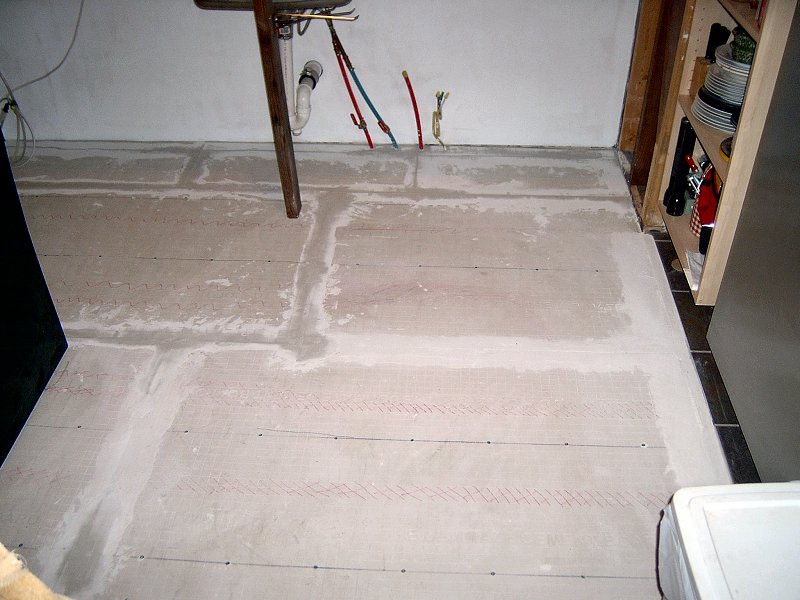
Installing Tile Backer-Board
After I'd cut a batch of tiles in the morning (I simply didn't have enough room outside to spread them all out at once, so I had to do
them in batches), I'd spend the rest of the day inside getting the floor ready for tile installation. I'd already removed the old
linoleum tile and 1/2-inch plywood substrate from the kitchen floor when we first tore the room apart, and put down layer off 1/4-inch
Luan plywood with subfloor adhesive and ring-shank nails to give us something even to work from back in the Fall of 2008. The next step
was to install HardiBacker® tile backer board on the floor, as well as get some
sealer on the tiles once those were dry.
As I'd already done with the siding, I used the Porter-Cable cement board shears to cut the HardiBacker® to size (no nasty silica dust with the shears), then attached the tile backer to the floor with Buildex Backer-On™ 1-1/4-inch square-drive screws. Because the floor is way out of level, I also did a little extra work to try and bring it up a bit closer to level when installing the backer board. Rather than just spread a "normal" layer of thinset on the Luaun with a 1/4-inch x 1/4-inch notched trowel then screw the backer down, I first installed a screws in the subfloor every 6-inches or so, but left the screw heads sticking up about a 1/2-inch to provide spacing under the backer for mortar. If I'd just tried to pile a bunch of mortar under there without the screw "spacers", it all would have squished out the edges of the board when I put in the hold-down screws. It was fussy work, but I thought it would be a lot easier to deal with trying to level the floor when installing the backer boards, rather then when working on individual tiles later in the project. I still ended up having to use extra mortar on the tiles along the "low edge" of the floor, but pre-leveling the backer board certainly helped.
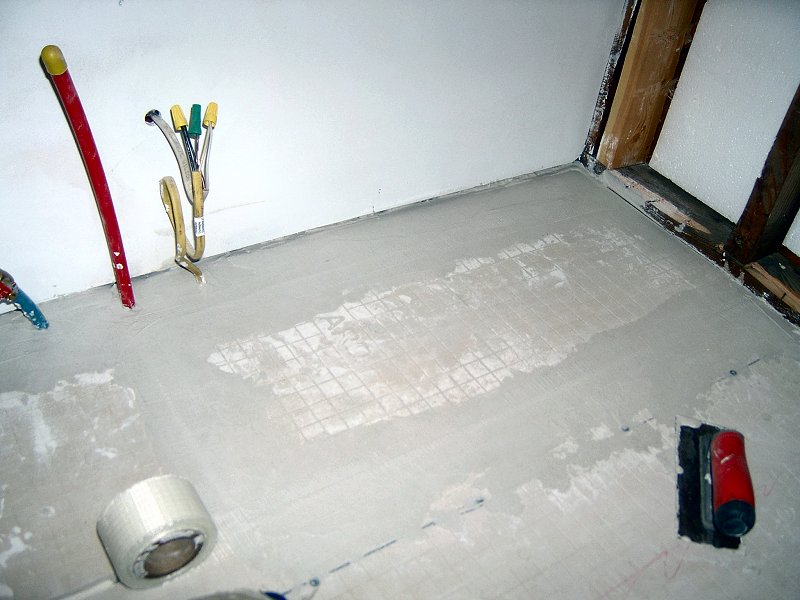
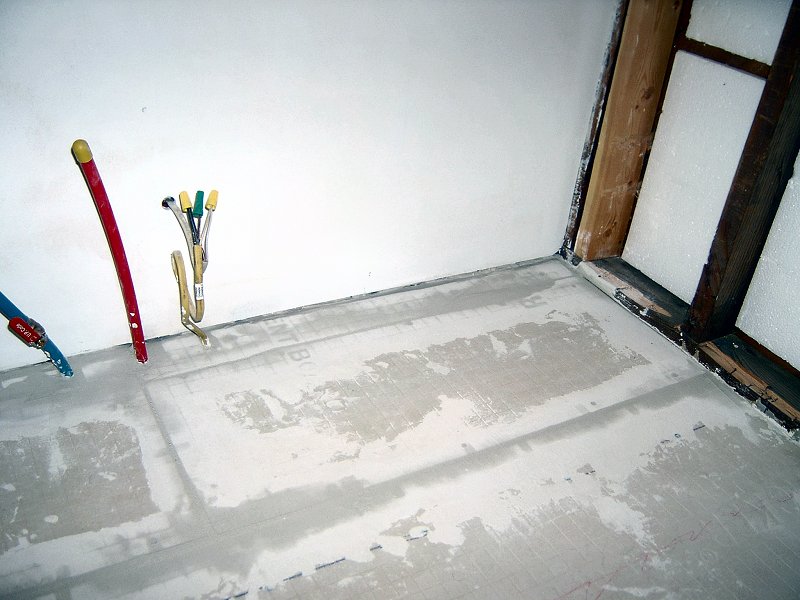
 Pre-sealing the tile (2 photos).
Pre-Sealing the Tile
Once I had a few sheets of backer board down and had taped the seams, I turned my attention back to tile prep. Slate tile is very
porous stuff, so before I could start installing it I wanted to pre-seal all of it to help prevent mortar and grout from getting
stuck in the tile face during installation. I spread the tile out on some kraft paper rolled out in the genkan
floor (again working in batches since some of the tile still needed to get cut and cleaned, and I only had so much space to work with),
then applied a couple coats of TILELabs® SurfaceGuard Penetrating Sealer, made by
Custom Building Products
![]() . The Penetrating Sealer goes on
very easily - just spray it on, give it a wipe with a tile sponge to remove any excess, then leave it be to dry for a couple hours. It
soaks in and doesn't change the color much, but it helps seal the porosity and readies the tile for the next step. After a couple coats
of Penetrating Sealer, I then applied three coats of TILELabs® Matte Sealer & Finish. The Matte Sealer is brushed on with a sponge,
and allowed to dry a couple hours between coats, then over-night after the final coat. The Matte Sealer does darken the tile a bit, and
leaves a very nice low-sheen finish on the surface that's easy to wipe clean with a damp sponge.
. The Penetrating Sealer goes on
very easily - just spray it on, give it a wipe with a tile sponge to remove any excess, then leave it be to dry for a couple hours. It
soaks in and doesn't change the color much, but it helps seal the porosity and readies the tile for the next step. After a couple coats
of Penetrating Sealer, I then applied three coats of TILELabs® Matte Sealer & Finish. The Matte Sealer is brushed on with a sponge,
and allowed to dry a couple hours between coats, then over-night after the final coat. The Matte Sealer does darken the tile a bit, and
leaves a very nice low-sheen finish on the surface that's easy to wipe clean with a damp sponge.
 Installing the kitchen tile (8 photos).
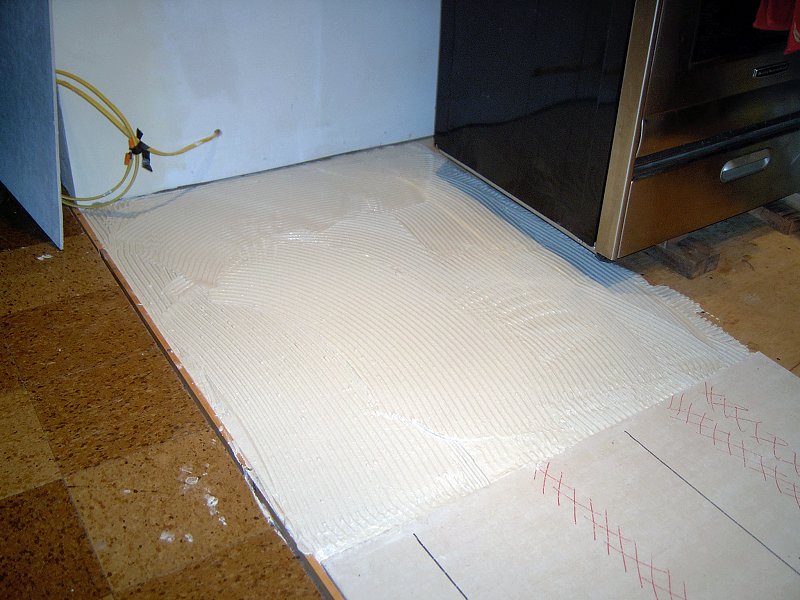
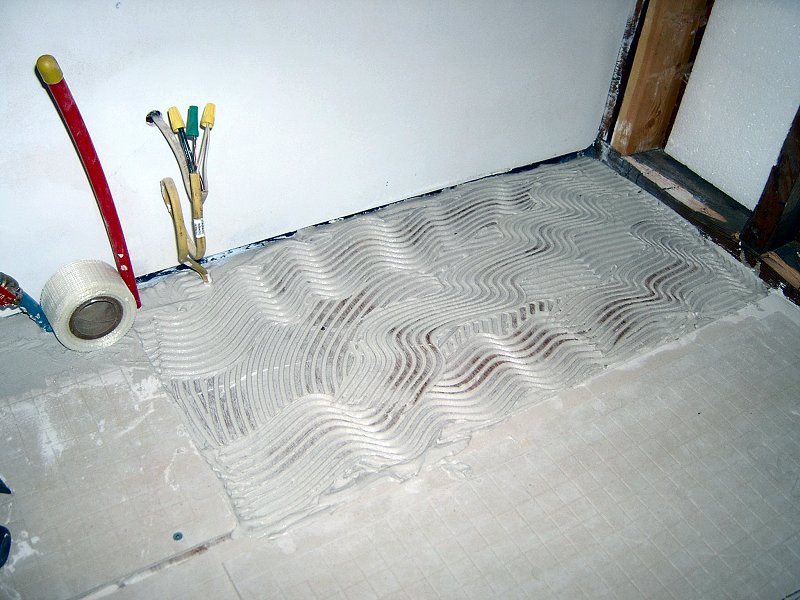
Installing the Tile
Tile installation started with the selection of a few tiles to go along the border between the "main" kitchen floor and the
porcelain tile that was in the "fridge cubby" area. The floor took a bit of a step in this area, since this is where the main house
connected to the old screen porch. The tiles along this border ended up with about 3/4-inch of mortar between the tile and the backer board,
while there was only about 1/8-inch of mortar under the part of the tile the was directly adjacent to the porcelain tiles, due to the step-down.
It was a little tricky, but with a stiff mortar mix I was able to get this first set of tiles in place and fairly level. Because there was so
much thinset under the tiles along this edge, I thought it best to leave these first few tiles to set before continuing the installation.
That evening when the lovely bride came home from work, we went through the rest of the tiles and figured out which colors and textures would go where. A lot of the floor will be covered with cabinets or appliances, but since we're not planning to use toe kicks under the cabinets, most of the tile will still be somewhat visible. After a bit of trial and error, we arrived at a final color layout for the main part of the floor, and I continued installing tiles the next day. Because the floor was still a good bit out of level, I was using a lot of mortar under the tiles at the living room side of the floor. My main concern was to get the individual tiles level, while trying to avoid big steps from one tile to the next in the areas where we'd be walking when the floor was finished. I also wasn't too worried about maintaining perfect 1/4-inch grout joints so just lined up the tiles by eye as I laid them, rather then using little grout joint spacers. It would be nice if the joints were perfect, but the Slate has such a variety of textures from one tile to the next, I kind of like the varying grout joint width to go with the imperfect surfaces of the tile.
Laying the Slate took quite a bit longer than working with porcelain, since each Slate tile needed to be "back buttered" and fussed around with quite a bit after the thinset had been spread on the floor. I was also working with pretty small batches of mortar, since the stuff would dry out quickly when working on the heated floor. I realized about half way through the project that I'd been using the wrong mortar too - I had a few bags of white thinset that I'd been using for the tiles, and I'm not sure why. I'd purchased the white mortar to use when attaching HardiBacker® to the subfloor, and just got excited to install tile and used the white for that too - I could have saved a good deal of time by using grey thinset instead, since I had to carefully clean the bright white thinset from the edges of each tile as it was installed. If I'd been using gray mortar, I probably could have just left all but the biggest chunks alone since I'd be applying grey grout. Ah well, when I needed more mortar for the kitchen I purchased the grey stuff and things moved along a little quicker.
 Grouting the tile (2 photos).
After a couple days of plodding along on the Slate, I decided to work on some of the porcelain tiles along the back wall. Each day I had to try and figure out what sections I could work on, and still keep the kitchen useable that evening to make dinner and clean up. On the last day however, I had to un-hook the stove and get that out of the room, so we had take-out that night. After six days, all the tile was down and we were ready for grout.
Grouting the Tile
After giving the floor a day to fully cure, I started the messy business of grout work. I used Laticrete®
1500 Sanded Grout, consisting of two parts #1524 "Natural Grey" and one part of a darker grey #1542 "Platinum" to get a dark grey
grout color, mixed in very small batches (like the Thinset, the grout would dry out fast working on the heated floor). Grouting is tiring work,
with all the shoving and scraping of a pile of mud around on the floor, but I got it all applied in a day. I finished it just in time
for the home owner to arrive home from work (which was the plan). Rather than try and wipe the
floor clean using a sponge in a bucket, I kept three sponges in constant rotation - me on the floor taking a swipe with each side of the
sponge, and the lovely bride stationed at the sink rinsing and wringing sponges and handing them back to me. It took about a half an hour
of this carrying on to get up the majority of the grout from the face of the tile. After all that pre-sealing business, I wasn't
convinced it had done any good. The tile had dried grout in every minute nook and cranny, and the damp sponge wasn't doing anything to
take it off. Since I'd never grouted Slate tile before, perhaps the pre-sealing had helped and I just didn't know any better, but I
wasn't impressed.
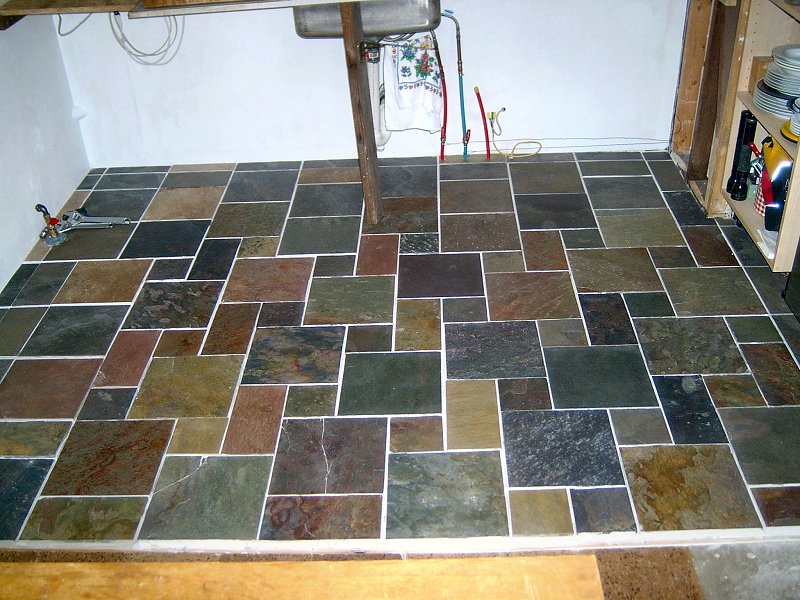
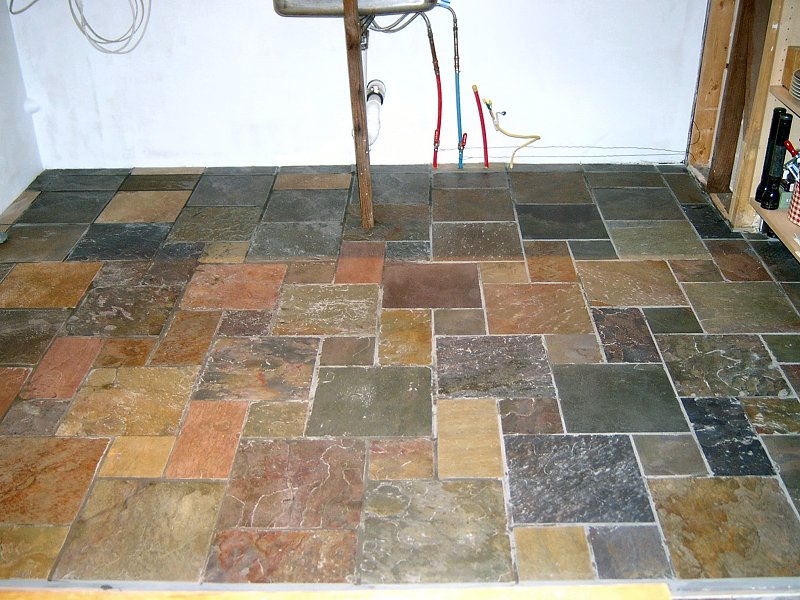
 The finished floor.
To remove the remainder of the grout that was imbedded in the tile face, I turned to some heavy duty cleaner in the form of Sulfamic Acid crystals. The stuff is dissolved in warm water, then applied to the tile with a nylon brush, allowed to sit for a minute or two, then wiped up with a damp sponge. You're supposed to wait ten days for the grout to cure before using the acid... I waited two. You're supposed to use a nylon brush... I used a stainless steel one. And a putty knife. And an awl. I won. I spent an entire day going over the floor, one tile at a time, picking out bits of grout and letting the acid dissolve any remaining haze. It all cleaned up nicely, but what a pain. The good news is I learned that grout must be cleaned off of the tile almost as soon as it's applied - On the porcelain glazed tile it wiped right off even after a few hours, but with the Slate stuff I shouldn't have waited at all. After the acid cleaning the tile was looking a lot better, but I did need to go back and touch up a few spots with additional grout where I'd been a little too enthusiastic with the wire brush and putty knife. The second time around I was very careful with how much smearing around I did, and cleaned the tile immediately after applying the grout. Much easier. I gave the floor a couple more days to cure after the second grout application, then went over the entire thing with two more coats of SurfaceGuard Penetrating Sealer, followed by three coats of Matte Sealer & Finish for the final sheen.
Finishing the Kitchen
Base Cabinets Installation: Winter 2009/2010
With the tile installation completed, the next step for the kitchen was to get ready for base cabinet installation. Because we'd decided
to not use toe kicks on any of the cabinets, I wanted to get some baseboard trim around the room (even though I don't think it'll ever really
be seen). I also had been going over the cabinet plans and determined we needed a few more "cover panels" and other little extras from
IKEA® (and one item had been back ordered from the first trip there for cabinets), so I made another trip
down to Stoughton just before Christmas to get the rest of the stuff we'd need. Before installing the baseboard trim, I went around the
entire perimeter of the room and picked out any remaining grout or mortar between the floor and the walls, then applied a second coat of
paint to the walls just to clean them up a bit. I then applied a bead of siliconized acrylic grey caulk in the little gap between the
tiles and walls. The room was ready for baseboard trim and the first base cabinet.
 Base cabinet installation (6 photos).
I started the cabinet installation working from the corner between the stove and sink, since that was the largest of the base units to we were planning to install. Since this was a "dead" corner, we selected a cabinet with a slide-out lazy-Susan fixture that would allow us to make use of the corner space for pots & pans. After assembling the cabinet then sitting it in place to get an idea of the final height, I then cut each of the legs to the proper length to give a little room for adjustment then re-installed the legs and attached the cabinet to the wall. The cabinet on the other side of the stove was next, which is a four drawer base unit that faces the living room, rather than have another "dead-corner" from the kitchen side. I installed it in the same manner: sat in place first, got a leg measurement, then did the final installation... sort of.
Cabinet Customization
There was about a 4-inch gap between each side of the stove and the two corner cabinets, so rather than just cover the space
with a filler panel, I purchased a single 12-inch wide base cabinet with an extra door, then used the case parts and the two
doors to make pair of narrow "cookie-sheet" cabinets. The doors and drawer fronts are an Oak veneer with
IKEA®'s "Nexus Brown-Black" finish, so to finish the door edges I had cut, I purchased a roll of
iron-on Oak veneer edge banding, then applied a very dark Walnut stain and a semi-gloss polyurethane finish to match the color
of the rest of the cabinets. The additional home-made cabinets are pretty small, but they do the job to hold baking sheets and
cooling racks.
I also used IKEA®'s Dioder in-cabinet low-voltage LED lights inside all the base cabinets, so I had to drill holes for wiring and mount the lighting prior to the final installation of the base cabinets. I used the round Dioders inside the cabinets, and used the 6-lamp strip lights under the lip of the counter top to provide light inside any drawers that get opened. The strip lights are only temporarily mounted to the mock-up counter top for now, but I needed to get the wiring in place during the installation of the base cabinets.
With the two most difficult cabinets installed, the rest of the base cabinet installation was fairly straight forward. Because of the un-level floor, getting all the little legs cut to the correct height required a little trail and error, but otherwise the remaining base cabinet installation proceeded along smoothly. I also got our double drawer Kitchenaid dishwasher installed after I got the sink cabinet in place (since the cabinet is what holds the dishwasher in place). We've never had a dishwasher before, and it's really quite a nice thing to have. We especially like the drawer unit, since it doesn't stick out into the room very far when the drawers are open, and with just the two of us the drawers give us the ability to run a small load each evening without feeling like we're wasting a lot of water and energy.
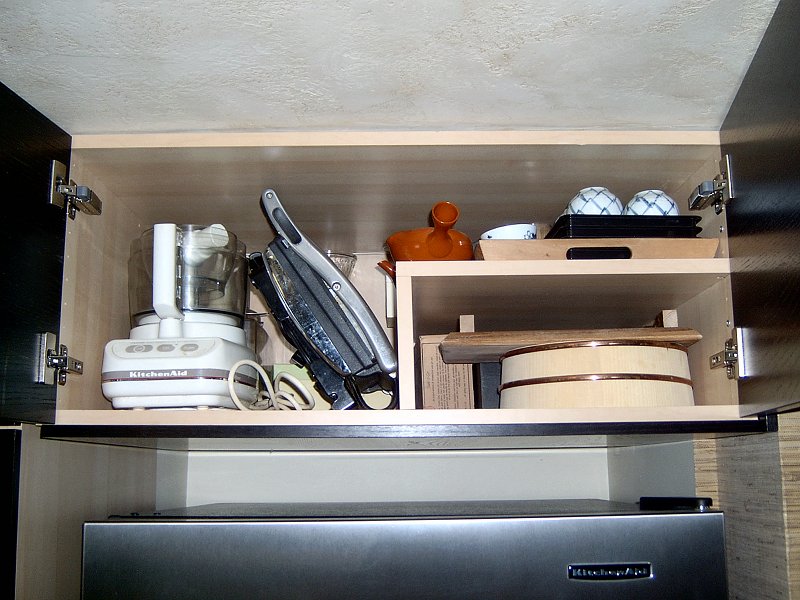
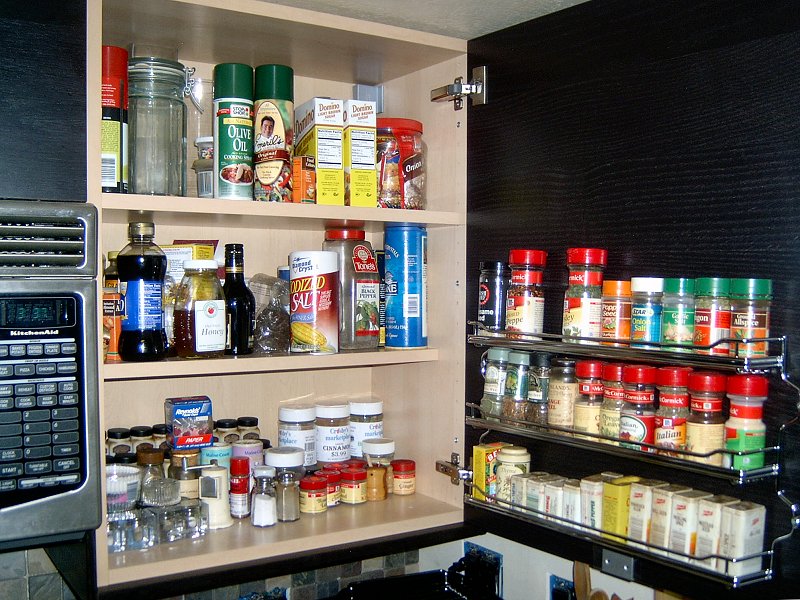
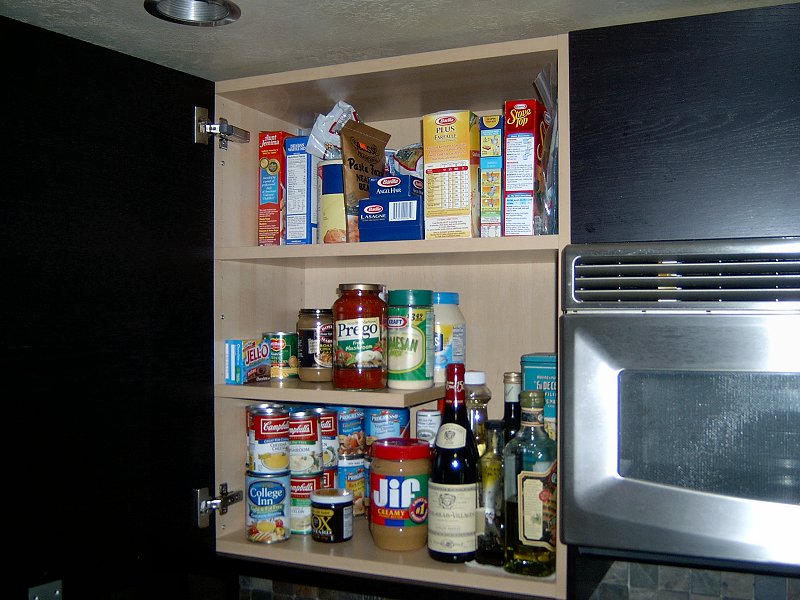
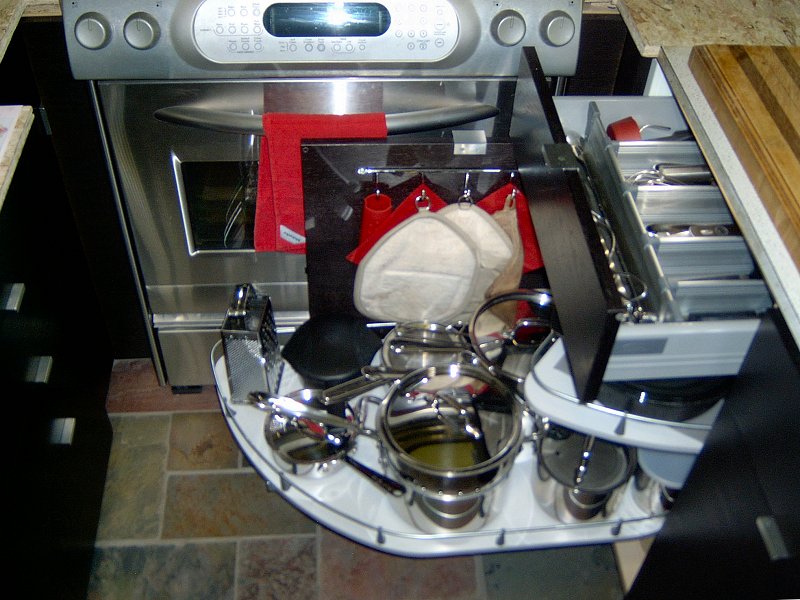
 Finished cabinets & interior fittings (12 photos).
Kitchen Cabinet Fixtures & Cover-Panel Installation: Spring 2010
Once the base cabinets were installed, I went through the remaining wall and base cabinets and installed all the hardware
and interior fixtures (and I mis-counted the number of handles I'd need, so there's going to have to be another trip
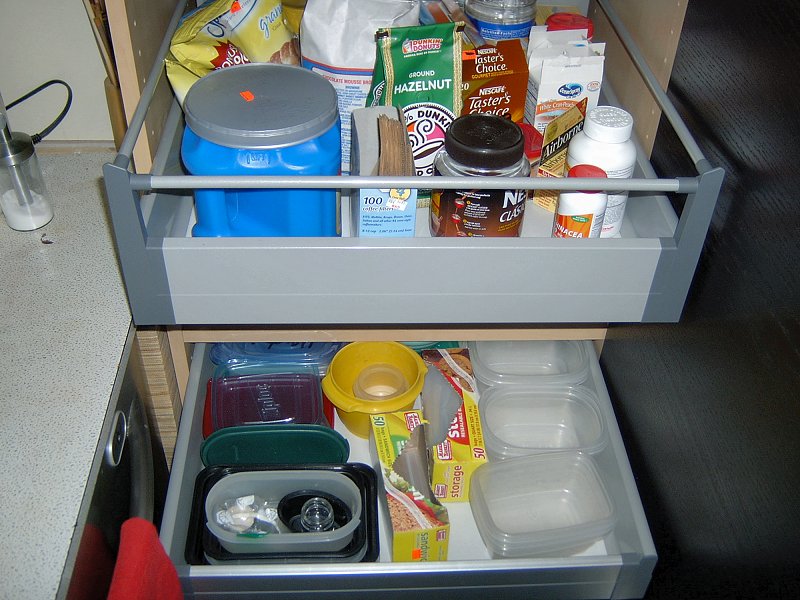
to IKEA® in the near future). We opted for a number of drawers and a pull-out basket for
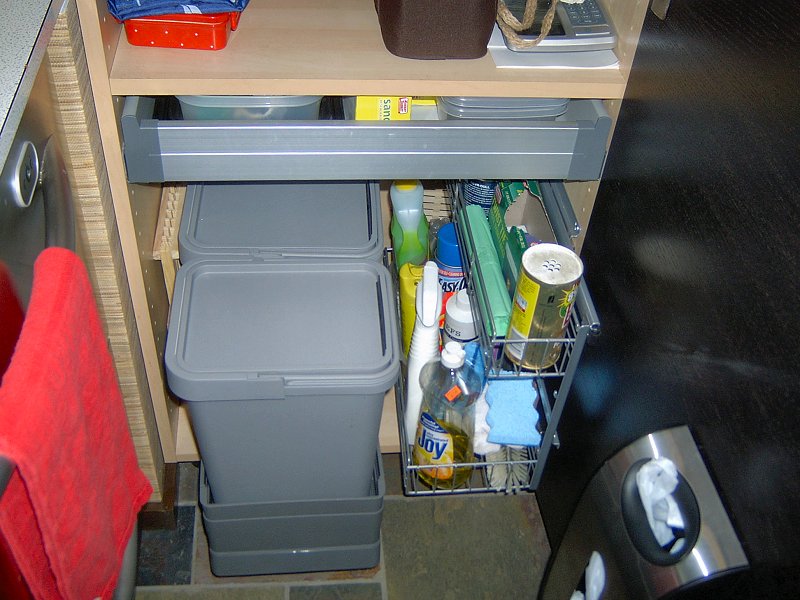
the pantry unit, as well as a pair of slide-out recycling containers in the bottom of the pantry. Trash is in a slide-out
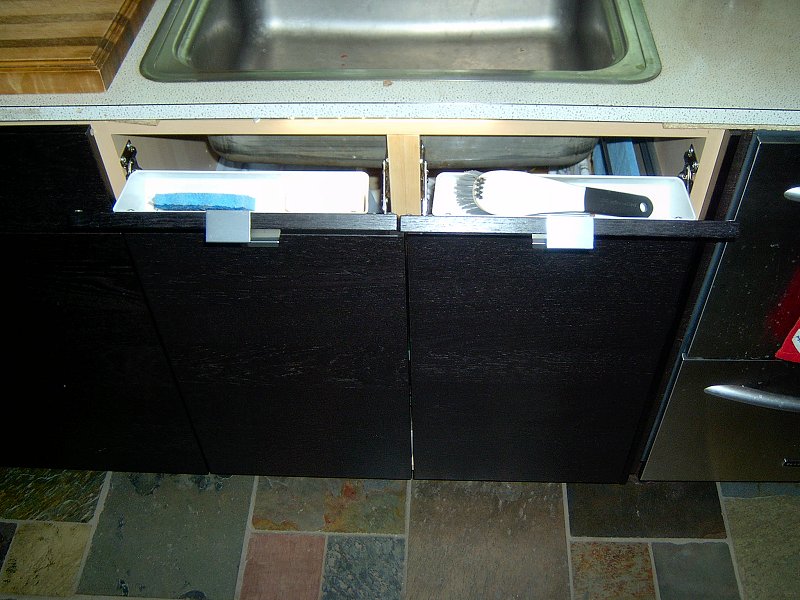
unit under the sink, with a compost pail mounted on one of the doors of the under-sink cabinet as well. I also replaced
the "dead" drawer fronts under the sink with a pair of tilt-out trays to hold a sponge, brushes and soap. We tried to make
use of every bit of space we had, since this isn't a very big kitchen to begin with.
The final step regarding the cabinet installation, at least with these IKEA® units, was to install cover panels on all the exposed sides and bottoms of the cabinets so they'll match the color of the door and drawer fronts. The cabinets are available with either a "Birch effect" finish, or plain white finish, so unless you get Birch or white doors, you need to buy lots of cover panels to make the cabinets look right. They sell the cover panels pre-cut for the sides of the wall and base cabinets, although I also needed some bigger pieces to use on the back of the island cabinets, as well as for the bottom of the over-the-fridge cabinet. To ensure I'd have enough of the proper material available, I purchased an extra 3 by 8 foot sheet of cover panel material. That big sheet provided plenty of material to work with, and allowed me plenty of factory edges to use to ensure a good match to the existing doors. I also used a few left over bits to add a little bookshelf on the side of the wall cabinets, as seen in the photos. Other than the large cover panel that goes on the side of the pantry unit and a couple more handles, the kitchen cabinets are done (I'll put that last cover panel on when I pull out the refrigerator and pantry to install the countertops).
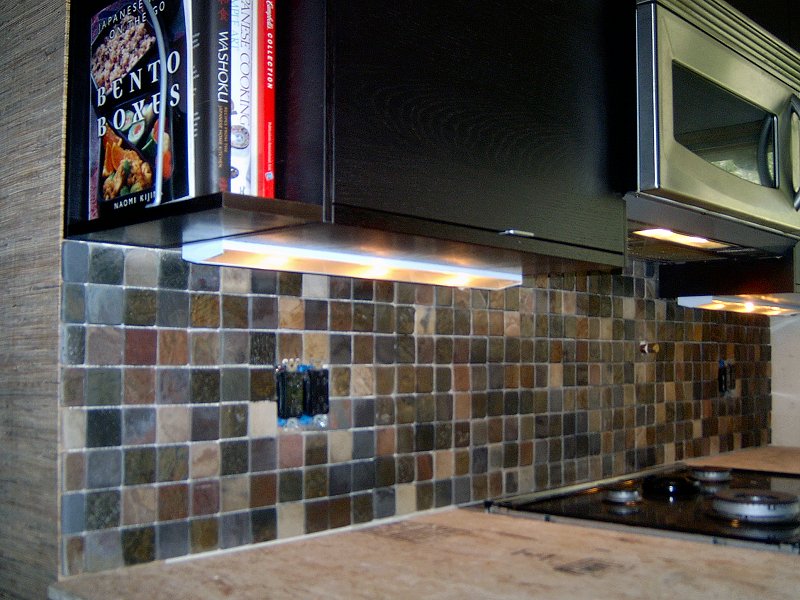
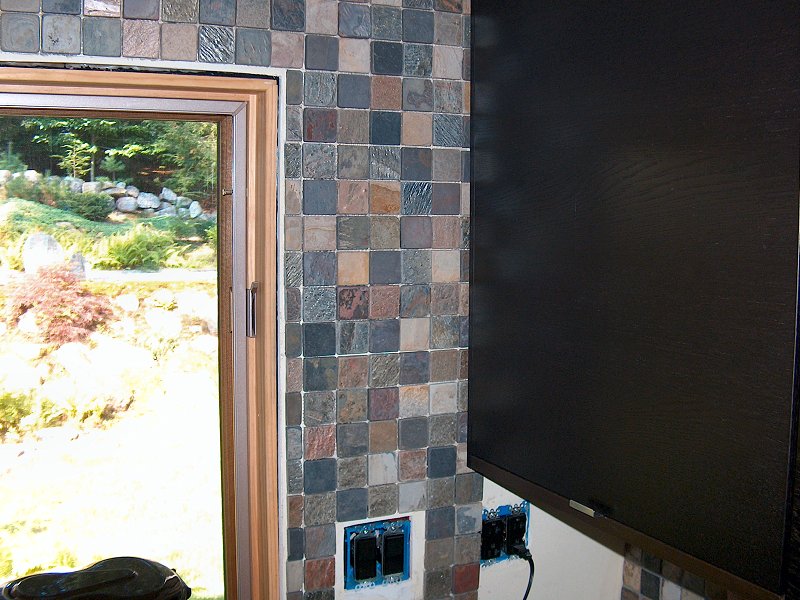
 Starting the backsplash (2 photos).
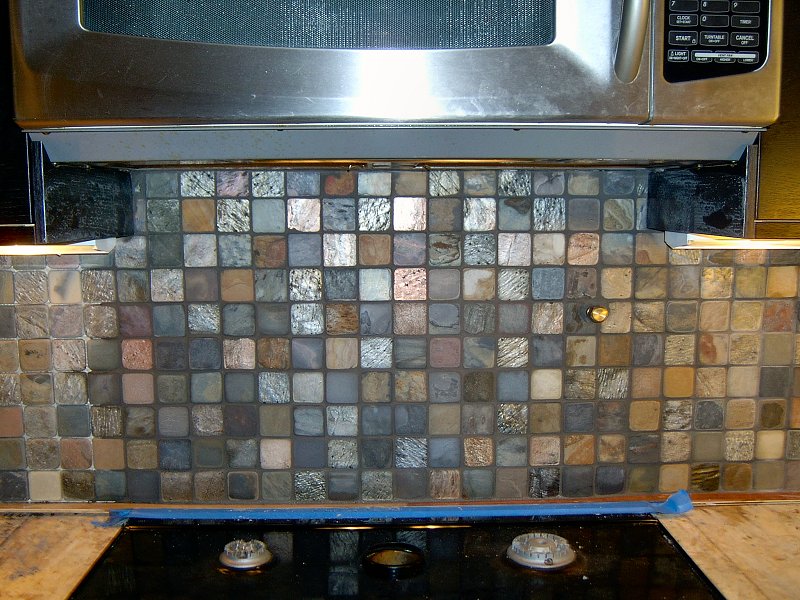
West Kitchen Tile Backsplash: Spring/Summer 2010
We selected a 2-inch tumbled Slate mosaic tile to use as the backsplash and wall covering for the kitchen walls. I
decided to go ahead and install the backsplash before the counter tops, since it's likely going to make a big mess
when grouting the mosaics, and I'd rather not get that all over our new counter top. I made a mock-up counter top with
a few pieces of scrap OSB, then placed a strip of 1/4-inch plywood along the edge of the counter top where it meets
the wall to give myself a little space between the tile and counter top (which I'll caulk after the counters
are installed). I used a basic white tile mastic for installing tile on the wall, and the stuff is far easier
to work with than thinset mortar. I just slap a bit up on the DensArmor Plus® wall board
with a 3-inch putty knife (and the wall board already has a semi-rough surface for the mastic to bond to), then spread it
with a 3/16-inch notched trowel. I then set the tile into the mastic, and gave each tile a little twist with my thumb
to set it. I thought I'd need to use lots of masking tape to prevent the tiles from sagging while the mastic sets, but the
stuff seems to grab really well, and I didn't have any problems with tiles sagging as I worked up the wall.
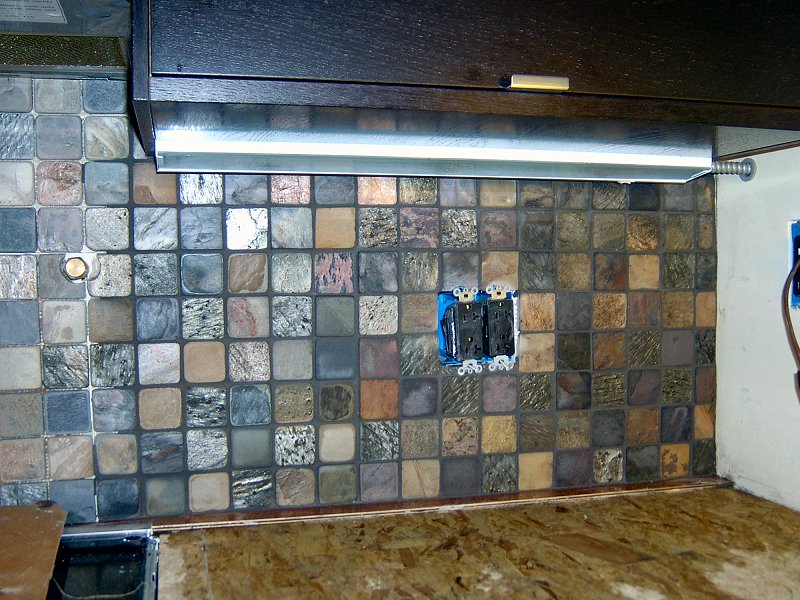
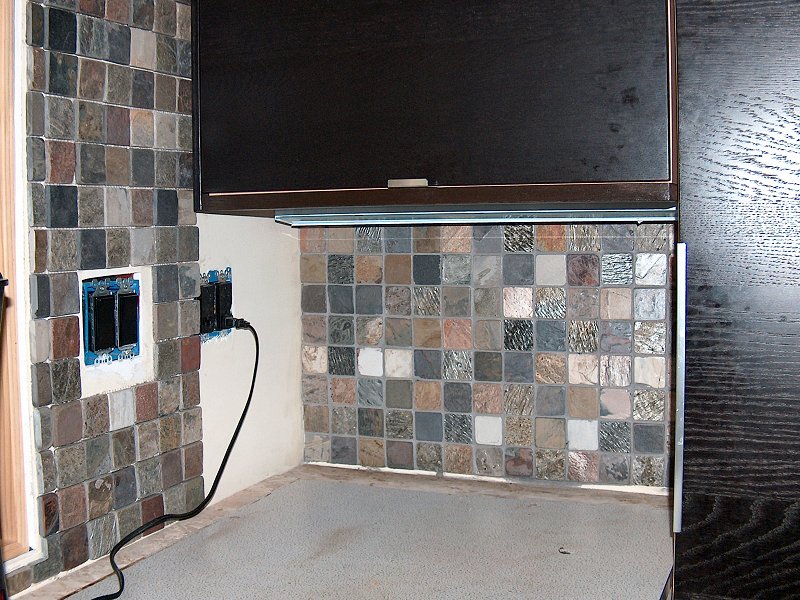
 Grouting the West wall (10 photos).
After a break on the interior for a month or two to get ahead on the yard work and finish up some other exterior projects (the new driveway, air conditioning installation, gable end siding trim, and antenna installation), I finally got back to work in on the tile backsplash project. The next step was to get some grout on the kitchen / bathroom West wall before I start tiling the North wall. I used a mixture of two tinted grouts as I had done on the floor, although I went for a bit darker tint on the wall using two parts #1542 "Platinum" to one part #1524 "Natural Grey". I also the used the Laticrete® 1776 Grout Enhancer add-mix to help make the grout a bit smoother to work with and prevent mold growth in the joints. I worked with very small batches, carefully weighed on a kitchen scale in order to ensure the add-mix to powder ratio was correct (2.6 oz. of add-mix per pound of powder). As I suspected, trying to work the grout up into all the nooks and crannies under the cabinets and around the under-cabinet fixtures made a huge mess, but by working with the tiny one-pound batches of grout gave me plenty of time to get everything wiped down while the grout was still easy to clean off.
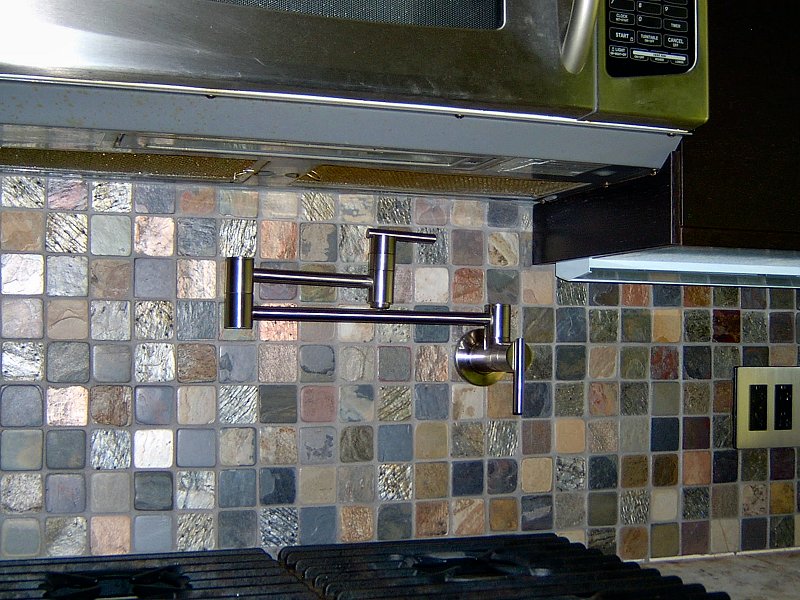
After the grout cured a couple days, I applied a coat of TILELabs® SurfaceGuard Penetrating Sealer, followed by three coats of their Matte Sealer & Finish. I may give all the wall tiles a final coat or two of Gloss Sealer & Finish when the rest of the walls are finished as well. After the sealer had dried overnight, I then installed a couple of screw-less stainless wall plates on the outlets, and finally got the Danze® "Parma" pot-filler mounted over the range. Now for more of the same on the North wall.
 Tiling the North & East walls (4 photos).
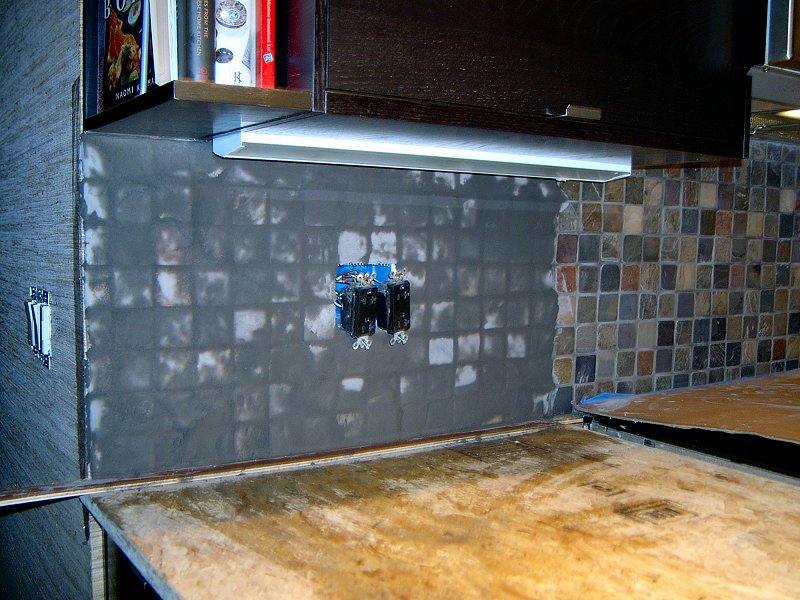
North/East Kitchen Tile Backsplash: Summer/Fall 2010
The North kitchen wall got pretty much the same treatment as the West wall, although there was a lot more cutting involved
to get the tile spacing correct around the window opening. I started the application with individual half-tiles at the bottom
center of the window. I then worked out toward the edge of the window with those little tile pieces. Once I knew what the
spacing would be around the window, I cut a nice stack of tiles in half (luckily the spacing on each side of the window was
a simple half tile) and things moved right along. Rather than cut each section as I progressed, I simply applied all the halves
around the window, then all the full tiles I could on the first day.
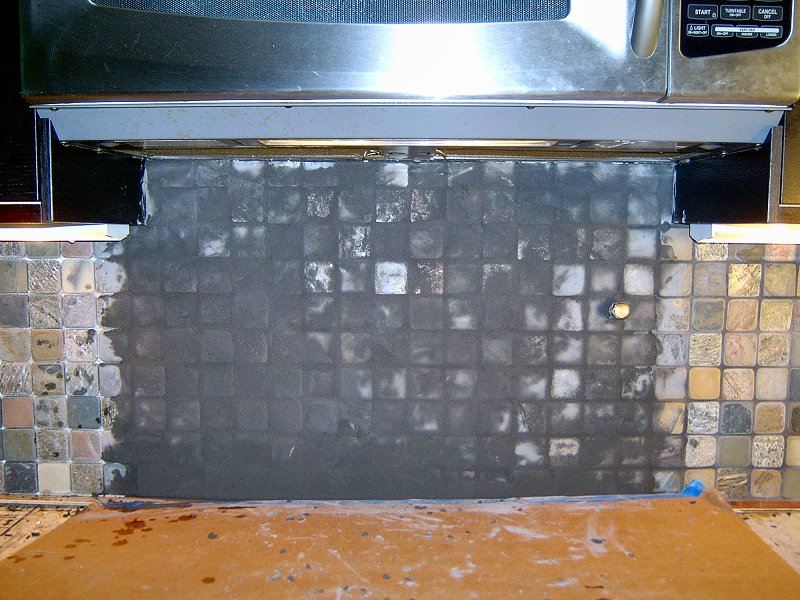
The little cubby next to the 'fridge also needed tile, so I thought it best to get that tile installed and grouted before I got too far along on the North wall, since the North wall tile needed to butt up against the East tile. With no fixtures or other openings in that wall, it was simple enough to glue up the tiles, then get them grouted the next day. I then finished the North wall tile application (after removing the right wall cabinet so I could get at stuff easier), and finally got the entire thing grouted using the same small batch method as detailed above. After adequate cure times for the grout, I applied the penetrating sealer, then finished all the tile walls with TILELabs® Gloss Sealer & Finish to give everything a nice sheen.
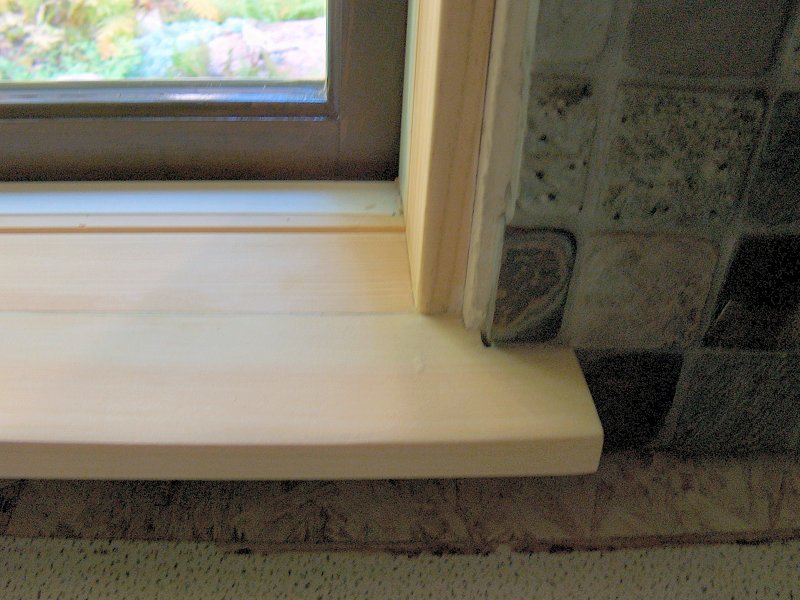
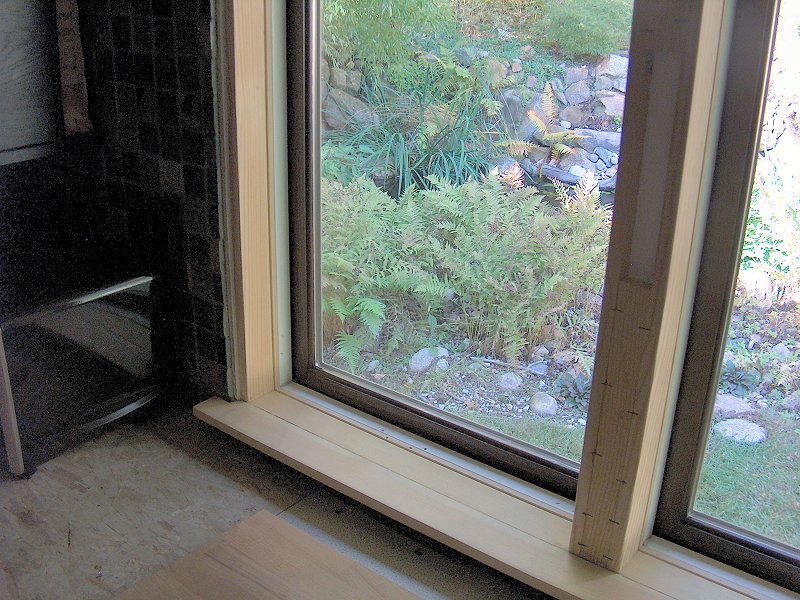
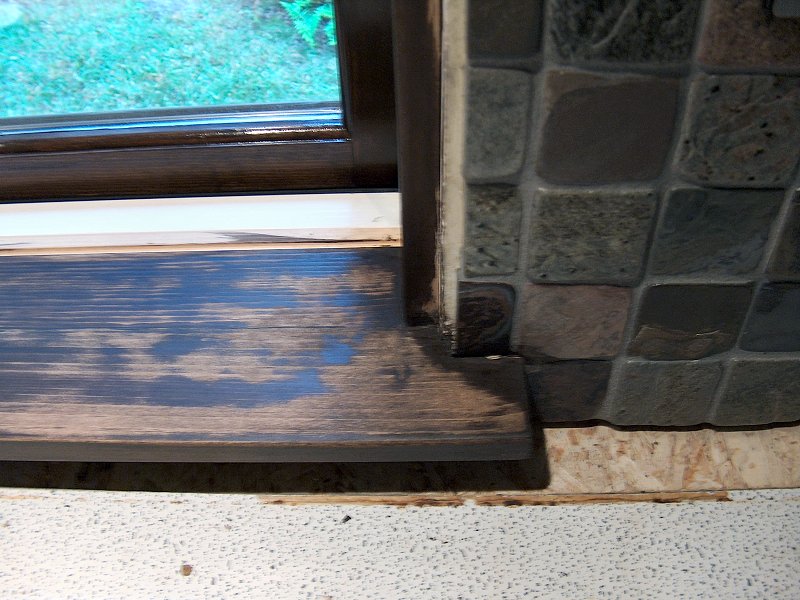
Kitchen Window & Wall Trim: Fall 2010
I don't now what the deal is with the rounded jambs on these windows, but I know it's no fun to try and trim. The bypass
sliding windows I'd installed elsewhere all had normal square corners on the jambs and they were simple enough to extend to
create the stool or sill - these couple of casement windows (used in the kitchen, bathroom and laundry room) for some reason have a
little 1/8" radius edge on them. I suppose if I were making "picture-frame" style trim, it'd be fine. I don't like picture
frame trim. I want my window trim to have a proper sill and apron at the bottom. I could have just added the still a little
below the radius, but then the sill would have a step in it and I thought that would be pretty useless. I wanted it to match the other
windows I'd already trimmed, so I was going to have to do a little custom milling to create a right proper stool.
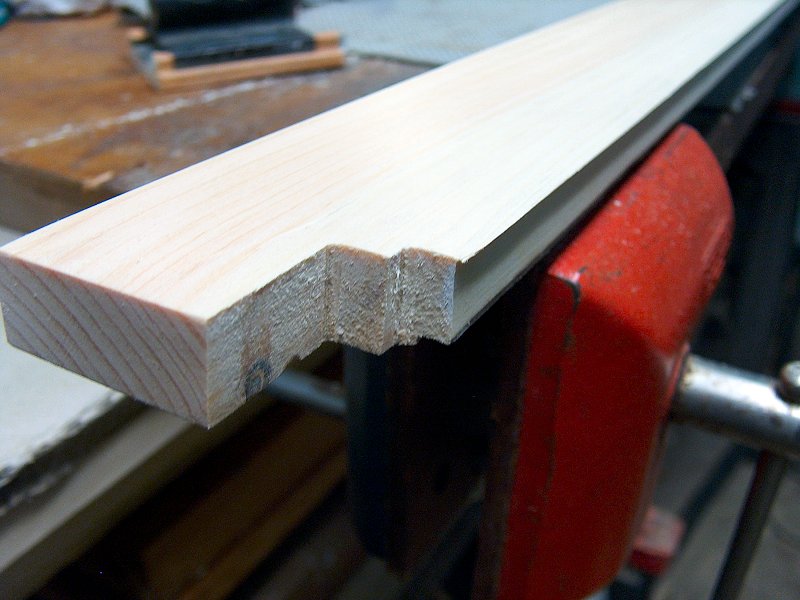
 Trimming the kitchen window sill (6 photos).
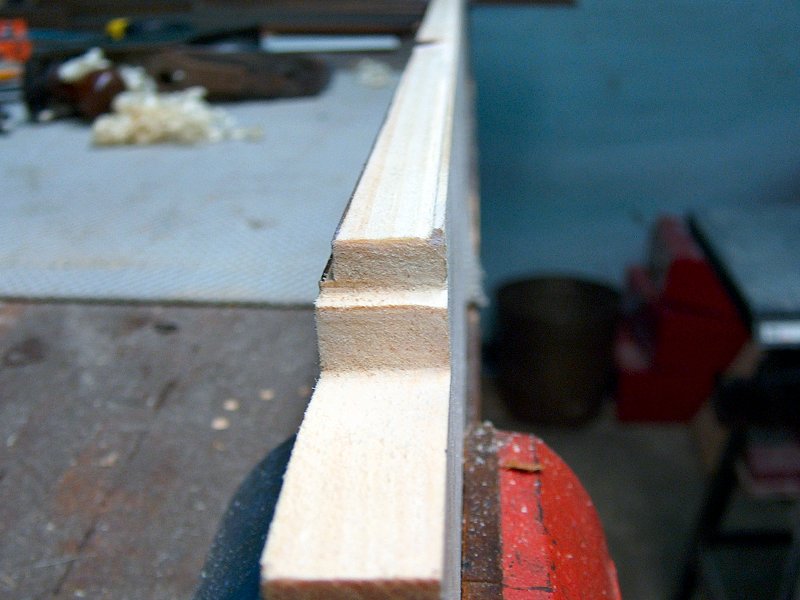
The Window Sill
If I would have noticed the radius before I installed these windows it would have been a simple task to just plane off the radius,
then extend the jamb to create what ever I wanted for the new sill. Too late now. I needed to mill a piece of stock that would
fit on to that 1/8 inch radius jamb, and appear seamless when I finished it. I entertained the idea of grinding a custom cutter
profile for my Stanley No. 45 hand plane, but even that would have been tricky, since I would need to plane the edge of the board,
and that would leave nothing for the fence of the plane to ride against. This was going to have to be a power tool job using the
router table.
Finding a 1/8 inch radius cove bit wasn't a problem... the problem was all of the bits I could find were only about 1/2 tall, and I needed to put the 1/8 inch radius cove at the top edge of a 3/4 inch thick piece of stock. To solve the problem, I ran the stock through the table on edge for the cove bit cut, then layed the stock flat and ran a second pass with a rabbet bit to remove the rest of the material below the cove cut. Since I couldn't perform the edge cut as close to the face of the board as it would ultimately need to be (since the edge of the top of the radius was supposed to be flush with the face of the board), I had to run the stock through the thickness planer a couple of times as well to sort of sneak up on the edge of the radius. All this just because I didn't want an 1/8 inch step-down in my window sill!
 The 3 cuts for the new sill.
I milled enough stock so I'll have what I need when it comes time to make the sill for the bathroom and laundry room too, then selected the nicest piece to use in the kitchen. The weather was pretty mild which was good, since I had to leave all the windows open so I'd have some place to clamp the new sill in place while the glue set up. The next day I scraped the extra glue from the joint, and found a couple spots that were still going to need some wood filler, despite my efforts to mill a perfectly matched profile. If I were going to do it over, I would have left more material above the radius and sanded the face flush after gluing rather than try to get the faces of the two boards flush while gluing. Oh well. I used DAP® Plastic Wood® Solvent Wood Filler to fill the joint (it takes stain very well, and sets in just a few minutes), then applied a coat of stain to the interior bits of the window to see how things looked. More filler was needed, which meant sand off most of the stain and do it all again. After a couple round of this, I was satisfied that the seam would disappear during final finishing.
Finishing the Trim
While I wasn't thrilled about the radius-edged jambs on these casement windows, the rest of the trim was very easy to stain
and finish. Each window had an extra 5 pieces of trim that were just tacked in place with a few brads, and they came out
of the window with a little prying from a putty knife. The windows themselves also came off the frames very simply, so staining
finishing the kitchen window took place at the bench for the most part. After I applied some jamb extensions to the existing
jambs (to make them flush with the face of the mosaic on the wall), I stained the frames and new apron to start each day. Then
I'd spend a few hours sanding and staining all the other pieces on a temporary work table made form an old door on a couple
saw horses.
 The jamb extensions (2 photos).
I prep loose trim pieces by first painting what will be un-exposed sides with white Zinsser® "Bullseye 1-2-3" primer (usually the backs and bottoms, for example) then later sand the face and exposed edges with 150 grit as the final surface prep and to remove any primer from the edges. I think it's a good idea to seal all sides of the trim, and a little primer on the back (that dries in about 15 minutes) makes it very easy to keep track of which side is the front when staining. The stain goes on easy enough, and after a few days everything had a nice, even color and was ready for top coating.
Applying top coat has become one of my favorite trim jobs, since the materials allow impressive results in a very short time. For interior work I only use Minwax ® water-based Polycrylic Protective Finish. I prep for application by giving everything a quick once-over with a maroon Scotchbrite pad, then wipe it down with a slightly damp cotton cloth. I start top coating with satin finish, applied with a natural "chip" brush (I also find it helps to use a previously used chip brush, since washing and rinsing it a few times seems to get rid of all the loose bristles, rather than having to pick them out of your work as you go with a new brush). I dip the brush, apply the finish that's on the brush, then immediately pick up a foam brush and drag out any brush marks with light pressure in one direction only, working from dry to wet. I then load the chip brush again and repeat the whole process. The water-based finish dries surprisingly fast, so the work must be done fairly quickly to remove brush strokes and leave an even finish before the stuff starts to set. After 2 hours of dry time, the piece is ready for another coat. The reason I use satin finish (even though the piece will have a gloss finish when it's done) is so I can see where I'm working when applying finish. There's no difference between the appearance of dried and wet gloss finish, so it's very difficult to see where you're working on the piece (especially when you look away to switch brushes). By starting with satin, it's very easy to tell the difference between the fresh, wet material you've applied over the existing dried coats. After at least 3 coats of satin, I let the piece dry overnight before proceeding.
 The finished trim pieces.
The next day begins with wet sanding all the faces of the pieces that were coated the day before. A spray bottle of water and a little 1/4 sheet of 400 grit wet-or-dry paper on a sanding block is all it takes. I basically just scuff the face of each piece (I don't worry about the edges, and it's very easy to blow through to bare wood on those corners) to ensure there's no big brush marks, drips, or little pieces of stuff in the finish. It doesn't take a lot of water or a lot of rubbing, but it does make a big difference in the finished piece. The piece should be wiped with a clean towel so the sanding water doesn't dry in place. I then repeat the top-coat application, this time using semi-gloss finish. As with the satin finish, it's easy to see where you've applied the fresh coat and what needs a going over with the foam brush as you work down the length of each piece. As before, everything is allowed to dry overnight after it's all received 2 or 3 coats of the semi-gloss. After it's thoroughly dried, the semi-gloss gives a very good indication of what the final finish is going to look like. I inspect all the pieces, and see if there's anything that warrants another round of wet sanding (which would also mean more semi-gloss coats after sanding) otherwise it's time for the final gloss top coat.
The gloss top coat step begins by going over the faces of each piece with a white Scotchbrite pad, which just knocks down the sheen a tad to make it easier to see where I'm working again. The key here is I'm only really concerned about the face of each trim piece this time around. That's why I used semi-gloss after the first wet sanding step - many edges and ends of the trim aren't in full view, so I don't worry about trying to get the perfect high gloss finish on stuff that no one will really see. I also find it helps finish work to look a little better if it's not reflecting light every which way... it really depends on where the final piece is installed as well as how big it is - long, wide trim is challenging to get a perfect finish on the face, so I don't worry much about edges. Small stuff I tend to just coat everything with gloss, since it's easier to get right. Anyway, application is the same as earlier coats, although I tend to try and load the brush a little more to ensure a full, wet coat of gloss with plenty of time for final smoothing with the foam brush. I try to only put 1 coat of gloss on, although sometimes I'll go for 2 if the lighting is adequate to actually see where I'm working on the second coat (it usually is when working on loose pieces, but can be tricky on installed pieces). After another overnight dry, the trim is ready for installation.
 Installing the trim (6 photos).
Installing the Trim
Installation of the loose trim pieces began with a little custom work on the casing pieces because of the uneven tiled wall.
Because of the radiuses on the jambs, I used the jamb extensions to gain a 1/4 inch set back for the casing, rather than setting
the casing itself back the 1/4 inch - essentially giving the appearance of a 1-1/2 inch think casing. Even with the 3/4 inch
deep jamb extensions, I still needed to relieve a few areas in the backs of the casing in order to have those pieces
sit evenly against the jamb extensions. I worked on each of the 3 pieces as they were being installed using lots of
trial and error as I carved out relief sections in their backs to fit over the high tiles. I wasn't worried about having
high spots in the outside edges (since those edges are hardly visible), but I had to take care not to remove any material
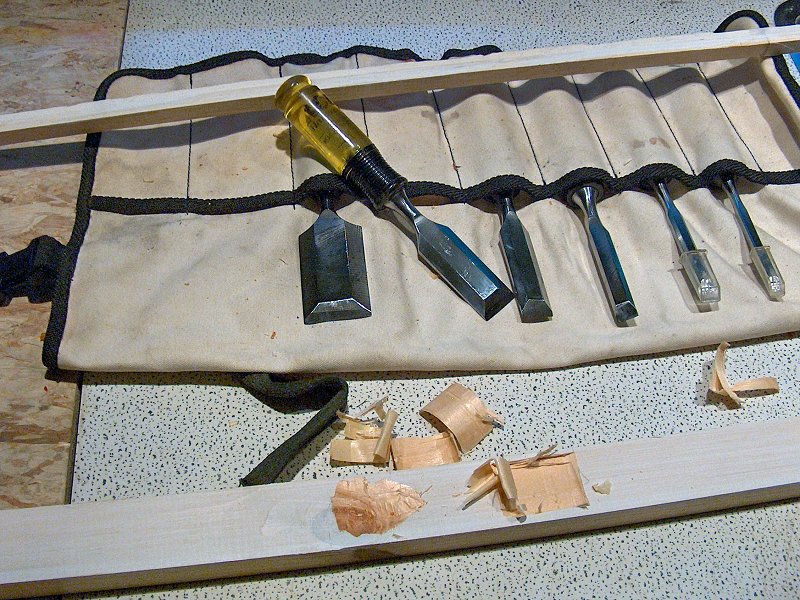
from the part of the casing that would sit against the jamb. Of course this also meant I needed to spend an afternoon honing
the wood chisels, since they were in pretty bad shape.
Once the casings fit nicely against the jamb extensions, everything was assembled using the 18 ga. brad nailer. Because of the tiled wall, I could only nail the casing to the jamb along the inner edge of the face. To ensure the casing was secure, I also dabbed the backs of the casing with some Liquid Nails every few inches along the back. The pieces for inside the window frames were all tacked in using the nailer. I also added an 1-1/2 inch wide piece of trim between the wall and ceiling above the window, this time using 2-1/2 inch brads driven from the bottom (since there's nothing to nail to behind the trim) and plenty of Liquid Nails. After the Liquid Nails dried overnight, I then filled all the nail holes with Minwax ® non-hardening American Walnut Wood Putty ®, then gave the face of all the trim one final coat of gloss finish. The trim was done at last.
Kitchen Counter Top: Fall/Winter 2010
With Thanksgiving fast approaching and plans to have my brother and his family visit for the holiday, the next project
was to try and get the kitchen counter built and installed as quickly as possible. I'd finished the trim work around
the end of October, which meant I only had a few weeks to get the counter built, laminate applied, and the whole
thing attached to the cabinets - something I'd never done before. We had considered putting in a Soapstone or Slate counter
for the kitchen (but not anything man-made... those really don't do a thing for me), however the cost is far more than we're
willing to put into the kitchen at this point. I could have a natural stone counter top made, or pay for the foundation for
the garage... The garage won. Laminate will do the job for now. Perhaps someday we'll go for the Soapstone.
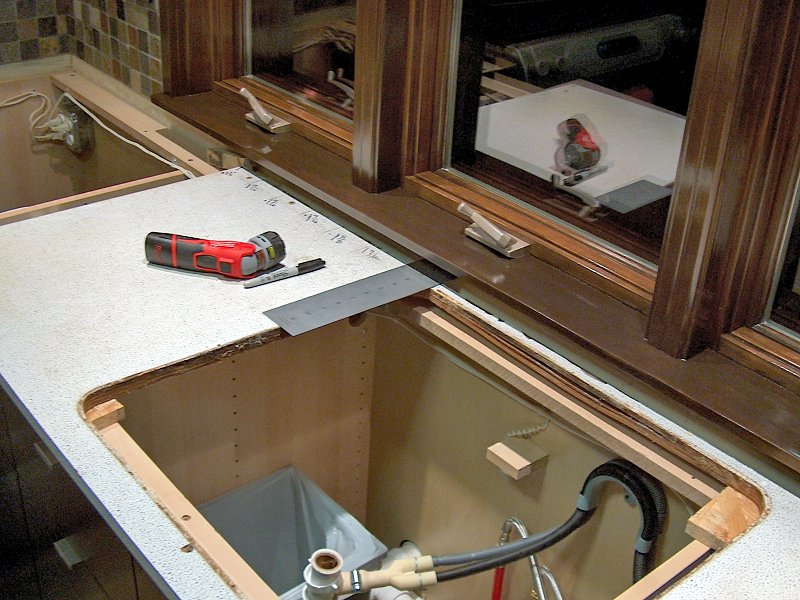 Measuring & prep (3 photos)
I started the project by using the old counter top as a template. The new cabinets were deeper than the old ones by a couple inches, so I set the front edge of the old counter even with the edge of the cabinet handles, then marked the counter with a measurement every few inches to get an idea of the profile for the back of the new counter top. The wall was pretty wavy, but I had about 1/4 inch of tile overhang to tuck the new counter under, so it didn't have to be a perfect fit. The plan was the new counter would slide in under the tiles on the walls, then I'd go around the whole thing with a bead of grout color-matched caulk to finish it off. Once the measurements were done, I spent some time doing final adjustments on the base cabinets to ensure everything was level and even. I also got the dishwasher leveled again, and secured to the cabinet and sidewall.
Building the Counter Top
The counter top is made from 3/4 inch particle board, with additional 3/4 pieces attached along the edges and around the sink
for strength. The plan was to make it a single piece counter top - no seams anywhere - which would make installation
challenging but not impossible (remember, the counter top is supposed to fit under all the tile on the wall, which means
it will have to slide into position from the front of the cabinets). The total length of the counter top (on the back wall)
is 9 foot 8 inches, but rather than just add a 20 inch piece to the end of a sheet, I made the split at 7 foot 7 inches, then
added a 2 foot 1 inch piece to the end at the stove end of the counter. Since the stove section had a little el in it, this
worked out well, and the seam would be over the center of the corner cabinet. The two top pieces were joined with plenty of
waterproof glue and the biscuit jointer, then allowed to dry overnight.
 Building the counter top (3 photos).
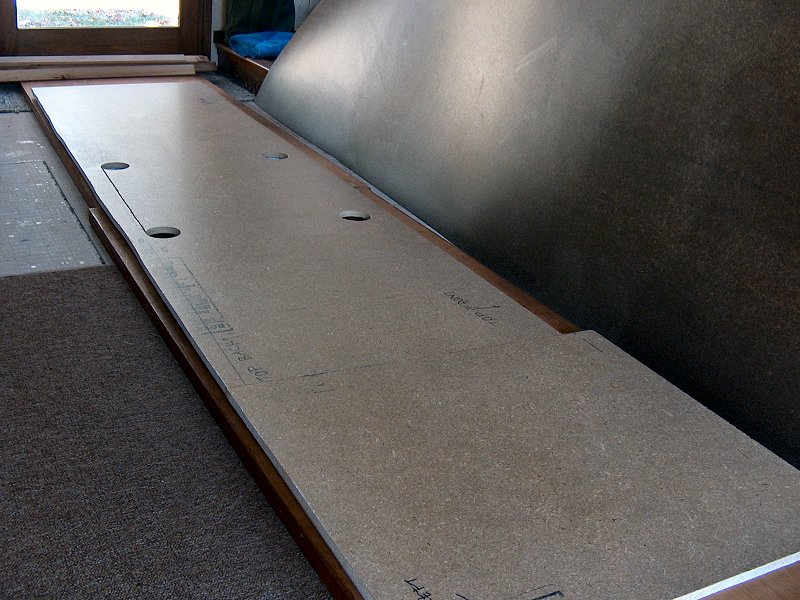
Once the main chunks of counter top were together, I brought the whole thing in from the wood shop and did a test fit to verify how the back edge was going to fit under the tile... this took a couple of trips from shop to kitchen to get just right, but I'm glad I did it before I had completed the whole thing - the counter was fairly easy to get into place when it was only 3/4 inch thick. On the last fit I also marked the bottom of the particle board along the cabinet edges so I could get the sink centered and the counter top supports in the right place. Back in the shop, I attached all the support strips with glue and screws to the counter top, and a biscuit at each joint. Things got a little tricky around the sink, since the new sink is almost as deep at the counter top. I traced the sink outline onto the counter top, then after lots of careful measuring, cut the narrow, radius ended strips to support the sink front and back. The final bit of construction on the counter top was to route some dadoes for the under cabinet lights and wiring, then it was ready for laminate.
Laminating the Counter Top
We selected Wilsonart® HD™Laminate
![]() in Night Passage, 1845-45,
from Home Depot for the kitchen counter tops. The stuff is available as either a 4 foot by 8 foot roll, or a 5 foot by 12 foot
roll. Because I needed more than 8 feet, we went for the 5 by 12 (and if I cut it carefully, it would provide 24 linear feet).
I also picked up a Gundlach 11-LS Laminate Shear and J200B "J" roller, a Diablo 1/2 inch by 3/4 inch Flush Trim router bit,
the DAP® Weldwood® Nonflammable Contact Cement, and a couple
5 inch low nap rollers. The only other thing I needed to get started was a couple Wilsonart®
Decorative Edge beveled edge pieces, 1845K-45. Those fairly inexpensive edge pieces are simple to glue on to the counter top,
and they give it a really nice, finished look without any of those horrid little brown lines that result from the usual flush
trim work on a laminate counter top. Unfortunately, the guy at Home Depot looked at me like I was from Mars when I asked him
to order those. I actually had to dig through his Wilsonart propaganda and show him the pieces so he could call his supplier
and ask about them. They'd never heard of them either. Apparently do-it-yourselfers either don't laminate their own
counter tops, or they really enjoy having little brown lines along the edge of the ones they make. I ended up calling
Wilsonart directly, and they sent me to a distributer in Worcester that sells the edging. After another day on the road I
finally had everything I needed to put together my counter top.
in Night Passage, 1845-45,
from Home Depot for the kitchen counter tops. The stuff is available as either a 4 foot by 8 foot roll, or a 5 foot by 12 foot
roll. Because I needed more than 8 feet, we went for the 5 by 12 (and if I cut it carefully, it would provide 24 linear feet).
I also picked up a Gundlach 11-LS Laminate Shear and J200B "J" roller, a Diablo 1/2 inch by 3/4 inch Flush Trim router bit,
the DAP® Weldwood® Nonflammable Contact Cement, and a couple
5 inch low nap rollers. The only other thing I needed to get started was a couple Wilsonart®
Decorative Edge beveled edge pieces, 1845K-45. Those fairly inexpensive edge pieces are simple to glue on to the counter top,
and they give it a really nice, finished look without any of those horrid little brown lines that result from the usual flush
trim work on a laminate counter top. Unfortunately, the guy at Home Depot looked at me like I was from Mars when I asked him
to order those. I actually had to dig through his Wilsonart propaganda and show him the pieces so he could call his supplier
and ask about them. They'd never heard of them either. Apparently do-it-yourselfers either don't laminate their own
counter tops, or they really enjoy having little brown lines along the edge of the ones they make. I ended up calling
Wilsonart directly, and they sent me to a distributer in Worcester that sells the edging. After another day on the road I
finally had everything I needed to put together my counter top.
 Applying & trimming the laminate (6 photos).
With the counter top inside the house and at room temperature, I did a little more fussing with it before I started spreading glue. Because of the window sill I'd already installed and the lack of space between the sink and back wall, I had to make the back sink cut before I tried to install the counter top. I'd measured and marked all my sink cut lines on the bottom of the counter top already, so I used a hole saw to cut out the four corners for the sink, then grabbed the jig saw and made the cut for the back of the sink. I didn't want to make any more cuts than that, since having a gaping hole in the center of the new counter top would have made it very easy to break the thing in half while trying to move it to the kitchen and slide it in place. The four holes and the single cut left most of the sink area intact, and would leave plenty of room to maneuver a saw when the counter top was resting on the cabinets after installation. I also gave the entire bottom (and the edges that wouldn't get the bevel pieces glued on) a coat of primer to help keep moisture from working into the particle board, as well as a quick coat of stain along the bottom of the edge that would hang over the front of the cabinets.
The toughest part of getting the laminate glued down was actually wrestling with the 5 by 12 foot roll to cut a piece off for the counter top. I finally got the hang of the new snips (just take little bites) and got a chunk cut that was an inch or so bigger all the way around than what I needed. After a little struggling to get the remaining laminate re-rolled and back in the box, it was time for glue. I started by flipping the laminate over then just dumped a couple ounces of glue in the center. I used the little roller to spread and even the stuff out, and added more as I worked along toward the edges of the laminate. Once the whole piece was covered, I leaned it up against the wall, and continued to spread glue on the counter top. The contact cement needs to dry for at least half an hour (but no more than 3 hours) before bonding, so I wasn't in too big a rush and took my time to ensure even coverage. I probably used more cement than I needed to on the counter top, but I figured a little extra wouldn't hurt anything, and the surface is quite porous compared to the laminate. After the counter top sat for half an hour, I placed a series of scrap wood straps across the surface and laid the laminate on them. I pulled out a few straps in the center and pushed the laminate down to make contact, then worked my way from the center to the ends pulling a few straps and pushing the laminate down. The whole thing was down in a few minutes. Next was the "J" roller work, so I grabbed the knee pads and spent a good half an hour going over the whole thing with the roller pressing down hard. I was rather surprised at how simple the whole procedure had been and was quite pleased with the results so far.
 Installing the counter top (3 photos).
Edging and Installing the Counter Top
Contact cement requires 7 days to reach full strength, but the can says finishing operations can be started immediately
so that's what I did. I popped the flush trim bit in the router, hooked up the vacuum cleaner and ran the router around
the whole works. I noticed on some of the area with a lot of overhang that I needed to make multiple passes to work my way
in toward the counter top, and sometimes a little adhesive would pile up against the counter top and prevent the bit
bearing from making a perfect cut. If I just gave the adhesive a minute or two to cool down, it would simply rub off the wood
and a second pass resulted in the perfect edge. A fine mill file took care of the to inside corner overhangs near the ends,
and the counter top was ready for edging.
Things had been moving right along so far, but the edging work slowed to a crawl. The edging is made of MDF, which is very porous stuff (it soaks glue up like a sponge), and the particle board is a close second - getting a wet edge for gluing on an 8 foot stretch of counter top was taking a while. After 3 passes with the glue bottle and a little brush, the thing finally stopped soaking in the glue and I was able to wiggle the longest piece of edging into place. I had a lot of glue on the new counter top by the time I was done, but luckily it cleaned up nicely with a little "Goof off" the next day. I held the edging in place with a lot of blue masking tape and a clamp every foot or so, then let the whole thing sit overnight to dry. The next day I glued in the short mitered end pieces of edging and let those to dry overnight as well (while spending the rest of the day cleaning off glue from round one). At this point another little bump in the road showed up, and that was that the edging turned out to be too tall. There was about 3/8 inch of extra edging hanging down past the bottom of the counter top, and since we had frameless cabinets, the drawer door tops were flush with the tops of the cabinets. That overhang had to go away in order to use the kitchen cabinets. It was a little precarious balancing the router on the edge of the counter top, but I managed to cut away the overhang with the flush trim bit, then used the belt sander to clean up parts I couldn't get at. The new counter top was ready for installation.
 Enjoying Thanksgiving 2010 (3 photos).
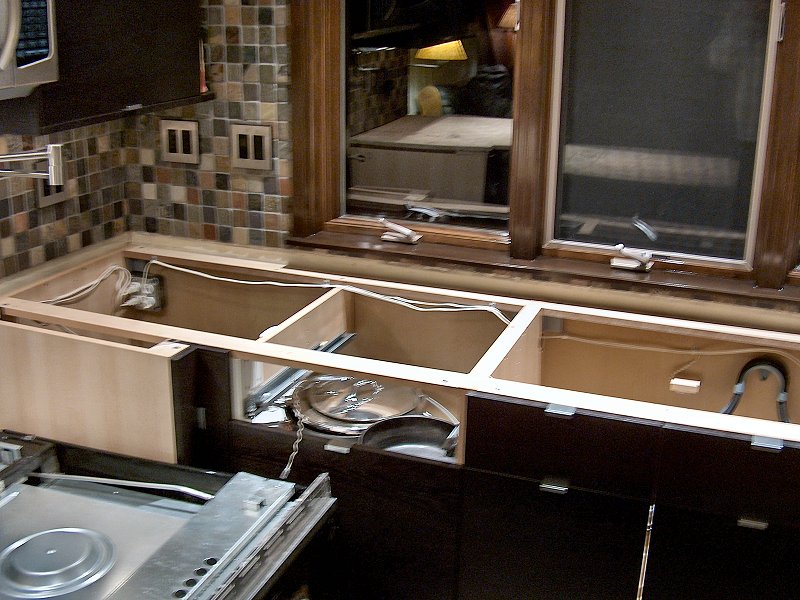
When the homeowner arrived that evening, we picked up the counter top and carried it into the kitchen. In order to get clearance to install the thing, I'd already removed the corner pantry and tipped the stove forward onto a blanket on the floor. That gave us enough room to stick the end of the counter into the pantry space, then slide the stove end over the stove and on to the corner cabinet. After a little scooching and pushing we got the thing lined up on top of the cabinets, and just slid it into position. I then drilled a couple of 1/2 inch holes into the laminate over the pre-cut sink corner holes, and used the jig saw (with masking tape over the sole so it wouldn't scratch anything) to make the remaining cuts for the sink. The next day I installed the sink, connected the wiring for the in cabinet lighting, and fastened the counter top to the cabinets with 2 inch screws. I also cut the IKEA "NEXUS" butcher-block counter section for the island to length, and got that screwed down into place as well. The small piece of counter top on the living room side of the stove would have to wait until after Thanksgiving for installation, since it was now the day before Turkey day - hey, at least I got the new counter in before our guests arrived!
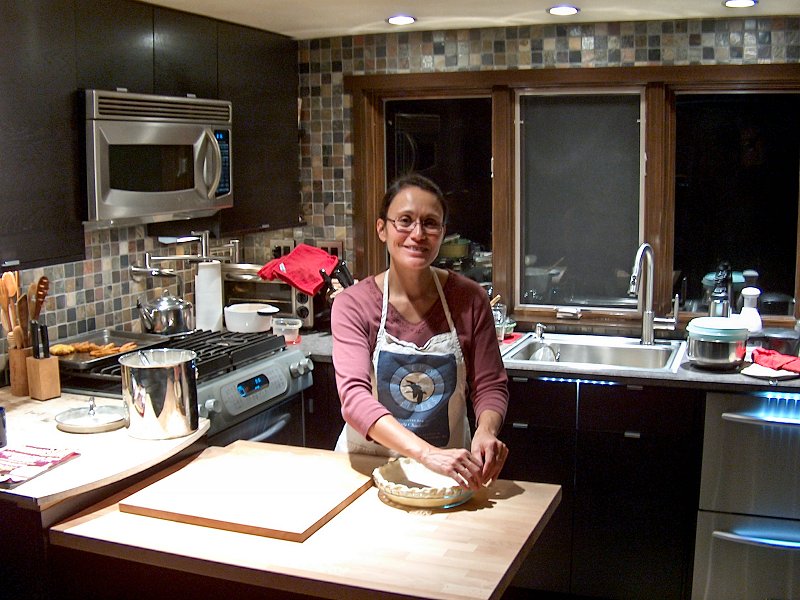
The Completed Kitchen Renovation
 The last kitchen project (5 photos).
Finishing Touches: Winter 2011
We'd made it through the holidays with the kitchen mostly finished, however there were still some lingering projects that
needed taking care of on the few days of Winter 2011 that weren't spent digging out of the constant snow storms we'd been
enjoying in New England that season. The first project was to complete the other section of counter top for the island cabinet,
which was a very simple project compared to the main counter top. No moving appliances or shuffling of cabinets was required, so
I built the counter top, laminated it, and installed it over the course of just a few days. We also decided to add the same natural
reed, Roman shades we'd used in the offices (and we purchased all the shades for the house at the same time) as a window
treatment for the kitchen windows. We had thought about not putting any shades in there, since there's such a fine view of
garden from the window (and that was the point of that huge window, after all), but the blinding glare from the snow on a sunny
day quickly made it clear we needed to add something. The shades attach with a couple of simple wing nuts on corner brackets,
so I painted all the hardware dark brown to match the window. This gives us the option to remove the shades in the Summer
and enjoy the view when the glare isn't so terrible and the hardware won't be noticeable at all.
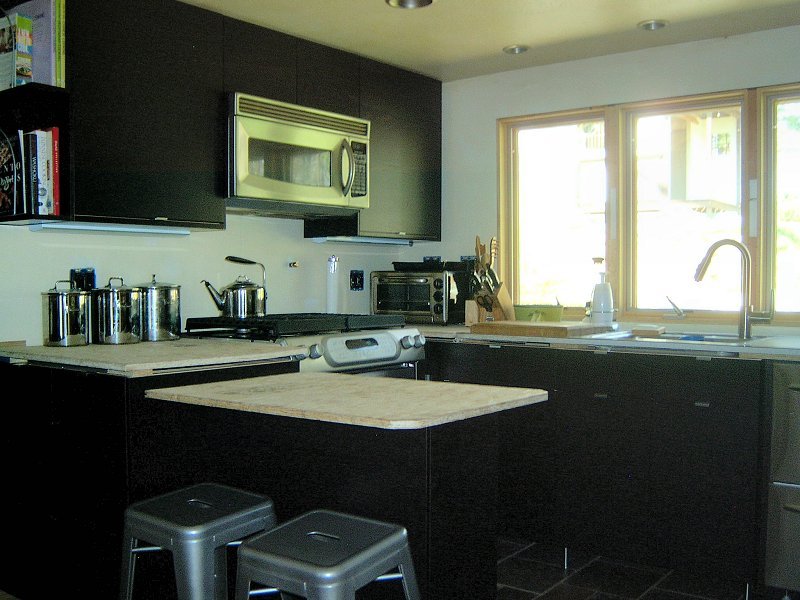
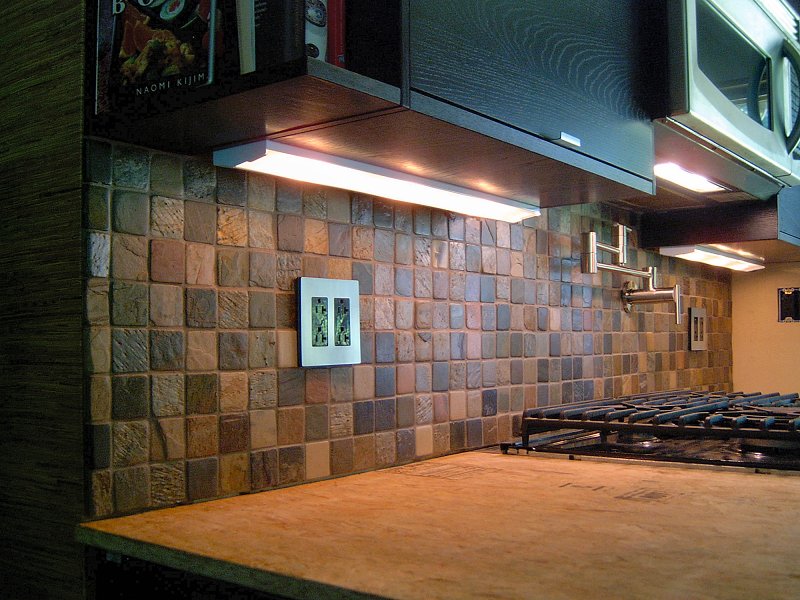
 The completed kitchen (6 photos).
The final project to complete the kitchen was the installation of the duct work for the microwave vent fan over the stove. I had to special order a duct adaptor to get from the 3-1/4 by 10 inch output on the microwave to the 8 inch round duct for the roof cap, and then do a little clean up work in the attic so I could have access to the area I need to perform the work. Unfortunately the duct outlet above the stove ran right into part of a ceiling joist, so I needed to do a little carpentry up there before I could screw everything together. Once the part of the joist that was in the way was cut out with a chisel, I installed the 3-14 x 10 section, covered with bubble-wrap insulation to help dampen the noise. The area around the ceiling hole was foam sealed at the vapor barrier, then the 8 inch ducting was connected to the roof cap I installed back in 2006. The kitchen renovation was completed at long last in March 2011.
↑
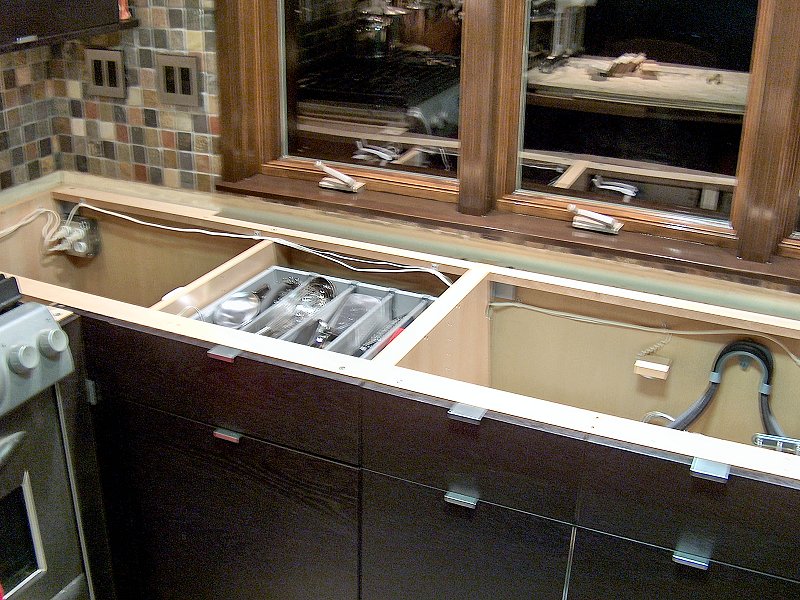
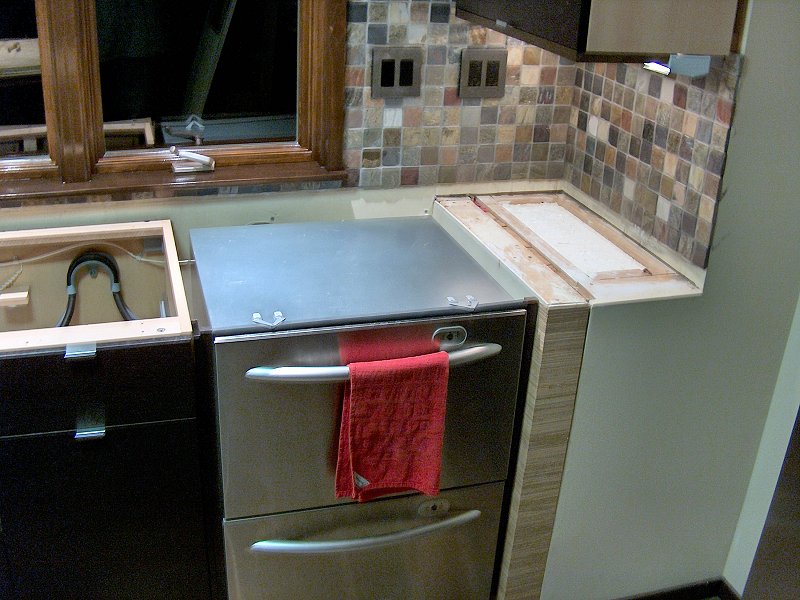
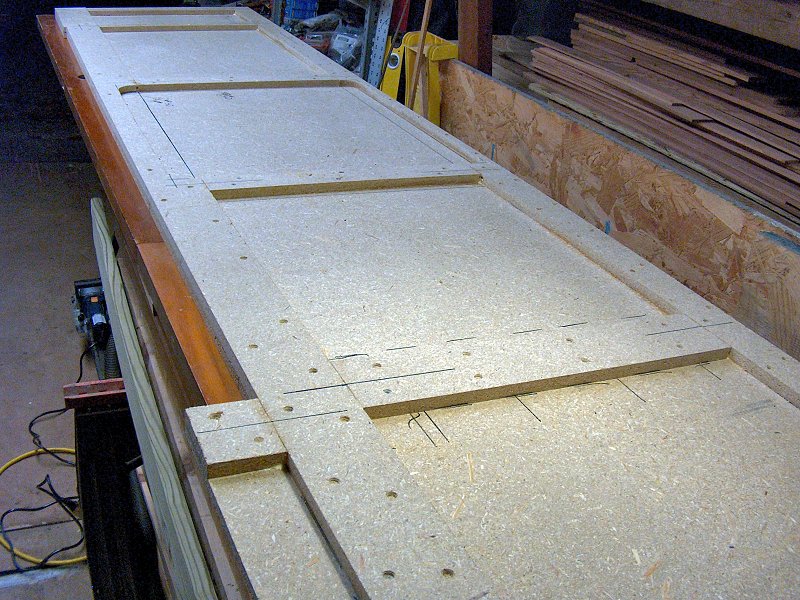
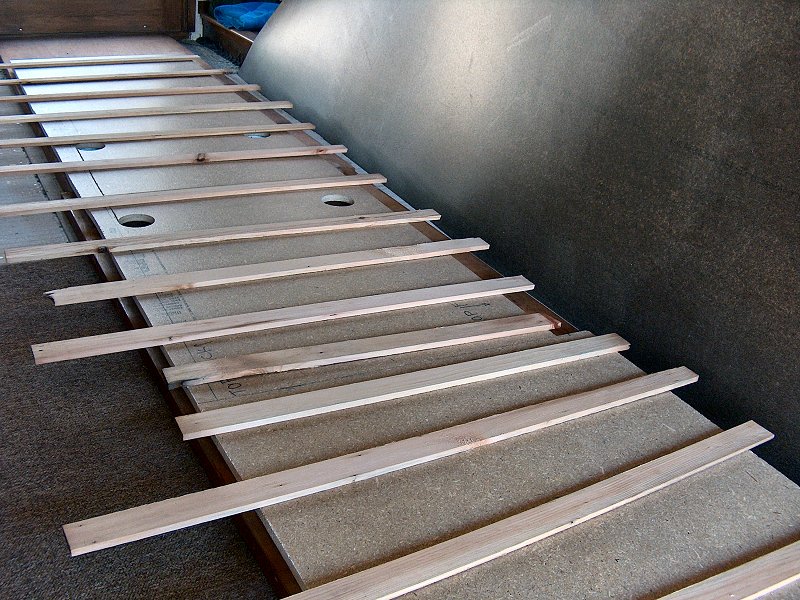
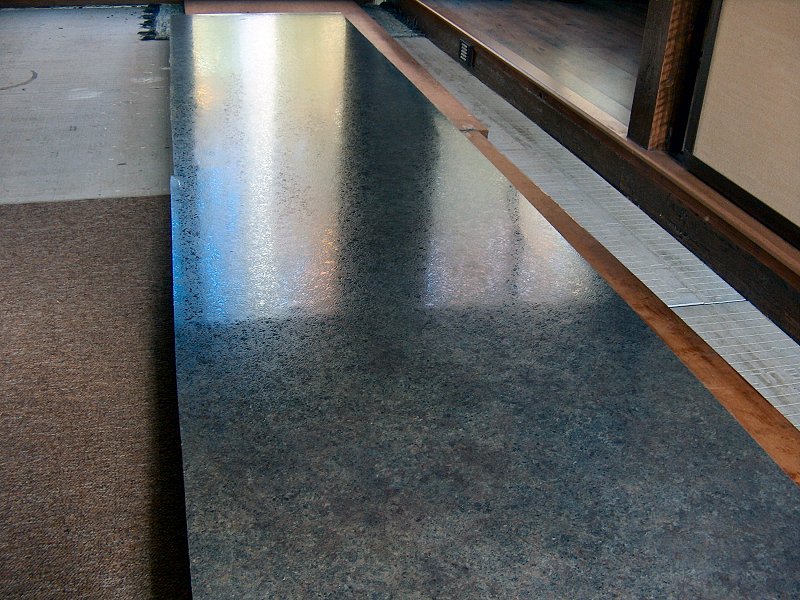
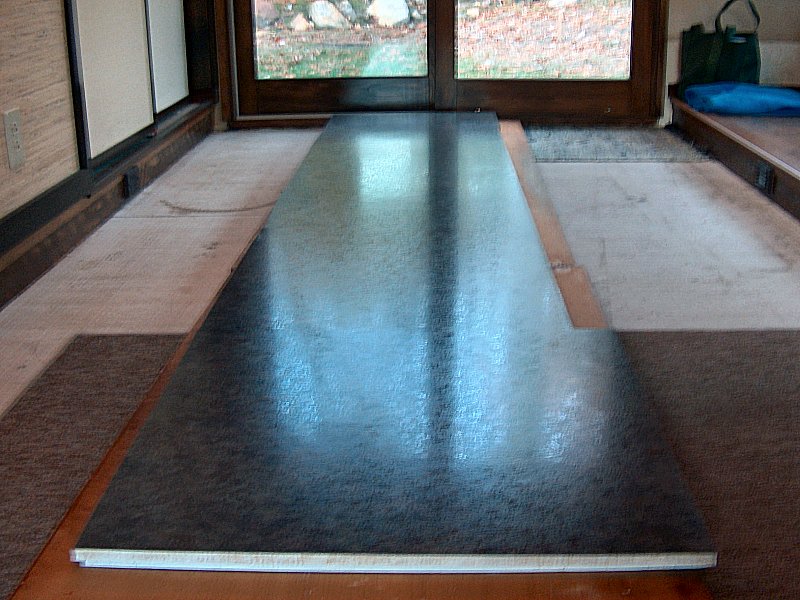
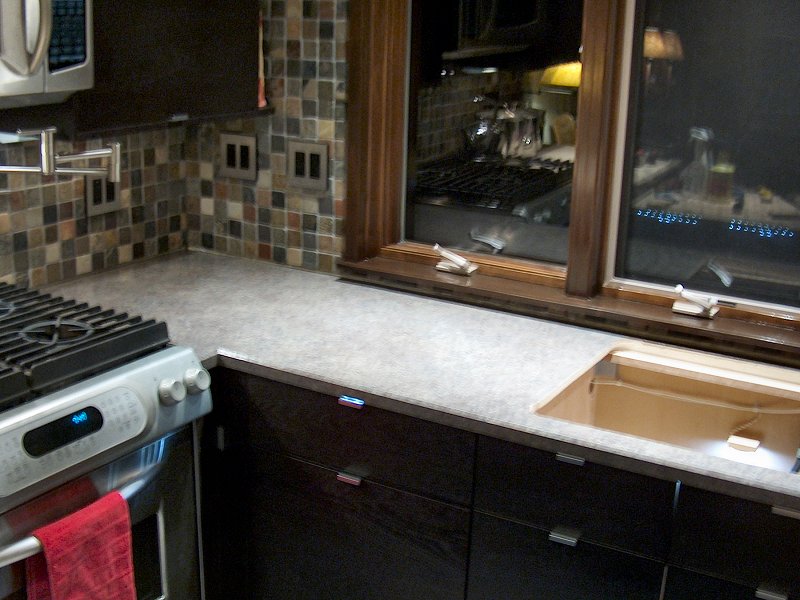
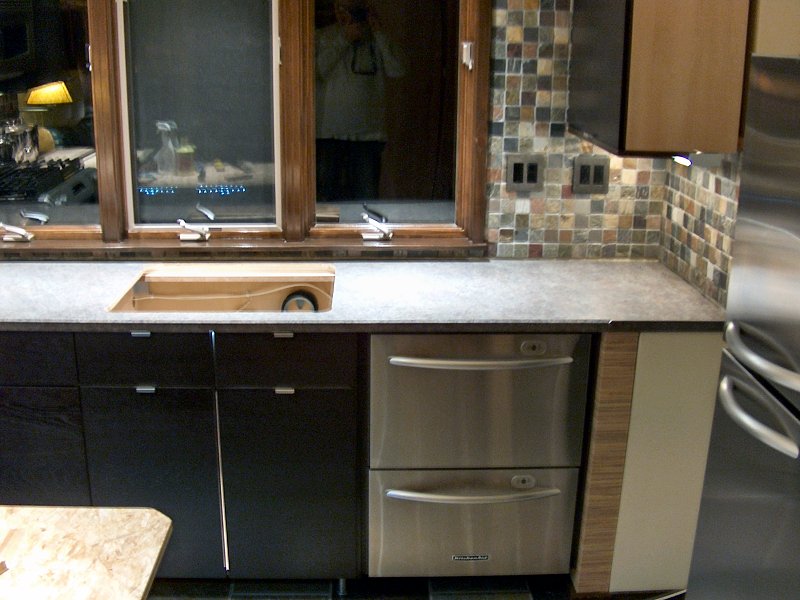