

Selecting Doors & Windows
 This traditional "door" system isn't very practical for a modern home.
Like the roof, I feel the doors and windows have a significant impact on the over all appearance of the outside of the house, and in determining the style of the building. Ideally to achieve our goal of creating a true Sukiya style home, all the exterior openings would be shoji screens that comprise entire walls of a post & beam structure. That'd be great if we were living in Southern Japan and didn't have to deal with New England winters, but paper windows just aren't gonna cut it here. Even with a full engawa (sort of a "farmer's porch" that runs around the entire building) where there's a series of solid wood doors or amado, that enclose the engawa at night adding a second layer of protection from the weather, a traditional window system just wasn't an option for a modern home renovation. We could re-create the same look with sliding wood-framed glass panels of course, but those door systems are pretty much made for post & beam construction, and not really something that was going to work for our little project (and our little budget).
As much as I would have liked to employ true shoji and amado, even on part of the house, the most practical solution to replace our leaky old awning windows was to find a modern alternative that could still convey some of the Sukiya tradition. We decided the best approach would be to use "normal" sized window openings (rather than floor to ceiling shoji), and install sliding or "glider" windows instead of the usual double-hung casements. We may still use shoji screens as part of the interior window treatments, although I doubt we'll sacrifice the view and airflow the windows provide to simply satisfy a desire for some shred of authenticity. Armed with a rough idea of what sizes we were looking for, we started investigating window manufacturers to try and narrow the field and get a better idea of the costs involved. I had no interest in vinyl framed windows, since those just don't have the solid feel of a real wood window. Vinyl clad units didn't seem much better, and I also didn't want white frames on the windows, which is pretty much the only choice for vinyl clad. The fact that we wanted sliding windows also severely limited our choices, leaving us to basically choose between Andersen and Marvin (Pella now makes a few sliders too, although they didn't back when we were shopping for windows).
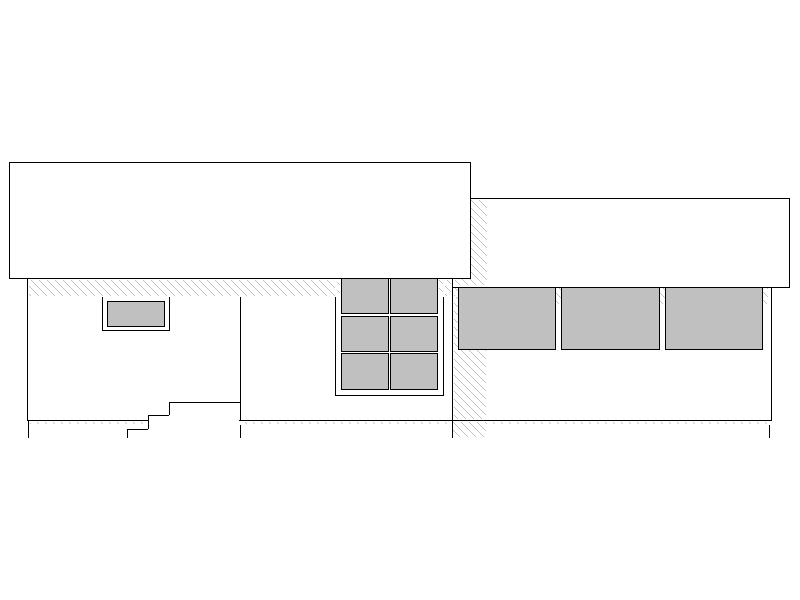
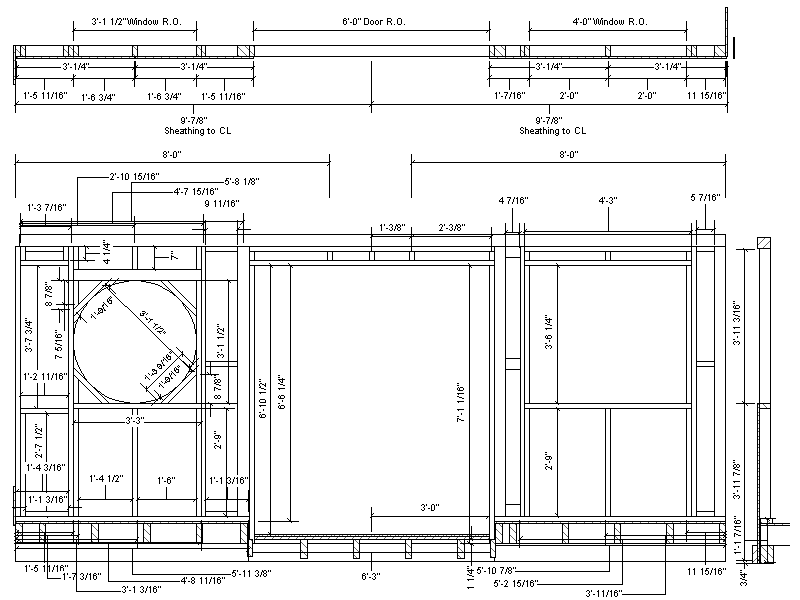
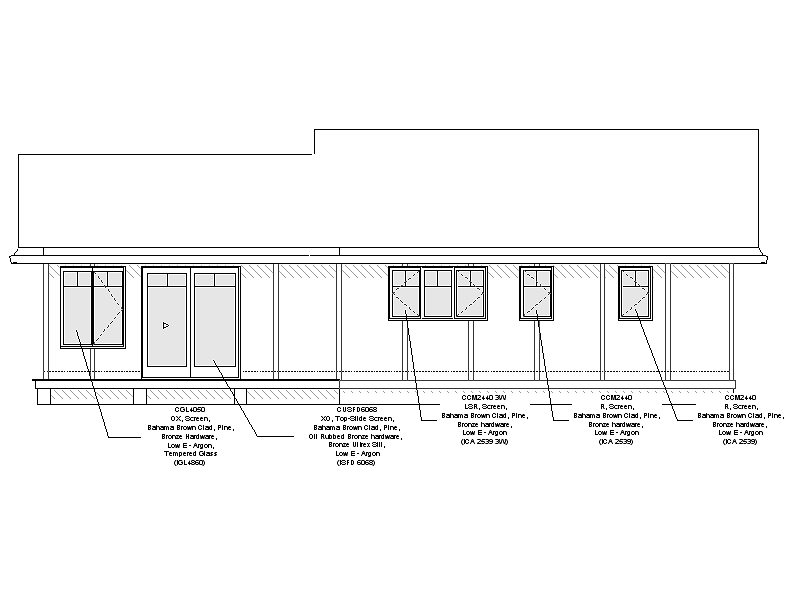
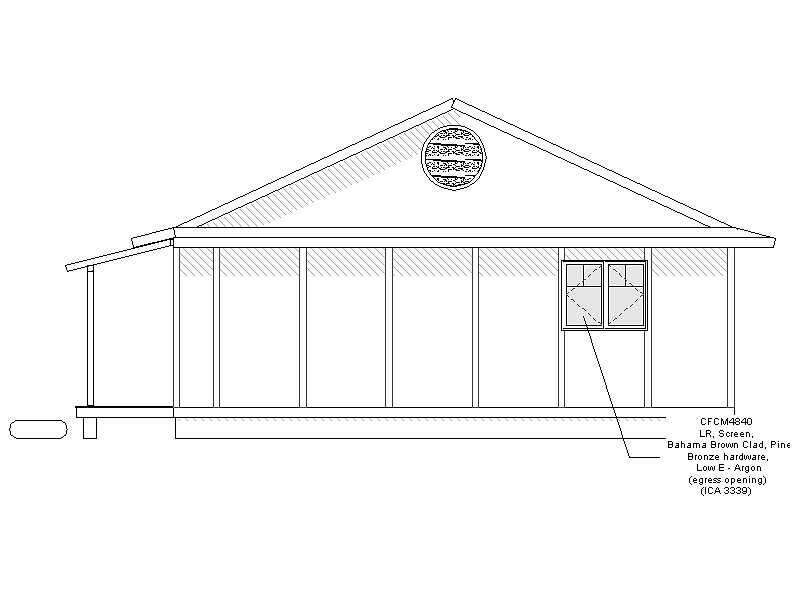
Rough plans helped make the window size and location decisions (5 sheets).
Andersen was my initial choice for the sliders, since they're the only manufacture that makes a slider where both panes can slide either direction. They've also got a pretty impressive "invisible" screen and a good selection of exterior colors. The problem was that in order to get the color we wanted with the nifty screens and the double slider, the cost per unit was going up very quickly. By this time we had also decided we were going to use a sliding door for the back door and a double door for the entrance, and my preference was to get them all from the same manufacturer. I'd seen a fair number of Andersen sliding doors, and I wasn't impressed. The sliding part of the door is on the outside, which made no sense (the screen is on the inside, so to shut the door at night you'd need to open the screen and let in all the bugs to close the door). Andersen was losing ground quickly when we visited a Marvin showroom. What a difference! I was really impressed with the quality of Marvin's products, and the exceptionally solid feel even compared to the top of the line Andersen. I also started looking at window stickers in some of the big fancy homes being built in the area and noticed they were almost all using Marvin. We weren't prepared to spend the big bucks on the aluminum clad stuff from Marvin, since that's pretty much the most expensive window you can buy, but Marvin also makes a line of fiberglass clad windows called Integrity that are very reasonably priced. I ran the question of window manufacturers by my neighbor's General Contractor friend as well, and he said the only window they'd been using lately was the Marvin Integrity line, and they'd had no problems with it at all. With his ringing endorsement, we selected the Integrity, double pane, low-e glass, fiberglass clad windows and doors for the entire house, with the exception of the round window. Since there's no way to extrude a complete circle, the only way to get a round window was to bite the bullet and go for the high-end aluminum clad unit. We took the plunge and apart from the costs of installing a new septic system at the time of the house purchase, we decided to spend the largest amount so far on the renovation: $12,000 later we had ordered all our new windows and doors.
Installing New Doors & Windows
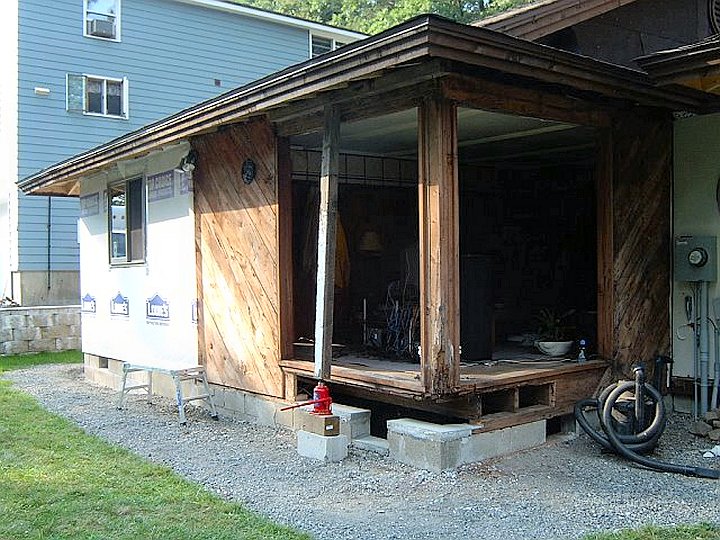
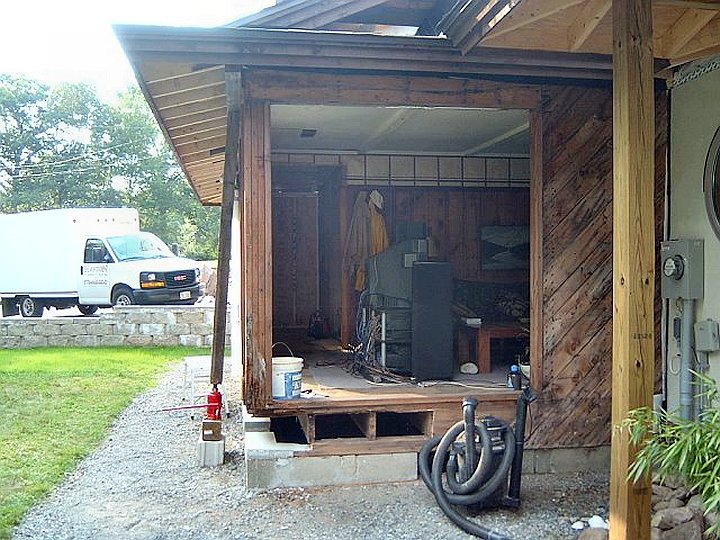
The Old Screen Porch: Fall 2005
The first section of the house to get rebuilt was the old screen porch, and since there was no existing interior wall finish on that section,
window installation seemed like a simple enough project. The original plan was to just re-frame the old screen window openings to a smaller size
for the new windows, then sit the new units in place. As I stripped the porch and got a closer look at the original framing, it became clear that
all the walls would need to be completely rebuilt. The original framing was some sort of half-baked post & beam system that used 4 x 4 top-plates
and a 4 X 4 post every 6 feet or so. The top-plates and posts were mostly held together by gravity and siding, which probably explains why the
whole porch was leaning to one side. By the time I got done removing all the junk framing, all that was left was a post in each corner of the room.
My brother had advised me back when we were thinking of buying this house and re-building it ourselves, that I had to be prepared for the "rule of old houses": Any surface that gets touched for any manner of repair, because of the old house factor, would require the entire surface be replaced. For example, if were going to replace what looked like a couple bad paneling boards on an otherwise sound wall, I would end up tearing out and rebuilding the entire wall. The more work I've done on the house, the more I've proved his "old house rule" to be absolutely correct. It has applied to walls, floors, ceilings, roofs - everything. No matter how simple a little repair I was contemplating, once I began to remove the damaged area I would find a much greater mess beneath the surface, and eventually have to replace everything.
The condition of the porch led to a complete re-build.
With the walls completely removed, re-building of the porch began with a new set of detailed plans. The silver lining to this mess was the ability to address a couple issues I had been trying to resolve with the front door. No matter what I had tried on paper, the top of the doors and windows just weren't going to line up with each other, and that had been driving me nuts. The house has roughly 7 foot 3 inch high interior ceilings, so there was not a lot of room in the wall to work with. I could physically fit a standard 6 foot 8 inch door in the wall, but there wasn't much room to spare at the top. Not a big deal for the door, but there wouldn't be any room to trim the window and install finish window treatments if the windows were essentially up against the ceiling. The windows had to be moved down a few inches, which meant the doors had to be moved down a few inches to match. Moving windows down is easy, but there was that pesky floor in the way of lowering the doors. So... lower the floor! All the walls were gone from the porch already, so after a little investigative poking around in the crawl space, I decided there was no reason I couldn't remove a section of floor joists, cut their ends off, and re-install them with joist hangers in between the existing floor support beams. I also ended up moving the support posts in the walls so I could install 6 foot wide doors, rather the 5-1/2 foot wide doors we had originally planned (unfortunately, all the photos taken of the porch re-build project have been lost due to a hard disk failure).
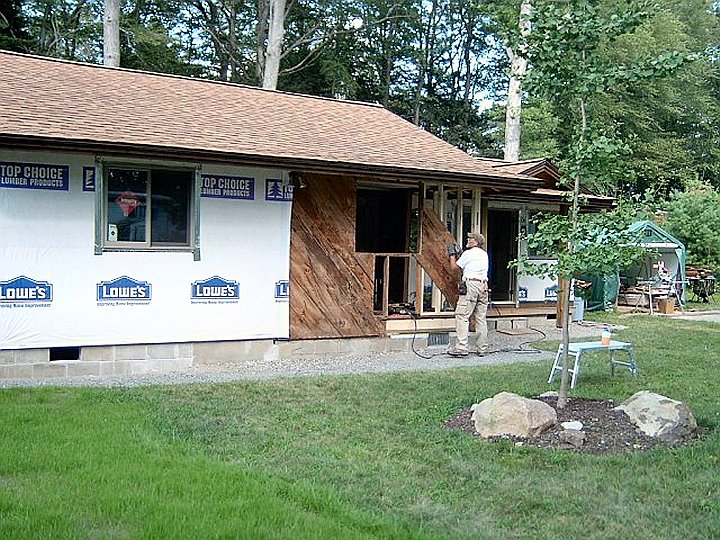
The Front (South) Side and Southeast Corner: Late Summer 2006
The Winter of 2005 was spent working on mechanical systems and finishing the interior of the old screen porch. When the weather warmed in 2006,
I returned to exterior work on the front of the house and the roof. We had removed the old entryway while doing roof work, so that area
was the next section to get re-built.
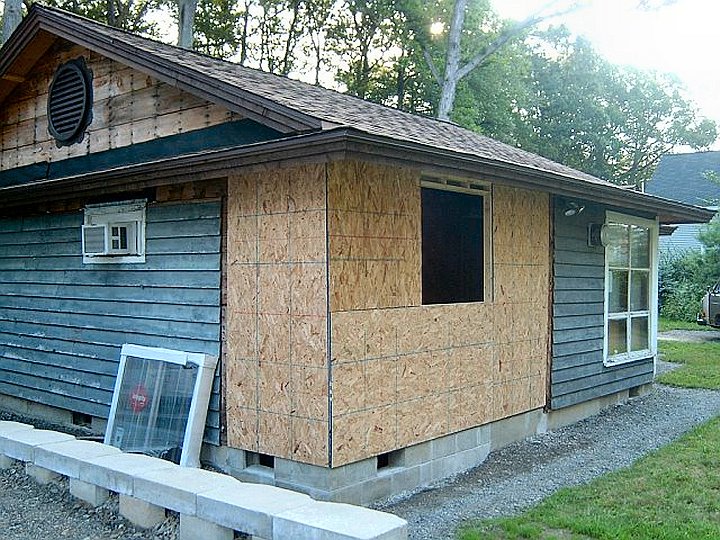
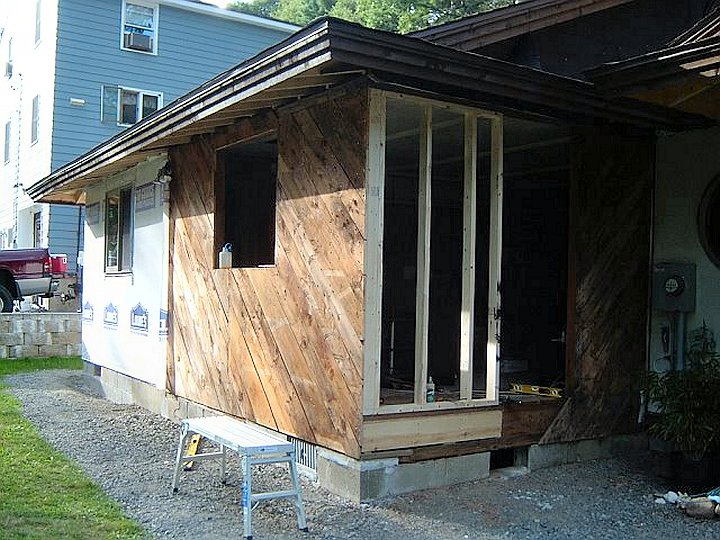
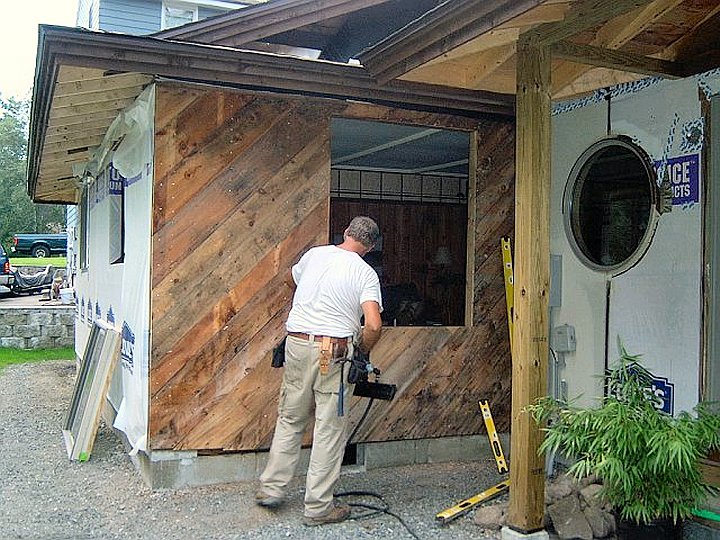
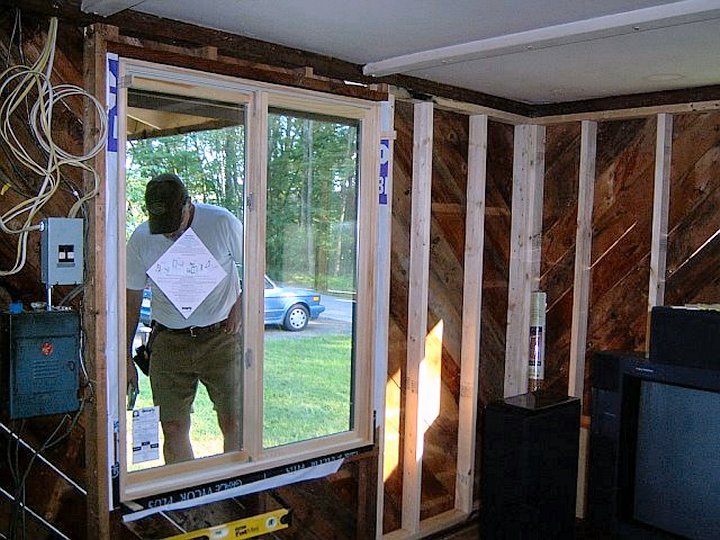
 Installation of the front windows (15 photos).
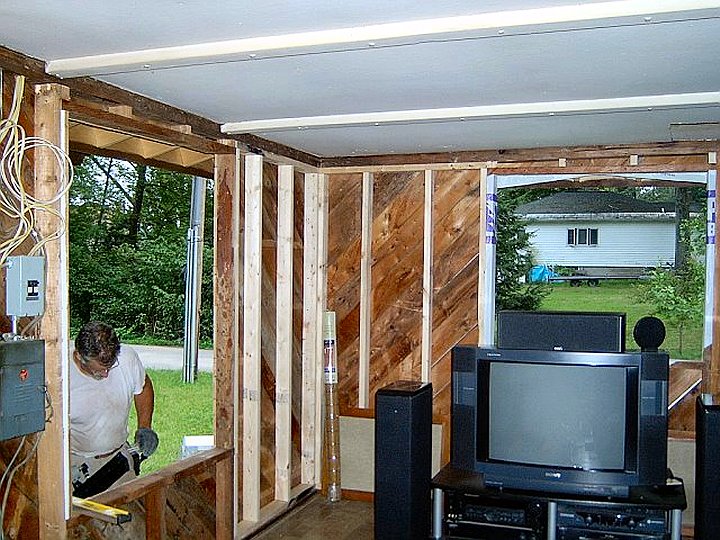
Since the old entryway already had been re-built with a new foundation wall and floor, framing the walls for a new window was a pretty straight forward task. When I turned my attention to replacing the old window section in the Southeast corner however, I ran into my brother's "old house rule" again with a vengeance. The windows in the Southwest corner were an odd collection of home-made double pane windows with a set of pre-made awning windows along the floor. I knew there was some water damage (rot) in the corner trim for that window unit, but the more trim and siding I removed, the worse things were looking.
I ended up removing and re-building the entire corner, including parts of the foundation (see the foundation section for complete details and photos), flooring, and all wall framing. It may seem drastic, but it was actually faster to just tear it all out and start again, rather than try and work with funky old studs and plates in an attempt to save a couple bucks on 2 x 4s. That's not to say I'm all for completely demolishing everything as I go along, then replacing it with all new. I only invoke the "old house rule" when absolutely necessary, and I try to re-use as much material as possible. All the sheathing for the Southeast corner, for example, was the old sheathing from the former entryway. It saves money, saves trees, and matched the existing wall thickness for the transition from new framing to old framing.
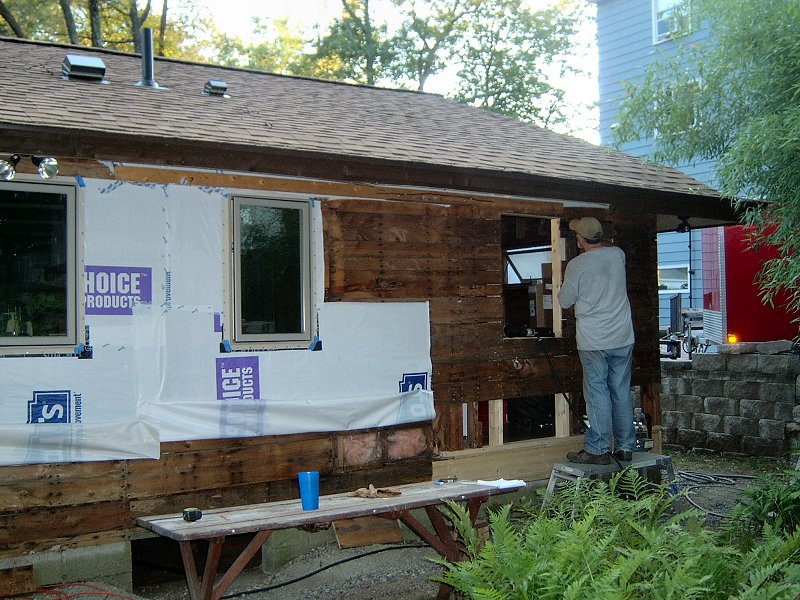
The Back (North) and West Side: Late Summer 2008
Installing new windows seems like a pretty basic task when considering the outside of the house and the framing in the wall...
the trouble crops up when dealing with the inside of the house. The back of the house is where the kitchen and bathroom are located, and we
still had a number of issues to deal with regarding plumbing layout, kitchen and bath design, and some wiring decisions to finalize.
We'd been living with a torn up living room and bedroom for quite a while, and I wasn't thrilled about destroying the kitchen and bathroom
until we could at least have a plan in place for how to put them back together. We were also pretty much out of money by the Fall of 2006,
and we would need the services of a plumber to install and relocate new waste lines in the walls near the windows. I had enough building
materials on hand at that time to occupy my time and continue working on exterior projects, but we needed to refinance our mortgage and get to
a fixed rate loan (glad we got out of that whole ARM mess before the current disaster in the housing market). In order to refinance, the bank
wanted some things repaired on the exterior to make the house look a little more complete (loan underwriters aren't big fans of housewrap,
apparently), so I had to stop removing siding and cutting holes in the house, and shift to getting new siding installed to cover the
housewrap.
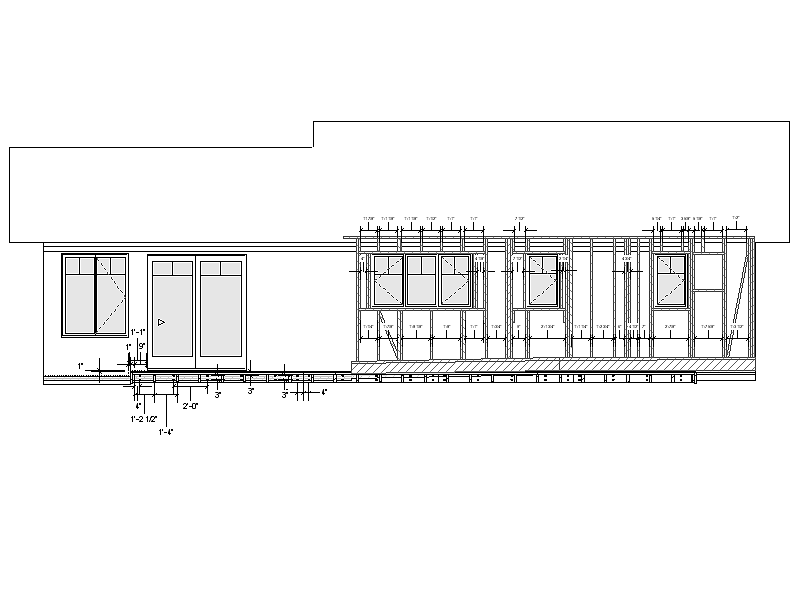
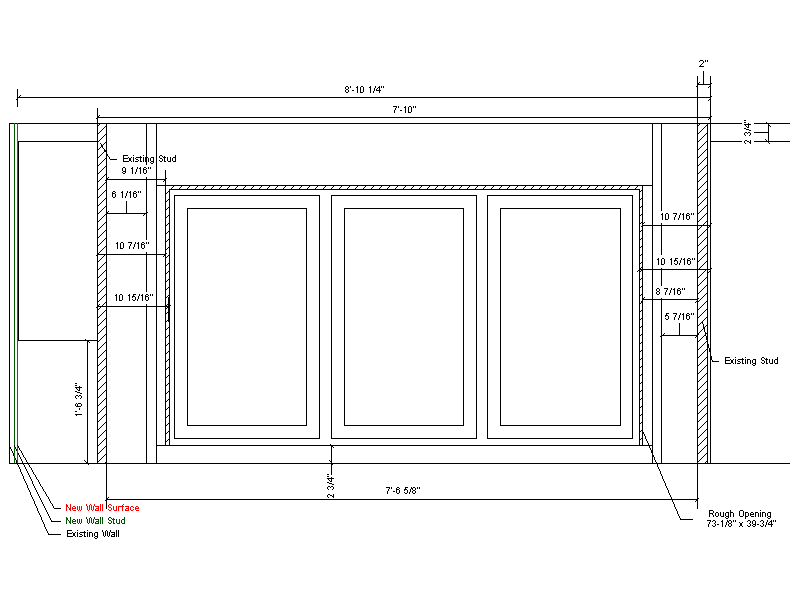
Planning the layout for the North wall (2 sheets).
With the fixed rate mortgage in place in late Fall of 2007, work continued on mechanical projects and planning throughout the Winter and Spring of 2008. By Summer of 2008 we secured a Home Equity Line of Credit to help with some of the big ticket items we'd need to get the house put back together. The first order of business was to get ready for the plumber and finally get rid of our old cast iron waste lines. That meant tearing into the bathroom and kitchen walls, which would allow us to finally finish getting our windows installed. As usual, I worked on the plans a bit to try and figure out exactly where the windows were going to go along the back wall. The back of the house will get a full length engawa, so window placement was getting a little tricky since I had to consider the location of support posts and the roof for the engawa, as well as the kitchen cabinetry and bathroom fixtures on the interior.
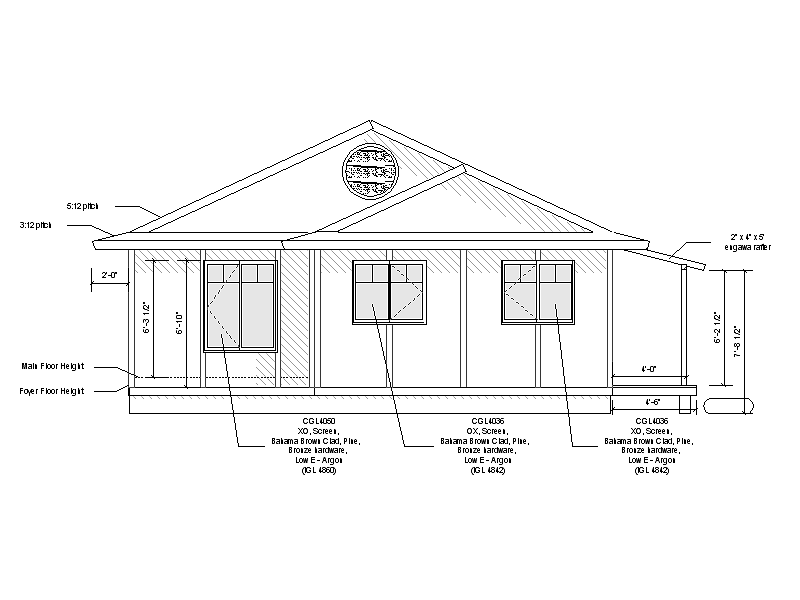
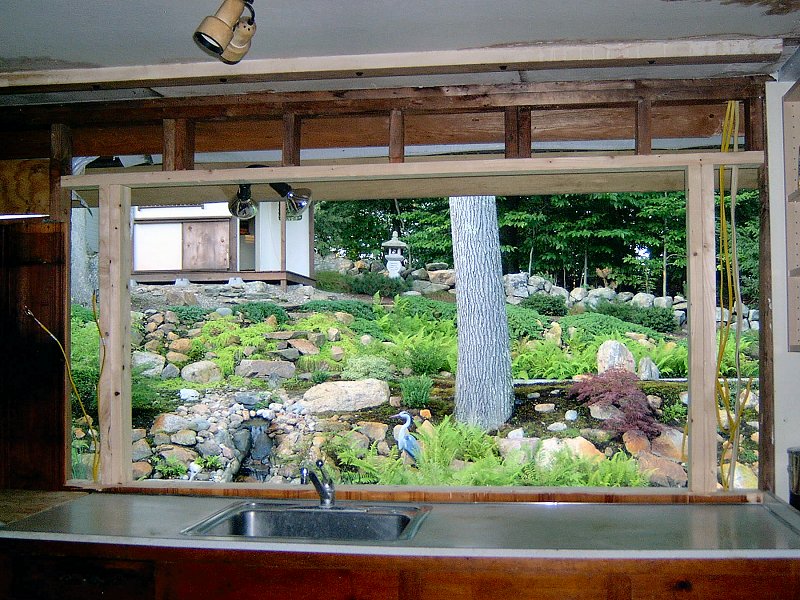
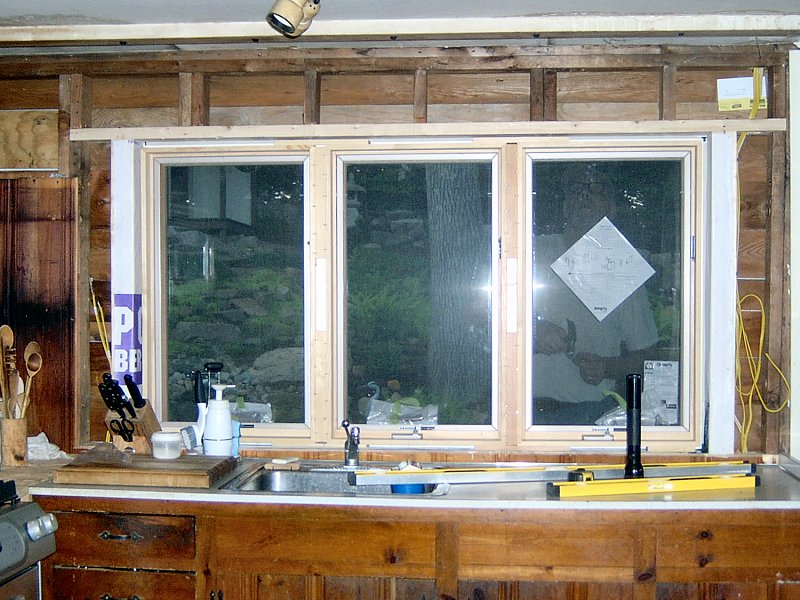
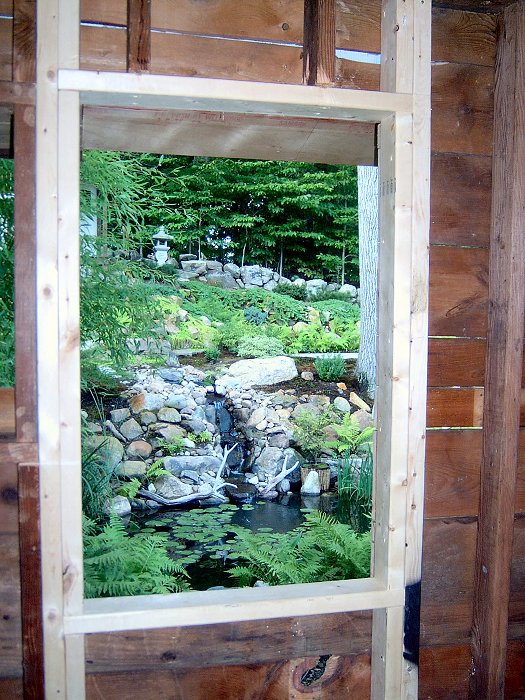
Because of the small rooms along the North side of the house, we selected 24" wide crank-out casement windows for the back of the house, instead of the 48" wide sliders we'd been using everywhere else. We also abandoned the slider for the kitchen, since we wanted a larger window there to view the garden and pond. The 48" slider wasn't as large as we wanted, but the next size up would have been 96" wide due to the mechanics of sliding windows. An 8 foot wide window would be great, but kitchen wall cabinets are nice too, so we decided to go for a 6 foot wide, 3 panel crank-out casement unit. The 6 foot window still allows us to have our big view, but also allows some space for wall cabinets in the kitchen.
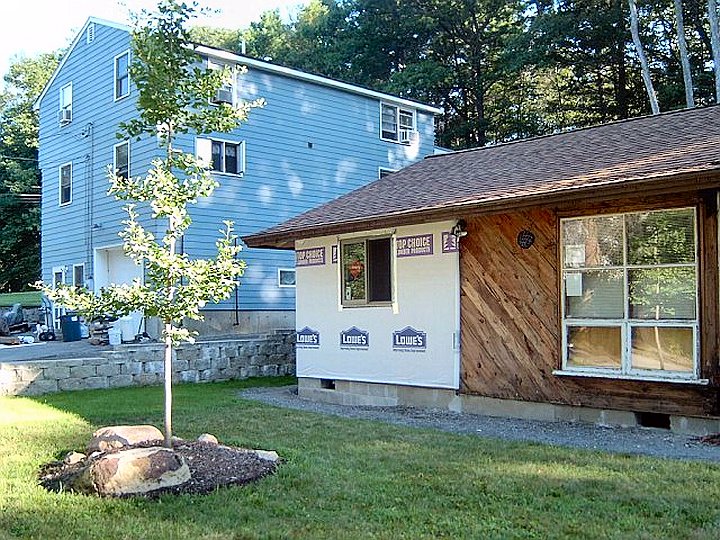
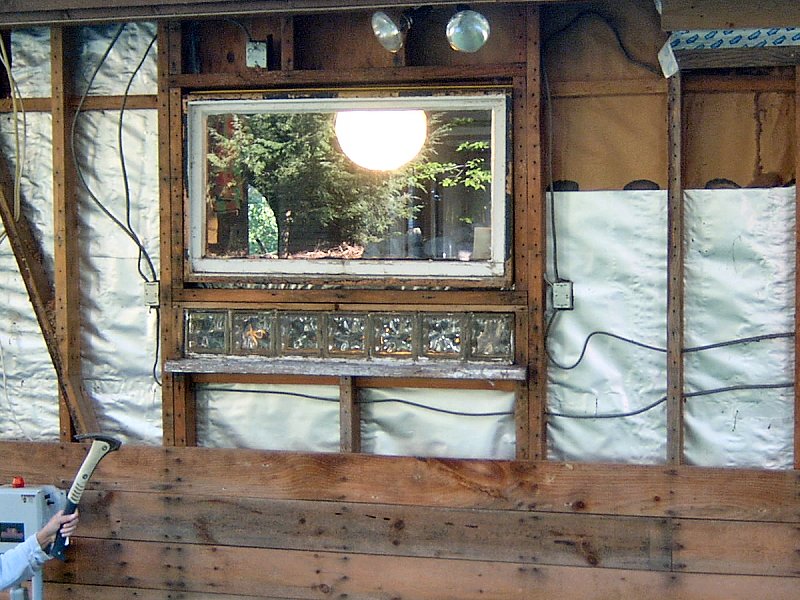
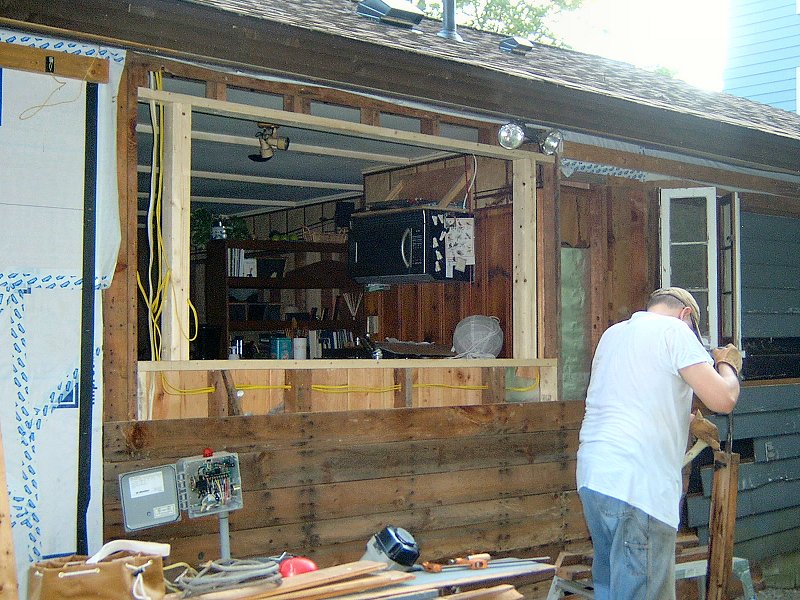
 Installation of the back windows (11 photos).
Other than a little damage to a couple studs from an old leak behind the shower, I didn't have to deal with re-building the entire wall to install the new kitchen and bathroom windows. Getting the spacing just right required some careful measuring and cutting of the old wall studs, but installing these 2 windows was otherwise uneventful.
I wasn't so lucky when I continued to strip siding and turned my attention to the laundry room and the West side. Like I'd found in the front corner, the Northwest corner post was complete junk, as was the sill and rim joist (see the siding section for complete details and photos). Once I dealt with that, re-framing the window opening to replace the old awning windows with the new casements wasn't too bad, and installation proceeded nicely.
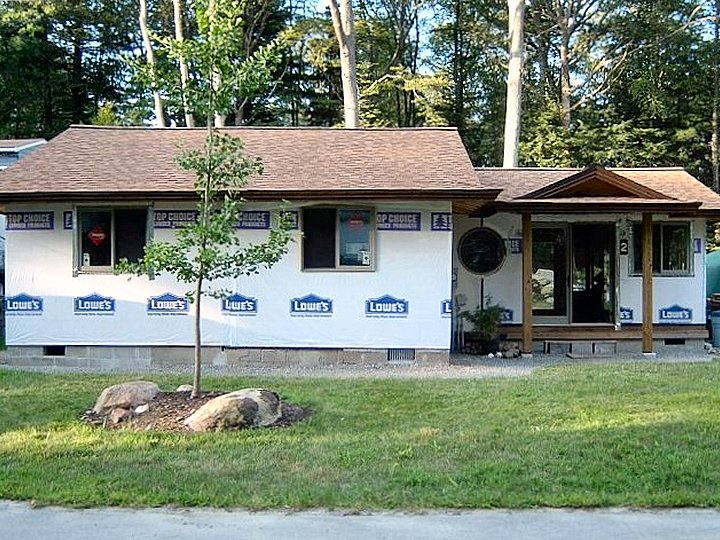
As I had hoped, the new windows and doors really give the place a nice look and take a big positive step in changing the place from a run down little cottage into a home we can be proud of. The combination of the new windows, especially the round window at the entrance, with the new roof lines appear to me to have struck a good balance between a modern window style and a strong influence from the traditional Sukiya house style.
↑