

Post & Beam with Mud Plaster
That's the idea, anyway: post & beam construction with walls of hand-tied bamboo lattice, slathered with progressively finer coats of locally mixed mud plaster. I have neither post & beam walls, enough local bamboo to create the lattice, nor the time and inclination to cover my entire house with mud plaster created from clay in the yard and straw. I do have the desire to create a finished exterior that looks like I did do all that work to build a traditional Japanese style house.
 An example of post & beam walls with plaster.
I briefly considered vertical board & batten wood siding, or just staying with the existing clap board siding, but I really want that stucco look. Luckily there are a number of modern methods available to re-create the post & beam with stucco look. In the course of deciding how to achieve that look, I investigated a few of these methods and believe I've found the most cost-effective, reasonable solution for our house.
My initial thought was to go ahead and apply a real stucco finish to the exterior, but that idea didn't last long once I took
a closer look at the actual structure. The house is pretty solid, but to support a proper stucco finish I would have had to install
new sheathing to the entire exterior (as opposed to just the parts I repaired), and the existing foundation isn't anything great. Real
stucco is heavy and brittle - I needed a finish that's a little more forgiving of a marginal structural base. Next up was the spray-on
stucco stuff that's often seen on commercial buildings. While it's attractive due to the apply-and-forget-it maintenance, it's pricey and
still requires an exceptional strong base to avoid later cracks and flaking. I found the solution from the good folks at
James Hardie![]() .
.
James Hardie makes a wide variety of fiber cement products that look just like wood (folks seem to be most familiar with HardiePlank® clap board siding around here), but they also make sheet goods for vertical siding applications, as well as trim boards. They also make a product that looks exactly like stucco, which is what I used on our house.
Installing the Stucco Siding
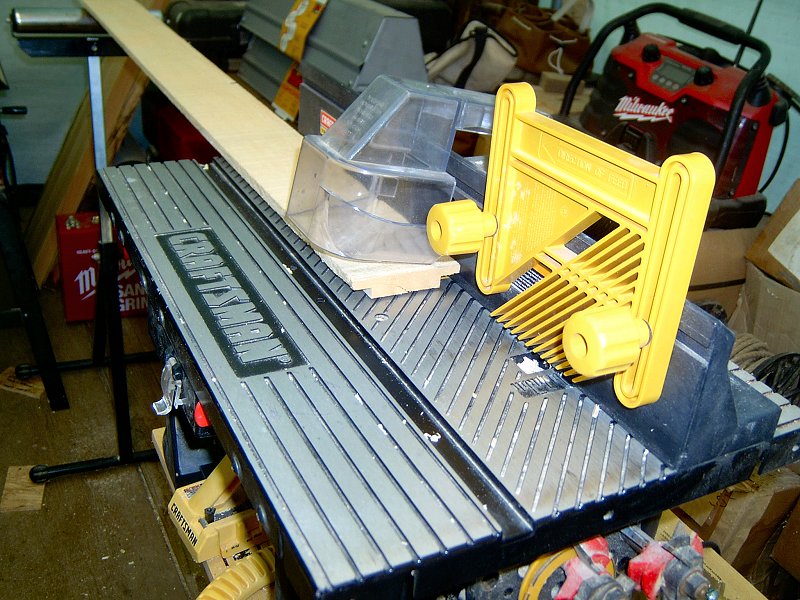
The HardiePanel® cement board we selected comes in 4 x 8 sheets, and it's pre-primed. The stuff is pretty heavy - one 5/16" thick sheet weighs about the same as a 3/4" sheet of exterior plywood, so it's just barely manageable for 1 person. The biggest problem working with this stuff is the silica dust that results from cutting it. My neighbor had recently added a small mudroom to his house and used HardiePlank® clap boards for siding. I remember seeing these huge clouds of dust blowing down the street whenever he had to make a cut in the stuff. The saw blades to get through it aren't cheap either - around $100 for a standard circular saw blade. However, I found a solution to the dust problem: Porter-Cable makes a power shear that's purpose built to cut fibre cement board that's 5/16" thick. The tool is fantastic! It's about the size of an electric drill, but has a set of jaws sticking out the front of it instead of a drill chuck. With a squeeze of the trigger, it zips through the panels like scissors through paper. A little pigtail curl of cement board comes out the top of the shear jaws as you cut, but there's no silica dust produced at all.
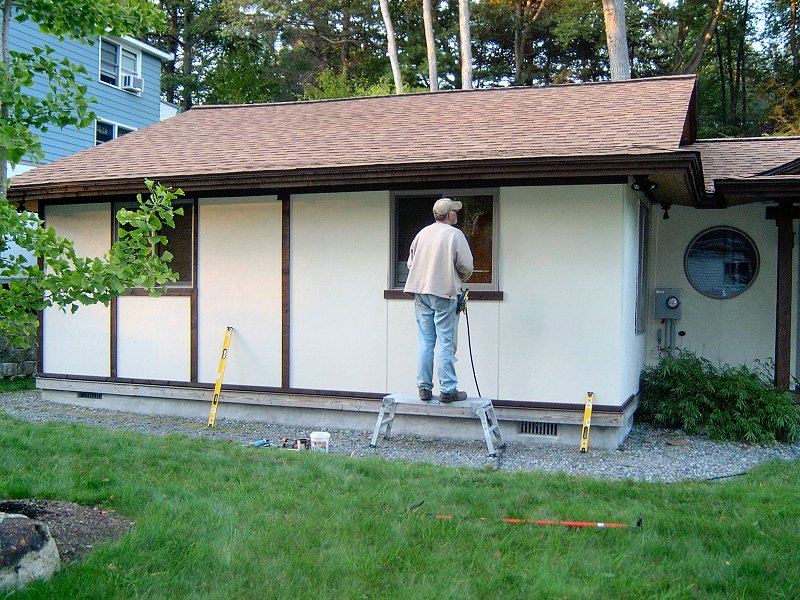
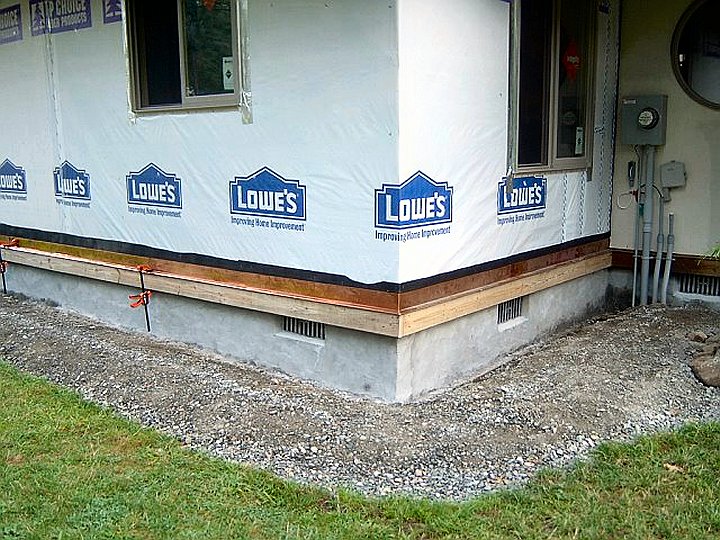
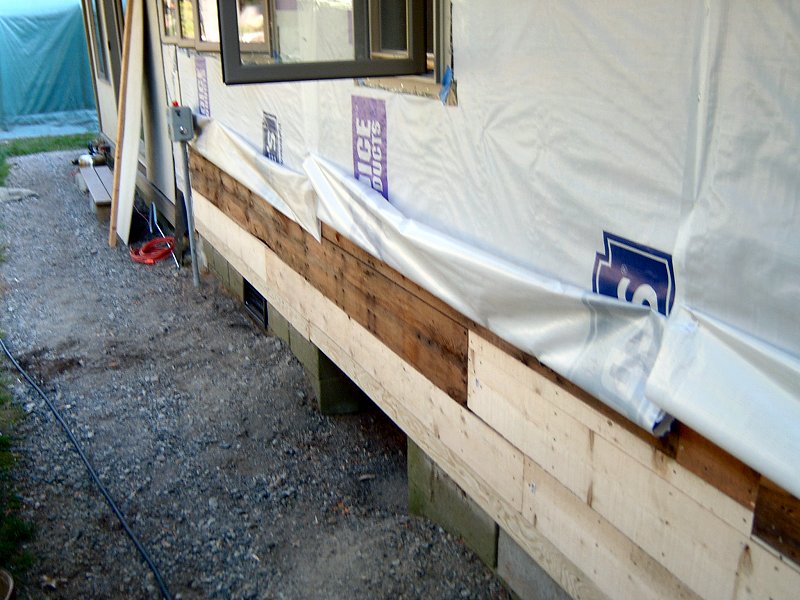
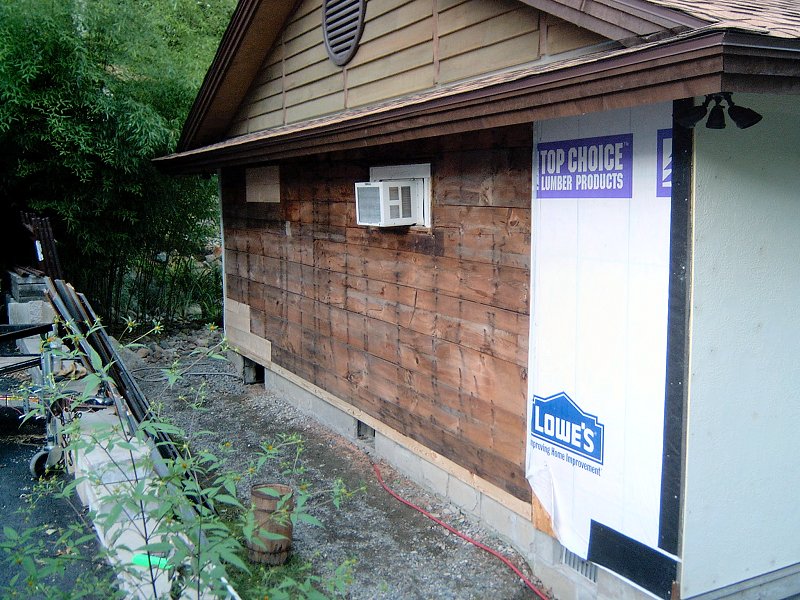
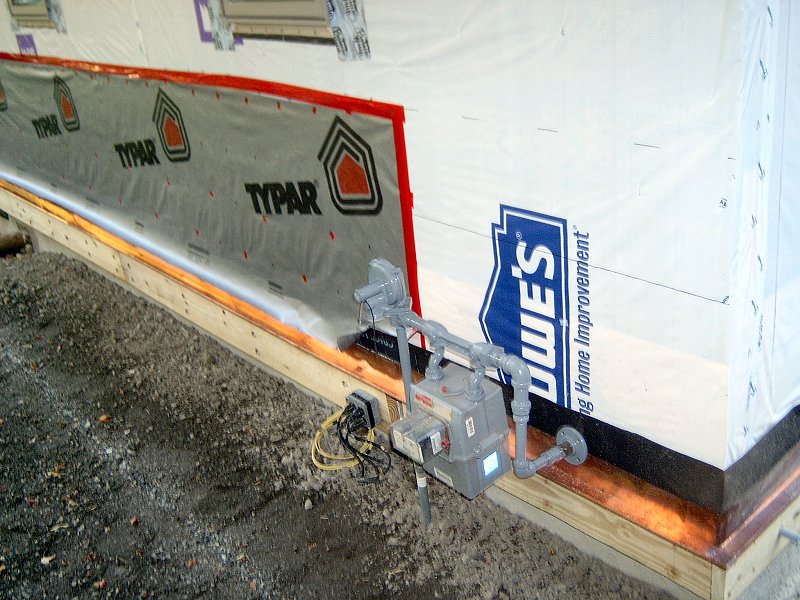
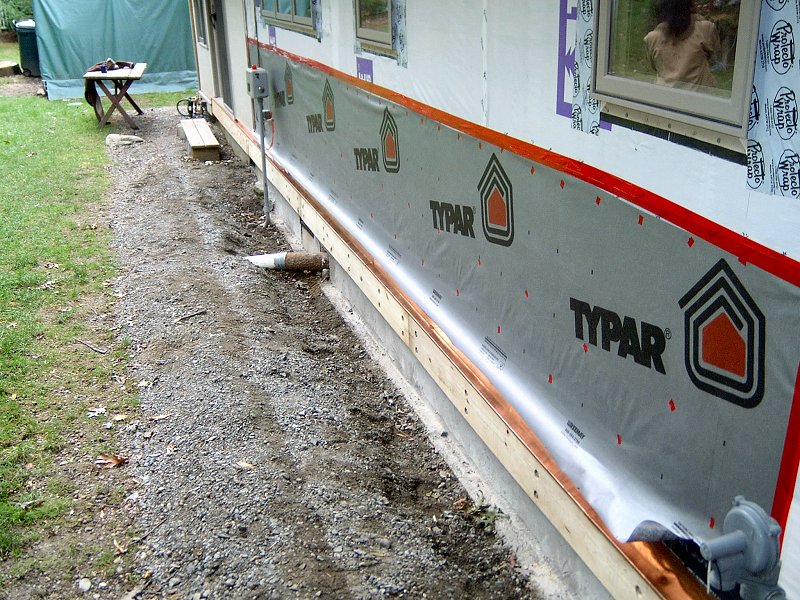
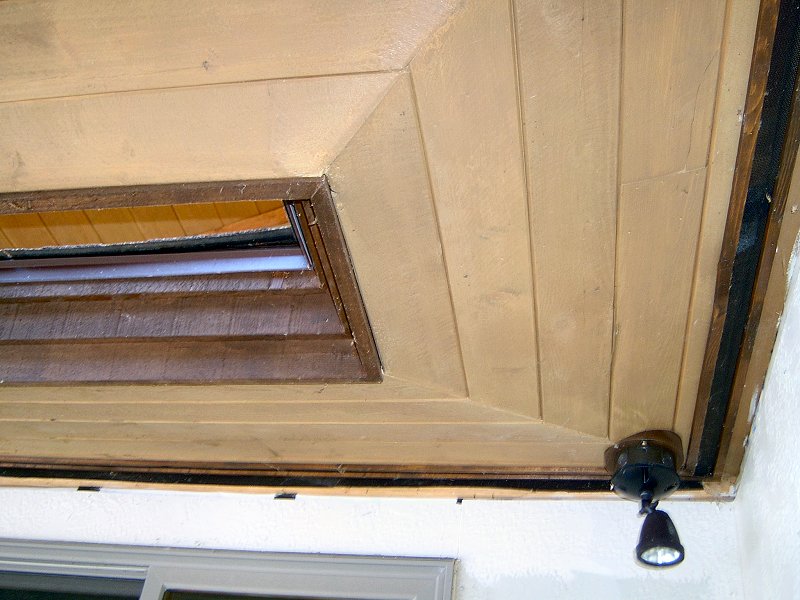
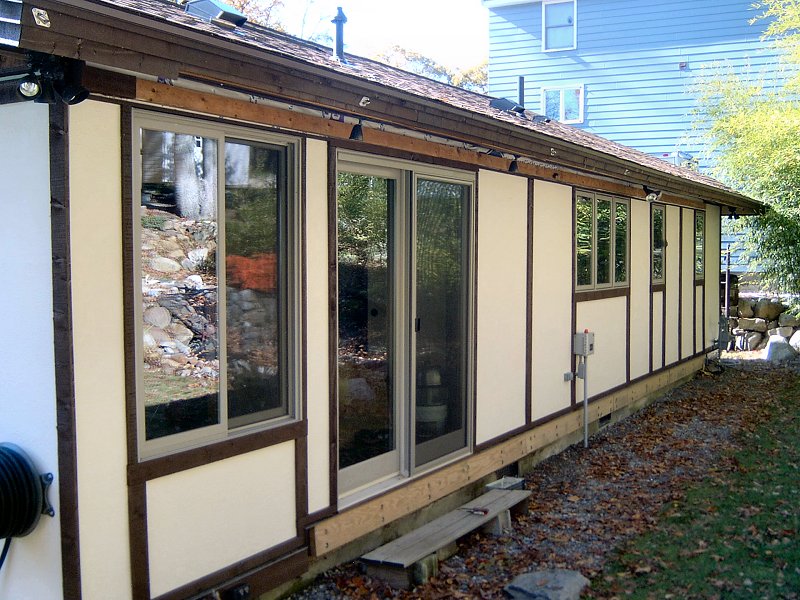
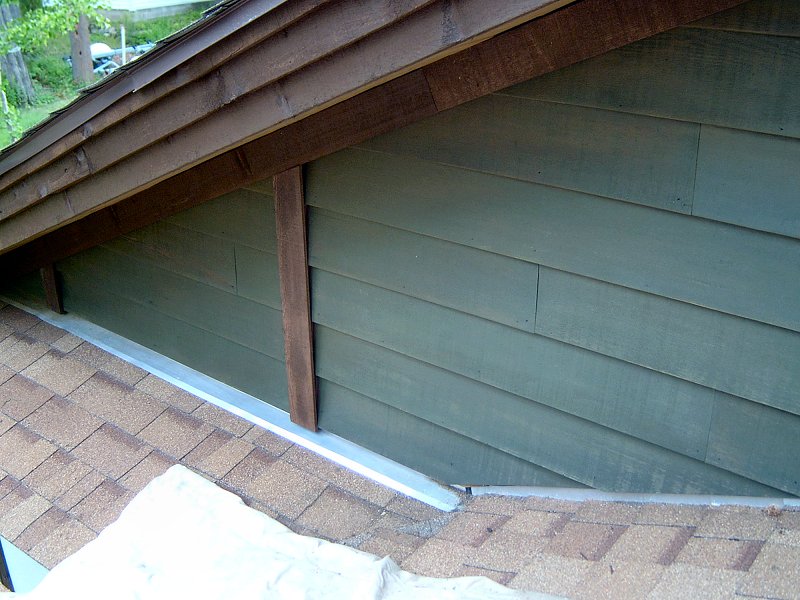
 Installation of the siding across the front of the house (4 photos).
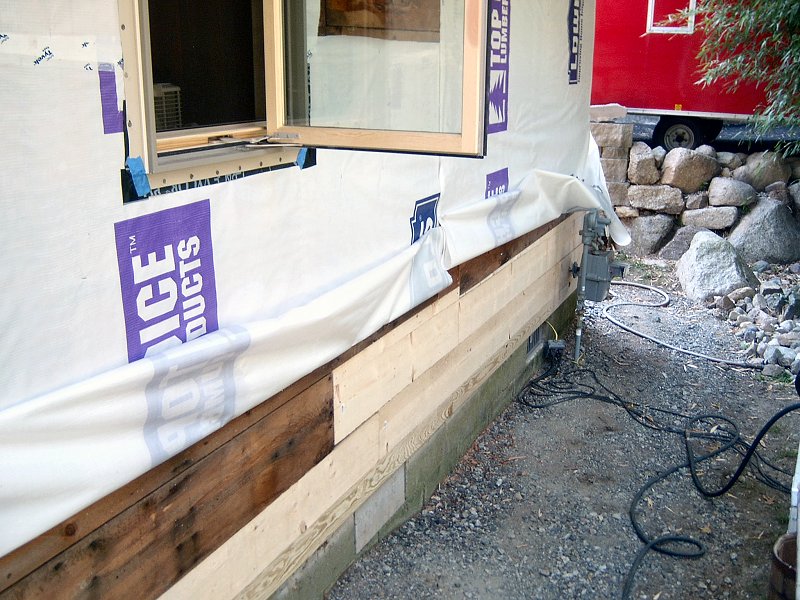
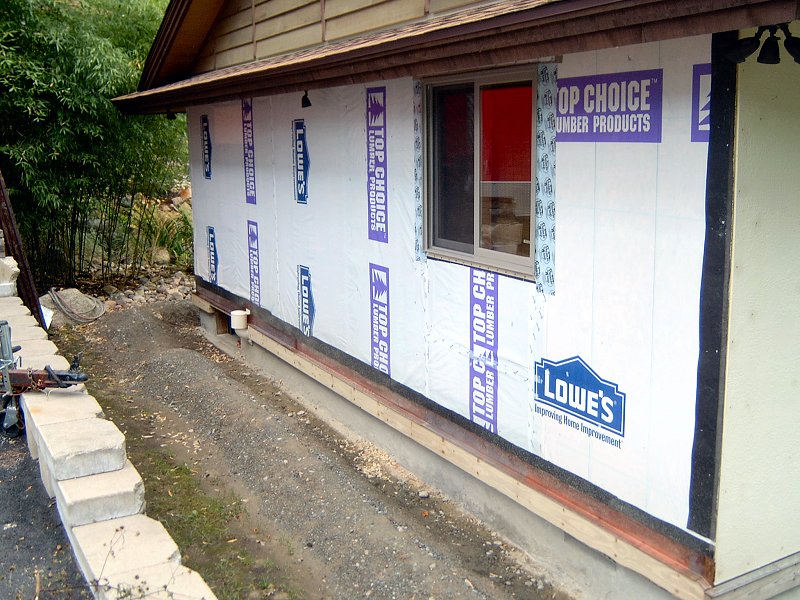
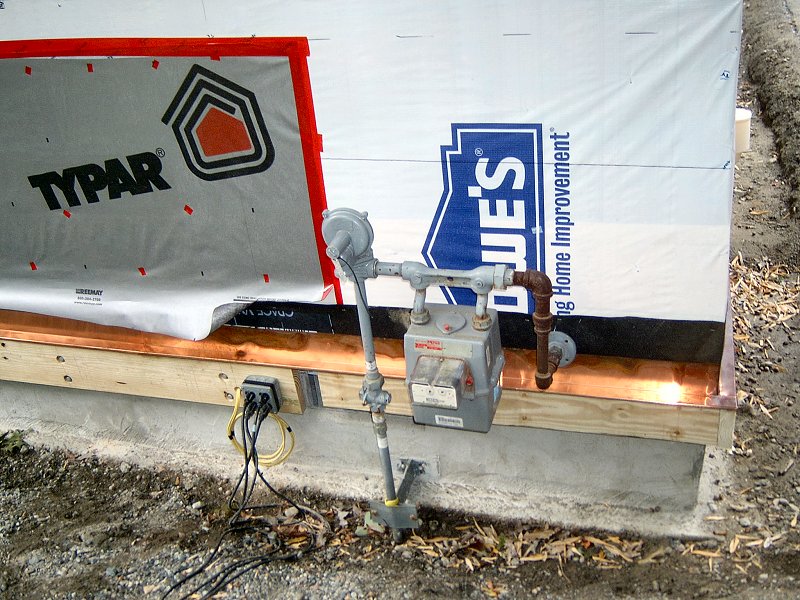
Like most building projects, the prep-work seems to take much longer than the actual installation of the product, and exterior siding is no exception. The big concern is ensuring a weather-tight building shell, but making sure the building can "breath" is also important. Once the sheathing is installed, whether it's oriented strand board (OSB), plywood or planks, the next step is to apply house wrap. House wrap prevents air and water infiltration into the wall and insulation, but also allows moisture to escape - insulation only works if the air it traps is still and dry. That's the tricky part - keep water out, but allow moisture to escape at the same time. To accomplish that, the breathable house wrap is tacked up, and then any penetrations (staples, seams, etc.) should be taped to seal them against water penetration. The top of the house wrap is run up and over the attic insulation at the top plate, then tape sealed to the roof rafters on both sides (the top edge is attached to the soffit vent airways to ensure air flow into the attic). The bottom edge of the house wrap overlaps a Vycor® butyl rubber self-adhesive flashing that prevents water from wicking up and under the sheathing and house wrap. Vycor® is also used on the bottom half of all the window openings, over the house wrap and under the window casing. Once the windows are installed, the top and sides are sealed to the house wrap with Vycor® aluminum self-adhesive flashing. With that the building envelope should be completely weather tight - the siding is simply a durable, decorative cover to all that flashing and house wrap that's behind it.
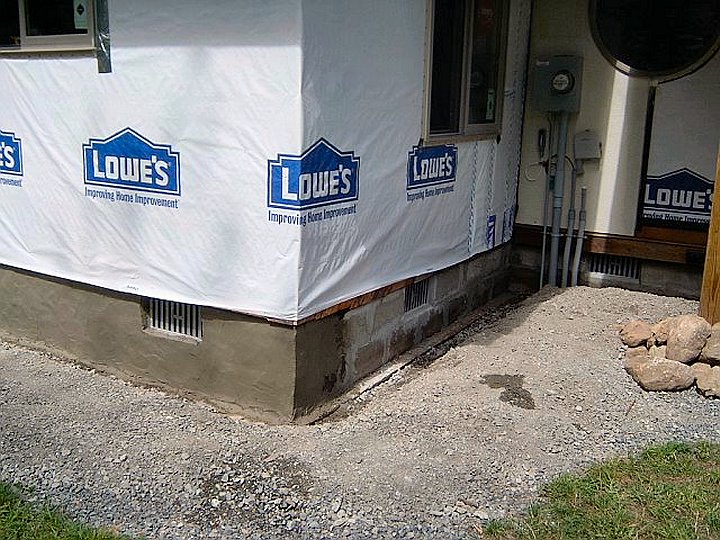
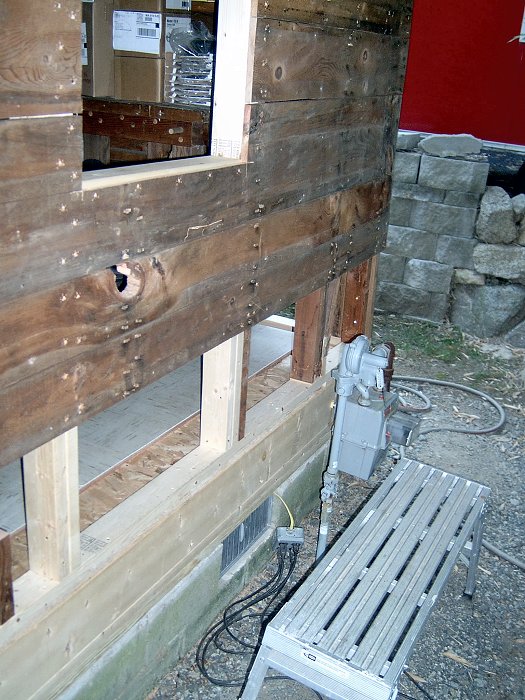
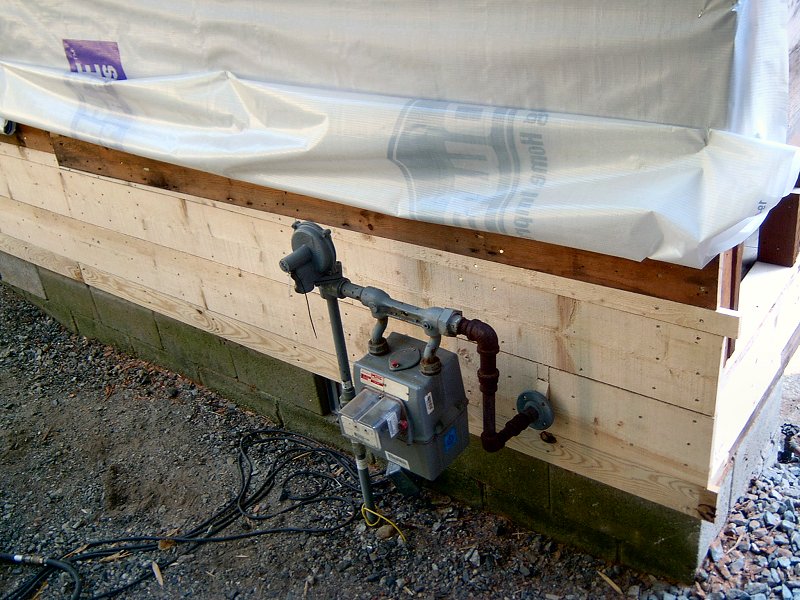
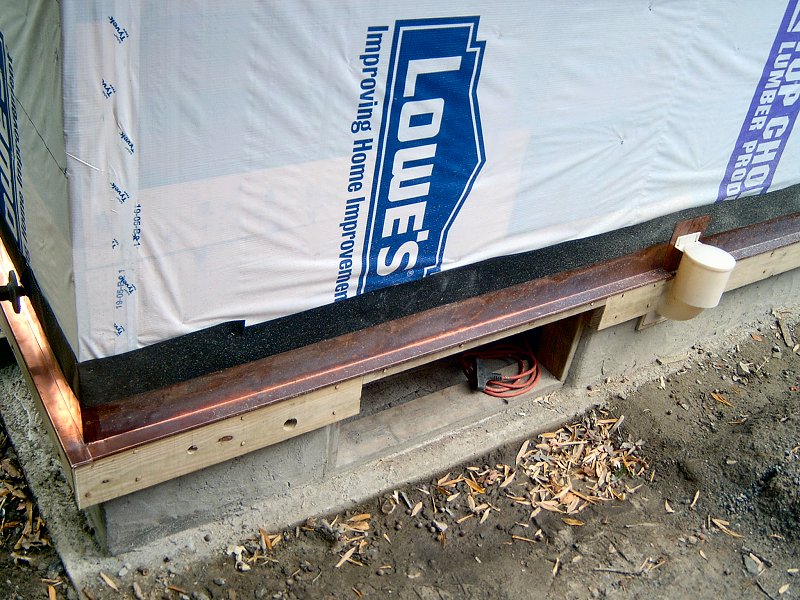
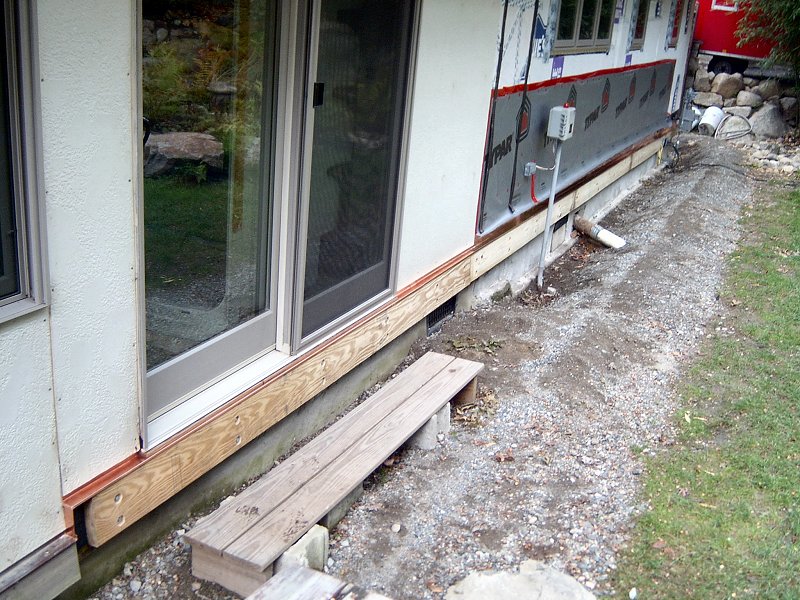
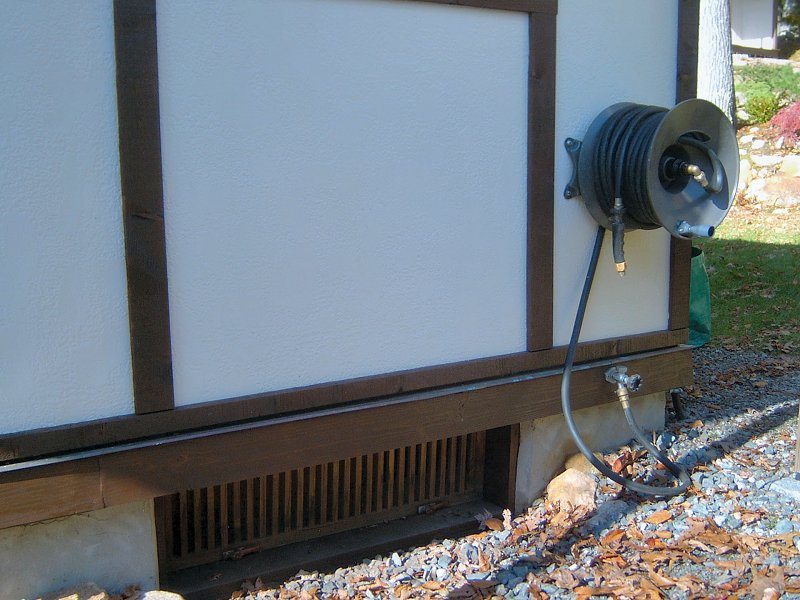
We took on extra step in preparing the building for siding, with the addition of "water table trim", also known as a bandboard. I don't know when or why bandboards went out of fashion, but I rarely see them on new and remodel construction projects, and I think houses look kind of "unfinished" without them. Additionally, with our goal of emulating the traditional Sukiya style, the water table trim hints at the traditional location of the floor support structure that would be exposed around the perimeter of the building in post & beam with mud plaster construction. We used pressure treated 2 x 6 for the water table trim, and attached it to the building with a pair of 4" deck screws every 16". I counter-sunk all the deck screws, and then glued PT wood plugs into the holes to cover them up. Adding a water table trim does require some additional flashing (perhaps that's why folks don't use them anymore), to ensure any water that runs down the siding will go over the water table trim, rather than seep behind it. I figure since we have a pretty small house, we could take the plunge and install 16 ga. copper flashing on the water table board. I had the flashings custom fabricated from the father and son team at The Tin Shop, in Beverly, MA (those guys can do anything with copper you can dream up - they've been making weather vanes for This Old House for years). The advantage of adding a water table trim in our case, is that it provides a stable base to rest the HardiePanel® on during installation, as well as a level line to work from.
The last thing we did before nailing the stucco panels in place was to staple up a 2" wide vertical strip of #20 tar paper over every wall stud, and a 4" wide strip where ever a seam in the stucco panels would occur. The minute spacing the strips provide between the panels and the underlying house wrap would allow just a bit of air to move behind the panels and carry off any moisture build up. There's no point in going through the effort and expense of using house wrap if we just completely seal it off with the finish siding. The siding was installed with 2" long stainless steel ring-shanked nails and the framing nailer. Once the depth adjustment is set on the nailer so it doesn't blow the nails through the siding, installation proceeds very quickly. After the siding is fastened to the building, I then caulked all the seams (but not the top or bottom edges, to allow moisture to escape), as well as every nail head.
Oh Look, More Rot!
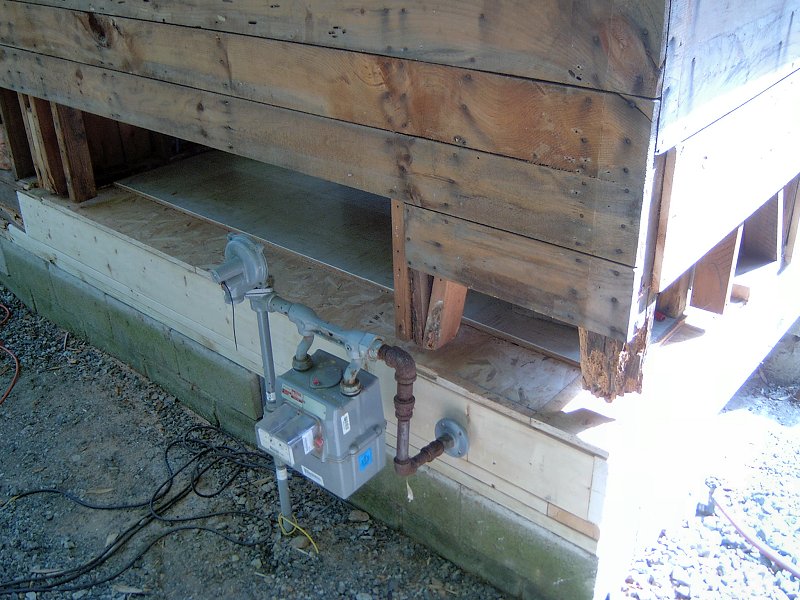
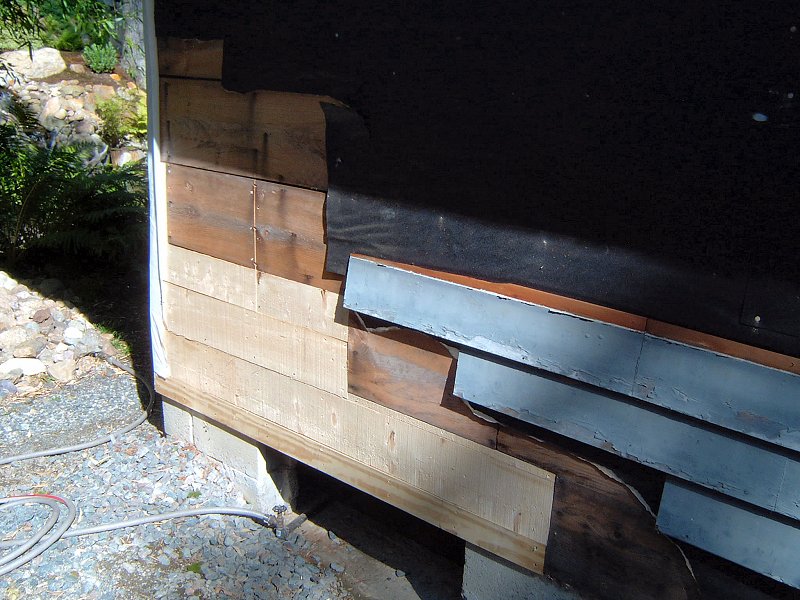
 Rot repair and siding prep in the Northwest corner and back (22 photos).
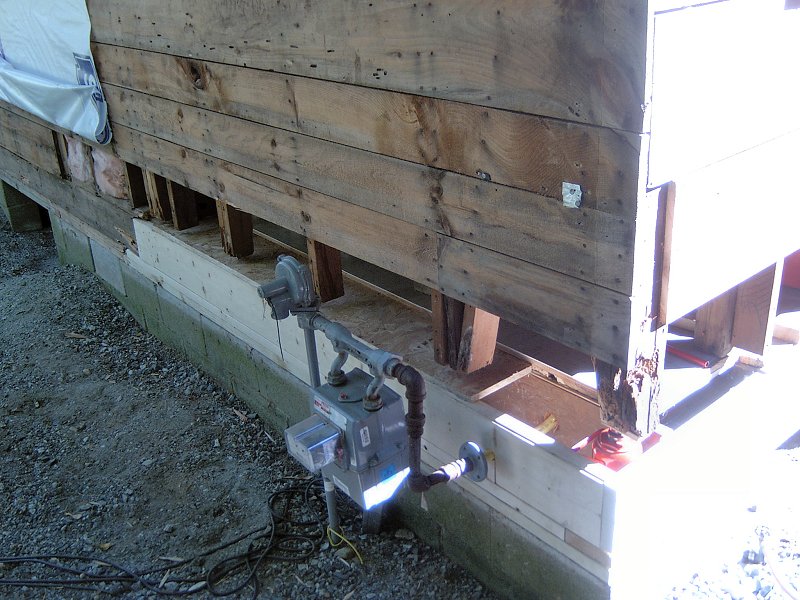
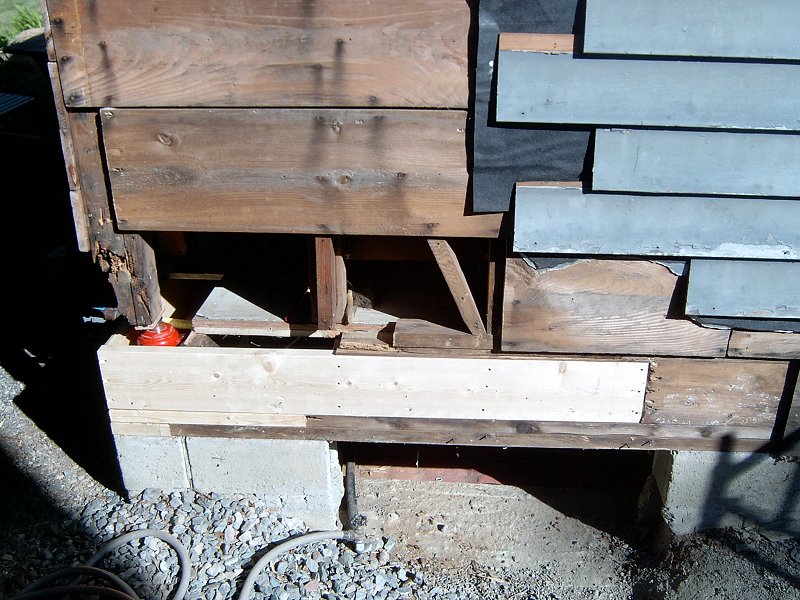
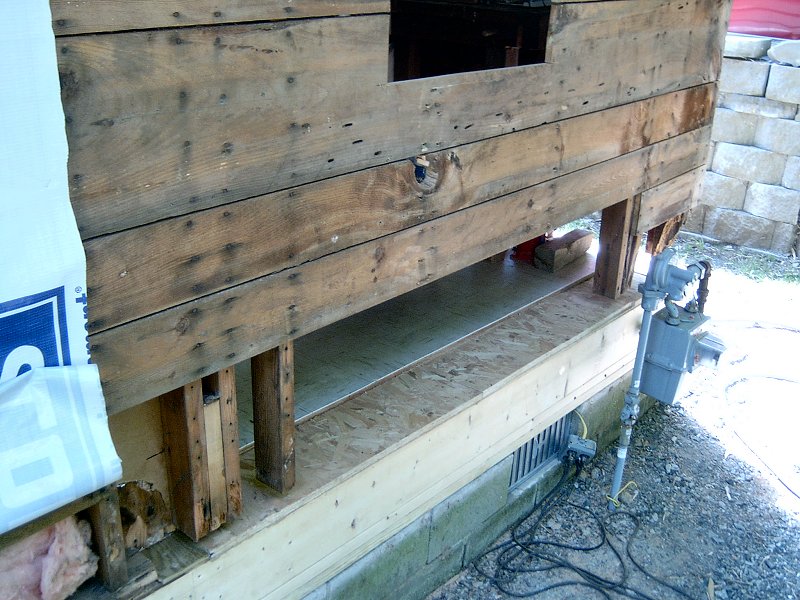
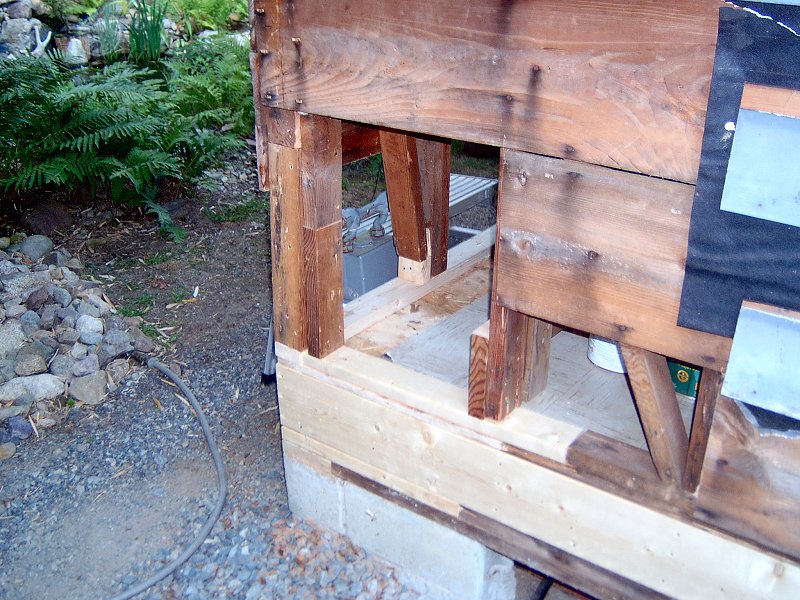
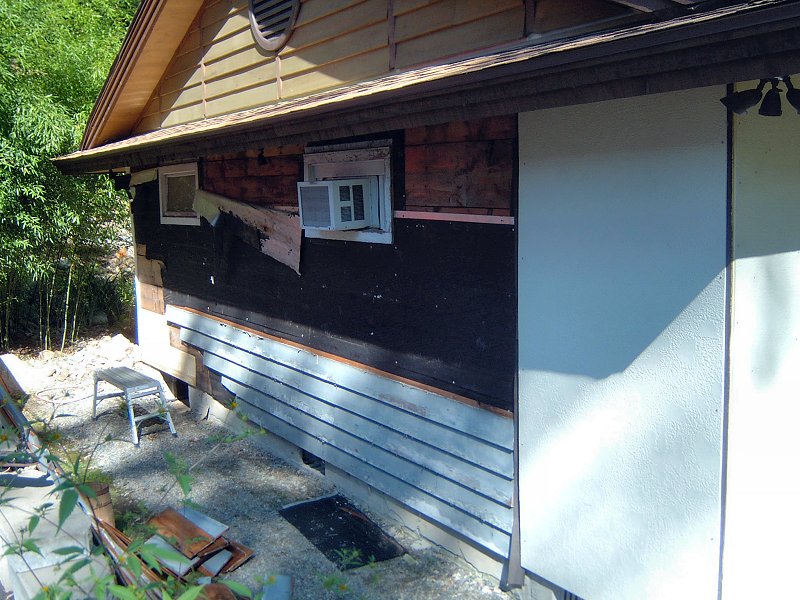
While installation of siding around the old porch and across the front of the house went pretty smoothly... wait a sec, I did have to re-build the entire porch, the old entryway area, and the corner of the living room walls and foundation. Hmm. I suppose I consider those re-building projects part of the window and foundation work, so when it came time to nail up the siding, it really did go up quickly. Anyway, one of the big hold-ups to installing the siding across the back of the house was figuring out the location of the windows (since those determine the spacing of the siding panels too), as well as the location of the deck ledger. The back of the house is going to have an engawa, (a narrow covered porch) that runs nearly the full length of the building. Rather than continue to run the 2 x 6 water table trim around the back of the house, I wanted to go ahead and get the 2 x 8 ledger board bolted into the foundation before installing the siding. With that ledger in place, I could then run the Vycor® and copper flashing around the ledger before the siding went up, rather than try and slip it up under the edge of the siding when it comes time to build the engawa. I had been stripping off old siding and getting measurements for the windows and ledger when I found more rotted framing all along the Northwest corner of the house. Joy.
As near as I could tell, water had been leaking behind the corner trim, then running along the bottom plate for the walls, as well as the sills at the top of the foundation. It would all have to be cut out and replaced, just as I'd done in the front. At least this time I didn't re-build the entire wall, but just tried to limit the replacement to the sections of framing that were junk. I replaced the sill with a pressure treated length of lumber, then added a new rim joist and partial floor joist to the floor framing. For the walls, I only removed a couple of sheathing planks, then added new wall studs to the existing studs that had rotted bottoms on them. It turned out to not be so bad, and I was able to get back to siding prep work within a few days.
Like the front, the siding went up quickly across the back and around the corner on the West side. Having the deck ledger and water table trim available to rest the siding on during installation really helped (especially when working alone). After the rather tedious job of caulking nail heads - oh, did I mention that when using plastic collated gun nails, there's little plastic chips that stick up around each nail head when they're installed? When nailing into wood, the plastic bits just bury themselves or break off cleanly, but when nailing the stucco panels the nails are set to just barely break the surface of the panel, so the plastic doesn't get sheared off. All those plastic chips need to get plucked out from under the nails with a pair of needle-nosed pliers before hitting them with the caulk. Like I said: tedious. Anyway, now that all the nail heads and vertical seams are caulked, I'm really looking forward to getting paint and trim on the house this Summer to finish off the exterior.
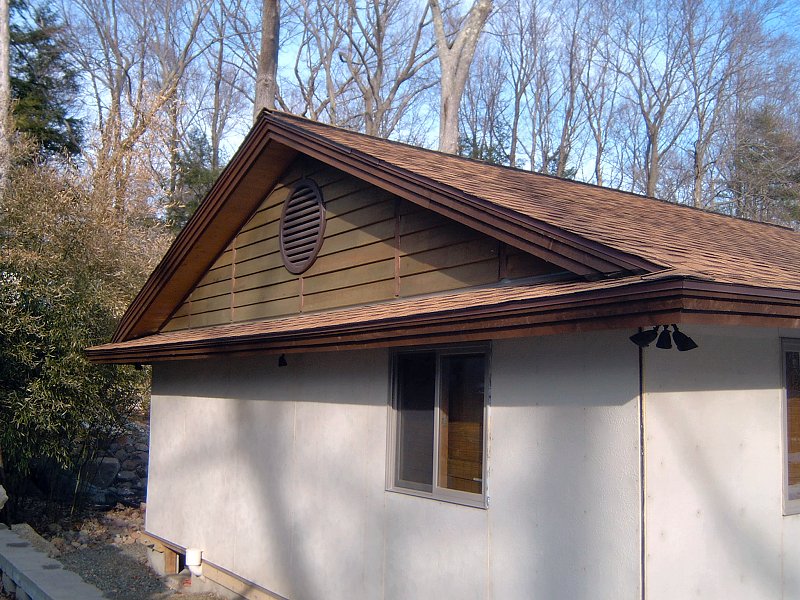
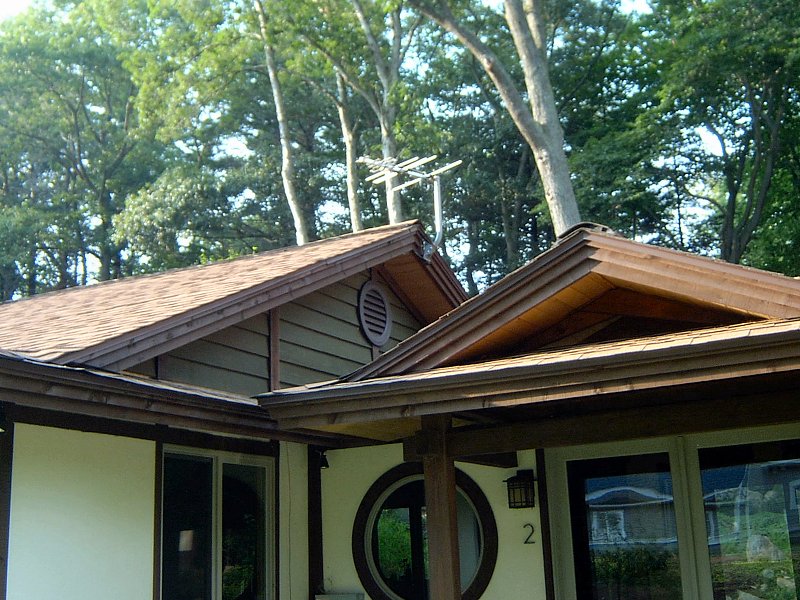
Gable Ends & Soffits
Prepping the Gable End Siding
With the roof, siding and window work that had taken place throughout 2006, my little storage shed / work shop was getting
pretty crowded with all the old siding I had stripped off the house. Even though the old paint was in terrible shape, there
was nothing wrong with the wood itself. The main house had been covered with 8" wide clear Western Red Cedar beveled siding,
and I was very careful to remove all the nails and save whatever I could as I stripped the house. I even saved the old siding
from the porch, although it was just 6" wide Spruce Dutch lap siding, and not Cedar. As I stripped all this stock off the house,
I wasn't sure what I'd eventually do with it, but I certainly wasn't going to just throw it all in a dumpster. As I considered
how to finish the gable ends and soffits, I found a use for all the old siding.
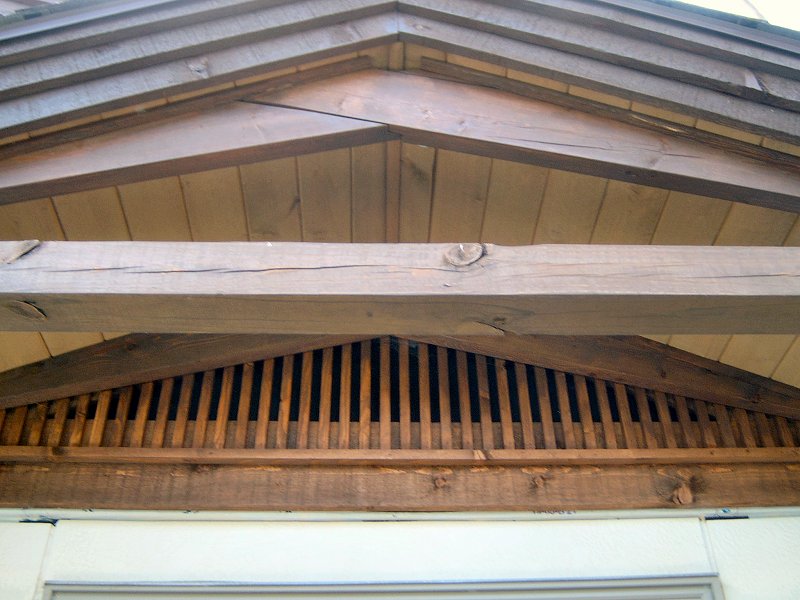
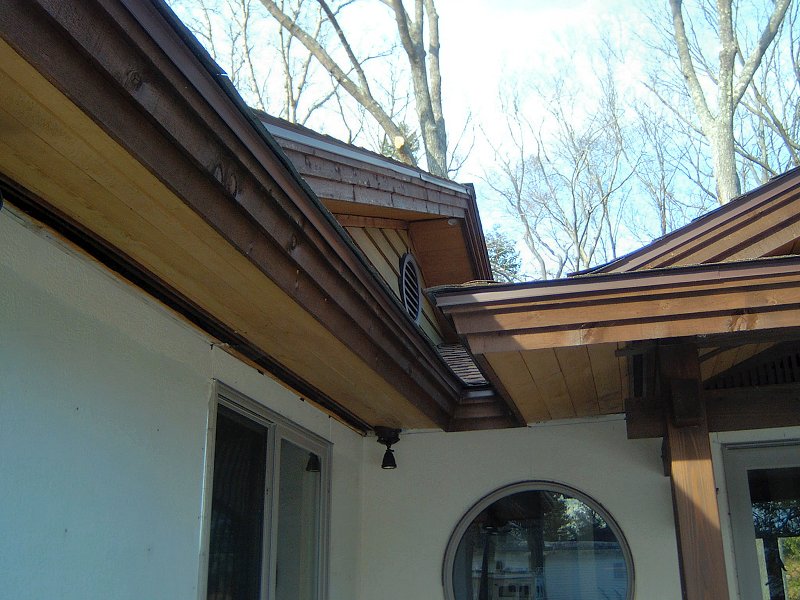 The gable ends and soffits (7 photos).
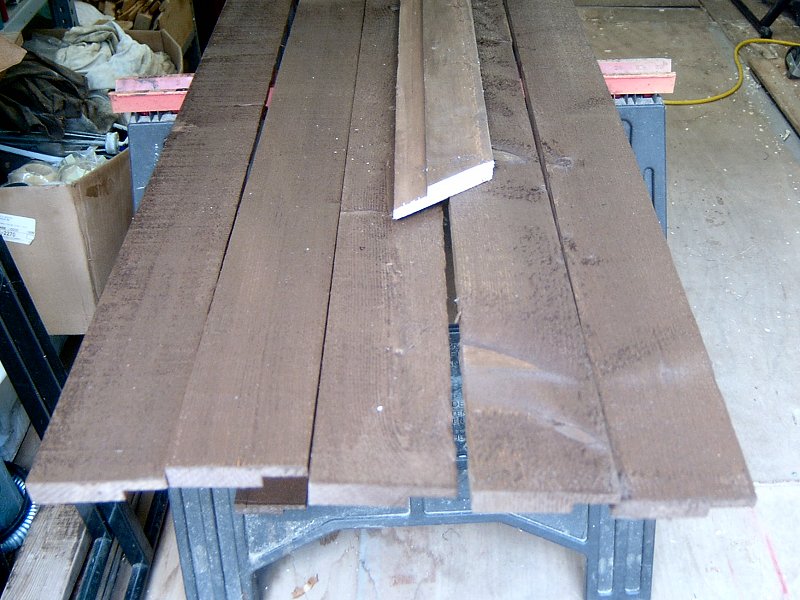
The first step to re-using the huge stacks of paint-flaking lumber I had sitting around was to get all that old paint removed. I started with the Cedar stock first, and set up a work area outside where I went over everything with a 36 grit tungsten-carbide disc to remove any loose paint. I wasn't planning to re-use the old painted surface, but I did want the loose stuff gone. I then flipped the siding over and hit the rough-sawn back side (which would be the new front side) with a 4 x 24 belt sander and an 80 grit belt. The goal wasn't to make a perfectly smooth surface, but just to knock down the really rough milling marks and even out the color a bit. With the sanding done and most of the siding back to useable condition, I was able to get a handle on the amount of stock I had available and determine whether or not I had enough material to cover all the gable ends. I seemed to have plenty of material, so the next step was to sort it by length, and start applying stain. We'd already determined the paint and trim colors for the exterior back when we built the garden shed and tea house, but decided to take a chance and add a little color to the house with the gable ends. We selected Olympic's Maximum® Semi-Transparent 723 "Avocado" stain to add a touch of green to the overall brown and beige pallette of the exterior.
Prepping the Soffit Stock
While staining the Cedar siding in batches, I began working on the old Dutch lap siding from the porch. Like the Cedar,
I removed the old flaking paint then flipped the stock to work on what would be the new face. The old porch siding required
a lot more attention than the Cedar to bring it back to useable condition. I planned to use the Spruce to create tongue &
groove paneled soffits, but as I worked on the paint removal I found most of the old tongues and grooves had been destroyed
during removal and years of handling in stacks. I decided to run all of it through the table saw and take off the old edges,
then I set up the router table and milled in all new tongues and grooves. I hadn't actually totaled up the amount of stock I had
on hand, since I was still having to discard some of it while milling it. That's when the lovely bride poked her head into the shop
one evening and stated, quite matter of factly, that it looked like I was a couple hundred feet short of what I'd need to finish
the soffits. Huh? I was the one playing general contractor here, and she was playing home owner. The home owner isn't supposed
to be telling the GC how to manage their building materials! Pfft, what did she know, anyway? Well, after years of marriage, I'd
figured out that she knows quite a lot, so I shut down the equipment and grabbed the tape measure. Don't have enough material indeed...
I went muttering off to the computer to figure out exactly how much stock I'd need for the soffits. Ha, I'll show you,
silly home owner!
 It sure looked like enough wood at the time.
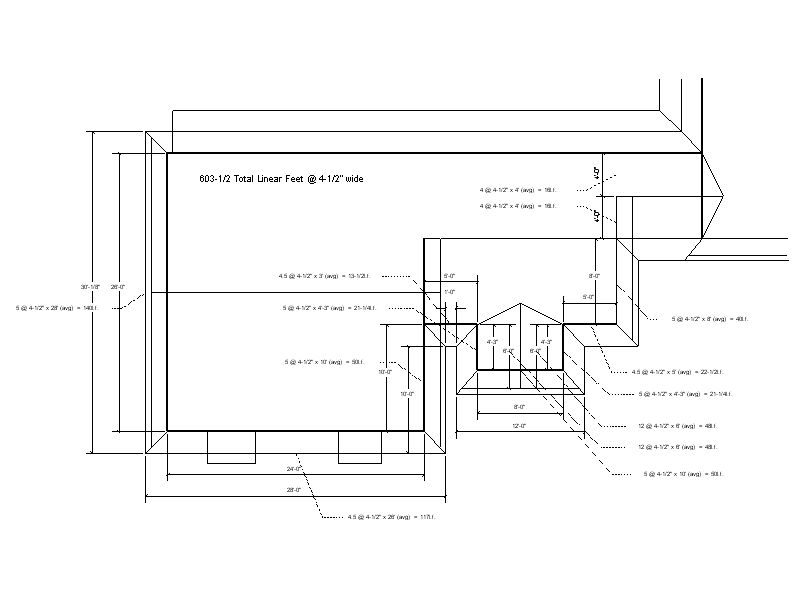
Never question the home owner - making suggestions based on their requests is okay, but it's their home and their money and the GC's job is to do what they want done. When the home owner tells you you're doing it wrong, listen to them. It might not be "wrong" but if it's not what they wanted, it's wrong to them. When the home owner tells you you're a couple hundred feet short of material, they're right. I totaled up all the re-milled stock and had about 400 linear feet on hand. I made a new plan to calculate all the soffit area, and determined the job would require 603.5 linear feet of stock. I don't know how she figured that out with just a glance at a stack of lumber. Listen to the home owner.
Even with the need to purchase a couple hundred linear feet of stock to mill enough material for the soffits, we saved a substantial amount of money by re-using the siding that was removed from the house for the gables and soffits. In order to match the additional new rough-sawn soffit stock to the old soffit stock, I went over the old stock with a 36 grit disc prior to staining to give the surface a rough-sawn look that closely matched the surface on the new stock. All the soffit stock was then stained before installation with Olympic's Maximum® Semi-Transparent "Desert Sand" stain, which adds a little contrast to the dark brown trim and facia.
Installing Gable End Siding & Soffits
With everything stained and sorted, I got the soffits installed in the Summer and Fall of 2007. I had hoped to delay the
installation of the gable ends as late into the Fall as I could, so I wouldn't need to crawl around on the new roof shingles
while the weather was warm. The plan worked well, and the gable siding finally went up in late Fall of 2007 without any
damage to the roof. As soon as the weather turns a bit warmer this Spring (2009), I plan to start the exterior trim work
with the installation of final trim on the gable ends.
Exterior Paint & Trim
Between working on the bathroom, taking care of the garden, and fiddling with the new boat, the Summer of 2009 went by pretty quickly without much work happening on the outside of the house. I also hadn't had a proper work vehicle since I had to junk my old VW Vanagon back in the Fall of 2008 after the brake lines kept rusting out of the thing. I managed to wrestle an old friend's '89 VW Vanagon Synchro out of his driveway in June, and did some tinkering with that over the Summer too. I finally had a reliable vehicle to pick up building supplies with again, so I could get back to projects that needed lumber at last. By the time September rolled around, I decided to make finishing the outside of the house a priority before the weather turned really lousy and I completely lost the chance to work outside for the rest of the year.
 Applying exterior trim.
Painting the Exterior
I'd been fairly judicious about keeping track of paint colors that we'd used on various parts of the house, but somewhere along the
way I'd lost the code for the main house paint. I'd taken the original lid off the only can I had left of house color and replaced
it with one of those lids with a pop-up pour spout in it. Those spout lids work really well - except they don't have the paint code on
'em. I'd already painted the shed and teahouse with this color, as well as a couple sections of house siding where the electrical
service entrance is located. I really didn't want to change color, but no matter what I looked at I couldn't come up with what appeared
to be the correct color (and the names weren't ringing any bells either). I dipped a stir stick in the paint I had and took it to Lowes
to have them match it, thinking perhaps we could find the proper pre-defined color based on the formula they came up with. Nice idea, but
the formula for custom colors doesn't always work out the same as for pre-defined colors, even though the colors look the same in the end.
So while I could've bought more paint based on their custom code, I didn't want to have to go through that every time I wanted paint.
I finally just grabbed handfuls of color sample cards and brought them home to try and match the painted walls to the cards. I'd check
on sunny days, then cloudy days, then have the lovely bride do the same. We narrowed it down to a couple colors: it was either "Woodrow
Wilson Linen", "Woodlawn Lace", or "Light Raffia". We really couldn't tell the difference, so I finally just decided that I simply
wouldn't have picked a color named "Woodrow Wilson Linen" for my house paint back when we first picked our colors, so eliminated that one.
Off to Lowes I went, and had them mix me up a 5-gallon bucket of "Light Raffia" just because I liked the sound of that better
than "Woodlawn Lace". That was going to be our house color, and if it didn't match the old stuff, I'd just re-paint it.
The weather forecast for mid-September was for upper 60's all week and low humidity, so it was perfect for painting. In addition to the bucket o' paint, I grabbed a fresh 5-gallon bucket, one of those expanded-metal roller screens to hang inside it, and a couple 1/2" nap rollers. I didn't mask off the windows, but I did attach a 20' strip of kraft paper along the copper flashing at the bottom of the siding panels with blue painter's tape to protect the copper and water table board from any dribbles or roller spray. I'd put about a gallon of paint into the fresh bucket at a time, and give it a stir after every panel. I started by working a panel at a time with a 3-1/2" brush to "cut in" the panel edges and around the windows, then roll out a fairly heavy coat of the pudding consistency paint on the siding panel. It was slow working getting the paint into all the nooks and crannies of the stucco, but I progressed steadily along with the roller on a 4' pole. Every 20 feet I'd peel the tape / kraft paper strip off and move it to the next 20' section, then when I finished that, I'd peel it again and go back to the first section and give it a lighter second coat to ensure full coverage. The first day I took care of the front of the main house, entrance area, and the East side near the door. The second day I got the rest of the East side and about 3/4 of the back, and on the last day I finished the rest of the back and the West side. We'd been looking at our pre-primed siding panels for years, and as the paint went on it didn't look like that much of a color change from the primed panels. However, once the whole thing was painted - wow what a difference! The color was a perfect match (I still did a second light coat over the pre-painted sections just to be sure), and the place really looked impressive. Oh, and before I forget again - the exterior paint is Valspar's Ultra Premium Exterior Latex Satin in "Light Raffia", number 3008-10B.
 A month later, and most of the trim is finished (6 photos).
Cutting the Trim Stock
With paint finished I got to work right away on the trim. I had originally planned to trim the gable ends first, since I
didn't need to paint anything to get that going. Now with the house finally painted, I wanted to try and finish the
siding sections up while the Fall weather was still decent. Most of the real labor for installing the exterior trim was
involved in getting the stock ready to apply, rather than just simply nailing the boards onto the house. I selected rough-sawn
spruce for exterior house trim, just as I'd done with the teahouse and garden shed. It's very inexpensive wood (about $8 for
a 16 foot 1" x 8") and isn't kiln dried. Because it's pretty wet stuff when it's purchased, I'd been buying a few boards on
almost every trip I made to the lumber yard, then "sticking" it (stacking it up with little slats of wood between every board
to allow air circulation) in the wood shop on a couple saw horses. I had a pretty good stack of the stuff already, but grabbed
another dozen boards when work began anyway - it would get at least a month to continue air drying while I worked through
the pile I already had. In addition to giving the bargain stock some extra drying time before using it, I also did some extra work
on the staining part of things to try and make sure the stuff doesn't just rot off the house in a year or two. I was really looking
forward to getting rid of the stack of lumber I'd had in the shop for nearly a year, too.
I started the prep work by "reversing" the entire lumber stack so the newest boards were on the bottom, then began ripping the oldest boards in half on the table saw. I essentially based the width of the trim boards on what I'd end up with after ripping the rough-sawn stock. The narrowest pieces would be just under 1-7/8" wide, and the widest pieces just under 3-3/4" (I use a thin-kerf ripping blade in the table saw, so it's taking about a 1/16" kerf, and the boards start out nearly a full 8" wide since they're rough-sawn stock). The majority of stock was ripped in half, well - just under half really - the first cut was at 3-3/4" and that piece would get re-stacked, then the remaining "wider" half was set aside to get ripped in half again when I re-set the fence on the saw to make the narrowest pieces for window trim. I didn't try and cut all the trim for the entire building at once, and instead just worked one side at a time. I'd get all the wide pieces cut that I needed for vertical trim between panels and horizontal trim above and below the windows, then re-set the fence and rip whatever else I needed for vertical trim next to each window. Once that was all cut, I'd re-set the fence again and run a few full-width pieces through to get three 2-1/8" wide strips for use as vertical door trim and horizontal trim at the bottom of the panels, then the remaining wide piece would get ripped to 1-1/8" wide for horizontal trim at the tops of the panels. It all sounds quite nit-picky, but my goal was to use as much of the lumber as possible, and not end up with a huge stack of 1/2" wide strips when I was done. I was also using kind of odd lengths of lumber, in that whenever I purchased 16 footers, I had them cut at 8-1/2 feet and 7-1/2 feet, instead of just whacking 'em in half at an even 8 feet long. The exterior panels are just over 7 feet tall, so the 7-1/2 foot length gave me some extra material to work with without too much waste. The extra couple inches on the 8 foot pieces came in very handy when doing horizontal trim too - since the panels are 4 feet wide the trim has to be longer than 8 feet to cover pair of panels as well as the little gap in between each panel. It worked out well, and when I was finished trimming the entire house, I hadn't even filled a 5 gallon bucket with scraps.
Staining the Trim
Once I had enough lumber cut to width to cover a few panels on the side of the house I was working on, I moved the stack to my
staining bench, which is just an old picnic table set up out by the compost bins. I'd stack all the lumber over the bins, then start
staining 2 or 3 boards at a time on the picnic table with a 4" natural bristle "chip" brush. I used the same Olympic
Maximum® Semi-Transparent 707 "Tobacco" stain on all the house trim, just as I'd done on the garden shed and
teahouse. It's pricey stuff, but with the inexpensive wood I figure I should go for the best protectant on it I can get. I stained all
four sides of each board, as well as one of the ends (none of the stock was cut to length yet, so there was no point in soaking both ends).
Staining rough-sawn lumber requires lots of jabbing and poking with a well-loaded brush to work the stain into the rough surface,
and there's not much spreading of material around on the board either so it uses a lot of stain. Once I'd get a set of boards done, I'd
lay them over the compost bins and grab another 2 or 3 boards and repeat. When those were done I'd go back to the previous set and wipe
off any stain that hadn't soaked in yet (which usually wasn't much), then start staining another 2 or 3 boards again. Not exactly
thrilling work, but someone's gotta do it - and this was only the first coat.
This went on for days, as long as the weather held. I'd spend the morning jotting down a few notes about how many boards I'd need at what width, moving the stained lumber from the previous day out to the staining bench, then start ripping fresh stock. Next it was off to the staining bench where I'd put a second coat of stain on the all but the back side of whatever I'd stained the day before, then hit all four sides of the stock I'd cut that morning. By the time I'd finished staining all that, it would be dark so it all got moved back into the wood shop and stacked to dry over night out of the dew. After a week and a half of this carrying on, I was finally ready to actually install some trim.
Installing Siding & Window Trim
I started the installation with the narrow strip that runs horizontally around the perimeter of the house just above the
water table board. I used a couple 1/4" thick scraps of wood placed on the copper water table flashing as spacers to get the
piece situated in about the right spot, then just started bangin' in a pair of 2-1/2" long, 15 gauge galvanized finish nails
every 8 to 10" along the board with the finish nailer while sliding a 2 foot level along the top edge as I went to keep things nice
and level. These base strips had received an additional trip through the table saw prior to staining as well, where I cut the top
edge at a 15° angle. This would ensure that any rain or snow that ended up on the trim would run off the front of the trim,
rather than just puddle up on top edge of the board. The ends of each board got a 30° cut through the face (except the corners,
which are simple lap joints) so when I added the next board there'd be an overlap from one board to the next instead of just butting
the ends together. I didn't care where one board ended and another began, although I did pay attention as I got near the end of each
wall to make sure I didn't end up with some little 1 foot long chunk at the end of the run (if I did need a little piece, I'd add
a 2 foot long chunk somewhere mid-wall so I could end the run with a full 8 foot length). I kept an extra quart can of stain with
me as I worked on each piece, and would slather each cut and nail-hole with stain using a little 1/2" chip brush when it was installed.
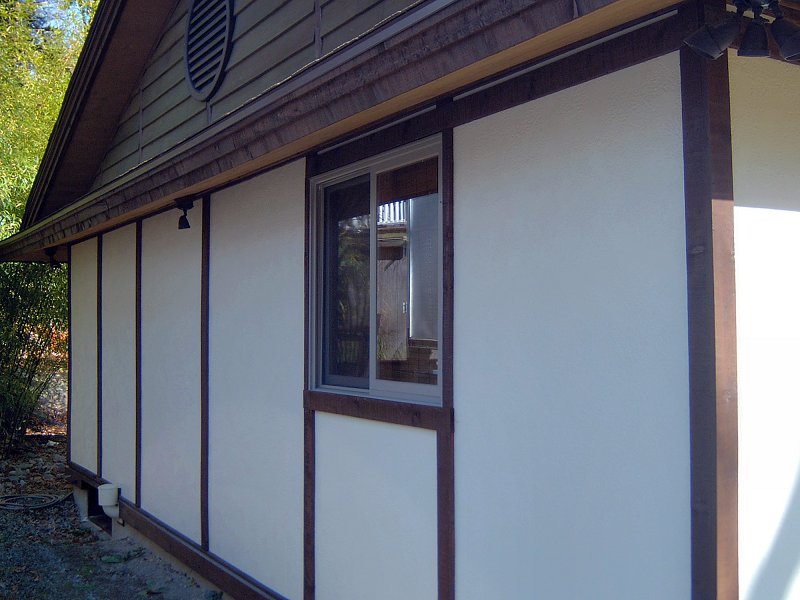
 Trimming the round window (9 photos).
Next I added a horizontal strip under each window, which was cut a little longer than needed (by about 1/4") so it would stick out just a tad past the vertical window trims. The idea was to give the impression that all this trim was actually the exposed sections of a post & beam frame, so I tried to give it the appeareance of vertical posts with horicontal beams "let in" to the posts for windows and doors. Still working my way up the wall, I then applied the horizontal piece the runs along the top of the windows, and finally the little horizontal strip to cover the gap between the top of the panel and the bottom of the soffit. Other than applying a bead of caulk between the window trims and the window frames, as well as where the corner trim boards met, none of the other trim was caulked. The siding panels and windows were already caulked and completely weather tight before painting, so the trim is just applied to the surface, and doesn't act as any sort of moisture barrier. With all the horizontal bands taken care of, I then filled in the vertical pieces, finishing each wall with some little blocks between the window top and panel top trims to complete the vertical post look. The trim went on very quickly, and in a couple days most of it was finished. The place was really starting to look nice after all these years.
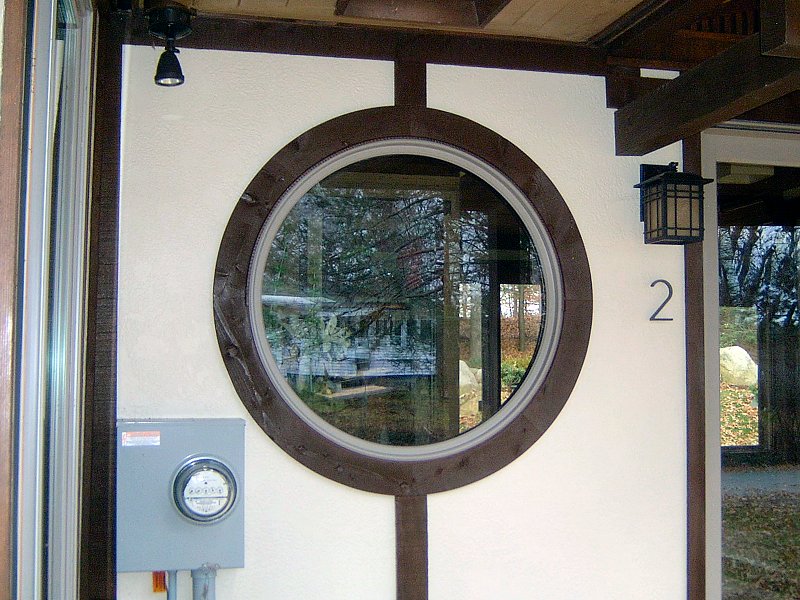
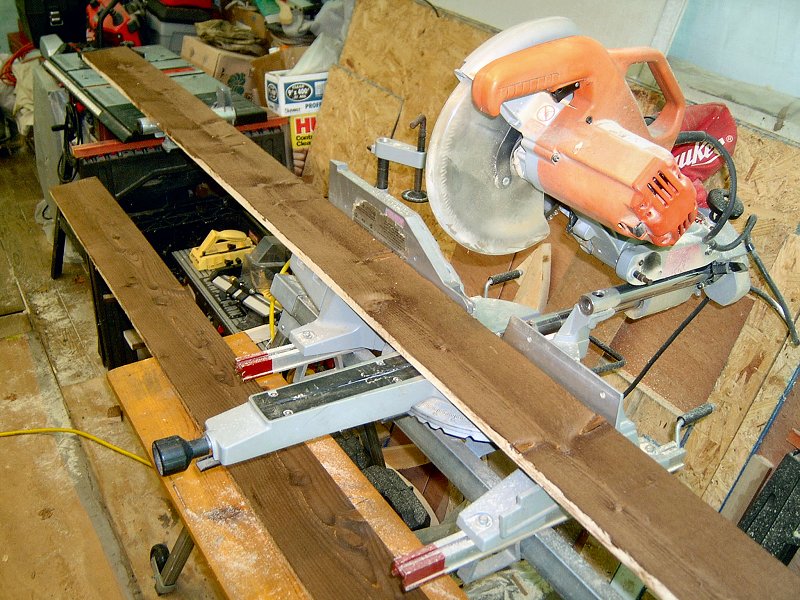
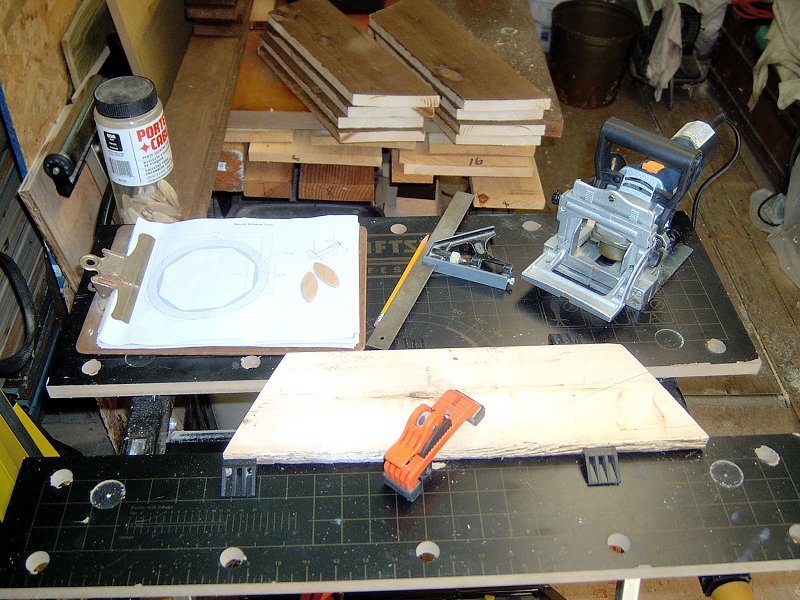
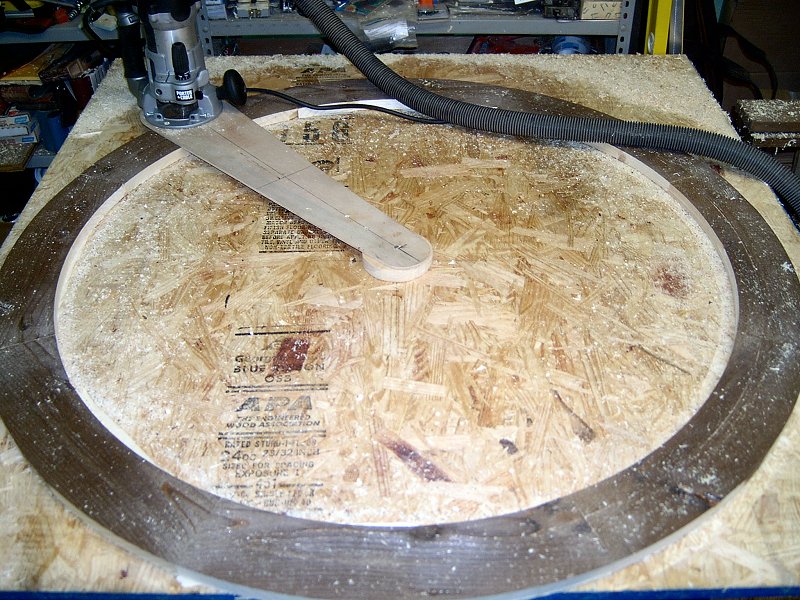
Trimming the Round Window
With most of the siding and window trim done, I still had to deal with the round window near the entrance. I took the same approach
I'd done with the round trim for the interior of that window and the curved shower ceiling: glue up an octagon, then cut it into
a circle. I wanted the exterior trim on the round window to be perfect since it's a very noticeable feature on the house, and
you get a good look at it when coming to the front door. As usual, when I'm concerned about how to put something together, I
spent a few hours doing a virtual assembly on the computer and made a plan to work from.
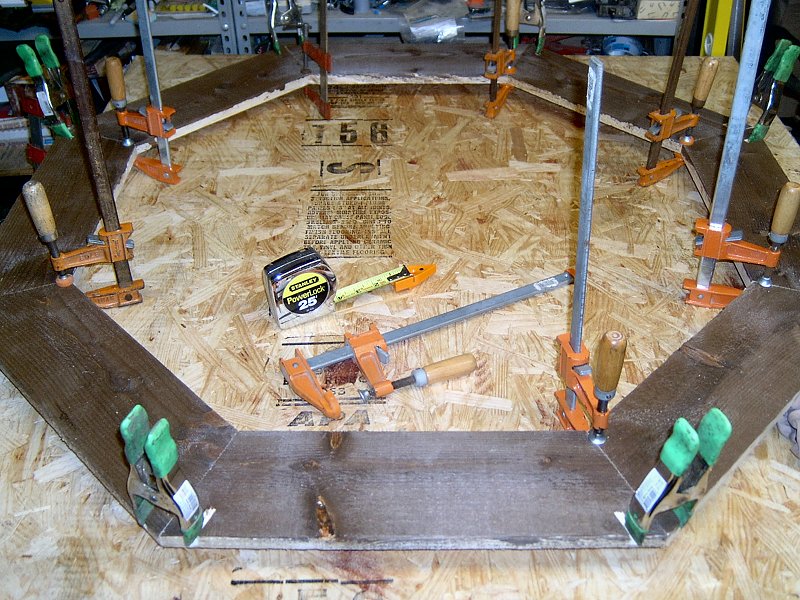
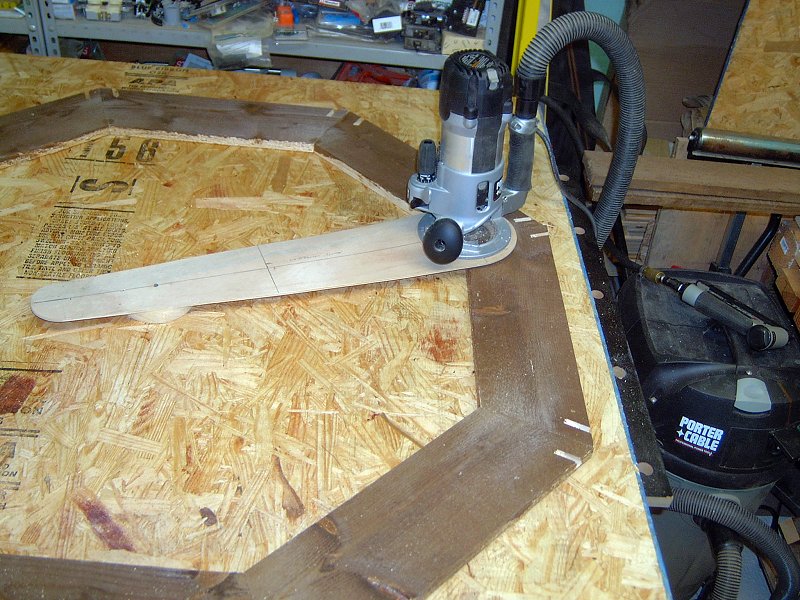
With the plan in hand, I selected a couple straight, nearly knot-free pieces of stock and started cutting. I first ripped it to the right width, then put a coat of stain just on the face so I wouldn't screw up and flip a piece upside-down during glue up of the octagon. The next day I cut pieces to length with 22-1/2° cuts on the sliding compound miter saw (it's got a built-in stop for that angle, so no fussy measuring needed), and glued up the octagon using a biscuit joiner and plenty of clamps. I tacked the whole assembly down to a piece of 3/4" OSB with a pin nailer after it had dried overnight, then dug up the circle cutting jig I'd made for the router back when I made the trim for the inside of this window. I find it's much easier to just tack the assembly down like this rather than try and clamp it in place. Any kind of clamping system would require me to move clamps around while doing the circle cuts, which would inevitably lead to something moving and the whole piece getting screwed up. The pin nails are tiny, and have no head so the piece can just be popped off the OSB with a putty knife when the cuts are finished. Using a 1/2" straight bit in the router, I cut each side of the circle with 3 or 4 passes, adjusting the depth after every pass until I hit the OSB with the bit. I then stained the whole thing again, and nailed it up the next day. That wasn't so bad after all.
 Mid-November and exterior trim is nearly finished.
Finishing the Siding Trim
While waiting for glue and stain to dry on the round window trim, I grabbed the 60 grit disc sander and finally got after that
water table board I'd installed 2 years ago. I went around the whole house and sanded down the little plugs I'd glued into the screw
holes, as well as freshen up the surface a bit before staining. Two coats of stain later, and the water table was done at long last.
The final step to complete the exterior trim will be to trim those pesky gable ends, which is the task I had thought I was going to start
the exterior trim project with. I've got a pile of what I believe is enough stock to do the job already cut to width and stained, but
I'll need to do a little more mill work on it before I can install it. Because it is going to cover the ends of the gable siding, I
need to cut a rabbet in the back on each side so it'll fit over the ends of the siding and still sit up against the spacer boards on
the gables. I suppose I could make some 1/2" thick spacer boards to go in between the existing vertical spacers and the final siding,
but I'd rather not sandwich a bunch of layers of wood up there where it's bound to get a good soaking whenever it rains.
Hopefully I'll get it done before snow flies.
 I finally get started on the gable end trim (2 photos).
Gable End Trim
Okay, I missed my target by 8 months or so, but the gable end trim is finally completed. Like pretty much anything else I've
done on the house, the prep work was a lot more involved than the actual installation of the trim itself. The first issue
was to deal with finishing the gable end siding installation, which had been done in the late Fall of 2007 (see above).
Because the weather was pretty chilly at the time, I hadn't caulked any of the ends of the clapboards when they were installed.
I also needed to do the final "post installation" staining of the clapboards which was also put off because of the weather.
With the very dry Summer we'd been having in 2010, I had nothing to keep me off the roof (other than walking around on hot, mushy
shingles). To prevent destroying the shingles, I put down a couple canvas tarps on the areas where'd I'd be walking, and
tried to only work up there early in the morning or later in the evening when the sun wasn't too brutal.
I started by caulking all the top edges and ends of the clapboards with my favorite DAP® Alex Plus® siliconized acrylic latex caulk, then went over all the clapboards with a fresh coat of stain. While I was up there, I noticed the facia trim was looking a little weather worn in the stain department, so I gave all of the facia a new coat of stain as well. Most of the facia was installed over 4 years ago, so having to touch up the stain wasn't much of a surprise.
 Milling the gable end stock (4 photos).
Milling the Trim Stock
Since I was trying to work on the roof when the sun wasn't beating on it, that left plenty of time during the day to
finish milling the trim in the wood shop and pre-stain the pieces. I had no plans to try and make a bunch of angle
rabbets along the edges of the boards to fit around the installed clapboards, and instead just milled a rabbet into
each board that would allow the trim to sit on top of the clapboards and still provide plenty of surface to attach
the trim to the existing 1x3 spacers on the gables. To start I made a quick plan of the profile I wanted (of course)
along with rough length measurements of all the pieces, and then ran the stock to create enough material for all the
trim I'd need. I used two profiles - the vertical pieces received a rabbet on each edge, and the horizontal angle
pieces received a rabbet down one edge only. I used a Freud® 16-108 1-1/4 inch diameter
by 1/2 inch mortising bit in the router table, adjusting the depth an 1/8 inch deeper on each pass. Most of the stock
was stained and set aside for the gable ends back when I was prepping the siding trim last fall, although I did have
to mill a couple unstained boards to ensure I'd have enough material. Once everything was milled, I gave everything
a fresh coat of stain (two coats on the fresh stock) and when it was dry it was time to do lots of up-and-down-the-ladder
work.
Installing the Gable End Trim
With the trim stock and gable ends ready, I started the installation on the East gable end. I used a sliding T-bevel
along with an eight inch torpedo level to get an accurate measurement of the roof pitch angle, then measured the angle
with a "Bevel-Boss" in order to set the miter saw for the cut. I trimmed the two horizontal angles first, then cut
the short vertical pieces to fit and installed those next, extending the bottoms about 1/2 an inch below the edge of
the clapboards. All trim was nailed into place with the Porter-Cable 15ga DA Finish Nailer and galvanized nails, with
pairs spaced about a foot apart. Each cut was stained as the pieces were installed, then I went over all the faces of
the trim with a light coat stain while trying to ensure a got a little dab into each nail hole. I then gave the rafter
trim and facia another coat of stain, since some of that was beginning to fade.
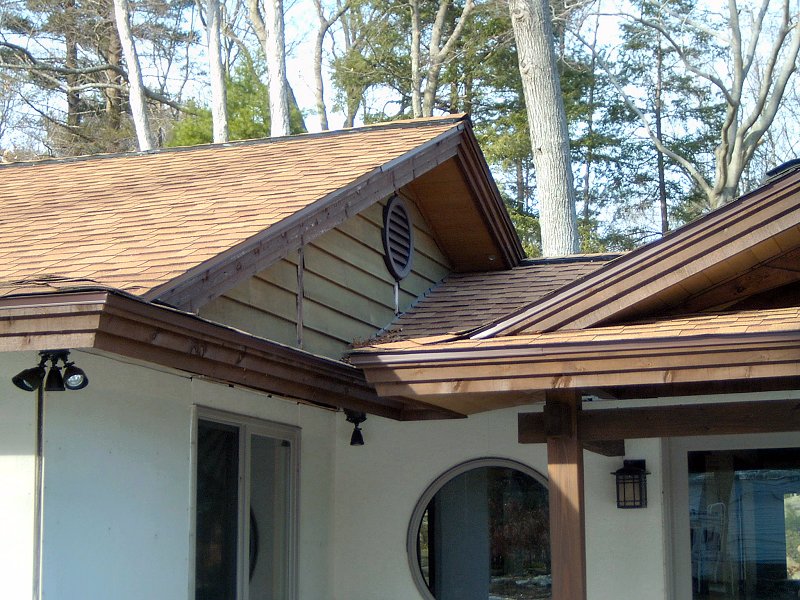
 Installing gable end trim (7 photos).
When working on the middle gable end, I laid down a canvas tarp on the roofing to prevent any damage the warm shingles when walking on the roof, otherwise the installation proceeded along quickly enough. I also installed our FM/UHF antenna on the middle gable barge rafter, since I'd purchased the antenna and installation supplies for that project over a year ago when we upgraded to HDTV (please see the Mechanical/Wiring section for more information regarding the antenna installation). I did the West gable end last, following the same installation procedures. The West end took a little longer to finish since it's bigger, and it gets to be a fair hike walking back and forth to the saw to get all the angles just right (measure once, cut 5 times... or something like that). The last step was to install the gable vent trim rings, which were just snapped in to place with a little dab of silicone caulk an each tab to help them stay put. After about 3 weeks, between tinkering with the boat, the antenna, the yard, and other Summer time distractions, the gable ends were finished.
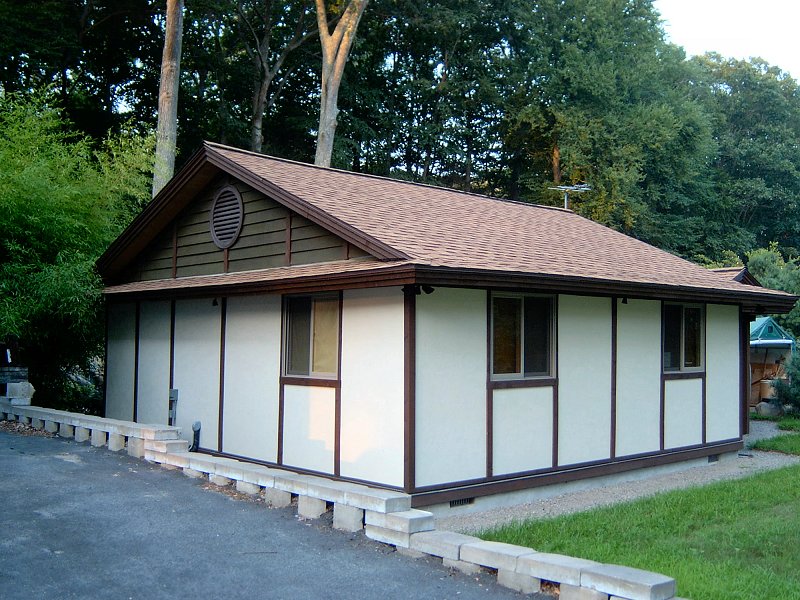
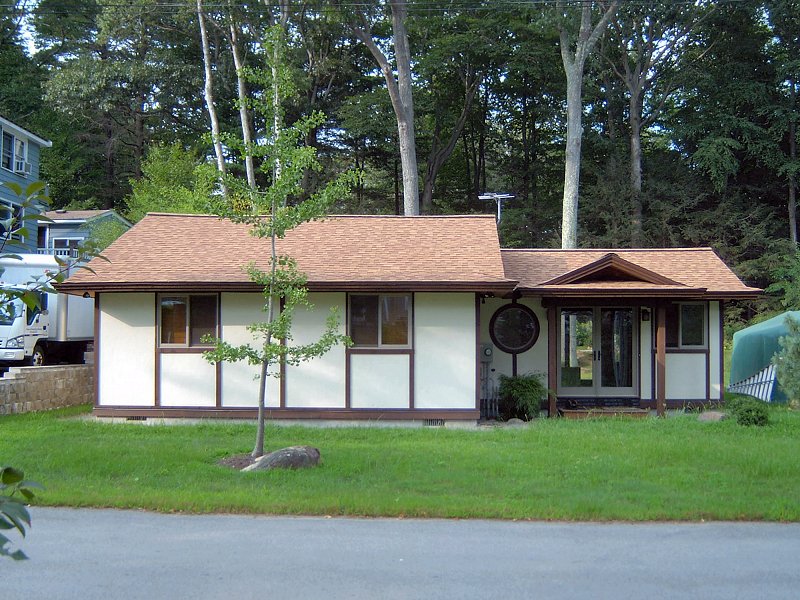
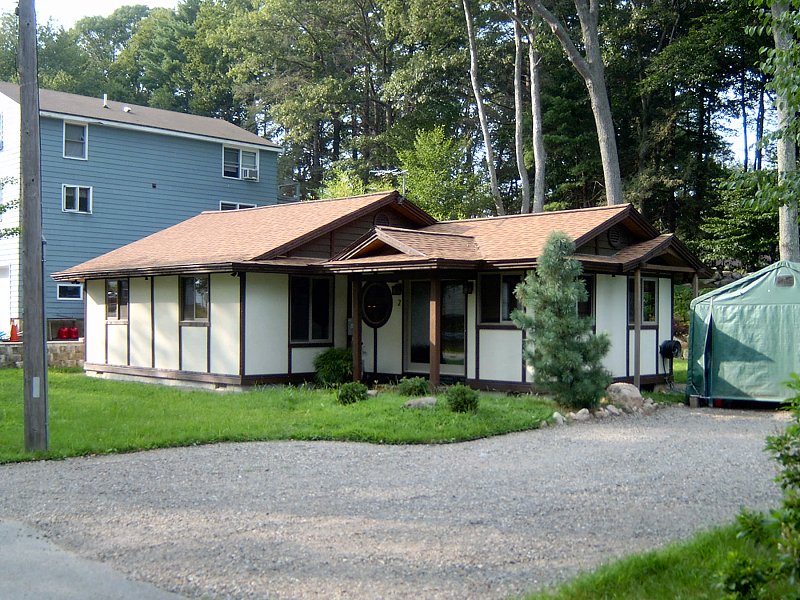
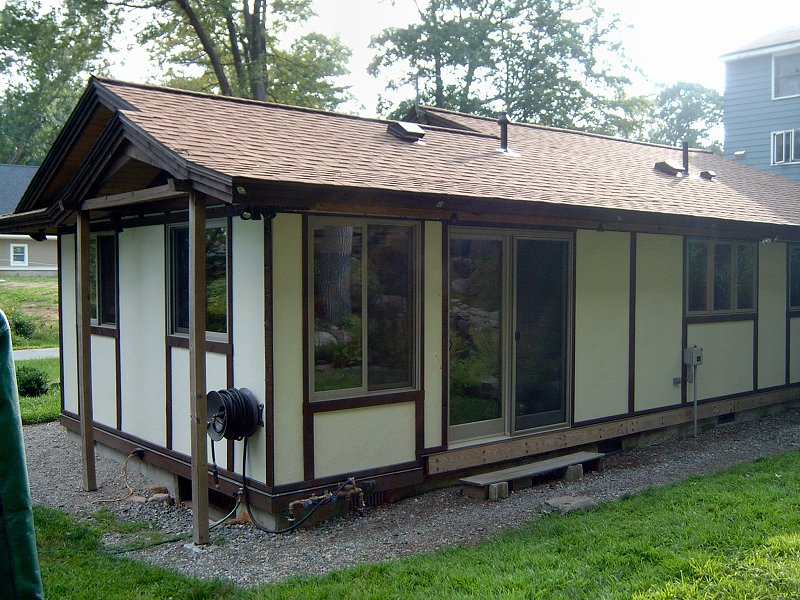
The Completed Paint & Trim
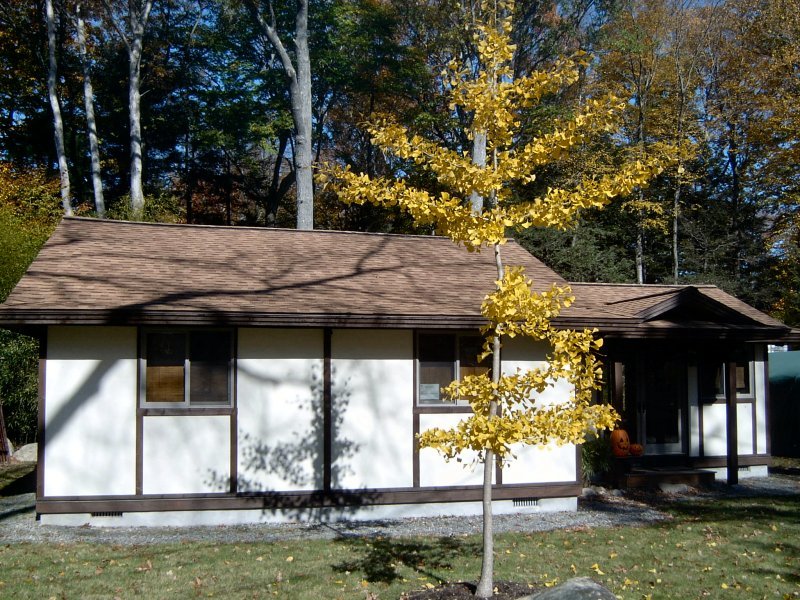
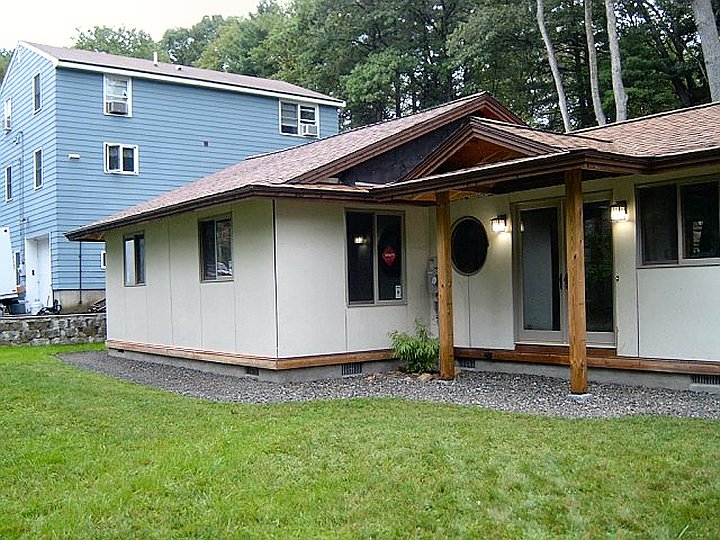
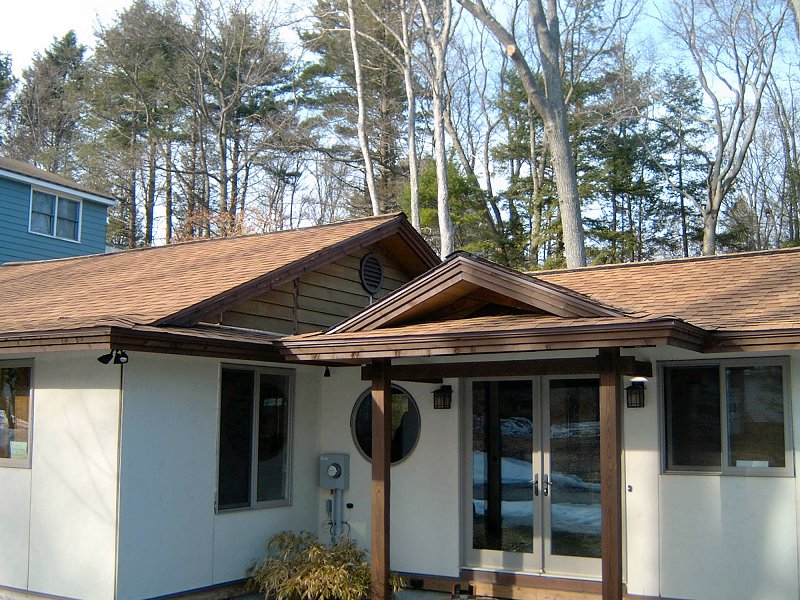
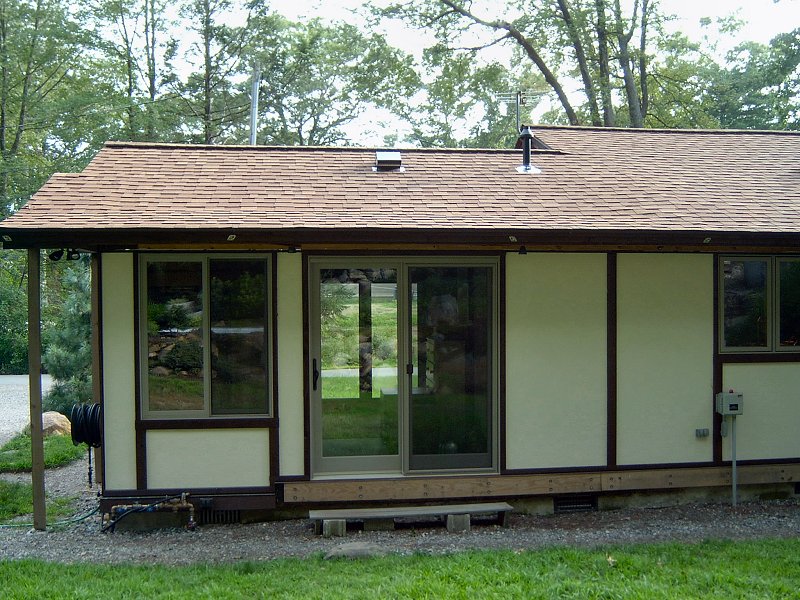
July 2010 - Finished!
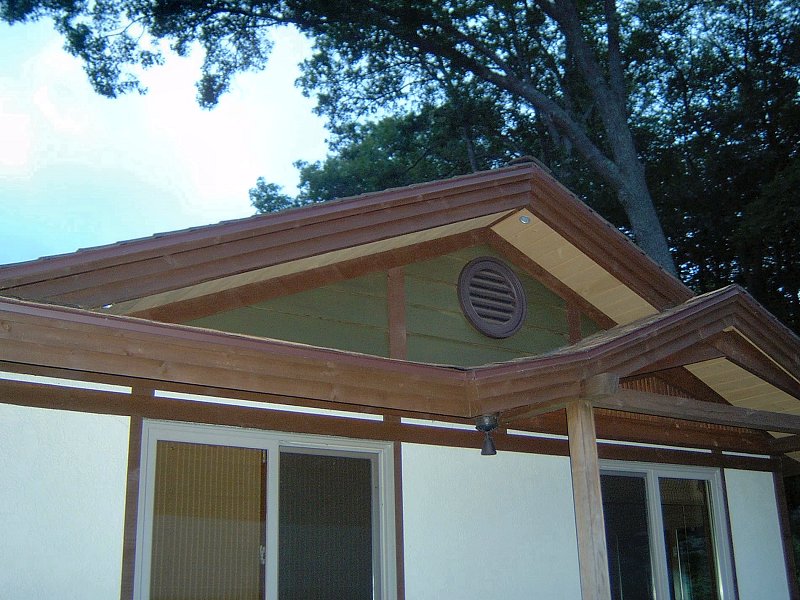
Completion of the gable end trim project means the exterior is finished. I've actually finished something! We can now
turn in our first building permit, which was a "Windows, Siding & Roof" permit obtained back in 2005. There were still
other things to work on the exterior — the veranda and deck out back (which was completed in 2012-13), the access door for the
West crawl space entry (which I finally got installed in 2021), and possibly some degōshi style
kōshi (wood lattice) screens for the front windows, but this is a pretty big milestone. I dug up a few
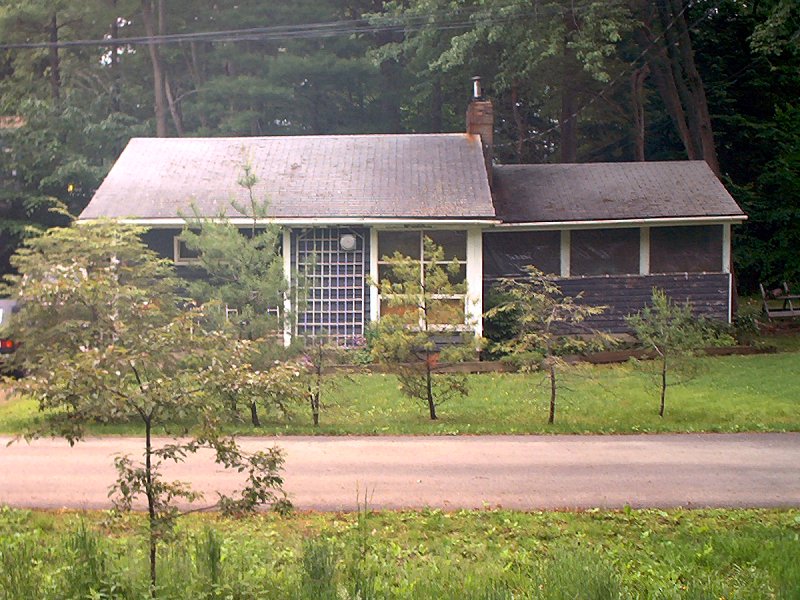
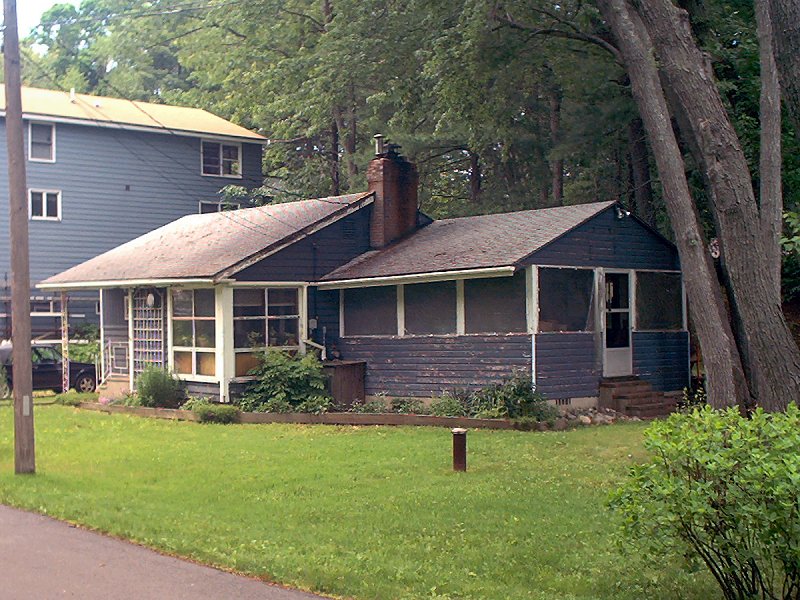
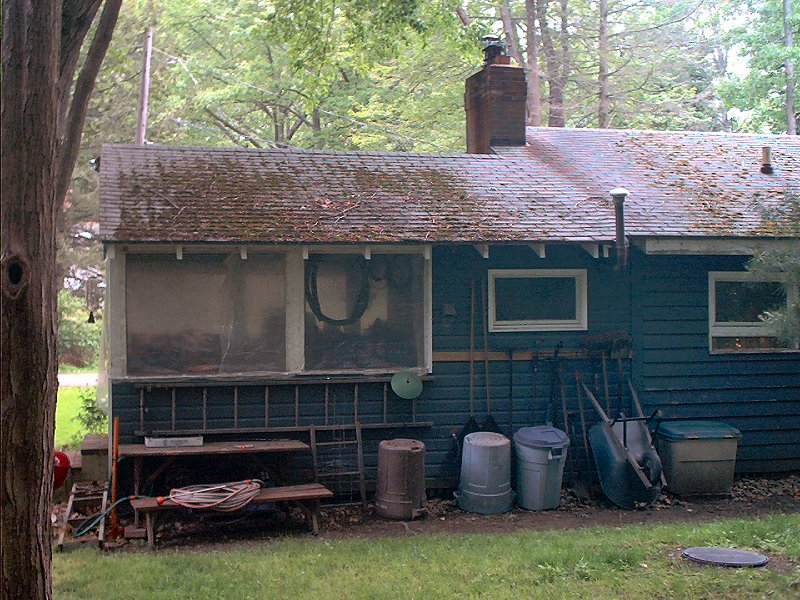
old pictures of the house from 2000 for comparison, and to end this section with some nice before and after shots:

Quite a transformation from '50s Camp Style to Sukiya Post & Beam with Mud Plaster (10 photos).